background image

EQ and Dynamics


64


Reference Manual 


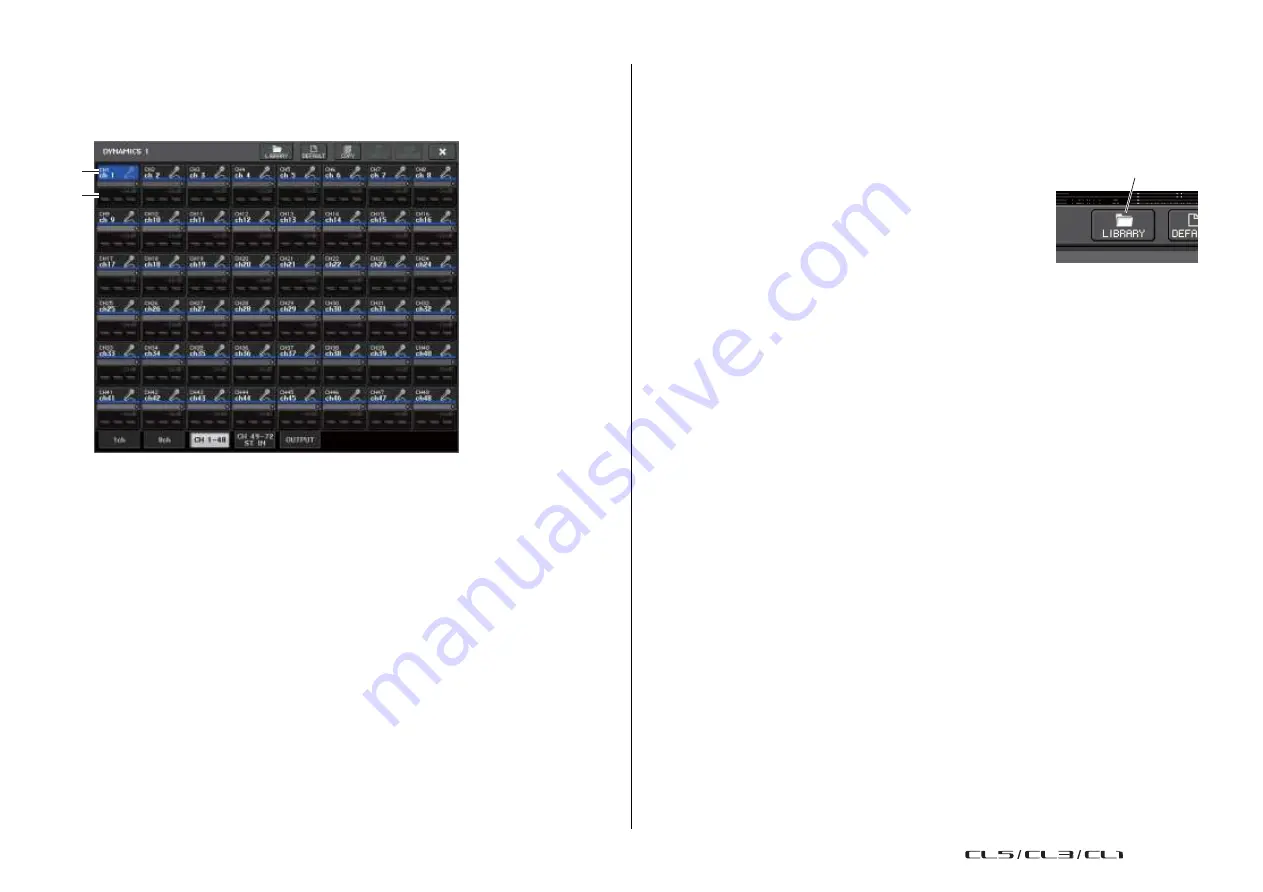
DYNAMICS 1/2 window (CH 1-48, CH 49-72/ST IN (CL5), CH 49- 
64/ST IN (CL3), ST IN (CL1),   OUTPUT)


This window enables you to make settings of the global dynamics parameters for the 
corresponding channel. 

Using the EQ/Dynamics  libraries


You can use dedicated libraries to store and recall EQ and dynamics settings. For details on 
using the EQ and dynamics libraries, refer to the 

“Using the library” section in the separate 

Owner's Manual. 


EQ library


There is an 

“INPUT EQ LIBRARY” that lets you store/recall EQ 

settings for input channels, and an 

“OUTPUT EQ LIBRARY” that 

lets you store and recall EQ settings for output channels. 
To recall settings from a library, press the LIBRARY tool button in 
the /HPF/EQ window. 

NOTE


LIBRARY button 

You can recall 199 different settings from both the input EQ library and output EQ library. Forty 
(40) of the input library items are read-only presets, and three (3) of the output library items are 
read-only presets. 


Channel select button


Selects the channel that you want to control. The current channel icon, number, 
threshold, and color appear on the button. 

Dynamics parameter area


This area displays the dynamics type and various meters. Press the area to access the 
DYNAMICS 1ch window of that  channel. 
If DUCKING, EXPANDER, COMPANDER (-H/-S), or DE-ESSER has been selected as the 
dynamics type, the type appears near the top of this area. 
The lower part of this area displays meters that indicate the levels of signals  after 
dynamics processing, the GR meter, and the threshold (a numeric value). If the 
dynamics processor is any type other than GATE, the threshold setting is indicated as a 
vertical line. 

Dynamics library


Use the 

“Dynamics Library” to store and recall dynamics settings. All of the dynamics 

processors on CL series units use this dynamics library. (However, the available types will 
differ between an input channel's Dynamics 1 and Dynamics 2, and an output channel's 
Dynamics 1. You can't recall a type that cannot be used. 

To recall an item from the dynamics library, press the LIBRARY tool button in the DYNAMICS 
1/2 window. 

NOTE


You can recall 199 different settings from the library. Forty-one (41) of these are read-only 
presets. 

USO 

RESTRITO

Содержание CL5

Страница 1: ...the Enter key of your computer keyboard to search for occurrences of that term Reference Manual Displaying the next previous view If you re using Adobe Reader you can jump to the previous next view in your viewing history This is a convenient way to jump back to the previous page after you ve used a link to jump to a different page Using the Function Tree A function tree for the CL series is provi...

Страница 2: ...ls and STEREO MONO channels to MATRIX buses 53 Correcting delay between channels Output Delay 56 Channel library operations 57 EQ and Dynamics 58 Using EQ 58 Using dynamics 61 Using the EQ Dynamics libraries 64 Channel Job 65 DCA group 65 DCA Roll out function 68 Mute group 70 Using the Recall Safe function 73 Channel Link function 76 Copying moving or initializing a channel 81 About Mix Minus 84 ...

Страница 3: ... be assigned to the assignable encoders 207 GAIN PAN ASSIGN knob assignable encoder functions 208 Custom fader bank 208 Master fader 209 Custom fader bank functions 210 Console Lock 210 Saving and loading setup data to and from a USB flash drive 211 Formatting a USB flash drive 217 Word clock and slot settings 218 Using cascade connections 220 Basic settings for MIX buses and MATRIX buses 223 Swit...

Страница 4: ... 22 24 HPF EQ 58 1ch 58 8ch 60 CH1 48 60 CH49 72 ST IN 60 OUTPUT 60 DYNAMICS 61 1ch 61 KEY IN SOURCE SELECT 62 8ch 63 CH1 48 64 CH49 72 ST IN 64 OUTPUT 64 CHANNEL PARAMETER MIX SEND MATRIX SEND 38 TO STEREO MONO 51 8ch 51 CH1 48 52 CH49 72 ST IN 52 OUTPUT 52 SURROUND 44 I O DEVICE I O 156 AMP 159 WIRELESS 160 EXTERNAL HA 162 EXTERNAL HA RACK 162 EXTERNAL HA EDIT 162 EXTERNAL HA PORT SELECT 163 MON...

Страница 5: ... that do not exist on thosemodels CH JOB CH LINK MODE 77 DCA GROUPASSIGN 66 MUTE GROUP ASSIGN 66 RECALL SAFE MODE 74 CH COPY MODE 81 CH MOVE MODE 83 CH DEFAULT MODE 84 RECORDER USB 173 NUENDO LIVE 182 SETUP OUTPUT PORT 56 MIDI GPI 165 237 MIDI SETUP 166 PROGRAM CHANGE 168 CONTROL CHANGE 171 GPI 238 FADER START 241 BUS SETUP 223 CONSOLE LOCK 210 DATE TIME 225 NETWORK 226 DANTE SETUP 226 PATCH PORT ...

Страница 6: ...tion or the STEREO MONO section to select the channel to control 2 Press one of the knobs in the SELECTED CHANNEL section 3 Use the knobs of the SELECTED CHANNEL section and the buttons in the SELECTED CHANNEL VIEW screen to edit the parameters of the selected channel NOTE Toselect a MIX or MATRIX channel use the Bank Select keys to recall the desired channel to the Centralogic section and then pr...

Страница 7: ... 3 1 SEND knob Adjusts the send level to the corresponding bus 2 PRE indicator The type of the corresponding bus is indicated If the type is VARI PRE EQ or VARI PRE FADER and if the PRE button on the MIX SEND 8ch screen is turned ON the type is displayed 3 ON button Switches the send signal to the corresponding bus on or off If the destination bus is a stereo channel 1 2 3 1 SEND PAN knob The righ...

Страница 8: ... the digital gain value is shown here If digital gain is assigned to the GAIN knob the analog gain value is shown here NOTE For an input channel that is patched to an input that has no head amp 1 2 5 6 and 7 willnotbeshown Foranoutputchannel 1 7willnotbeshown If a GAIN KNOB FUNCTION is set to DIGITALGAIN in the USER SETUP PREFERENCE screen the digital gain knob will appear for 1 and 2 5 6 and 7 wi...

Страница 9: ... Fully rotating the HIGH band Q knob on the panel counter clockwise while pressing and holding it down will set the filter type to LPF Fully rotating the Q knob clockwise while pressing and holding it down will set the filter type to high shelving Fully rotating the LOW band Q knob on the panel clockwise while pressing and holding it down will set the filter type to low shelving If an output chann...

Страница 10: ...ter settings INSERT field Thisfieldenablesyoutomakeinsertsettings 1 1 Popup button Press this button to open the INSERT DIRECT OUT 2 1ch window 2 ON button 3 4 Switches the insert on or off 3 RACK EDIT button Appears if an effect or Premium Rack is inserted Press this button to display the edit screen for the inserted rack 4 IN indicator Appears if a port has been assigned to the insert in patch I...

Страница 11: ...IP indicator will light 3 ON button Switches the channel on and off The button is linked with the corresponding ON key on the top panel NOTE For CL V2 0 and later the TOUCH AND TURN function assigned to one of the USER DEFINED knobs enables you to control the fader in the FADER field of the SELECTED CHANNELVIEW screen 6 DCA groupindicators Indicate the DCA group to which the channel is assigned DC...

Страница 12: ...the Centralogic sectionto adjust the level of the up to eight selected channels and switch them on off 3 Use the fields on the OVERVIEW screen and the multifunction knobs to adjust the parameters for the group of up to eight channels NOTE When the SELECTED CHANNEL VIEW screen is displayed you can switch to the OVERVIEW screen by pressing any of the multifunction knobs 1 8 This is convenient when y...

Страница 13: ...ndicator appears showing the level of the signal output to the audio network If the GAIN knob has been assigned to a multifunction knob press the knob to open the GAIN PATCH 8ch window 2 OVER indicator Lights when a signal at the input port or from the rack output exceeds the full scale level This indicator is available only if an input channel is selected 3 48Vindicator Indicates the phantom powe...

Страница 14: ...EQ NOTE If DCA or monitor has been selected this field will be blank DYNAMICS 1 2 field This field displays the threshold value and meter for Dynamics 1 2 Press this field to open the DYNAMICS 1 2 1ch window NOTE If DCA or monitor has been selected this field will be blank SEND field This field displays the send level send on off status and pre post settings for 16 buses To select the 16 destinati...

Страница 15: ... the status of a signal sent to the STEREO MONO bus DCA group field A DCA group 1 16 to which the channel is assigned is displayed on the first or second row in this field Press this field to open the DCA MUTE GROUP ASSIGN MODEwindow Mute group field A mute group 1 8 to which the channel is assigned is displayed on the third row in this field If the channel has been temporarily removed from the mu...

Страница 16: ...s and Dante audio network Dante patching CL series internal patching I O Device ID 1 I O Device ID 3 I O Device ID 2 Dante MY16 AUD SW OMNI MY MY 8 16 16 64 INPUT PATCH CL series Dante Network Up to 512 channels logical value 64 512 MY 16 Dante ports Output port jack port Output channels SLOT2 9 16 MATRIX1 8 SLOT3 1 2 STEREO L R SLOT3 3 MONO SLOT3 4 5 MONITOR L R SLOT3 6 MONITOR C SLOT3 7 8 CUE L ...

Страница 17: ...ATCH screen NOTE By default DANTE 1 64 are assigned to input channels 1 64 Output patching Use the OUTPUT PORT screen to patch the CL console s output channels and Dante audio network In this window assign output channel signals to DANTE 1 64 ports NOTE By default MIX 1 24 are assigned to DANTE 1 24 MATRIX 1 8 are assigned to DANTE 25 32 STEREO L R are assigned to DANTE 33 34 and MONO is assigned ...

Страница 18: ...rresponding channel When you press this button a screen will appear in which you can select an icon or sample name 3 Channel name input box Indicates the name that is assigned to the corresponding channel When you press this field a keyboard window allowing you to change the channel name will appear 4 Category select list Selects the category of input port The categories correspond to the followin...

Страница 19: ...ve a window will appear enabling you to select the network and port 2 Channel select button Selects the channel to set NOTE Switching channels on this screen will not affect the channel selection on the console 3 Channel icon button Indicates the icon and color that are currently selected for the corresponding channel When you press this button a screen will appear in which you can select an icon ...

Страница 20: ...R MMTX C MMTX LFE MMTX Ls MMTXRs DIRECT OUT 1 32 CH 1 CH 32 Direct Outs DIRECT OUT 33 64 CH 33 CH 64 Direct Outs DIRECT OUT 65 72 CH 65 CH 72 Direct Outs INSERT OUT 1 32 CH 1 CH 32 Insert Outs INSERT OUT 33 64 CH 33 CH 64 Insert Outs INSERT OUT 65 72 CH 65 CH 72 Insert Outs INSERT OUT MIX MATRIX MIX 1 MIX 24 MATRIX 1 MATRIX 8 Insert Outs INSERT OUT ST MONO STEREO L STEREO R MONO C Insert Outs CASC...

Страница 21: ...e insert position NOTE You can set the I O ports to function as an insert for each block 1 INSERT OUT button Displays the currently selected output port for insert 1 and insert 2 Press this button to open the PORT SELECT window in which you can select an output port 2 INSERT IN button Displays the currently selected input port for insert 1 and insert 2 Press this button to open the PORT SELECT win...

Страница 22: ...amp input signal for insert 1 and insert 2 9 Close button Closes the screen 10 Resource Meter Displays the settings for each channel for INSERT IN and INSERT OUT NOTE If surround mode is set on the CL series console the INSERT resources for output channels MIX ST MONO are reduced from 30 to24 INSERT DIRECT OUT screen 8ch 1 2 3 4 1 Channel select button Selects the channel to set The channel icon c...

Страница 23: ...layed categories vary depending on the channel type OMNI OMNI1 OMNI8 SLOT1 SLOT1 1 SLOT1 16 SLOT2 SLOT2 1 SLOT2 16 SLOT3 SLOT3 1 SLOT3 16 GEQ RACK GEQ1L A GEQ16R B MIX MATRIX STEREO MONO channelsonly GEQ1L A GEQ8R B INPUT channelsonly EFFECT RACK FX1L A FX8R B PREMIUM RACK PR1L A PR8R B 2 Port select buttons Assign the port that will be used as insert out insert in for the currently selected chann...

Страница 24: ...rect Out on or off 4 DIRECT OUT LEVEL knob Indicates the output level of the Direct Out Press this button to control the level using the multifunction knob 5 APPLY TO ALL INPUT button input channels only Specifies whether the insert point Direct Out point settings will be applied to all input channels 6 Close button Closes the screen 1 DIRECT ON button Switches the Direct Out on or off The current...

Страница 25: ...the category of output port The categories correspond to the following output ports The displayed categories vary depending on the channel type OMNI REC OMNI1 OMNI8 REC IN L REC IN R SLOT1 SLOT1 1 SLOT1 16 SLOT2 SLOT2 1 SLOT2 16 SLOT3 SLOT3 1 SLOT3 16 DANTE1 32 DANTE1 DANTE32 DANTE33 64 DANTE33 DANTE64 2 Output port select buttons Assign the output port used for direct output of the currently sele...

Страница 26: ...put signal from the Dante connector is assigned 1 2 2324 L R C 1 2 7 8 L R MIX M O N O MATRIX CUE INPUT PATCH 1 2 2324 L R C 1 2 7 8 L R Assigns input signals to the input channels Ø phase Switches the phase of the input signal DIGITAL GAIN Attenuates boosts the level of the input signal HPF High Pass Filter Cuts the region below the specified frequency 4 BAND EQ 4 band equalizer A parametric EQ w...

Страница 27: ... MATRIX ON OFF MATRIX send on off This is an on off switch for signals sent from the input channel to MATRIX buses 1 8 MATRIX LEVEL 1 8 MATRIX send levels 1 8 Adjusts the send level of the signal sent from the input channel to MATRIX buses 1 8 As the position from which the signal is sent to the MATRIX bus you can choose from the following immediately before the EQ pre fader or post fader INSERT M...

Страница 28: ...x the SOFT KEYBOARD window will appear enabling you to edit the channel name 4 Tabs Enable you to switch between items 5 Close button Closes the screen 1 Channel color select buttons Select a channel color 2 Icon select buttons Select a channelicon 3 Sample name setup buttons Select a preset sample name You can edit the name on the NAME tab later NOTE You can also add or edit characters in the cha...

Страница 29: ...reen 3 Press the 1ch or 8ch tab in the GAIN PATCH window 4 Make settings for the head amp OVERVIEW screen GAIN PATCH window 1 ch NOTE The PAD will be switched on or off internally when the HA gain is adjusted between 17 dB and 18 dB Keep in mind that noise may be generated if there is a difference between the Hot and Cold output impedance of the external device connected to the INPUT connector whe...

Страница 30: ...ference Manual Input channels 1 Channel icon Channel number Channel name indicator Indicates the channel icon number and name 2 HA section Appears if the head amp is patched to the input channel USO RESTRITO ...

Страница 31: ...level on your own console without affecting the level of other consoles 10 AG DG ALL ON OFF buttons You can turn on off the link between the analog and digital gain for all input channels simultaneously You can also view the link status in the SELECTED CHANNEL VIEW screen Link is on Link is off GAIN PATCH window 8ch ischanged IftheGainCompensationfunctionisturnedoff theanaloggainanddigital 7 9 gai...

Страница 32: ...isplayed 48V button This button will appear for the input channel to which the head amp has been patched Press the button to switch phantom power 48V on or off A GAIN analog gain knob Indicates the analog gain of the head amp Press this knob to control the parameter values using the multifunction knobs If the Gain Compensation function is turned on an indicator appears showing the analog gain posi...

Страница 33: ... or from the rack output exceeds the full scale level This indicator is available only if an input channel is selected 3 48Vindicator Indicates the 48V on off status for each channel 4Ø Phase indicator Indicates the phase setting for each channel NOTE If the input channel is patched to a slot for which the connection to the head amp is not recognized the knob 1will be replaced with the slot port n...

Страница 34: ... the Gain Compensation on off function to one of the USER DEFINED keys Sending the signal from an input channel to the STEREO MONO bus The STEREO bus and MONO bus are used to send signals to the main speakers There are two ways to send signals to the STEREO bus or MONO bus ST MONO mode and LCR mode You can select the mode individually for each channel These two modes differas follows ST MONO mode ...

Страница 35: ...ut channel you want to control and then raise the fader to an appropriate position The subsequent steps will differ depending on whether ST MONO mode or LCR mode was selected for the channel in step 4 Channels for which ST MONO mode isselected 7 In the TO STEREO MONO window use the STEREO MONO button to turn on off the signal sent from the input channel to the STEREO bus MONO bus 8 Use the TO ST P...

Страница 36: ...tiple channels simultaneously 2 Mode LEDs The LED of the currently selected mode will light 3 MODE select button For a MONO channel the mode can be switched between ST MONO and LCR For a STEREO channel the mode can be switched between PAN and BALANCE 4 ST MONO buttons These buttons are on off switches for signals that are sent from each channel to the STEREO bus MONO bus when the MONO button is se...

Страница 37: ... the corresponding input channel to the STEREO bus or MONO bus 9 CSR knob Adjusts the relative level of signals sent from the channel to the STEREO L R bus and to the MONO C bus in the range of 0 100 To adjust the value press the knob to select it and then operate the corresponding multifunction knob page 36 1 Channel select button Selects the channel You can select multiple channels simultaneousl...

Страница 38: ... L C R PAN knob When the CSR knob is set to 100 ST IN channel L C R TO ST PAN knob When the CSR knob is set to 0 STEREO channel The TO ST BALANCE knob operates as a conventional BALANCE knob and no signal is sent to the MONO C bus Signal sent from the ST IN L channel to the MONO C bus Signal sent from the ST IN L channel to the STEREO L bus L C R TO ST BALANCE knob L C R TO ST BALANCE knob Signal ...

Страница 39: ...levels of signals sent from a specific input channel to all MIX MATRIX buses STEP 1 Assign an output port to each MIX MATRIX bus to which you want to send signals and connect your monitor system external effects processor or other device to the corresponding output port 2 Use the SEL keys on the top panel to select the input channel that will send signals to the MIX MATRIX bus 3 Press one of the k...

Страница 40: ...W screen you can also adjust the send level of the signal sent to theMIX MATRIX buses Todo so press the SEND LEVEL knob for the MIX MATRIX that you wantto adjust and then use the multifunction knob in the Centralogic section to adjust it MIX SEND MATRIX SENDwindow bus If PANmode has been selected in the TOSTEREO MONO window the left knob will function as the PAN knob The right knob function will b...

Страница 41: ...n knobs If the send destination is set to FIXED only a gray circle will appear STEP 1 Assign an output port to each MIX MATRIX bus to which you want to send signals and connect your monitor system external effects or other device to the corresponding output port 2 In the Function Access Area press the SENDS ON FADER button 3 UsetheMIX MTRXONselectbuttonsintheFunctionAccessAreatoswitchbetween MIX 1...

Страница 42: ...buses that will be controlled by the faders 3 Close button Closes the SENDS ON FADER mode Correcting delay between channels Input Delay This section explains how to correct delay between input channels by using the Input Delay function This function is useful when you want to correct the phase variance caused by microphone locations on the stage to add depth to the sound by using phase variance or...

Страница 43: ...ob to adjust the delay You can view the current value immediately above the knob always shown in unit of ms and below the knob shown using the currently selected scale If ms millisecond has been selected for the DELAY SCALE nothing will appear above the knob 4 Tabs Enable you to switch between windows 5 Close button Closes the screen 3 4 1DELAYSCALEbutton Press the button to display the DELAY SCAL...

Страница 44: ... 1 DELAY SCALE button Press the button to display the DELAY SCALE window in which you can select the unit for the delay time 2 Channel select button Lights to indicate the currently selected input channel Press the button to select the channel 3 Delay setting knob input channels only Press this knob to adjust the value using the multifunction knob You can view the current value immediately above t...

Страница 45: ...ct lights up and the others go off Setting procedure If a stereo input channel is selected the SELECTED CHANNEL VIEW screen will appear as shown below If a stereo input channel is selected the OVERVIEW screen will appear as shown below 2 2 LR MONO SELECT button This a toggle button The setting switches each time the button is pressed ON PAN BAL STEREO R ON PAN BAL 1 Normal STEREO setting L MONO R ...

Страница 46: ...ess the OK button in the confirmation dialog box 4 5 SETUPscreen SURROUNDSETUPscreen NOTE When you switch from Stereo mode to Surround mode the signals for MIX1 2 3 4 and 5 6 change to MONO x2 However when you switch from Surround mode to Stereo mode the signals for MIX1 2 3 4 and 5 6 remain as MONO x2 1 L R knob This parameter is used to set the left right surround position Use the SEND knob MIX ...

Страница 47: ...ng on whether the surround position is a hard pan panned fully left or right or any other setting Hard pan Red Any other setting Orange 7 Surround graph This graph shows the surround positions Press here to open the SURROUND PAN 1CH screen OVERVIEW screen If you set a bus to Surround mode in BUS SETUP the OVERVIEW screen appears as shown 1 2 3 1 Surround graph Adjusting F R below 1 2 3 This graph ...

Страница 48: ...memory 10 PASTE button Press this button to paste the copied settings from buffer memory to the current settings If no valid data has been copied in the buffer memory nothing will happen SURROUND PAN screen CH 1 48 CH 49 72 ST IN CL5 CH 49 64 ST IN CL3 ST IN CL1 If you set a bus to Surround mode in BUS SETUP the SURROUND PAN screen CH1 48 CH 49 72 ST IN CL5 CH 49 64 ST IN CL3 ST IN CL1 appears as ...

Страница 49: ...justing F R 1 L R buttons Use these buttons to set the output destination This graph shows the surround positions 2 L R F R switch button Use this toggle button to switch between the screen for adjusting L R and the screen for adjusting F R Use the SEND knob MIX 5 of the Selected Channel section to make adjustments 2 Coefficient Setting fader Use this fader to set the downmix coefficient There is ...

Страница 50: ...nnel libraryoperations The INPUT CHANNEL LIBRARY enables you to store and recall various parameters including the head amp settings for input channels To recall a library item press the corresponding LIBRARY button in the SELECTED CHANNEL VIEW screen For details on using the library refer to the Using libraries section in the separate Owner sManual LIBRARY button USO RESTRITO ...

Страница 51: ... or other buses The following types of output channels are provided MIX channels These channels process signals sent from input channels to MIX buses and output them to the corresponding output port MATRIX bus STEREO bus or MONO C bus MIX 1 2 2324 M O N O MATRIX CUE MIX 1 2 2324 M O ST N MATRIX CUE L R C 1 2 7 8 L R MATRIX channel These channels process the signals sent from input channels MIX cha...

Страница 52: ...RT You can patch the desired output input ports to insert an external device such as an effect processor You can switch the insert out and insert in locations METER Indicates the level of the output channel You can switch the position at which the level is detected KEY IN MIX channels 21 24 only You can send the output signals of MIX channels 21 24 to Dynamics processors and use them as key in sig...

Страница 53: ...tion The subsequent steps will differ depending on whether ST MONO mode or LCR mode was selected for the channel in step 3 Channels for which ST MONO mode isselected 7 In the TO STEREO MONO window use the ST MONO button to turn a signal sent from the MIX channel to the STEREO bus MONO bus on or off 8 Use the TO ST PAN knob to set the panning of the signal sent from the MIX channel to the STEREO bu...

Страница 54: ...Reference Manual STEREO L R bus ST MONO mode LCR mode 1 Channel select button Selects the channel You can select multiple channels simultaneously 2 Mode LEDs The LED of the currently selected mode will light USO RESTRITO ...

Страница 55: ...e level of signals sent from the channel to the STEREO L R bus and to the MONO C bus in the range of 0 100 To adjust the value press the knob to select it and then operate the corresponding multifunction knob TO STEREO MONOscreen CH 1 48 CH 49 72 ST IN CL5 CH 49 64 ST IN CL3 ST IN CL1 OUTPUT Adjusts the status of a signal sent from the corresponding channel to the STEREO MONO bus Here you can also...

Страница 56: ...of the Centralogic section to select the input channel that will send signals to the MATRIX buses 4 Press one of the knobs in the Selected Channel section 5 In the SELECTED CHANNEL VIEW screen turn on the TO MATRIX SEND ON OFF button for the send destination MATRIX bus 6 Use the MIX MATRIX SEND LEVELknob in the SELECTED CHANNEL section to adjust the send levels to the MATRIX buses SELECTED CHANNEL...

Страница 57: ...cator Indicates the currently selected send destination 4 Send destination select buttons Select MIX MATRIX buses as the send destination 5 Channel select button Selects the send source channel that you wish to control The current channel icon number and color appear on the button and the channel name appears below the button 6 PRE POST button Switches the send point of each send source channel be...

Страница 58: ...ion buttons in the Function Access Area to select the send destination MATRIX bus 5 Use the faders in the top panel Centralogic section to adjust the send level from the MIX and STEREO MONO channels to the selected MATRIX bus 6 Repeat steps 4 5 to adjust the send level for other MATRIX buses in the same way 7 When you re finished adjusting the MATRIX send levels press the X symbol in the Function ...

Страница 59: ...umber and the type of I O card installed in that slot 2 DELAY SCALE button Press this button to open the DELAY SCALE window in which you can select the unit for the delaytime 3 Output Port This is the type and number of the output port to which the channel is assigned 4 Channel select button Enables you to select the channel that you want to assign to the output port The name of the currently sele...

Страница 60: ... appears immediately below the knob 9 Level meter Indicates the level of the signal assigned to the output port 10 Tabs Switch the output ports controlled in groups of up to eight ports Tabs are categorized into three groups DANTE SLOT and PATCH VIEW To display tabs in the desired group press the group name button located at the right or left end of the bottom row Channel libraryoperations The OUT...

Страница 61: ... the SELECTED CHANNEL VIEW screen and use the knobs in the SELECTED CHANNEL section to edit the EQ and high pass filter page 9 Even when the HPF EQ window is displayed you can use the knobs in the SELECTED CHANNEL section to control the EQ HPF EQ window 1ch This lets you edit all EQ parameters of the currently selected channel This is convenient if you want to make detailed EQ settings for a speci...

Страница 62: ...er s Manual EEQFLATbutton Press this button to reset the GAIN parameters of all EQ band to 0 dB F HIGH SHELVING ON OFF button Turn on this button to select the shelving type filter for the HIGH band G LPF ON OFF button Turn on this button to select the low pass filter for the HIGH band H EQ ON OFF button Switches the EQ on or off IEQIN OUTlevelmeters Indicates the peak level of signals before and ...

Страница 63: ...want to control The current channel icon and number appear on the button and the channel name appears immediately below the button 2 EQ graph Displays the parameter values for the EQ and filter The currently selected EQ type appears below the graph 3 EQ ON OFF button Switches the EQ on or off The Σ clipping indicator located to the right above the button lights if the input signal is clipping 4 HP...

Страница 64: ...ng the dedicated library You can also take advantage of a wide variety of presets suitable for various instruments or situations You can also access the SELECTED CHANNEL VIEW screen and use the knobs in the SELECTED CHANNEL section to edit the dynamics settings page 10 Even when the DYNAMICS 1 2 window is displayed you can use the knobs in the SELECTED CHANNEL section to control the dynamics Press...

Страница 65: ...ou can select a key in signal that will trigger thedynamics SELF PRE EQ The pre EQ signal of the same channel SELF POST EQ The post EQ signal of the same channel MIX OUT 21 24 Output signals of MIX channels 21 24 CH 1 72 POST EQ ST IN 1L 8R POST EQ MIX 1 24 POST EQ MTRX 1 8 POST EQ ST L R MONO POST EQ The post EQ signal of the corresponding channel 1 1 Choose from a group of eight channels NOTE In...

Страница 66: ...ion knobs to operate this 5 DYNAMICS ON OFF button Switches dynamics on or off 4 5 1 Channel select button Selects the channel that you want to control The current channel icon and number appear on the button and the channel name appears immediately below the button 2 DYNAMICS OUTPUT meters GR meter Indicate the output levels of signals after dynamics processing and the amount of gain reduction If...

Страница 67: ...s the channel that you want to control The current channel icon number threshold and color appear on the button 2 Dynamics parameter area This area displays the dynamics type and various meters Press the area to access the DYNAMICS 1ch window of that channel If DUCKING EXPANDER COMPANDER H S or DE ESSER has been selected as the dynamics type the type appears near the top of this area The lower par...

Страница 68: ... group to which it should be assigned NOTE DCA group settings are saved as part of the scene With CL V3 0 and later you can now assign the Stereo Mono bus master Mix bus master and Matrix bus master channels to a DCA group on channels other than input channels DCA groups were formerly used exclusively for input channels However with this new feature you can use the DCA groups for output master cha...

Страница 69: ... each DCA group If you mute any of the DCA groups on a channel assigned to multiple DCA groups the signal route for that channel including sends to the corresponding bus will bemuted 9 CLOSE button 9 8 Closes the window 1 DCA GROUP ASSIGN MUTE GROUP ASSIGN buttons Toggle between the DCA GROUP ASSIGN window and MUTE GROUP ASSIGN window 2 DCA group assign field This area displays the channels assign...

Страница 70: ...on Cue Monitor CUE key When you press the Centralogic section CUE key to make it light the CUE keys of the channels assigned to that DCA group will blink and cue monitoring will be enabled For more information about cue refer to Using the Cue function page 109 SELECTED CHANNEL VIEW screen DCA MUTE field Controlling DCA groups Use the faders of the Centralogic section to control DCA groups STEP 1 A...

Страница 71: ...ant to control then press the SEL key for that DCA group DCA Roll out mode is engaged and the faders that have been assigned to the DCA group will be rolledout 2 If you press the SEL key for another DCA group faders that have been assigned to that DCA group will be rolled out 3 Press the same SEL key again to exit DCA Roll out mode NOTE You cannot turn DCA Roll out mode on if one of the following ...

Страница 72: ... is ON Assigned to MUTE GROUP 1 and DCAGROUP 1 1 ROLL OUT BLOCK Enables you to select a block in which the DCA group is rolled out to the faders CL5 Blocks A B C CL3 CL1 Blocks A B 2 ALIGN button Enables you to choose whether the DCA group is rolled out to the faders from the left or right 3 DCA group select button Selects the DCA group that you want to control Operation Example 2 1 Set MUTE MASTE...

Страница 73: ...ld of the OVERVIEW screen indicates the mute group s to which each channel is assigned Numbers that are lit red in the lower line of this field indicate the mute groups to which that channel belongs If the dimmer level is set to any level other than dB these numbers will light orange For a channel for which the Mute Safe function page 72 has been turned on an S indicator will light up green at the...

Страница 74: ... button Switches the mute for the corresponding mute group on or off Selecting the mute groups to which a specific channel will belong STEP 1 Press the SEL key of the input channels and output channels that you want to operate 2 Press one of the knobs in the SELECTED CHANNEL section 3 Use the mute group select buttons in the SELECTED CHANNEL VIEW screen to select the mute group s to which the curr...

Страница 75: ...ER DEFINED keys To mute a mute group press the USER DEFINED key to which you have assigned the Mute On Off function The LED of the USER DEFINED key will light and all channels that belong to the selected mute group will be muted At this time the ON key of the muted channels will blink You can turn on multiple USER DEFINED keys to mute multiple mute groups To defeat muting for a mute group press th...

Страница 76: ...hannels included in a link group or one of two channels set to stereo the parameter settings of that channel may differ from those of the other channel s In such cases the applicable parameter will be automatically re linked the next time it is operated You can globally apply Recall Safe to channel links by using the global parameter You can use the Recall Safe function along with the Focus Recall...

Страница 77: ...y Recall Safe to rack A and B individually For other racks the setting for racks A and B will be linked 5 Channel select button Selects the channel for which you want to set the Recall Safe function NOTE Switching channels using this button will not affect the channel selection on the top panel 6 Selected channel display This area indicates the icon number color and name of the currently selected ...

Страница 78: ...sly Settings are linked according to the channel link for the current scene when the settings are made Button name Corresponding parameter Input channel MIX channel MATRIX channel STEREO MONO channel WITH MIX SEND Send level to the MIX bus O WITH MATRIX SEND Send level to MATRIX bus O ALL 1 All parameters O O O O HA HA related settings O HPF HPF settings O EQ EQ settings O O O O DYNA 1 Dynamics 1 ...

Страница 79: ...ings EQ settings Dynamics 1 settings Dynamics 2 settings Insert on and insert point settings Direct Out on Direct Out level and Direct Out point settings Send levels and PRE POST settings of signals sent to MIX buses On off status of signals sent to MIX buses Send levels and PRE POST settings of signals sent to MATRIX buses On off status of signals sent to MATRIX buses Fader operations ON key oper...

Страница 80: ... create a link group the corresponding input channels will be highlighted If there are two or more link groups each group is shown in a different color Press this field to open the CH LINK SET window You can also link input channels in this window NOTE Left and right of the ST IN channel are always linked In the case of the CL3 and CL1 faders that do not exist on those models will not be shown 2 L...

Страница 81: ...d together 4 SEND PARAMETER field If you have turned on the MIX ON MIX SEND MATRIX ON or MATRIX send buttons in the LINK PARAMETER field use the buttons in this field to specify the send destination bus es MIX 1 24 MIX buses 1 24 MTRX 1 8 MATRIX buses 1 8 NOTE If nothing is selected in the SEND PARAMETER field send on off and send level will notbe linked 5 INPUT OUTPUT button Use this button to sw...

Страница 82: ...s of the link group that had been previously displayed 1 MATRIX channel not applicable NOTE If you link Dynamics for two or more output channels the parameter values will be linked but the key in sources are not linked and can instead be set for each channel The behavior of key in signals is linked in units of 8ch For details about dynamics see EQ and Dynamics page 58 Units of 8ch refers to MIX 1 ...

Страница 83: ...ked channel adjust the parameter value You can also remove all linked channels from the same link group temporarily This can be helpful if you want to edit parameters that are linked to each other while maintaining the same relative level differences While you are holding down the SEL key the fader values will not be linked However you cannot temporarily cancel this link during the fading phase of...

Страница 84: ... copy operation the settings will overwrite the parameters of the copy destination You can copy between the following combinations of channels Between input channels Between the STEREO L R channel and MONO channel Between MIX channels Between MATRIX channels CH COPY MODE window This window enables you to copy channel settings STEP 1 In the Function Access Area press the CH JOB button 2 Press the C...

Страница 85: ...want to defeat all of the selected copy destination channels press the DESTINATION CHs field NOTE In the case of the CL3 CL1 faders that do not exist on those models will not be shown 3 COPY button Executes the copy operation After selecting the copy source channel and copy destination channel s press this button to execute the copy operation 4 CLOSE button Press this button to close the window an...

Страница 86: ...nction Access Area press the CH JOB button 4 2 Press the DEFAULT button in the CH JOB menu 3 Press the SEL key of the channel s to be initialized to make it light multiple selections are allowed 4 Press the DEFAULT button to execute the Initialization Displays the move source channel While this window is displayed press a SEL key on the top panel to select an input channel The selected channel wil...

Страница 87: ...input channel press the corresponding SEL key 4 If necessary in the DESTINATION field select a bus You cannot select a FIXED bus 5 Press the OK button to set the parameters as follows The send level of the signals sent from the selected input channels is lowered to dB The send level of the signals sent from all other input channels is set to nominal 0 0dB Send to the destination bus is turned on a...

Страница 88: ...Channel Job 85 Reference Manual NOTE You can also access the MIX MINUS popup window by pressing the CH JOB button in the Function Access Area then pressing the MIX MINUS button USO RESTRITO ...

Страница 89: ...ou cannot store data to a scene number for which the Protect symbol or R symbol is displayed Storing and recalling scenes To store the current mix settings as a scene in memory and recall it later you can use the keys in the SCENE MEMORY MONITOR section on the top panel or you can use the SCENE LIST window Storing a scene Using the keys of the SCENE MEMORY MONITOR section STEP 1 Use the pad contro...

Страница 90: ...e number 4 Press the STORE button in the SCENE LIST window 5 Assign a title or comment to the scene as desired 6 Press the STORE button located in the lower part of the SCENE STORE window 7 Press the OK button in the STORE CONFIRMATION dialog box to execute the Store operation NOTE You can select multiple scene numbers as the store destination Todo so press the MULTI SELECT button to turn it on an...

Страница 91: ...01 No symbol No scene will be protected NOTE The R symbol for scene number 000 cannot bedisabled 6 Current scene The currently selected scene that is the current scene is highlighted in blue in the list If you press another scene number in the list the list will scroll and that scene will become the current scene 7 SCENE SELECT knob Use the multifunction knobs to select a scene You can view the cu...

Страница 92: ... button to a USER DEFINEDkey page 197 You can also use MIDI messages Program Changes to recall scenes page 168 Using USER DEFINED keys to recall You can use the USER DEFINED keys to recall a selected scene with a single keystroke or to step through the scenes To do this you must first assign a scene recall operation to a USER DEFINED key The following recall operations can be assigned to a USER DE...

Страница 93: ...RECALL in the PARAMETER 1 column To assign DIRECT RECALL Choose DIRECT RECALL in the PARAMETER 1 column and choose SCENE xxx xxx is the scene number in the PARAMETER 2 column 7 When you have finished making settings press the OK button to close the window 8 Press the USER DEFINED key to which you want to assign a recall function STEP 1 Press the SCENE field in the Function Access Area 2 Press the ...

Страница 94: ...o overwrite the selected scene with the scene in buffer memory 3 CLEAR button Press this button to erase the selected scene 4 CUT button Press this button to delete the selected scene and copy it to buffer memory 5 INSERT button Press this button to insert the scene copied to buffer memory into the selected scene number The numbers of the subsequent scenes will be incremented by one 6 UNDO button ...

Страница 95: ...sert 3 Rotate one of the multifunction knobs to select the insert destination scene number and then press the INSERT button in the SCENE LIST window 4 Press the OK button in the CONFIRMATION dialog box to execute the Insert operation NOTE If you select multiple scenes as the insert destination the same scene will be inserted the selected number of times If nothing has been copied to the buffer mem...

Страница 96: ... 2 3 SCENE LIST window NOTE GLOBAL PASTE window 1 SET BY SEL button Turn on this button to add a channel by using the corresponding SEL key 2 CLEAR ALL button SET ALL button The CLEAR ALL button clears all of the selected channels The SET ALL button selects all channels simultaneously NOTE In the case of the CL3 CL1 faders that do not exist on those models will not be shown 3 Tabs Enable you to sw...

Страница 97: ...elected together 2 Settings are linked according to the channel link for the current scene when the settings are made 1 While in PREVIEW mode changes that are made in CL Editor are not applied immediately They are applied after PREVIEW mode is exited DCA tab You can select ALL LEVEL ON or NAME If ALL is selected all channel parameters will be copied If LEVEL ON is selected the master level and DCA...

Страница 98: ...hich Focus settings are made are indicated by a FOCUS indication in the STATUS field of the SCENE LIST window You can use the Focus function in conjunction with the Recall Safe function Channels or parameters that are excluded from Recall operations by either Focus or Recall Safe will not be recalled For FOCUS RECALL the NAME parameter is included in the DCA indicator 0 1 CLEAR ALL button Clears a...

Страница 99: ... function on or off 10 CLOSE button Using the Fade function Fade is a function that smoothly changes the faders of specified channels and DCA groups to their new values over a specified duration when you recall a scene The settings of the Fade function are made independently for each scene STEP 1 Press the SCENE field in the Function Access Area 2 Press the FADE TIME tab at the bottom of the SCENE...

Страница 100: ...will be saved by the next scene store operation Changes you make here are immediately applied to the CL console 1 Channel display field The channels or DCA groups to which Fade is applied are highlighted To select the channels or DCA groups to which Fade is applied press the SEL keys for the channels or DCA groups Press the same SEL key once again to de select the channel 2 FADE TIME knob Sets the...

Страница 101: ...E LIST window 3 For each scene specify the control signal that you want to output to each GPI OUT port 4 Recall the scene for which you want to output GPI OUT signals SCENE LIST window GPI OUT field 1 Output control signal select buttons These specify the control signal will be output from each GPI OUT Pressing a button repeatedly will switch between the following functions OFF Nothing will beoutp...

Страница 102: ...e offset time setting SCENE LIST window PLAYBACK LINK field 1 STEP 1 Connect a USB flash drive that contains the audio files to the USB connector 2 Press the SCENE field in the Function Access Area 3 Press the PLAYBACK LINK tab at the bottom of the SCENE LIST window 4 Press the song select button for a scene to which you want to link the audio file 5 Press a list in the SONG SELECT window or use t...

Страница 103: ...rrent directory path It will show only the YPE SONGS level 3 SONG TITLE FILE NAME switch buttons Switch between the song title list and the file name list 4 SONG TITLE list button 5 ARTIST list button Press these buttons to sort the audio file list at the current directory level by song title and artist name respectively 6 List Displays the name of the folder or audio file artist name and audio fi...

Страница 104: ...Switching users Changing the User Level Load Save functions Cue changes USER DEFINED KEY operations USER DEFINED KNOB operations Monitor MONITOR CUE OSCILLATOR TALKBACK changes or display Changing or viewing Nuendo Live settings Changing or viewing the recorder Changing DANTE SETUP or DANTE PATCH settings FADE TIME EFFECT FREEZE playback or recording MIDI clock and tap tempo for effects Internal m...

Страница 105: ...ht MIX MATRIX STEREO or MONO channel output signals RECORDER PLAYBACK output signals and OMNI IN 1 2 3 4 5 6 7 8 input signals The Cue function lets you check an individual selected channel DCA group by temporarily monitoring it via MONITOR OUT or PHONES When you press the CUE key on the top panel the cue signal of the corresponding channel or DCA group is sent as the monitor output from the selec...

Страница 106: ...elected output port With the factory default settings this function is turned on Turn it off if you do not want to output cue signals to the monitoring speakers Using the Monitorfunction This section explains how to select the desired monitor source and monitor it from the PHONES Out jack or external monitor speakers STEP 1 Connect your monitor system to the OMNI OUT jacks or 2TR OUT DIGITAL jack ...

Страница 107: ... 8 CUSTOMs Multiple faders in the Custom fader bank 5 Meter field Indicates the output level of Monitor Out channels L R and C Press this field to open the MONITOR window 6 MONITOR OUTPUT button Switches Monitor Out on or off 7 PHONES LEVEL LINK button If this is on the MONITOR FADER LEVEL knob will adjust the level of signals sent to the PHONES Out jack 8 MONO MONITOR button When you press this b...

Страница 108: ...s sent to the PHONES Out jack by using the MONITOR FADER LEVEL knob 0 or the fader A to which this knob function has beenassigned NOTE If the PHONES LEVEL LINK button is ON use the MONITOR LEVEL knob and the monitor fader as well as the PHONES LEVEL knob to adjust the monitor level when monitoringthrough headphones 7 CUE INTERRUPTION button Press this button to interrupt the monitor signal by the ...

Страница 109: ...knobs Meter field Indicates the monitor outputlevel D Meters This field indicates the output level of the monitor L R C channels E MONITOR OUT PATCHbutton Press this button to open the PORT SELECT window in which you can select an output port to patch to the monitor out L R C channels DANTE 1 64 Output channels 1 64 to audio network OMNI1 8 OMNI OUT jacks 1 8 DIGI OUT L R DIGITAL OUT jack on the C...

Страница 110: ...ted in this field use the SURROUND MONITOR window to specify the source channel 3 Speaker Mute field You can individually mute each speaker that is monitored 4 DOWNMIX field Select in which field to perform downmixes STEREO button Downmix in stereo mode MONO button Downmix in mono mode 5 Meter field Shows the meters for the surround signal being monitored The layout of the meters is the same as th...

Страница 111: ...kers When turned on all speaker buttons in the speaker mute field are turned on At this time if you press one of the speaker buttons only that button remains on the other buttons go off If you press a different speaker button the other buttons go off NOTE If you switch to Surround mode the patch for monitor output can be set in the OUTPUT PORT screen rather than this screen Refer to page56 MONITOR...

Страница 112: ...ignals of DCA groups make up this group To enable Cue for this group assign the DCA groups to the Centralogic section and press a CUE key in the Centralogic section to turn Cue on 1 Output channel field Selects the output channel You can use the L and R buttons to switch each between on off 2 Downmix parameter field Sets the downmix parameters for each channel and the master channel monitors 3 APP...

Страница 113: ...vel for each CUE group 5 Press one of the CUE OUT PATCH buttons L R in the meter field to specify a port as the output destination for cue signals L and R multiple selections are allowed 6 Press the CUE key of the channel or DCA group to be monitored to turn it on window This group will automatically be disabled when you exit the corresponding window NOTE On screen CUE button 7 Adjust the Cue sign...

Страница 114: ...u turn on the CUE key the background of the cue meter in the Function Access Area will turn blue indicating the cue output level The upper part of the cue meter shows an abbreviation indicating the currently on cue group or cue button The abbreviations displayed for the cue meters have the following meaning MONITORscreen The CUE field of the MONITOR screen lets you check the current Cue settings a...

Страница 115: ...ill be cleared if you switch between MIX CUE mode and LAST CUE mode in the CUE MODE section INPUT CUE field This field enables you to make settings related to the input channel cue 2 Cue point select button Sets the cue point to PFL immediately before fader AFL immediately after fader or POST PAN immediately after PAN NOTE Be aware that if you turn on the POST PAN button you will be unable to moni...

Страница 116: ... Switches the FADER CUE RELEASE function on or off F THRESHOLD knob Sets the fader value for releasing the cue If the fader value exceeds the value set with this knob the cue is released MONITOR screen CUE field in Surroundmode If you set a bus to Surround mode in BUS SETUP the CUE field in the MONITOR screen appears as shown below 15 1 SOLOButton Used to cue only the input channels to be used in ...

Страница 117: ...LKBACK display button or the ASSIGN field in the MONITOR screen 3 Connect a mic to the front panel TALKBACK jack and turn the TALKBACK GAIN knob to adjust the input sensitivity of the mic 4 Press a button in the ASSIGN field in the TALKBACK window to specify the bus es to which the talkback signal will be sent multiple selections are allowed 5 To enable talkback press the TALKBACK ON button to tur...

Страница 118: ... TALKBACK jack 3 INPUT TO TALKBACK field INPUT TO TALKBACK patch button Press the button to open the PORT SELECT window in which you can patch a desired input port totalkback The selected port name will appear on the button INPUT GAIN knob Sets the input gain of the selected port Input level meter Indicates the level of signals after the inputgain A TALKBACK IN field This field enables you to make...

Страница 119: ...These buttons enable you to select a channel on which the talkback signal is sent A CLEAR ALLbutton Press this button to clear all selections Using the Oscillator function You can send a sine wave or pink noise from the internal oscillator to the desiredbus MONITORscreen MONITORscreen In the MONITOR screen the OSCILLATOR field lets you check the current oscillator settings and turn the oscillator ...

Страница 120: ...e outputcontinuously SINE WAVE 2CH Two sine waves of different frequencies will be output separately PINK NOISE Pink noise will be outputcontinuously BURST NOISE Pink noise will be output intermittently 2 Parameter field Enables you to set the oscillator parameters The controllers and their functions in this field vary depending on the selected mode Mode SINE WAVE LEVEL knob Indicates the output l...

Страница 121: ...section Enables you to select a channel to which the oscillator signal will be sent Press one of the three tabs below to select the type of channels displayed and then press the button s for the desired channel s multiple selections are allowed The ASSIGNED indicator is lit green for a tab that contains a selection If the mode is set to SINE WAVE 2CH the signal is output to either odd ODD L side o...

Страница 122: ...l meter s metering points the points in the signal route at which the level is detected To access the METER screen press the METER field of the Function Access Area INPUT OUTPUT RTA tab Use these tabs to switch between the INPUT METER screen OUTPUT METER screen and RTA screen INPUT METERscreen This screen shows the meters and faders for all inputchannels NOTE In the case of the CL3 CL1 channels th...

Страница 123: ...e following as the metering point at which the level will be detected The metering point for the level meter can be specified independently for input channels and output channels For INPUT METER PRE GC Immediately before GAIN COMPENSATION PRE D GAIN Immediately before DIGITAL GAIN POST D GAIN Immediately after DIGITALGAIN PRE FADER Immediately before the fader Immediately before INPUTDELAY POST ON...

Страница 124: ...selected MIX MATRIX bus SEND MASTER The position of the fader is the level of the signal sent to thebus The fader turns gray if you switch the SEND button to OFF or switch the channel OFF For OUTPUT METER Only the fader for the signal sent from the MIX bus to the MATRIX bus changes color 2 7 1 Frequency Response graph A graph of a frequency analysis is shown in the 1 6 octave band 2 Source selecti...

Страница 125: ... Setting this switch to ON allows you to add rate of decay to the graph FAST SLOW switch button Use this button to set the rate of decay FAST SLOW 7 HOLD button Press this button to hold the graph that displays frequency response METER screen Surround mode If you set a bus to Surround mode in BUS SETUP the METER screen appears as shown below 1 MONITOR Meters for MIX1 6 The layout for L R C LFE Ls ...

Страница 126: ...is possible Touch the CUE or 5 1 SOLO display area to clear the cue as usual Using an MBCL meter bridge optional on the CL3 or CL1 console If an optional meter bridge MBCL is installed on the CL3 or CL1 console you will always be able to view the output levels of MIX MATRIX STEREO MONO and CUE channels in the same way as in the meter section ofCL5 The MBCL meters indicate the MIX channel and MATRI...

Страница 127: ...ual rack and used patch cords to connect it You can mount a GEQ or PEQ instance in each of the sixteen racks 1 16 and EFFECT an effect rack instance in each of the eight racks 1 8 and a Premium Rack instance in each of theeight racks 1 8 Up to two channels of input and output can be used for each rack However if the 31BandGEQ is mounted in a rack there will be only one channel each for input and o...

Страница 128: ...he type of rack you want to display on the screen Choose from GEQ 1 8 GEQ 9 16 GEQ rack EFFECT effect rack or PREMIUM Premium Rack 2 Rack mount button Press this button to open the RACK MOUNTER window in which you can select the type of the rack you want to mount Function Access Area NOTE VIRTUAL RACKwindow 3 SAFE button Switches Recall Safe on or off for the rack If this button is turned on for a...

Страница 129: ...r patchpoint will automatically be defeated and at the same time insert mode will automatically be switched off For effects if you select DYNAMICS EQ for EFFECT TYPE the operation is the same as for GEQ above For PREMIUM RACK the operation is the same as for GEQ above For more information on insert in out refer to Inserting an external device into a channel page 20 5 OUTPUT PATCH button If the typ...

Страница 130: ... and the input and output levels for A and B respectively Press this area to open the GEQ EDIT window in which you can modify the GEQ settings for A and B If 8BandPEQ is mounted This area indicates the EQ frequency response the PEQ on off status and the input and output levels for A and B respectively Press this area to open the PEQ EDIT window in which you can modify the PEQ settings for A and B ...

Страница 131: ...band can be adjusted using the Centralogic section s faders and ON keys The following two types of GEQ are provided 31BandGEQ 2 Virtual rack This area indicates the GEQ or effect selected via the MODULE SELECT buttons 3 MODULE SELECT field Select the GEQ or effect that will be mounted in the rack Each button has the following function BLANK button Removes the GEQ or effect currently mounted in the...

Страница 132: ...elect the input source of the rack The operating procedure is the same as for the INPUT button in the GEQ field 3 OUTPUT button Press this button to open the CH SELECT window in which you can select the output destination of the rack The operating procedure is the same as for the OUTPUT button in the GEQ field 4 RACK LINK button PressthisbuttontoopentheRACKLINKwindow inwhichyoucanlinkadjacentGEQun...

Страница 133: ...ndGEQ 2 Press the GEQ ON OFF button to turn the 31BandGEQ on 3 Press one of the buttons in the FADER ASSIGN field to select the group of bands you will control 4 Use the faders in the Centralogic section to adjust the selected band 5 When you ve finished making settings turn off the buttons in the FADER ASSIGN field 1 2 3 1 EQ graph Indicates the approximate response of the current 31Band GEQ 2 Fa...

Страница 134: ...ess one of the buttons in the FADER ASSIGN field to select the group of bands you will control 4 Use the faders in the Centralogic section to adjust the selected band 5 When you ve finished making settings turn off the buttons in the FADER ASSIGN field With CL version 2 0 or later pressing the ON key again for this band will restore the adjusted gain value In this way comparison is easy and quick ...

Страница 135: ... PEQ EDIT window 1 2 D E 4 3 5 6 7 8 9 0 A B STEP 1 Refer to steps 1 8 in Virtual rack operations page 125 to mount a PEQ in a rack and set its input source and output destination 2 In the GEQ field rack or the EFFECT field rack press the rack container in which you mounted the PEQ 3 If you re using a stereo source press the RACK LINK button to link the two PEQ units 4 Press the PEQ ON OFF button ...

Страница 136: ...RESET BOTH button The parameters of both will be initialized and then linked CANCEL button Cancels the link and closes the window NOTE The RACK LINK button is shown only if linking is possible When you link RACK units a symbol will appear in the GEQ field to indicate the linked status 10 PEQ ON OFF button Switches the currently selected PEQ on off APEQFLATbutton Press this button to reset the GAIN...

Страница 137: ...PF NOTCH 3 HPF LPF frequency knob This knob is used to adjust the HPF LPF frequency 4 ON button There is an ON button for the HPF LPF and each of the three notch filters 5 Notch Filter Q knob Adjusts the Q of the notch filter 6 Notch Filter frequency knob Adjusts the frequency of the notch filter 3 4 3 4 1 1 2 5 4 6 5 4 6 5 4 6 1 Attenuation select button There are four types of HPF and LPF This b...

Страница 138: ...omixer in post fader POST ON field UsingAutomixer Master field Channel control field The Dugan speech system functions differently from a limiter or auto level controller When multiple people are speaking the engineer can adjust the each level using the faders as normal Even if nobody is speaking the system searches for mic audio andautomatically distributes gain Therefore faders can be left in th...

Страница 139: ...4 group 1 Level indicator Lights green when the audio is at an optimum level for Automix NOTE If the level indicator flashes increase the input gain If the level indicator lights up red reduce the input gain 2 Meter indicator There are three display modes Pressing the meters button in the master field will switch modes gain Displays the gain for Automixer Green input Displays the inputlevel Yellow...

Страница 140: ...T MUTE Makes settings for each group a b c selected in the channel control field Shows only the selected group OVERRIDE When you press this button channels where the channel override button is on will fade in to 0 dB unity gain All channels with the override button turned off will be Alternatively you can assign the input and output of the internal effect to the insert out in of a desired channel ...

Страница 141: ...d as the output destination for the rack to the corresponding MIX bus is set to 0 If you Using an internal effect via send and return This section explains how to use a MIX bus as an effect send bus and a ST IN channel as an effect return channel so that the effect can be used in a send and return configuration NOTE If you want to use a MIX bus as an effect send bus select VARI as the bus type Thi...

Страница 142: ...the INSERT DIRECT OUT popup window turn on the INSERT ON OFF button for the channel into which you inserted the effect 7 Display the EFFECT EDIT window again and select the effect type and edit the effect parameters 8 Using the fader of the channel you selected as the rack s output destination in step 3 adjust the level as appropriate NOTE If you are inserting an effect into a channel that handles...

Страница 143: ... be used only in rack 1 3 5 or 7 Also even ifyou copy these two effect types you will not be able to paste them to rack 2 4 6 or 8 4 EFFECT CUE button Cue monitors the output of the currently displayed effect This Cue function is valid only while this screen is displayed The cue will be canceled automatically when you switch to a different screen NOTE If the Cue mode is set to MIX CUE all channels...

Страница 144: ...ustments by rotating a knob while pressing and holding it down 9 MIX BAL knob Adjusts the balance between the original sound and effect sound included in the output signal from the effect If you press this knob to select it you will be able to adjust it using the corresponding multifunction knob If you are using the effect via send and return set this to 100 effect sound only 10 Tool buttons Copy ...

Страница 145: ...Function Access Area press the RACK button 2 Press the EFFECT tab in the VIRTUAL RACK window 3 Press the rack container in which the effect you want to control is mounted 4 Press the effect type field in the EFFECT EDIT window If you specify CURRENT PAGE in the PARAMETER 1 column in the USER DEFINED KEY SETUP window the Tap Tempo function can be used for the currently displayed effect rack If you ...

Страница 146: ...s calculated as follows DELAY NOTE x 4 x 60 TEMPO sec FREQ TEMPO 60 NOTE x 4 Hz Example 1 When SYNC ON DELAY 250 ms TEMPO 120 you change NOTE from 8th note to quarter note DELAY new NOTE x 4 x 60 TEMPO 1 4 x 4 x 60 120 0 5 sec 500 ms Thus the DELAY will change from 250 ms to 500ms Example 2 When SYNC ON DELAY 250 ms NOTE 8th note you change TEMPO from 120 to 121 DELAY NOTE x 4 x 60 new TEMPO 1 8 x...

Страница 147: ...sampled content will be erased if you record another sample change the effect or turn off the power to the CL unit EFFECT EDIT window when FREEZE is selected If the FREEZE effect type is selected a PLAY button REC button and progress barwill appear in the special parameterfield 1 PLAY button 2 REC button 3 Progress bar NOTE As an alternative to switching the effect type you can also recall setting...

Страница 148: ...ch you inserted the processor 10 Adjust the processor parameters 11 Using the fader of the channel you selected as the rack s output destination in step 6 adjust the level as appropriate NOTE If you are inserting a processor into a channel that handles a stereo source assign the R channel insert out and insert in to the R input and output of the processor in the same way as steps 5 and 6 For detai...

Страница 149: ... 3 2 LIBRARY button 1 Press this button to display the Library window for each Premium Rack 3 DEFAULT button 2 7 Restores the default parameter setting 4 Multifunction knob access field 4 6 Indicates the name and value of the parameters that are assigned to the multifunction knobs To switch the parameter to control press the knob in the window NOTE If the ASSIST button is on you will be able to ea...

Страница 150: ...s in DUAL mode and two meters appear in STEREO mode 3 FB button Switches the gain reduction method between FF Feed Forward circuit and FB Feed Back circuit The button will light when FB circuit is selected The FF circuit is used in most contemporary compressors This type is useful when you want to apply consistent compression while maintaining a consistent tonal color The FB circuit is used in vin...

Страница 151: ...for the value of the reference level added by 4 dB or 8 dB OFF Turns off the meterdisplay 6 OUTPUT knob Adjusts the output level If you have adjusted the amount of gain reduction by changing the INPUT knob the level of audible volume will also change In this case use the OUTPUT knob to adjust the volumelevel Opt 2A Opt 2A is a processor that emulates a popular vintage model of tube optical compres...

Страница 152: ...amically only when a specific frequency region of the input signal becomes too high or too low For example you could use this on a vocal sound as a de esser so that EQ is applied to a specific frequency band only when sibilance or high frequency consonants reach an unpleasant level thus preserving a natural sound that does not impair the original tonal character Two full band DynamicEQs are provid...

Страница 153: ...h the processor will begin taking effect 8 RATIO knob Sets the boost cut ratio relative to the input signal Rotating the knob clockwise will set the ratio for boost and counter clockwise for cut Fully rotating the knob in either direction will create the maximum effect 9 ATTACK RELEASE buttons Enable you to select one of the three settings as the attack release time for compression or boost Select...

Страница 154: ...tput gain is 5dB See below for more information about how to use INPUT ADJUST If the level of the input signal sent to effects is too low to reach the threshold increase the input gain Adjust the sound quality by changing the input level sent to the input circuitry audio transformer and Class A amplifier INPUT ADJUSTstructure Buss Comp 369 STEREO mounting DUAL mounting 2 LINK STEREO mounting Stere...

Страница 155: ...sfollows VU GR VU When METER is IN When METER is GR When METER is OUT 9 VU SELECT DUAL mounting Selects the signal source for the VU meter You can select from input level or output level 10 LIMIT IN Limiter on off ALIMITATTACK Limiter attack time FAST 2ms SLOW 4ms B LIMITTHRESHOLD Limiter threshold However the changing value is linked to INPUT ADJUST C LIMITRECOVERY Limiter release time The releas...

Страница 156: ...d at the top of the PEQ EDIT window NOTE Store and recall operations are performed on individual GEQ units For one rack you can store and recall two Flex15GEQ or 8BandPEQ units independently as A and B To access the GEQ EDIT window or the PEQ EDIT window press the rack container in the GEQ field Effect library Use the Effect library to store and recall effect settings 199 items can be recalled fro...

Страница 157: ...in the I O DEVICE screen DANTE PATCH page 7 Press the port select button in the OUTPUT PATCH window 8 In the PORT SELECT screen select the output port 1 I O device list This shows the ID number and model name of the I O devices Press here to access the OUTPUT PATCH window where you can specify patching from the console s output ports to the I O devices If a previously set up device does not curren...

Страница 158: ...elect the I O port 3 1 LIBRARY button Enables you to store or recall the DANTE INPUT PATCH settings to or from the library You can store ten sets of settings in the library 2 AUTO SETUP button The current I O device connection status will be ascertained and input patching to the console will be performed automatically according to the order in which they are registered in the I O device list When ...

Страница 159: ...he head amp of the I O device in the GAIN PATCH window 7 When you have finished making settings press the x symbol to close the window 8 Press the rack in which the I O device on the OUTPUT side is mounted 9 Set the output port on the OUTPUT PATCH window as necessary Refer to step 7 in I O device patching page 154 1 Display switch buttons Press one of these buttons to view the corresponding I O de...

Страница 160: ...s here to access the OUTPUT PATCH window where you can make output port settings for the I O device If you press the SEL key of an output channel the corresponding port will light It does not light for external CL seriesconsoles 1 MADI SRC ON indicator MADI SRC ON button Switches the SRC Sampling Rate Converter on and off 2 MADI SRC WCLK IN indicator MADI SRC WCLK IN button Use this button to sele...

Страница 161: ...e rack in which the I O device on the head amp side is mounted In this window you can remotely control the head amp of the I O device from the CL series console by using the on screen knobs and buttons or the multifunction knobs 7 1 2 3 8 4 5 6 1 48VMASTER Indicates the on off status of the I O device s master phantom power Switching this on or off is performed on the I O device itself 2 48Vbutton...

Страница 162: ... in the upper part of the I O DEVICE screen 2 Press the I O device displayed on the I O DEVICE screen AMP page 3 Set the output port on the OUTPUT PATCH window as necessary Refer to step 7 in I O device patching page 154 1 Display switch buttons Press one of these buttons to view the corresponding I O device For more information about VIRTUAL CONFLICT DUPLICATE displayed below this button refer to...

Страница 163: ...CL unit to the NAI48 ES Then connect the HA REMOTE connector on the NAI48 ES to the HA REMOTE 1 connector on the AD8HR using an RS422 D sub 9 pin cable This connection enables you to remotely control the AD8HR from the CL series console To transmit audio signals input to the AD8HR to the CL series console connect the DIGITAL OUT A or B connector on the AD8HR to the AES EBU connector on the NAI48 E...

Страница 164: ...chain or ring connection and install two MY16 EX expansion cards in the slots on the CL unit to remotely control up to three SB168 ES units simultaneously NOTE Remote control data will be received and transmitted only at Slot 1 of the CL series console Daisy chain network CL5 Audio signal Remote signal NAI48 ES DIGITAL OUT A connector HA REMOTE connector HA REMOTE 1 connector AD8HR 1 HA REMOTE 2 c...

Страница 165: ... HA tab in the upper part of the VIRTUAL RACK screen 4 Press the EXTERNAL HA PORT SELECT button for the corresponding rack in the VIRTUAL RACK screen EXTERNAL HA page 5 Use the PORT SELECT buttons in the EXTERNAL HA PORT SELECT window to select the input ports to which the audio output of the external HA isconnected 6 Press the CLOSE button to close the EXTERNAL HA PORT SELECT window 7 In the VIRT...

Страница 166: ...D number is automatically assigned in order of the connected devices from 1 to 6 This field also enables you to view the on off status of the master phantom power 3 Virtual racks These are up to six racks in which remotely controllable external HA units can be mounted If an external HA is mounted this field will indicate the HA settings GAIN setting and on off status of the phantom power and HPF P...

Страница 167: ...ff setting is made on the external HA unit itself 2 48Vbutton These switch phantom power on off for each channel 3 GAIN knob These indicate the gain of the external HA If you press and select the GAIN knob you can make adjustments to gain using multifunction knobs 1 8 The level meter located at the immediate right of the knob indicates the input level for the corresponding port 4 FREQUENCY knob HP...

Страница 168: ...ved from an external device This allows you to record fader and key operations on a MIDI sequencer or other external device and play them back later Parameter Change SysEx transmission and reception When specific events fader knob or key operations changes in system settings or user settings are executed Parameter Change SysEx system exclusive messages canbe transmitted to an external device Conve...

Страница 169: ... messages Tx PORT Tx CH Press these buttons to open windows in which you can respectively select a port and MIDI channel to transmit MIDI messages Rx PORT Rx CH Press these buttons to open windows in which you can respectively select a port and MIDI channel to receive MIDI messages NOTE When transmitting or receivingParameter Changes the channel number you specify here is used as the device number...

Страница 170: ...elect the port that will transmit or receive MIDI messages You can choose from the following items NONE No port will be used MIDI MIDI IN Rx and OUT Tx connectors on the rear panel SLOT1 A card that supports serial transmission and is installed in Slot 1 on the rear panel 2 PORT NO field If you select SLOT 1 in the TERMINAL field choose port number 1 8 in this field The number of available ports w...

Страница 171: ...d received and choose the event scene recall or effect library recall that will be assigned to each program number 1 PROGRAM CHANGE field Switches Program Change transmission and reception on or off This setting is linked with the PROGRAM CHANGE section of the MIDI SETUP page Tx If this is on the corresponding Program Change messages will be transmitted when events on the list are executed Rx If t...

Страница 172: ... assigned to that event will be transmitted on the Tx channel If the same event is assigned more than once in the list the lowest numbered bank number and program number will be transmitted NOTE The settings of the OMNI and BANK buttons are ignored in Multi mode If the BANK button is on and only a Program Change on an applicable MIDI channel is received the last selected bank number will be used I...

Страница 173: ...two ways Using Control Changes This method uses typical Control Changes control numbers 1 31 33 95 102 119 You can freely assign an event to each control number Using NRPN Non Registered Parameter Number This method uses a special type of Control Change messages called NRPN NRPN uses Control Change numbers 99 and 98 to specify the MSB Most Significant Byte and LSB Least Significant Byte of the par...

Страница 174: ...tate 4 6 Scrollknob 6 5 Scrolls the contents of the list You can use the multifunction knobs to operate this 1 CONTROL CHANGE field Enables you to switch Control Change transmission reception on or off and specify whether Control Changes will be echoed out This setting is linked with the CONTROL CHANGE field on the MIDI SETUP page Tx button Switches control change transmission on off Rx button Swi...

Страница 175: ...NOTE Parameter changes include a device number that specifies the transmitting or receiving device The transmit Tx channel and receive Rx channel specified on the MIDI SETUP page are used as the device number Please be aware that if the device number included in the transmitted Parameter Change does not match the device number of the receiving CL console the message will be ignored Do not turn Par...

Страница 176: ... the RECORDER INPUT L or R button 4 Use the category list and the port select buttons in the CH SELECT window to select the channel that you want to patch to the USB memory recorder input 5 When you have finished assigning the channel press the CLOSE button 6 Assign a channel to the other input in the same way 7 Press the PLAYBACK OUTPUT L or R button 8 Use the category list and the channel select...

Страница 177: ... and the PLAYBACK OUTPUT CUE button simultaneously 4 Meters Indicate the level of the signals input to the recorder 5 PLAYBACK OUTPUT L R buttons Press these buttons to open the CH SELECT window in which you can select the signals patched to the recorder s L R output channels for playback 6 PLAYBACK OUTPUT GAIN knob Sets the level of the signal output to the recorder 1 Category List Enables you to...

Страница 178: ...ll not be output from the recorder output jacks PLAYBACK OUT 7 8 9 0 A 3 4 5 6 The level meter on the RECORDER screen shows the signal level before and after the recorder If necessary use the GAIN knob in the RECORDER INPUT field to adjust the input level to the recorder Operating the GAIN knob will not affect the level of the signal being output to other ports from the corresponding output channe...

Страница 179: ... recorder will change from play record recording standby mode to stop mode 9 PLAY button Changes the recorder mode as follows Stop mode Playback mode then starts playback from the beginning of the current song Playback mode Playback pause mode Playback pause mode Playback mode then starts playback from the paused point Recording standby mode Recording mode Recording mode Recording pause mode Recor...

Страница 180: ...the Function Access Area press the RECORDER button 3 You can use the change directory icon in the RECORDER screen and the folder icon in the No field to view a content list of the folder that includes the desired file 4 Use the multifunction knob or press the on screen file name to select the desired file 5 Press a button in the PLAY MODE field to select the playback mode 6 If you turned on the RE...

Страница 181: ...th a PLAY check symbol If this button is off the recorder will stop after playback of the current song is complete unless there are no subsequent songs that are marked with a PLAY check symbol One of the following playback methods is selected according to the on off settings of the SINGLE button and the REPEAT button SINGLE button REPEAT button Mode On On The currently selected song will play repe...

Страница 182: ...berg Nuendo to an audio network that includes a CL console and I O devices you must use Dante Virtual Soundcard DVS driver software DVS works as an audio interface making it possible to transmit signals between a DAW and an audio network that includes a CL series console and I O devices In this way you will be able to make multi track recordings of live performances or use live recordings that wer...

Страница 183: ...he Dante latency Use a high setting to ensure stability when using multiple channels In theAdvancedsettings selectthenumber of channels to be used for recording and playback the default is 8 x 8 V3 7 and earlier V3 7 NOTE Please refer to the Dante Virtual Soundcard User s Guide for more information on ASIO settings Windows Dante Accelerator settings After mounting a Dante Accelerator card on the c...

Страница 184: ...C128 D as the sound card or audio driver used for input output Some DAW software may require internal patching for the driver and the DAW software For more information refer to the DAW softwaremanual Setting up Nuendo Live If you install the Yamaha Console Extension software for linking Nuendo Live to a console and then start up Nuendo Live and create a new project tracks corresponding to the numb...

Страница 185: ...R screen 3 Press the EASY RECORDING button to start recording F I G 7 8 9 0 4 5 6 A B C D E H 4 When you finish recording press the record lock button and then press the STOP button RECORDER screen when selecting the Nuendo Live tab 1 Nuendo meter display field This shows the channel levels of Nuendo Live 2 PEAK CLEAR button Clears the peak levels indicated by the peak hold function 3 Marker list ...

Страница 186: ...RECALL LINK button Specifies whether a marker will be created when you recall a scene If this function is turned on the button will be lit H Record lock button Turns recording status lock on off This prevents recording from being accidentally stopped during recording NOTE Transport functions can also be controlled from USER DEFINED keys page 197 IDVSinformationdisplay Shows the device label of the...

Страница 187: ...y Yamaha Console Extension you must specify the IP addressmanually 1 1 2 1 DEVICE LIST Shows a list of the I O devices on the Dante audio network From the list choose the DVS that you want to use with Nuendo Live 2 DEVICE LIST select knob Operate the multifunction knob to choose the DVS that you want to select 1IPADDRESSknobs Use the multifunction knobs to specify the IP address NOTE As the IP add...

Страница 188: ...window select the DVS you re using with Nuendo Live and select the port you want to assign it to 4 Press the button located in the upper part of the window to switch the port and assign a DVS port to it in the same way 5 When you have finished making settings press the CLOSE button to exit the window 6 Press the X symbol in the upper right of the DANTE INPUT PATCH window to close it 7 In the Nuend...

Страница 189: ...utton is off phantom power will not be supplied even if the 48V button of each channel G is on 9 WORD CLOCK SLOT SETUP button Press this button to open the WORD CLOCK SLOT SETUP window in which you can make word clock settings and various settings for each slot 10 CASCADE button I J K CURRENT USER field This field enables you to make various user related settings 1 USER SETUP button Press this but...

Страница 190: ... grayed out If you press the 5 1 SURROUND button to switch to Surround mode you can then set the bus settings for MIX1 6 For Stereo mode For Surroundmode Assign channels to MIX 1 6 for surround output You can press the APPLY button to open the CONFIRMATION dialog box Press the OK button to set the bus to Surround mode NOTE When you switch from Stereo mode to Surround mode the signals for MIX1 2 3 ...

Страница 191: ...u to set the LCD brightness and contrast IBANKA BANKBbuttons Select a bank to which you want to save the brightness and contrast settings You can save two different settings in bank A and B and switch between them if desired J CONTRAST NAMEknob Adjusts the contrast of the channel name display K BRIGHTNESS NAME knob Adjusts the brightness of the channel name display BRIGHTNESS CH COLOR knob Adjusts...

Страница 192: ...ollowinginformation Password except for Guest User Level settings except for Administrator Preferences USER DEFINED keys USER DEFINED knobs Assignable encoders Custom fader bank MASTER fader Privileges for each user are as follows SETUPscreen Keyboard window NOTE The password can be up to eight characters If the two passwords that were entered match the Administrator password will be set For detai...

Страница 193: ...e CREATE TO button 7 Press the OK button in the confirmation dialog box CREATE USER KEYwindow 2 3 4 1 5 SETUPscreen CREATE USER KEYwindow CREATE KEY window 1 USER NAME Displays the user name Press this area to access a keyboard window in which you can enter a user name of up to eight characters 2 COMMENT Displays a comment about the user Press this area to access a keyboard window in which you can...

Страница 194: ...password However if you cancel the input you will be forcibly logged in as Guest Logging in as Administrator STEP 1 In the Function Access Area press the SETUP button 2 In the SETUP screen press the CURRENT USER button 3 In the LOGIN window press the ADMINISTRATOR button 4 Enter the password and press the OK button SETUPscreen LOGIN window Logging in as a User To log in as a User you will use a us...

Страница 195: ...r the Administrator password of the CL series console that you will be using If the Administrator passwords are identical this window will not appear When you enter the correct Administrator password another keyboard window will appear allowing you to enter the password for the selected user If you re save the user authentication key you will not be asked for the Administrator password the next ti...

Страница 196: ... the user level setting of the Guestaccount Guest The Guest can view the user level setting of the Guest account It cannot be changed Normal user A normal user can view the user level setting of his or her User account It cannot be changed Power User A power user can view and change his or her User account STEP 1 In the Function Access Area press the SETUP button 2 In the SETUP screen press the US...

Страница 197: ...ations for mute group assignment and mute group Here you can specify for each channel the operations that will be permitted for input channels output channels and DCA groups The settings will apply to the currently NOTE master will berestricted selected channel Settings for currently selected channels will be displayed below the CH OPERATION section Use the panel SEL keys or the Selected Channel f...

Страница 198: ...nging Store Recall Clear Library Name If an operation is restricted the message This operation is not allowed is displayed at the bottom of the screen With the factory settings this is turned off no restrictions 8 SET ALL CLEAR ALL button Permits clears all items Preferences Follow the steps below to make various settings for the CL console operating environment such as how windows appear and whet...

Страница 199: ...for that channel If this ON button is lit pressing a SEL key on the panel will cause the signal indicator to flash for the port of the I O device that is assigned to the corresponding channel by the INPUT PATCH OUTPUT PATCH settings POPUP APPEARS WHEN KNOB S PRESSED Specifies whether pressing a knob in the SELECTED CHANNEL section of the panel while the SELECTED CHANNEL VIEW screen is displayed wi...

Страница 200: ...DEFINED keys 1 16 on the top panel The name of the function or parameter assigned to each key appears tothe right of the corresponding button If nothing is assigned to the button an indication of is shown The list shown in the USER DEFINED KEY SETUP window is the same for all models of the CL series For the CL3 CL1 the display will indicate Cannot Assign if you specify a parameter that does not ex...

Страница 201: ...send signal on or off HPF knob Press this knob to switch the high pass filter on or off DYNAMICS 1 knob Press this knob to switch DYNAMICS 1 on or off DYNAMICS 2 knob Press this knob to switch DYNAMICS 2 on or off NOTE In Alternate mode all knobs in the SELECTED CHANNEL section other than those knobs mentioned above will be disabled Switching banks for USER DEFINED key settings You can register th...

Страница 202: ...S BANK CHANGE Toggle between the brightness settings stored in A and B CH ON SPECIFIC CH 4 Switch the CH ON OFF CH SELECT INC Increment or decrement the selected channel number DEC SPECIFIC CH 1 Select a channel from list 1 CUE OUTPUT Switch CUE on off CLEAR CUE This clears the CUE SPECIFIC CH 2 CUE the channel selected from list 2 CUE MODE This function switches the cue mode In Surround mode it t...

Страница 203: ...or NOTE ON it goes OFF when the bank is switched CONTROL CHANGE CC 1 31 33 95 102 119 NOTE ON NOTE ON C 2 0 NOTE ON G 8 127 MONITOR OUTPUT Switch the monitor output on off SELECTED CH ASSIGN While holding down this key press the SEL key of a MIX or MATRIX channel to switch the assignment on off During this time the SEL LED will be lit if assign is ON or dark if OFF The assignment setting made whil...

Страница 204: ...L Recall the scene of the next existing number REC RECALL Recall the scene of the previous existing number SCENE DIRECT RECALL SCENE 000 300 Directly recall the scene of the specified number RECALL UNDO Execute RECALL UNDO STORE UNDO Execute STORE UNDO INC Select the scene of the next existing number DEC Select the scene of the previous existing number RECALL This function recalls the currently se...

Страница 205: ...ect If WITH POPUP is selected the Tap Tempo screen is displayed If WITHOUT POPUP is selected the Tap Tempo screen is not displayed WITHOUT POPUP FUNCTION PARAMETER 1 PARAMETER 2 Description SENDS ON FADER MIX1 MIX24 NORMAL WITH CUE This function switches between the normal function on off NORMAL and the function with cue on off WITH CUE With the WITH CUE option cue will be enabled if SENDS ON FADE...

Страница 206: ...TRIX3 4 MATRIX5 6 MATRIX7 8 STEREO MONO PB OUT STEP 1 In the Function Access Area press the SETUP button 2 In the SETUP screen press the USER SETUP button 3 In the USER SETUP window press the USER DEFINED KNOBS tab 4 Press the button corresponding to the USER DEFINED knob to which you want to assign a function 5 In the USER DEFINED KNOB SETUP window make sure that the FUNCTION field is enclosed by...

Страница 207: ...s operated About TOUCH AND TURN The TOUCH AND TURN function is assigned to the USER DEFINED 4 knob by default If this function is assigned to one of the USER DEFINED knobs you can press a desired knob in the touch screen and then immediately use the USER DEFINED knob to operate it At this time a pink frame is shown around the knob in the touch screen indicating that you can operate that knob Funct...

Страница 208: ...SLOT2 1 SLOT2 16 SLOT3 1 SLOT3 16 DIGITAL OUT L DIGITAL OUT R 13 SELECTED CH MIX1 MIX24 MTRX1 MTRX8 STEREO MONO C 14 SELECTED CH CL5 CH1 CH72 CL3 CH1 CH64 CL1 CH1 CH48 a If not mounted in the RACK is displayed b If there are no parameters is displayed Function PARAMETER 1 PARAMETER 2 EQ ATT 2 LOW Q LOW FREQUENCY LOW GAIN LOW MID Q LOW MID FREQUENCY LOW MID GAIN HIGH MID Q HIGH MID FREQUENCY HIGH M...

Страница 209: ... PAN ASSIGN knob on each channel strip The CL3 and CL1 have only one GAIN PAN ASSIGN key so the function of all GAIN PAN ASSIGN knobs will change simultaneously On the CL5 you can switch the knob function in block A left side and block C Master fader section right side independently by using the corresponding GAIN PAN ASSIGN keys This assignment does not apply to the multifunction knobs in the Cen...

Страница 210: ...ARAMETER 1 PARAMETER 2 O MATRIX8 SEND MTRX8 3 O HPF FREQUENCY HPF 4 O DYNAMICS1 THRESHOLD THRE1 5 O DYNAMICS2 THRESHOLD THRE2 6 O DIGITAL GAIN D GAIN O EQ ATT ATT O INPUT DELAY DELAY Units of scale are m ms ft and fr No description for samples O DIRECT OUT LEVEL D OUT O SURROUND L R PAN L R 7 O SURROUND F R PAN F R 8 O SURROUND ROUND PAN L R and F R O SURROUND DIV DIV O SURROUND LFE LFE PAN GAIN A...

Страница 211: ...R BANK MASTER FADER page press the bank select button for the custom fader bank you want to set up 6 In the FADER field press the select button for the fader you want to set up 7 Press a SEL key on the top panel to assign a channel to the fader number selected in step 6 8 To assign channels to other faders repeat steps 5 through 7 Channel levels Adjust with assignableencoder Send level to MIX MATR...

Страница 212: ...der banks vary depending on the console model CL5 A1 A2 B1 C1 C2 C3 C4 C5 C6 CL3 A1 A2 A3 B1 B2 CL1 A1 B1 B2 B3 B4 2 MASTER button Press this button to set channels that will be controlled by the faders in the Master fader section 3 Block indicators Display the graphics of the top panel block and faders that are the current target for editing The graphics vary depending on the consolemodel CL5 A 1...

Страница 213: ...taking a break If a password is set for the currently logged in user that password will be used for the Console Lock function When the Console Lock function is enabled the CONSOLE LOCK screen will appear and all controllers excluding the MONITOR LEVEL knob will become inoperable NOTE If you have forgotten the password refer to Initializing the unit to factory default settings page 245 The Guest ca...

Страница 214: ... drive You can connect a commercially available USB flash drive to the USB connector located to the right of the display and save the internal settings and user authentication keys of the CL series console to the USB flash drive or load them from the USB flash drive CAUTION An ACCESS indicator is shown in the Function Access Area while data is being accessed saved loaded or deleted During this tim...

Страница 215: ...irectory 5 PATH Indicates the name of the current directory Press the arrow button to move to the next higher level If the current directory is the top level the arrow button is dimmed 6 VOLUME NAME FREE SIZE Indicates the volume name and the amount of free space on the USB flash drive If the USB flash drive is write protected a protect symbol will appear in the VOLUME NAME field 7 File list This ...

Страница 216: ...select ALL tab This button selects all the items SCENE tab This button selects scene memories INPUT OUTPUT tab The following table lists the items that you can select SAVE SELECT screen 1 EFFECT GEQ tab The following table lists the items that you can select Button Data content EFFECT LIB Effect library GEQ LIB GEQ library 8PEQ LIB 8Band PEQ library 2 3 PREMIUM tab The following table lists the it...

Страница 217: ...le again Loading a file from a USB flashdrive Follow the steps below to load a CL settings file extension CLF from the USB flash drive into the CL series console You can use the same procedure to load the following files as well as settings files Extension Type Contents of file CLF ALL CL console internal setting file CLU KEY CL console user authentication key XML XML XML file for displayingHelp T...

Страница 218: ...BACK MIDI SETUP MIDI setup MIDI PGM MIDI program changes MIDI CTL MIDI control changes Dante In Patch Dante input patch library NOTE When the output port items are loaded individually channel assignments for the port will not be applied Toprevent this load and then recall the scene that contains input output patching for the channel assignment Button Data content EFFECT LIB Effect library GEQ LIB ...

Страница 219: ...to the column heading you press 1 FILE NAME Sort the list in numerical alphabetical order of the file names 2 COMMENT Sort the list in numerical alphabetical order of the comment 3 READ ONLY Sort the list by Write Protect on off status 4 TYPE Sort the list by file type 5 TIME STAMP Sort the list by date and time of update NOTE By pressing the same location again you can change the direction ascend...

Страница 220: ...d in FAT32 and a USB flash drive with a capacity of 2GB or smaller will be formatted in FAT16 STEP 1 In the Function Access Area press the SETUP button 2 In the SETUP screen press the SAVE LOAD button 3 In the SAVE LOAD window press the FORMAT button 4 Enter a volume name and press the FORMAT button 5 To execute the Format operation press the OK button STEP 1 Rotate the multifunction knob to selec...

Страница 221: ...orrectly and noise may be present in the signal even if the sampling rates are the same Specifically you must first decide which device will transmit the reference word clock for the entire system the word clock master and then set the remaining devices the word clock slaves so that they synchronize to the word clock master If you wish to use the CL series console as a word clock slave that is syn...

Страница 222: ...aster from the following options INT 48 k INT 44 1 k The CL console internal clock sampling rate 48 kHz or 44 1 kHz will be the clock source WORD CLOCK IN The word clock supplied from the WORD CLOCK IN jack on the rear panel of the console will be used as the clock source NOTE When is displayed and the specified word clock is not synchronized with a device acting as a Dante master the audio might ...

Страница 223: ...n the cascade slave CL unit and in the cascade master CL unit The DIGITAL OUT jacks of the sending unit are connected to the DIGITAL IN jacks of the receiving unit Indicates the type of card installed in the slot If nothing is installed will appear 6 SRC buttons The SCR Sampling Rate Converter function can be switched on or off for a slot in which an MY card MY8 AE96S that features the SRC functio...

Страница 224: ...ut ports that you want to assign and then press the CLOSE button 6 In the CASCADE COMM PORT field select the port that will transmit and receive control signals for cascade link 7 Use the CASCADE LINK MODE buttons to select the item that you want to link NOTE You cannot assign two or more buses to the same output port If you select a port to which a signal route has already been assigned the previ...

Страница 225: ...utton for the bus to which you want to assign the port 5 In the PORT SELECT screen use the slot select list and the port select buttons to select the slot and input ports that you want to assign and then press the CLOSE button 6 As described in step 6 of Operations on a cascade slave CL unit page 221 in the CASCADE LINK PORT field select the port that will transmit and receive control signals for ...

Страница 226: ... bus type send point select buttons to select the bus type and the position from which the signal of the input channel will be sent 6 As desired turn the buttons in the PAN LINK field on or off MIX 1 16 page MIX BUS 17 24 MATRIX BUS page SETUPscreen BUS SETUPwindow 1 SIGNAL TYPE switch buttons Select how signals are processed for every adjacent pair of buses Select either STEREO stereo signal or M...

Страница 227: ... STEP 1 In the Function Access Area press the SETUP button 2 In the field located in the right of the bottom row of the SETUP screen press the BANK A or BANK B button 3 Use the multifunction knob to adjust the brightness of each item NOTE You can also assign this parameter to a USER DEFINED key and press that key to switch between banks A and B SETUP screen brightness setting field 1BANKA Bbuttons...

Страница 228: ...n the SETUP screen to open this window 1 DATE This field specifies the date of the internal clock 2 TIME This field specifies the time of the internal clock 3 FORMAT Display format Specifies the format in which the date and time of the internal clock are displayed You can select from the following display formats Date MM DD YYYY Month Day Year DD MM YYYY Day Month Year YYYY MM DD Year Month Day Ti...

Страница 229: ... Mbps or 10BASE T transmission speed max 10 Mbps 8 7 Dante audio network settings 9 You will use the CL series console to make Dante audio network settings for the console itself and the I O devices connected to the Dante connector of the CL series console This section explains how to make Dante audio networksettings STEP 1 In the Function Access Area press the SETUP button to access the SETUP scr...

Страница 230: ...y one CL console for which this button is turned ON that console will become the master If there are multiple CL consoles for which this button is turned ON only one of them will become the master If this button is turned OFF for all CL consoles one unit out of all Dante devices including I O devices will become the master NOTE Settings that are shared with the I O device BIT LATENCY W CLOCK will ...

Страница 231: ...s set to OFF all the mounted devices will be virtual You can edit HA GAIN and other settings for R series units but notification of the settings will not be sent to the device This is the same as when the devices are not connected Setting the Dante audio network latency An appropriate latency setting for signals transmitted over a Dante audio network varies depending on the network connection meth...

Страница 232: ...t connections Simple 64 in 48 out 4 hops 0 5 ms 3 hops 0 25 ms 3 hops 0 25 ms Daisy chain connections FOH and monitor consoles are sharing 64 in 48 out Redundant connections FOH and monitor consoles are sharing 64 in 48 out 4 hops 0 5 ms 4 hops 0 5 ms 3 hops 0 25 ms 3 2 2 3 1 1 4 3 2 2 3 1 1 3 4 1 2 3 4 1 2 USO RESTRITO ...

Страница 233: ...aisy chain connections 256 ch HA remote maximumsize Redundant connections Two CL series consoles are sharing 256 ch HA remote maximum size 9 hops 1 0 ms 4 hops 0 5 ms 5 hops 0 5 ms 9 8 3 7 6 4 5 4 2 3 2 1 1 4 5 3 1 2 USO RESTRITO ...

Страница 234: ...the button shows the device label The lower line of the button shows the model name and the number of inputs and outputs If no device has been mounted the upper row will indicate and the lower row will show nothing For more information on VIRTUAL CONFLICT DUPLICATE shown below these buttons refer to P 154 1 I O device list DANTE SETUP window DANTE SETUP window DEVICE MOUNT page 1 CLEAR ALL button ...

Страница 235: ... AND TURN knob to select the I O device that you want to mount 3 INPUT OUTPUT knobs Use the TOUCH AND TURN knobs to specify the number of inputs and outputs on the Dante audio network If the selected I O device is supported by the CL series the inputs and outputs will be entered and displayed automatically 1 DEVICE TYPE This area shows a list of the I O device types that are supported by the CL se...

Страница 236: ...ESH setting since mute will be cleared after synchronization has been completed with CL units whose system setting for REMOTE HA ASSIGN is set to WITH RECALL With the RESUME setting mute will be cleared and the unit will start operating with the settings that were backed up by the R series unit itself which could allow unexpected audio to be output A single CL series console can control the HA of ...

Страница 237: ...upper row will indicate and the lower row will show nothing For more information on VIRTUAL CONFLICT DUPLICATE shown below these buttons refer to P 154 1 I O device list REMOTE HA SELECT window DANTE SETUP window REMOTE HA page 1 CLEAR ALL button Clears all HA devices in the list to an unmounted state 2 REFRESH button Updates the displayed list of HA devices on the Dante audio network 1 DEVICE LIS...

Страница 238: ...series The I O field of the I O DEVICE screen shows indicators for the status of the R series units and the Dante network For firmware that predates support for V1 60 the version indication will be yellow and the indicator will be unlit Messages Error warning and information messages are displayed Messages are also displayed in the Dante Controller Error Status field Each indicator lights or flash...

Страница 239: ... the word clock master If the green indicator lights the unit is operating as a word clock slave and synching to the word clock SYNC indicators Meaning Possible solution Lit or Lit blinking A non GbE compatibledevice is connected If audio is transmitted overthe Dante network use a GbE compatible device Lit or Blinkin g blinking The SECONDARYconnector has taken over communications during redundant ...

Страница 240: ...the Tap Tempo function or switch scenes STEP 1 Connect an external device to the CL series console s GPI connector 2 In the Function Access Area press the SETUP button 3 In the SETUP screen press the MIDI GPI button 4 In the MIDI GPI screen press the GPI tab 5 Specify the POLARITY MODE for each port as appropriate for the specifications of the external device you re using 6 To assign the function ...

Страница 241: ...Press this button to display the GPI IN SETUP window NOTE The items that can be selected in the GPI IN SETUP window are the same as for the USER DEFINED keys page 197 4 Switch attribute select button This button selects the switch attribute Each time you press the button its indication will alternate between LATCH and UNLATCH LATCH a switch that alternately turns on off each time it is pressed is ...

Страница 242: ... POLARITY MODE for each port as appropriate for the specifications of the external device you re using 6 To assign a function or parameter that you want to control press the GPI OUT SETUP button 7 In each field of the GPI OUT SETUP window select the desired function and parameter then press the OK button SETUPscreen MIDI GPI screen 1 GPI OUT status indicator This indicates the status of the voltag...

Страница 243: ...e corresponding GPI OUT port will be active and will output a control signal Function PARAMETER 1 PARAMETER 2 Description NO ASSIGN No assignment CUE ACTIVE CUE ON Turn on the CUE key of the selected channel DCA ONLY Turn on the DCA CUE key INPUT ONLY Turn on the CUE key of an input channel OUTPUT ONLY Turn on the CUE key of an output channel DANTE REDUNDANCY IND PRIMARY This function activates wh...

Страница 244: ...OKE value will be valid if MODE is set to FADER STOP If MODE is set toFADER TALLY both the UPSTROKE and DOWNSTROKE values will be valid MODE field Here you can select the mode of fader operation that will be the trigger for signal output from the GPI OUT port You can choose from the following fader modes 5 FADER START A trigger signal 250 msec long will be output when the fader of the selected cha...

Страница 245: ... which is selected as the polarity of the GPI OUT port If the polarity is the polarity of the output signal will be reversed FADER START FADER STOP 250 msec 250 msec FADER TALLY NOTE At the high level the output signal of the port will be open If the receiving device requires high level take it from the 5V power supply pin However in this case the amount of current is limited For details refer to ...

Страница 246: ...nfirmation dialog box to load the file NOTE By default the character code set of the text file will be detected as UTF 8 However by adding a line consisting of ISO 8859 1 or Shift_JIS at the beginning of the file you can force recognition of the file using that character code set You can specify the desired character code set when using your text editor to save the text file The Help function is a...

Страница 247: ...ed NOTE Panel controllers other than the faders and the MONITOR LEVEL knob will not function as long as you continue holding down the USER DEFINED key to which the Help function is assigned If there are multiple explanations for the same controller you can repeat the steps above to successively display these explanations Directly recalling the Help for a specific controller in the LCD screen While...

Страница 248: ...nitialization 5 A message indicates that the initialization process is complete Press the EXIT button on the startup menu screen NOTE Do not press any buttons until initialization is complete Once initialization is complete you can continue operation by selecting a different menu instead of pressing the EXIT button Adjusting the detection point of the touch screen Calibration function Follow the s...

Страница 249: ...complete calibration starts 9 When calibration has been completed press the APPLY button 10 Press the EXIT button on the startup menu screen to start up the CL unit in normal operating mode NOTE Faders for which a problem was detected at start up will already be selected in step 3 If the RESTART button appears calibration has failed Press the RESTART button to execute calibration once again Once i...

Страница 250: ...n 0 1 dB steps OUTPUT PORT TRIM Fine adjustment of the output port gain Access the OUTPUT PORT TRIM window and make fine adjustments to the gain of the specified analog output port in 0 01 dB steps SLOT OUTPUT TRIM Fine adjustment of the slot output port gain Access the SLOT OUTPUT TRIM window and make fine adjustments to the gain of the output ports of the specified slot in 0 01 dB steps USO REST...

Страница 251: ...sary you can adjust the brightness of the channel name display STEP 1 While holding down the SCENE MEMOR Y STORE key on the panel turn on the power to the CL unit 2 On the startup menu screen press the LED COLOR CALIBRATION button 3 Press the CUE key or ON key of the channel whose brightness you want to adjust Pressing the CUE key will increase the brightness and pressing the ON key will decrease ...

Страница 252: ...ralogic section Turning the knob toward the left will lighten the contrast of all channels turning it toward the right will darken the contrast of all channels 4 If you want to adjust a channel whose contrast differs from that of the other channels STEP 1 While holding down the SCENE MEMORY STORE key and INC key on the panel turn on the power to the CL unit 2 A message indicates that initializatio...

Страница 253: ...Loaded Data in an unsupported format was loaded Directory Not Empty You attempted to delete a directory but failed because there were files remaining in the directory Editor Data Framing Error Editor Data Overrun Invalid signals are being exchanged with CL Editor Editor Rx Buffer Full Too much data is being received at CL Editor s input port Editor Tx Buffer Full Too much data is being sent from C...

Страница 254: ...ess is not possible because the USB flash drive is not ready SURROUND Mode Cannot Use This Function You cannot use this function in Surround mode Message Meaning Loading Aborted Loading from USB flash drive was aborted Loading Finished Finished loading from USB flash drive Low Battery The backup battery voltage is low Maximum Number of Audio Files Exceeded The number of songs that can be managed b...

Страница 255: ...d Power consumption of the I O cards installed in the slots has exceeded the rated value Unassigned Encoder Your operation has been ignored because there is no parameter that corresponds to the knob you operated Unit Fan has Malfunctioned The fan in the R series console has malfunctioned Unit ID Duplicated The UNIT ID is duplicated on the Dante audio network Unsupported File Format The file you at...

Страница 256: ... 225 Internal effects 137 L Lamp brightness 224 LED 224 Libraries 64 153 Library 168 MATRIX buses 53 223 MBCL option 123 Meter bridge option 123 METER screen 119 Meters 119 MIDI 165 MIX buses 223 MIX channels Sending to MATRIX buses 53 Sending to STEREO MONO bus 51 MIX MINUS 84 MIX MATRIX buses 37 Monitor 102 103 Mute group 70 N Name displays 224 Network address 225 Nuendo Live 182 O Oscillator 11...

Страница 257: ...Data List USO RESTRITO ...

Страница 258: ...Rack ProcessorParameters 20 Parameters That Can Be Assigned to Control Changes 22 NRPN Parameter Assignments 26 Mixing Parameter Operation Applicability 30 MIDI Data Format 36 Input output characteristics 43 Electrical Characteristics 45 Mixer Basic Parameters 46 Pin Assignment Chart 47 MIDI Implementation Chart 48 EN USO RESTRITO ...

Страница 259: ...AKING PEAKING PEAKING G 4 5 dB 0 0 dB 4 0 dB 2 0 dB F 140 Hz 1 00 kHz 1 90 kHz 5 60 kHz Q 8 0 4 5 0 63 9 0 17 E G Crunch 2 PEAKING PEAKING PEAKING H SHELF G 2 5 dB 1 5 dB 2 5 dB 0 0 dB F 125 Hz 450 Hz 3 35 kHz 19 0 kHz Q 8 0 0 40 0 16 18 E G Dist 1 L SHELF PEAKING PEAKING H SHELF G 5 0 dB 0 0 dB 3 5 dB 0 0 dB F 355 Hz 950 Hz 3 35 kHz 12 5 kHz Q 9 0 10 0 19 E G Dist 2 L SHELF PEAKING PEAKING H SHEL...

Страница 260: ... 25 36 Piano 3 PEAKING PEAKING PEAKING H SHELF G 4 5 dB 13 0 dB 4 5 dB 2 5 dB F 100 Hz 475 Hz 2 36 kHz 10 0 kHz Q 8 0 10 0 9 0 37 Piano Low PEAKING PEAKING PEAKING H SHELF G 5 5 dB 1 5 dB 6 0 dB 0 0 dB F 190 Hz 400 Hz 6 70 kHz 12 5 kHz Q 10 0 6 3 2 2 38 Piano High PEAKING PEAKING PEAKING PEAKING G 5 5 dB 1 5 dB 5 0 dB 3 0 dB F 190 Hz 400 Hz 6 70 kHz 5 60 kHz Q 10 0 6 3 2 2 0 10 39 Fine EQ Cass L S...

Страница 261: ... 1 Release ms 238 29 SamplingPerc COMPANDER S Threshold dB 18 Ratio 1 1 7 Attack ms 8 Out gain dB 2 5 Width dB 18 Release ms 238 30 Sampling BD COMPRESSOR Threshold dB 14 Ratio 1 2 Attack ms 2 Out gain dB 3 5 Knee 4 Release ms 35 31 Sampling SN COMPRESSOR Threshold dB 18 Ratio 1 4 Attack ms 8 Out gain dB 8 0 Knee hard Release ms 354 32 Hip Comp COMPANDER S Threshold dB 23 Ratio 1 20 Attack ms 15 O...

Страница 262: ...red to activate ducking RANGE dB 70 to 0 71 points This determines the amount of attenuation when ducking is activated ATTACK ms 0 120 121 points This determines how soon the signal is ducked once the ducker has been triggered HOLD ms 44 1kHz 0 02 ms 2 13 sec 48kHz 0 02 ms 1 96 sec 160 points This determines how long ducking remains active once the trigger signal has fallen below the THRESHOLD lev...

Страница 263: ...w soon the signal is expanded once the signal level drops below the threshold The value is expressed as the duration required for the level to change by 6 dB OUT GAIN dB 0 0 to 18 0 181 points This sets the expander s output signal level KNEE Hard 1 5 6 points This determines how expansion is applied at the threshold For higher knee settings expansion is applied gradually as the signal exceeds the...

Страница 264: ...uencies TYPE HPF BPF Type of filter used to detect the frequency band Q 10 0 0 10 41 points Q steepness of the filter when TYPE is BPF Output Level Title Type Description REV X Hall REV X HALL New reverb algorithm that delivers dense and rich reverberation smooth decay and provides a spaciousness and depth that enhances the original sound Choose from three types depending on your location and need...

Страница 265: ...early reflections and reverb E R BAL 0 100 Balance of early reflections and reverb 0 all reverb 100 all early reflections HPF THRU 21 2 Hz 8 00 kHz High pass filter cutoff frequency LPF 50 0 Hz 16 0 kHz THRU Low pass filter cutoff frequency GATE LVL OFF 60 to 0 dB Level at which gate kicks in ATTACK 0 120 ms Gate opening speed HOLD 1 Gate open time DECAY 2 Gate closing speed 1 0 02 ms 2 13 s fs 44...

Страница 266: ...es for normal phase feedback minus values for reverse phase feedback FB G R 99 to 99 Right channel feedback plus values for normal phase feedback minus values for reverse phase feedback HI RATIO 0 1 1 0 High frequency feedback ratio HPF THRU 21 2 Hz 8 00 kHz High pass filter cutoff frequency LPF 50 0 Hz 16 0 kHz THRU Low pass filter cutoff frequency SYNC OFF ON Tempo parameter sync on off NOTE L 1...

Страница 267: ...filter cutoff frequency SYNC OFF ON Tempo parameter sync on off NOTE L 1 Used in conjunction with TEMPO to determine left channel DELAY NOTE R 1 Used in conjunction with TEMPO to determine right channel DELAY NOTE FBL 1 Used in conjunction with TEMPO to determine left channel feedback DELAY NOTE FBR 1 Used in conjunction with TEMPO to determine right channel feedback DELAY Parameter Range Descript...

Страница 268: ...equency LSH G 12 0 to 12 0 dB Low shelving filter gain EQ F 100 Hz 8 00 kHz EQ peaking type frequency EQ G 12 0 to 12 0 dB EQ peaking type gain EQ Q 10 0 0 10 EQ peaking type bandwidth HSH F 50 0 Hz 16 0 kHz High shelving filter frequency HSH G 12 0 to 12 0 dB High shelving filter gain Parameter Range Description SOURCE INPUT MIDI Control source input signal or MIDI Note On velocity SENSE 0 100 Se...

Страница 269: ... reverse phase feedback MODE 1 10 Pitch shift precision PITCH 2 24 to 24 semitones Channel 2 pitch shift FINE 2 50 to 50 cents Channel 2 pitch shift fine LEVEL 2 100 to 100 Channel 2 level plus values for normal phase minus values for reverse phase PAN 2 L63 to R63 Channel 2 pan DELAY 2 0 0 1000 0 ms Channel 2 delay time FB G 2 99 to 99 Channel 2 feedback gain plus values for normal phase feedback...

Страница 270: ...ion speed DEPTH 0 100 Modulation depth DIR 1 Panning direction WAVE Sine Tri Square Modulation waveform SYNC OFF ON Tempo parameter sync on off NOTE 2 Used in conjunction with TEMPO to determine FREQ LSH F 21 2 Hz 8 00 kHz Low shelving filter frequency LSH G 12 0 to 12 0 dB Low shelving filter gain EQ F 100 Hz 8 00 kHz EQ peaking type frequency EQ G 12 0 to 12 0 dB EQ peaking type gain EQ Q 10 0 0...

Страница 271: ... 99 Feedback gain plus values for normal phase feedback minus values for reverse phase feedback WAVE Sine Tri Modulation waveform SYNC OFF ON Tempo parameter sync on off NOTE 1 Used in conjunction with TEMPO to determine FREQ Parameter Range Description REV TIME 0 3 99 0 s Reverb time INI DLY 0 0 500 0 ms Initial delay before reverb begins HI RATIO 0 1 1 0 High frequency reverb time ratio DIFF 0 1...

Страница 272: ... NOTE 2 Used in conjunction with TEMPO to determine FREQ Parameter Range Description REV TIME 0 3 99 0 s Reverb time INI DLY 0 0 500 0 ms Initial delay before reverb begins HI RATIO 0 1 1 0 High frequency reverb time ratio DIFF 0 10 Diffusion spread DENSITY 0 100 Reverb density REV SYM 0 100 Reverb and symphonic balance 0 all reverb 100 all symphonic HPF THRU 21 2 Hz 8 00 kHz High pass filter cuto...

Страница 273: ... High frequency feedback ratio DLY BAL 0 100 Delay and early reflected delay balance 0 all early reflected delay 100 all delay HPF THRU 21 2 Hz 8 00 kHz High pass filter cutoff frequency LPF 50 0 Hz 16 0 kHz THRU Low pass filter cutoff frequency TYPE S Hall L Hall Random Revers Plate Spring Type of early reflection simulation ROOMSIZE 0 1 20 0 Reflection spacing LIVENESS 0 10 Early reflections dec...

Страница 274: ...C DLY 1000 to 1000 ms Recording delay For plus values recording starts after the trigger is received For minus values recording starts before the trigger is received PLY MODE MOMENT CONTI INPUT In MOMENT mode the sample plays only while the PLAY button is pressed In CONT mode playback continues once the PLAY button has been pressed The number of times the sample plays is set using the LOOP NUM par...

Страница 275: ...r ATTACK1 0 01 80 0 ms Attack time of CH1 compressor RELEASE1 6 2 999 ms Release time of CH1 compressor RATIO1 1 0 500 Ratio for CH1 compressor OUTPUT1 20 to 40 dB Adjusts the CH1 output gain THRE 2 60 to 0 0 dB Threshold of CH2 compressor KNEE2 SOFT MEDIUM HARD Knee of CH2 compressor ATTACK2 0 01 80 0 ms Attack time of CH2 compressor RELEASE2 6 2 999 ms Release time of CH2 compressor RATIO2 1 0 5...

Страница 276: ...2 MID2 Q 0 50 16 0 Q of EQ3 MID2 F 16 0 Hz to 20 0 kHz Center frequency of EQ3 MID2 G 18 0 to 18 0 dB Gain of EQ3 INPUT 18 0 to 18 0 dB Input gain OUTPUT 18 0 to 18 0 dB Output gain MID3 Q 0 50 16 0 Q of EQ4 MID3 F 16 0 Hz to 20 0 kHz Center frequency of EQ4 MID3 G 18 0 to 18 0 dB Gain of EQ4 MID4 Q 0 50 16 0 Q of EQ5 MID4 F 16 0 Hz to 20 0 kHz Center frequency of EQ5 MID4 G 18 0 to 18 0 dB Gain o...

Страница 277: ... 0 dB Gain of the LMF band MF IN OFF ON Switches the MF band on off MF Q 0 70 to 5 00 Q of the MF band MF FREQ 330 0 to 2500 Hz Center frequency of the MF band MF GAIN 12 0 to 12 0 dB Gain of the MF band HMF IN OFF ON Switches the HMF band on off HMF Q 0 70 to 5 00 Q of the HMF band HMF FREQ 1 80k to 16 0k Hz Center frequency of the HMF band HMF GAIN 12 0 to 12 0 dB Gain of the HMF band LF HF IN O...

Страница 278: ...BELOW ABOVE Specifies whether the processor will operate when the sidechain signal exceeds the threshold setting ABOVE or when it falls below the threshold setting BELOW ATTACK RELEASE FAST SLOW AUTO Attack time release time for when compression or boost is applied Buss Comp 369 Parameter Range Description LOW FREQUENCY 20 30 60 100 Hz Frequency range of the low range filter LOW BOOST 0 0 to 10 0 ...

Страница 279: ...RACK1 GEQ RACK16 EFFECT RACK1 EFFECT RACK8 ON B GAIN 1A GAIN 31A GAIN 1B GAIN 31B Parameter Range Description Group a b c Channel control field group Override OFF ON Turns on off overriding of the channel control field ChMode man auto mute Channel control field mode man auto mute ChModePreset man auto mute Preset setting of the channel control field Weight 100 to 15 Relative sensitivity among inpu...

Страница 280: ...R MONITOR FADER H MONITOR FADER L DELAY AUTO BYPASS DELAY ON MUTE MASTER ON MASTER 1 MASTER 8 OUTPUT ATT OUTPUT MIX1 MIX24 MATRIX1 MATRIX8 STEREO L MONO C OUTPUT DYNAMICS1 ON MIX 1 MIX 24 MATRIX 1 MATRIX 8 STEREO L MONO C ATTACK THRESHOLD RELEASE H RELEASE L RATIO GAIN H GAIN L KNEE WIDTH Mode Parameter 1 Parameter 2 INPUT ATT INPUT CH 1 CH 72 1 STIN1L STIN8R INPUT DYNAMICS1 ON CH 1 CH 72 1 STIN1L...

Страница 281: ...H C FREQ L NOTCH C Q PHASE INPUT CH 1 CH 72 1 STIN1L STIN8R PREMIUM EFFECT A BYPASS RACK1 8 PARAM 1 H PARAM 64 L PREMIUM EFFECT B BYPASS RACK1 8 PARAM 1 H PARAM 64 L Mode Parameter 1 Parameter 2 OUTPUT EQ ON MIX 1 MIX 24 MATRIX 1 MATRIX 8 STEREO L MONO C LOW Q LOW FREQ LOW GAIN LOW MID Q LOW MID FREQ LOW MID GAIN HIGH MID Q HIGH MID FREQ HIGH MID GAIN HIGH Q HIGH FREQ HIGH GAIN LOW TYPE HIGH TYPE ...

Страница 282: ...TRIX 1 LEVEL L MATRIX 8 LEVEL L MATRIX 1 2 PAN MATRIX 7 8 PAN SURROUND MONITOR SOURCE SELECT 2CH MONITOR ASSIGN DOWNMIX SURROUND SPEAKER SOLO SURROUND SPEAKER L SURROUND SPEAKER R SURROUND SPEAKER C SURROUND SPEAKER LFE SURROUND SPEAKERLs SURROUND SPEAKER Rs SURROUND PAN LR PAN SELECTED CH CH 1 CH 72 1 STIN1L STIN8R FR PAN FR PAN REVERSE DIV L ON R ON C ON LFE ON Ls ON Rs ON LFE LEVEL H LFE LEVEL ...

Страница 283: ...F2 10F9 MIX7 SEND 10FA 1101 MIX8 SEND 1102 1109 INPUT57 64 to MATRIX5 8 LEVEL MATRIX5 SEND 110A 1111 MATRIX6 SEND 1112 1119 MATRIX7 SEND 111A 1121 MATRIX8 SEND 1122 1129 INPUT57 64 to MIX1 8 ON MIX1 SEND 112A 1131 MIX2 SEND 1132 1139 MIX3 SEND 113A 1141 MIX4 SEND 1142 1149 MIX5 SEND 114A 1151 MIX6 SEND 1152 1159 MIX7 SEND 115A 1161 MIX8 SEND 1162 1169 INPUT57 64 to MATRIX5 8 ON MATRIX5 SEND 116A 1...

Страница 284: ...3 PARAM9 2704 270B PARAM10 270C 2713 PARAM11 2714 271B PARAM12 271C 2723 PARAM13 2724 272B PARAM14 272C 2733 PARAM15 2734 273B PARAM16 273C 2743 PARAM17 2744 274B PARAM18 274C 2753 PARAM19 2754 275B PARAM20 275C 2763 PARAM21 2764 276B PARAM22 276C 2773 PARAM23 2774 277B PARAM24 277C 2783 PARAM25 2784 278B PARAM26 278C 2793 PARAM27 2794 279B PARAM28 279C 27A3 PARAM29 27A4 27AB PARAM30 27AC 27B3 PAR...

Страница 285: ...MATRIX7 8 3610 361F MONITOR SURROUND MONITOR FADER 3620 3620 SPEAKER MUTE SOLO 3621 3621 SPEAKER MUTE L 3622 3622 SPEAKER MUTE R 3623 3623 SPEAKER MUTE C 3624 3624 SPEAKER MUTE LFE 3625 3625 SPEAKER MUTE Ls 3626 3626 SPEAKER MUTE Rs 3627 3627 INPUT1 56 STIN1 4 HPF FREQ 3640 367F MIX21 24 MONO DYNAMICS1 ON 3680 3684 ATTACK 3686 368A THRESHOLD 368C 3690 RELEASE 3692 3696 RATIO 3698 369C GAIN 369E 36...

Страница 286: ...3 GAIN24 3F14 3F17 GAIN25 3F18 3F1B GAIN26 3F1C 3F1F GAIN27 3F20 3F23 GAIN28 3F24 3F27 GAIN29 3F28 3F2B GAIN30 3F2C 3F2F GAIN31 3F30 3F33 Parameter From HEX To HEX HA EXTERNAL GAIN1 3B06 3B0B INPUT GAIN 1 3B0F 3B15 EXTERNAL GAIN2 3B16 3B1B INPUT GAIN 2 3B1F 3B25 EXTERNAL GAIN3 3B26 3B2B INPUT GAIN 3 3B2F 3B35 EXTERNAL GAIN4 3B36 3B3B INPUT GAIN 4 3B3F 3B45 EXTERNAL GAIN5 3B46 3B4B INPUT GAIN 5 3B4...

Страница 287: ... INPUT PATCH INPUT PATCH 48V Gain Gain Compensation INPUT INSERT PATCH GLOBAL HA HA On INPUT INSERT O INPUT INSERT INPUT PROCESSING O Point INPUT INSERT O INPUT INSERT INPUT PROCESSING O Direct Out Out Patch O INPUT DIRECT OUT GLOBAL INPUT PATCH INPUT PATCH On Level DIRECT OUT O INPUT DIRECT OUT INPUT PROCESSING O Point DIRECT OUT O INPUT DIRECT OUT INPUT PROCESSING O HPF O INPUT HPF O INPUT HPF I...

Страница 288: ...DCA O 5 DCA GROUP ASSIGN O Fade Time On O 6 O 9 STORE O 6 Channel Link O GLOBAL CH LINK Cue O Key In Cue Mute Safe O Recall Safe O EACH PARAMETER Focus Recall O EACH PARAMETER Global Paste O 1 These parameters can be linked between L and R of ST IN channels 1 8 2 Applies to parameters for which the MIX channel 1 24 individual Send Parameter setting and the item in the table are both enabled 3 Appl...

Страница 289: ...G O Pan Balance O 11 O MIX TO ST TO ST BAL GLOBAL PASTE ONLY MIX FADER ON O LCR On O TO STEREO O 5 MIX PROCESSING O CSR O TO STEREO O 5 MIX PROCESSING O Mode O TO STEREO O 5 MIX PROCESSING O On O CH ON O MIX CH ON MIX FADER ON O Fader O FADER O MIX FADER MIX FADER ON O From Input On O WITH MIX SEND WITH SEND FROM SOURCE CHs WITH MIX SEND 4 Level O WITH MIX SEND WITH SEND FROM SOURCE CHs WITH MIX S...

Страница 290: ...ey InSource O MATRIX DYNA1 MATRIX PROCESSING Others O DYNAMICS O MATRIX DYNA1 MATRIX PROCESSING O To Matrix On TO MATRIX ON Level TO MATRIXSEND Pan Balance TO MATRIXSEND Pre Post TO MATRIXSEND Balance O O MATRIX BAL TO ST BAL GLOBAL PASTE ONLY MATRIX FADER ON O On O CH ON O MATRIX CH ON MATRIX FADER ON O Fader O FADER O MATRIX FADER MATRIX FADER ON O From Input From Mix From Stereo Mono On O WITH ...

Страница 291: ...e O STEREO MONODYNA1 STEREO MONO PROCESSING Others O O STEREO MONODYNA1 STEREO MONO PROCESSING O To Matrix On O O STEREO MONO MATRIX ON 7 STEREO MONO FADER ON 4 O Level O 13 O STEREO MONO MATRIX SEND 7 STEREO MONO FADER ON 4 O Pan Balance O O STEREO MONO MATRIX SEND 7 STEREO MONO FADER ON 4 O Pre Post O O STEREO MONO MATRIX SEND 7 STEREO MONO PROCESSING 4 O Balance O O STEREO MONO BAL TO ST BAL GL...

Страница 292: ... LEVEL ALL Parameter Select button Name Icon Color O DCA NAME DCA MASTER On O DCA LEVEL ON DCA MASTER Fader O DCA LEVEL ON DCA MASTER Fade Time On O 9 STORE Input DCA Assign DCA GROUP ASSIGN Parameters RECALL SAFE USER LEVEL ALL Name O MUTE GROUP MASTER On MUTE GROUP MASTER Dimmer MUTE GROUP MASTER MUTE Assign MUTE GROUP ASSIGN USO RESTRITO ...

Страница 293: ...wer than 128 steps paramWidth 128 rxValue Control value 2 If the assigned parameter has 128 or more but less than 16 384 steps paramWidth 16384 2 1 When High and Low data is received rxValue Control value High 128 Control value Low 2 2 When only Low data is received rxValue curValue 16256 Control value Low 2 3 When only High data is received rxValue Control value High 128 curValue 127 3 If the ass...

Страница 294: ...e unit The basic format is as follows Command rx tx Function F0 43 0n 3E cc cc 19 mm mm dd dd ee F7 F0 43 2n 3E 19 mm mm dd dd F7 rx tx rx BULK DUMP DATA BULK DUMP REQUEST The CL series console uses the following data types for a bulk dump Module Name mm DataNumber dd Portico5043LIB P5043 21 U76 LIB U76 21 Opt 2A LIB OPT 2A 21 EQP 1A LIB EQ 1A 21 DynamicEQ LIB DYNAEQ 21 Buss Comp 369 LIB BSCMP369 ...

Страница 295: ...both Rx CH and SUB STATUS match The data will be echoed when PARAMETER CHANGE ECHO is on The corresponding parameter will be changed via PARAMETER CHANGE immediately the data is received STATUS 11110000 F0 System exclusive message ID No 01000011 43 Manufacturer s ID number YAMAHA SUB STATUS 0011nnnn 3n n 0 15 Device number MIDI Channel GROUP ID 00111110 3E Digital mixer MODEL ID 00011001 19 CL Ser...

Страница 296: ...mm mm ASCII CODE DATA 0sssssss sh number source start High 0sssssss sl number source start Low 0eeeeeee eh number source end High 0eeeeeee el number source end Low 0ddddddd dh number destination start High 0ddddddd dl number destination to start Low EOX 11110111 F7 End of exclusive 4 3 2 Function Name Function Name Copy LibCpy Paste LibPst Clear LibClr Cut LibCut Insert LibIns Edit Undo LibEdtUd 4...

Страница 297: ...Top Number 0 End Number 0 STATUS 11110000 F0 System exclusive message Manufacturer s ID number YAMAHA 01100010 b ASCII CODE 01110100 t ASCII CODE MODULE NAME 0mmmmmmm mm ASCII CODE 0mmmmmmm mm ASCII CODE 0mmmmmmm mm ASCII CODE 0mmmmmmm mm ASCII CODE 0mmmmmmm mm ASCII CODE 0mmmmmmm mm ASCII CODE 0mmmmmmm mm ASCII CODE 0mmmmmmm mm ASCII CODE 0mmmmmmm mm ASCII CODE 0mmmmmmm mm ASCII CODE DATA 0nnnnnn...

Страница 298: ...ned Keys Guest UDEF_GST Custom Fader Bank Current CFAD_CUR Custom Fader Bank Admin CFAD_ADM Custom Fader Bank Guest CFAD_GST User Level Current UKEY_CUR User Level Guest UKEY_GST 4 7 FUNCTION CALL MODULE 4 7 1 Format PARAMETERCHANGE Reception Data will be received when PARAMETER CHANGE Rx is on and the Device number of both Rx CH and SUB STATUS match The data will be echoed when PARAMETER CHANGE E...

Страница 299: ... PARAMETER CHANGE ECHO is on Transmission When transmission is enabled by receiving Request the corresponding metering data will be sent in constant interval for a given period of time The interval and time will vary depending on devices When rebooted or port setting is changed the transmission will be disabled When PARAMETER CHANGE ECHO is on the message will be sent as it is STATUS 11110000 F0 S...

Страница 300: ...16mV 18dBu 6 16V PHONES 15Ω 8Ω Phones 75mW 4 150mW Stereo Phone Jack TRS Unbalanced 2 40Ω Phones 65mW 4 150mW 1 XLR 3 32 type connectors are balanced 1 GND 2 HOT 3 COLD 2 PHONES stereo phone jack is unbalanced Tip LEFT Ring RIGHT Sleeve GND 3 There are switches inside the body to preset the maximum output level 4 The position of the level control is 10dB lowered from Max In these specifications 0d...

Страница 301: ... 5IN 5OUT D Sub Connector 15P Female 1 NETWORK IEEE802 3 10BASE T 100Base TX RJ 45 LAMP CL5 x3 CL3 x2 CL1 x1 0V 12V 2 XLR 4 31 type 2 USB HOST USB 2 0 USB A Connector Female DC POWER INPUT JL05 Connector METER CL3 CL1 only D Sub Connector 9P Female 1 Input pin TTL level w internal pull up 47kΩ Output pin Open drain output Vmax 12V maximum sink current pin 75mA Power supply pin Output voltage Vp 5V...

Страница 302: ...at nominal level and one Ch fader at nominal level 84 79 All INPUTs OMNI OUT 1 8 600 Ω Rs 150 Ω GAIN 6dB Master fader at nominal level and all OMNI IN 1 8 in faders at nominal level 70 OMNI OUT 1 8 600 Ω Residual Output Noise ST Master Off 88 PHONES 8 Ω Residual Output Noise PHONES Level Control Min 88 Hum Noise are measured with A weight filter Dynamic Range Fs 44 1 kHz or 48 kHz Input Output RL ...

Страница 303: ... Send Point Pre EQ Pre Fader Post On Level 1024 steps 138 dB to 10 dB LCR Pan CSR 0 to 100 DELAY 0 ms to 1000 msec Function Parameter 4 Band Equalizer Frequency 20 Hz to 20 kHz Gain 18 dB to 18 dB Q 0 10 to 10 0 Low Shelving Low Band High Shelving LPF High Band Type I Type II Insert Insert Point Pre EQ Pre Fader Post On Dynamics 1 Type Comp Expander Compander H Compander S Threshold 54 dB to 0 dB ...

Страница 304: ...in Signal Name 1 GPO1 9 GPO2 2 GPO3 10 GPO4 3 GPO5 11 GND 4 GND 12 GND 5 5V 13 5V 6 GPI1 14 GPI2 7 GPI3 15 GPI4 8 GPI5 Pin Signal Name Pin Signal Name 1 24V 13 GND 2 24V 14 GND 3 24V 15 GND 4 24V 16 GND 5 24V 17 GND 6 24V 18 GND 7 24V 19 CAUTION 8 24V 20 CAUTION 9 24V 21 DETECT A 10 GND 22 DETECT B 11 GND 23 DETECT GND 12 GND Frame GND 4 3 2 1 9 8 7 6 5 15 14 13 12 11 10 20 19 18 17 16 23 22 21 US...

Страница 305: ... X X 0 32 O O Bank Select Control Change 6 38 98 99 1 31 33 95 102 O O O O O O Data Entry NRPN LSB MSB Assignable Cntrl 119 Prog O 0 127 O 0 127 Assignable Change True 0 300 System Exclusive O 1 O 1 2 Common Song Pos Song Sel Tune X X X X O X Recorder Control System Real Time Clock Commands X X O X Effect Control All Sound Off X X Reset All Cntrls X X Aux Local ON OFF X X Messages All Notes OFF X ...

Страница 306: ...Manual Development Department 2012 Yamaha Corporation Published 04 2015 MA D1 Yamaha Pro Audio Global Web Site http www yamahaproaudio com Yamaha Manual Library http www yamaha co jp manual USO RESTRITO ...

Отзывы: