background image

En

101

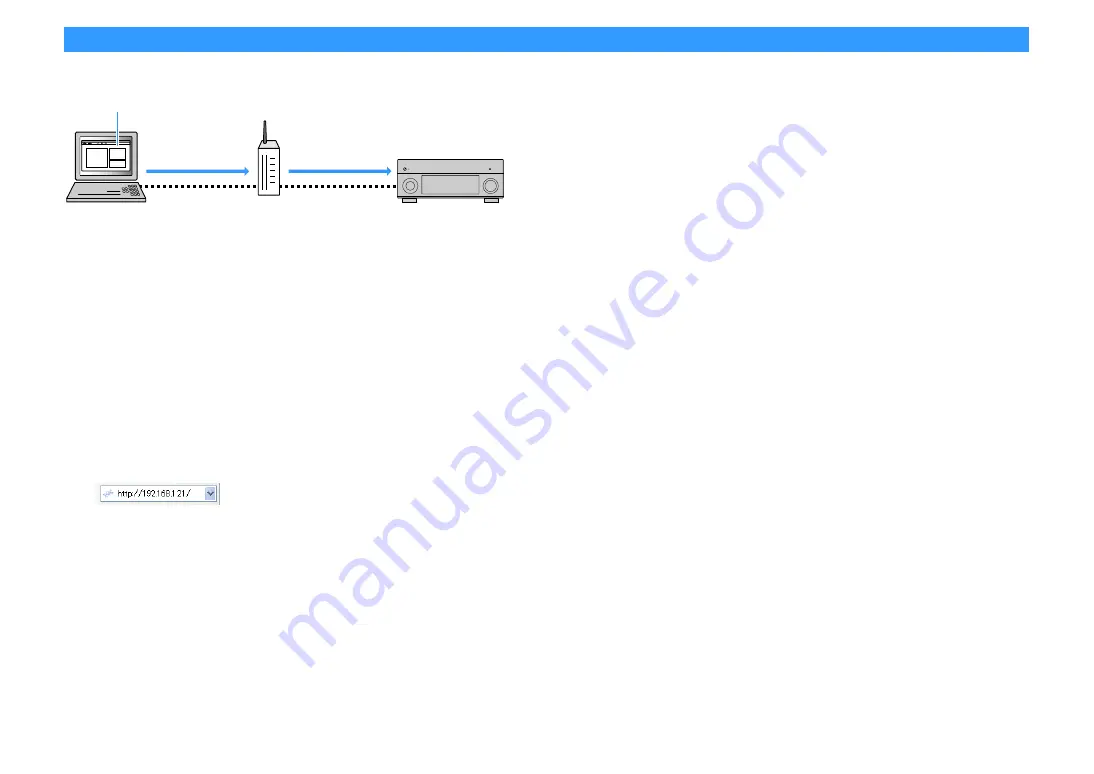
Controlling the unit from a web browser (web control)

You can control the unit with the web control screen displayed in a web browser.

Y

• To use this function, the unit and your PC must be connected to the same router.

• Some security software installed on your PC may block the access of the unit to your PC. In these cases, 

configure the security software appropriately.

• To display the web control screen or turn on the unit from the web control when the unit is in standby mode, 

set “Network Standby” (p.103) to “On”.

• We recommend using one of the following web browsers.

– Internet Explorer 11.x

– Safari 9.x

1

Start the web browser.

2

Enter the IP address of the unit in the address bar of the web browser.

(Example)

X

• You can check the IP address of the unit in “Network” (p.141) in the “Information” menu.

• You can bookmark the unit’s IP address in the browser or create a shortcut link (p.103) to access the web 

control screen quickly in the future. However, if you are using a DHCP server, the IP address of the unit may 

change each time the unit is turned on.

• If you have enabled the MAC Address Filter (p.132), you need to specify the MAC address of your PC to allow the 

PC to access the unit. For information on how to check the MAC address of your PC, refer to its instruction 

manual.

• By using the application for smartphone/tablet “AV CONTROLLER”, you can control the unit from an iPhone, 

iPad, iPod touch or Android devices (p.9).

Web browser

Web control

PC

Router

The unit

Web control

(wired or wireless)

(wired or wireless)

Содержание Aventage MusicCast RX-A1070BL

Страница 1: ... s Manual EN This unit is a product for enjoying video and music at home This manual explains preparations and operations for everyday users of the unit Read the supplied booklet Quick Start Guide before using the unit ...

Страница 2: ...sia models only 38 4 Connecting a network cable or preparing the wireless antenna 39 Connecting the network cable 39 Preparing the wireless antenna 39 5 Connecting other devices 40 Connecting a device compatible with the trigger function 40 6 Connecting the power cable 40 7 Selecting an on screen menu language 41 8 Configuring the necessary speaker settings 42 9 Optimizing the speaker settings aut...

Страница 3: ...Bluetooth speakers headphones 81 Playing back music stored on a USB storage device 82 Connecting a USB storage device 82 Playback of USB storage device contents 82 Playing back music stored on media servers PCs NAS 85 Media sharing setup 85 Playback of PC music contents 86 Listening to Internet radio 89 Playback of Internet radio 89 Registering favorite Internet radio stations Favorites 91 Playing...

Страница 4: ...UPDATE 146 Checking the firmware version VERSION 146 Updating the unit s firmware via the network 147 Updating the unit s firmware immediately 147 Updating the unit s firmware at power off 148 APPENDIX 149 Frequently asked questions 149 Troubleshooting 150 First check the following 150 Power system and remote control 150 Audio 151 Video 153 FM AM radio AM radio feature is not available on the Aust...

Страница 5: ...ontrol used in this manual are of the U S A model unless otherwise specified In this manual illustrations of English menu screens are used as examples China Korea U K Europe and Russia models only For information on how to control external devices with the remote control refer to Supplement for Remote Control on the supplied CD ROM Some features are not available in certain regions Due to product ...

Страница 6: ...se the supplied remote control Batteries Insert the batteries the right way round Operating range of the remote control Point the remote control at the remote control sensor on the unit and remain within the operating range shown below 30 30 Within 6 m 20 ft ...

Страница 7: ...rious wireless connection methods p 51 The unit supports the Wi Fi feature that allows the unit to connect to your wireless router access point without a network cable connection In addition Wireless Direct enables connecting a mobile device to the unit directly without router Surround playback with 5 speakers placed in front p 66 If you have surround speakers but there is no space to place them i...

Страница 8: ...t CINEMA DSP Yamaha has accumulated a massive amount of acoustical data by analyzing the actual sound fields of concert halls and performance spaces around the world CINEMA DSP allows this data to be applied to create sound fields This unit contains a wide variety of sound programs using CINEMA DSP By selecting a sound program that is appropriate to the content of the playback source such as movie...

Страница 9: ...and selecting the speaker system Functions Connection guide speakers TV and video audio devices Setup guide YPAO settings and various setup assistance with illustrations Viewing owner s manual X For details search for AV SETUP GUIDE on the App Store or Google Play MusicCast CONTROLLER MusicCast CONTROLLER is an application that allows you to link a MusicCast compatible device to other MusicCast co...

Страница 10: ...led p 133 c Front display Displays information p 12 d Remote control sensor Receives remote control signals p 6 e PURE DIRECT key Enables disables Pure Direct p 68 f INPUT knob Selects an input source g Front panel door For protecting controls and jacks p 11 h VOLUME knob Adjusts the volume Opening the front panel door To use controls or jacks behind the front panel door gently press the bottom of...

Страница 11: ... information displayed on the front display p 104 Enters the wireless network connection setup WPS push button configuration by holding down for 3 seconds p 53 k MEMORY key Registers FM AM DAB radio stations as preset stations p 70 p 73 p 76 Registers USB network contents or Bluetooth input source as shortcuts p 100 l FM and AM keys except Australia U K Europe and Russia models Switch between FM a...

Страница 12: ...gnal strength indicator Indicates the strength of the wireless network signal p 51 m Bluetooth indicator Lights up when the unit is connecting to a Bluetooth device p 80 n Hi Res Lights up when the high resolution mode p 109 is working o CINEMA DSP indicator CINEMA DSP HD lights up when CINEMA DSP p 64 is working CINEMA DSP lights up when CINEMA DSP HD3 is activated p ENHANCER Lights up when Compr...

Страница 13: ...DIO 2 AUDIO 3 2 TV 1 BD DVD OPTICAL 4 OPTICAL 3 COAXIAL COAXIAL 2 COAXIAL 1 PHONO VIDEO GND AC IN FM 75ȍ ANTENNA 4 RADIO OPTICAL 1 2 ZONE OUT ZONE 2 SPEAKERS CENTER FRONT SURROUND BACK SURROUND F PRESENCE R 5 6 L R R R L L L ZONE 2 SINGLE ZONE 2 BI AMP AM PRE OUT SUBWOOFER CENTER FRONT SURROUND SUR BACK SINGLE EXTRA SP1 EXTRA SP2 RS 232C TRIGGER OUT 1 2 12V 0 1A MAX TOTAL NETWORK 3 NET Y PR PB Y P...

Страница 14: ...nals p 34 g TRIGGER OUT 1 2 jacks For connecting to devices that support the trigger function p 40 h REMOTE IN OUT jacks For connecting to an infrared signal receiver emitter that allows you to operate the unit and other devices from another room p 96 i NETWORK jack For connecting to a network with a network cable p 39 j Wireless antenna For a wireless Wi Fi connection to a network p 51 and a Blue...

Страница 15: ...rope and Russia models or FM and AM radio other models PRESET Select a preset station TUNING Select the radio frequency External device operation keys Let you perform playback operations when USB or NET is selected as the input source or control playback of the HDMI Control compatible playback device p 165 k Sound mode keys Select a sound mode p 63 l INFO key Selects the information displayed on t...

Страница 16: ... 39 5 Connecting other devices p 40 6 Connecting the power cable p 40 7 Selecting an on screen menu language p 41 8 Configuring the necessary speaker settings p 42 9 Optimizing the speaker settings automatically YPAO p 43 10 Connecting to a network device wirelessly p 51 11 Connecting to the MusicCast network p 59 This completes all the preparations Enjoy playing movies music radio and other conte...

Страница 17: ...iddle of SBL and SBR in the diagram Caution Under its default settings the unit is configured for 8 ohm speakers When connecting 6 ohm speakers set the unit s speaker impedance to 6 Ω MIN In this case you can also use 4 ohm speakers as the front speakers For details see Setting the speaker impedance p 23 E 1 2 3 9 4 6 7 5 9 R 0 3 m 1 ft or more 1 8 m 5 9 ft 0 5 to 1 m 1 6 to 3 3 ft 1 8 m 5 9 ft 0 ...

Страница 18: ...a speaker system with a S mark About the number of channels For example 5 1 2 denotes standard 5 1 channel plus 2 for overhead speaker channels For details on how to place overhead speakers presence speakers see Presence speaker layout p 22 7 1 5 1 2 system S using both surround back and front presence speakers This speaker system brings out the full performance of the unit and allows you to enjoy...

Страница 19: ... 5 1 channel but also for 7 1 channel contents X When using front presence speakers installed to the ceiling or when using the Dolby Enabled speakers as the presencespeakers configurethe Layout FrontPresence settinginthe Setup menubeforeperformingYPAO p 42 7 1 system using surround back speakers This speaker system creates Virtual Presence Speaker VPS using the front center and surround speakers t...

Страница 20: ...em 5 1 system front 5 1 channel using surround speakers We recommend using this speaker system when you cannot place speakers in the rear side of the room X When placing surround speakers in thefront side set Layout Surround inthe Setup menuto Front before performing YPAO p 42 4 5 1 2 3 9 ...

Страница 21: ...ce speakers in the rear side of the room X When using front presence speakers installed to the ceiling or when using the Dolby Enabled speakers as the presencespeakers configurethe Layout FrontPresence settinginthe Setup menubeforeperformingYPAO p 42 2 1 system X Add the center speaker to configure a 3 1 system 1 2 3 9 E R ...

Страница 22: ...position of ceiling speakers see Notes on installation of ceiling speakers p 22 Dolby Enabled SP Use the Dolby Enabled speakers as the presence speakers It utilizessounds reflected from ceiling and lets you enjoy overhead sounds onlyfrom speakers that are placed at the same level as traditional speakers X Place the Dolby Enabled speakers on top of or near the traditional front speakers A Dolby Ena...

Страница 23: ...our room to the unit Precaution for connecting of the speaker cables Prepare speaker cables in a place away from the unit to avoid accidentally dropping wire strands into the unit s interior which could result in a short circuit or malfunction of the unit Improper connecting of the speaker cables may cause short circuit and also damage the unit or the speakers Remove the unit s power cable from an...

Страница 24: ...r amplifier Hi Fi amplifier etc to enhance speaker output see Connecting an external power amplifier p 31 Cables necessary for connection commercially available Speaker cables x the number of speakers Audio pin cable two for connecting two subwoofers Connection diagram Refer to the following diagram and connect the speakers to the unit Y When using only one surround back speaker connect it to the ...

Страница 25: ...the bare wires of the cable firmly together 2 Loosen the speaker terminal 3 Insert the bare wires of the cable into the gap on the side upper right or bottom left of the terminal 4 Tighten the terminal Using a banana plug U S A Canada China Brazil and General models only 1 Tighten the speaker terminal 2 Insert a banana plug into the end of the terminal Connecting the subwoofer with built in amplif...

Страница 26: ... four internal amplifiers for front speakers to have more high quality sounds Example Example Example Bi amp connection Combining with an external power amplifier Hi Fi amplifier etc to build an extended system Using the excess internal amplifiers for stereo speakers in another room Externalpower amplifier Main zone Zone2 Bi amp connection Power amp channel expansion Multi zone configuration ...

Страница 27: ...ot output sound Main zone Multi zone Power Amp Assign p 123 Page Output channel max Bi amp Surround back Front presence Externalpower amplifier required 7 Surround back 1 Zone2 7 1 1Zone 27 7 Front presence 1 Zone2 5 1 2 1Zone 28 5 5 1 Bi Amp 28 7 Surround back Surround back 7 1 Bi Amp ext SB 29 Speaker Connect to 12 FRONT 3 CENTER 45 SURROUND 67 SURROUND BACK ER not used 9 SUBWOOFER 1 2 Zone2 spe...

Страница 28: ... sound 5 1 Bi Amp Speaker Connect to 12 FRONT 3 CENTER 45 SURROUND 67 not used ER EXTRA SP1 9 SUBWOOFER 1 2 Zone2 speakers EXTRA SP2 2 1 1 E R 2 3 4 9 9 5 Main zone Zone2 Speaker Connect to 12 FRONT and EXTRA SP 1 bi amp connection 3 CENTER 45 SURROUND 67 not used ER not used 9 SUBWOOFER 1 2 1 3 4 5 9 9 2 Bi amp ...

Страница 29: ...t to 12 FRONT and EXTRA SP 1 bi amp connection 3 CENTER 45 SURROUND 67 SUR BACK PRE OUT via external power amplifier ER not used 9 SUBWOOFER 1 2 1 3 4 5 9 9 2 6 7 Bi amp via external amp Caution Before making bi amp connections remove any brackets or cables that connect a woofer with a tweeter Refer to the instruction manual of the speakers for details If you are not making bi amp connections make...

Страница 30: ...ct Zone2 speakers using an external amplifier p 95 when using surround back speakers in the main zone when using front presence speakers in the main zone SPEAKERS CENTER FRONT SURROUND BACK SURROUND F PRESENCE R L R R R L L L ZONE 2 SINGLE ZONE 2 BI AMP EXTRA SP1 EXTRA SP2 FL FR 1 2 3 4 5 7 6 9 9 The unit rear Main zone Zone2 SPEAKERS CENTER FRONT SURROUND BACK SURROUND F PRESENCE R L R R R L L L ...

Страница 31: ...t and turn off the external power amplifier before connecting them When using the PRE OUT jacks do not connect speakers to the corresponding SPEAKERS terminals When using a pre main amplifier that does not have the volume control bypass turn up the volume of the pre main amplifier enough and fix it In this case do not connect other devices except the unit to the pre main amplifier HDMI 1 BD DVD AV...

Страница 32: ...C and 3D and 4K Ultra HD video transmission features Use high speed HDMI cables to enjoy 3D or 4K Ultra HD videos Video jacks To input only video signals use the following jacks COMPONENT VIDEO jacks Transmit video signals separated into three components luminance Y chrominance blue Pb and chrominance red Pr Use a component video cable with three plugs VIDEO jacks Transmit analog video signals Use...

Страница 33: ...e Setup menu to Zone2 you can connect a video monitor for Zone2 to the HDMI OUT 2 jack and enjoy videos and audio using the video monitor p 96 HDMI OUT ARC ZONE OUT 1 2 1 BD DVD AV 1 AV 2 R L AV 1 AV 2 AV 3 AV 4 AUDIO 1 AUDIO 2 AUDIO 3 2 TV 1 BD DVD OPTICAL 4 OPTICAL 3 COAXIAL COAXIAL 2 COAXIAL 1 PHONO VIDEO GND FM 75ȍ ANTENNA 4 RADIO OPTICAL ZONE OUT ZONE 2 SURROUND R 5 6 L AM FRONT Y PR PB Y PR ...

Страница 34: ...tput from the unit X To connect a video device to the unit with a component video cable and a digital optical cable use Input Assignment p 137 in the Setup menu to assign the COMPONENT VIDEO and OPTICAL jacks to the same input source I OUT ARC 1 HDMI 1 BD DVD AV 1 AV 2 AV 3 AV 4 HDCP2 2 AV 5 AV 6 AV 7 IN OUT REMOTE AV 3 AV 4 OPTICAL 1 2 ZONE OUT ZONE 2 SPEAKERS CENTER SURROUND BACK SURROUND F PRES...

Страница 35: ...e Input jacks on the unit Video Audio Composite video Digital coaxial AV 1 2 VIDEO COAXIAL Digital optical AV 3 VIDEO OPTICAL Analog stereo AV 1 4 VIDEO AUDIO HDMI OUT ARC ZONE OUT 1 2 1 BD DVD AV 1 R L AV 1 AV 2 AV 3 AV 4 AUDIO 1 AUDIO 2 AUDIO 3 2 TV 1 BD DVD OPTICAL 4 OPTICAL 3 COAXIAL COAXIAL 2 COAXIAL 1 PHONO VIDEO GND FM 75ȍ ANTENNA 4 RADIO OPTICAL ZON ZONE 2 R 5 6 AM Y Y COM AV B AV A HDCP2 ...

Страница 36: ...audio device Audio input jacks on the unit Digital coaxial AV 1 2 COAXIAL AUDIO 3 COAXIAL Digital optical AV 3 OPTICAL AUDIO 1 2 OPTICAL Analog stereo AV 1 4 AUDIO AUDIO 1 3 AUDIO Turntable PHONO PHONO When connecting a turntable The PHONO jack of the unit is compatible with an MM cartridge To connect a turntable with a low output MC cartridge use a boosting transformer Connecting the turntable to...

Страница 37: ...AUX HDMI IN jack does not support HDCP 2 2 Analog stereo connection Connect an audio playback device such as CD players to the unit with a stereo pin cable If you select VIDEO AUX as the input source by pressing V AUX the audio played back on the device will be output from the unit X If you connect devices to both the VIDEO AUX HDMI IN jack and VIDEO AUX AUDIO jacks the unit outputs audio input th...

Страница 38: ... HDCP2 2 AV 5 AV 6 AV 7 IN R R L AV 1 AV 2 AV 3 AV 4 AUDIO 1 AUDIO 2 AUDIO 3 2 TV 1 BD DVD OPTICAL 4 OPTICAL 3 COAXIAL COAXIAL 2 COAXIAL 1 PHONO VIDEO GND FM 75ȍ ANTENNA 4 RADIO OPTICAL 1 2 ZONE OUT ZONE 2 SPEAKERS SURROUND BACK SURROUND F PRESENCE R 5 6 L R R L L ZONE 2 SINGLE ZONE 2 BI AMP AM PRE OUT SUBWOOFER CENTER FRONT SURROUND SUR BACK SINGLE EXTRA SP1 EXTRA SP2 TRIGGER OUT 1 2 12V 0 1A MAX...

Страница 39: ...o configure the network parameters manually p 131 You can check whether the network parameters such as IP address are properly assigned to the unit in Network p 141 in the Information menu Y Some security software installed on your PC or the firewall settings of network devices such as a router may block the access of the unit to the network devices or the Internet In these cases configure the sec...

Страница 40: ...10 120 220 240 V 50 60 Hz Y Make sure you set VOLTAGE SELECTOR of the unit BEFORE plugging the power cable into an AC wall outlet Improper setting of VOLTAGE SELECTOR may cause damage to the unit and create a potential fire hazard After all the connections are complete connect the supplied power cable to the unit and then to an AC wall outlet HDMI 3 AV 4 HDCP2 2 AV 5 AV 6 AV 7 IN OUT REMOTE 1 2 SP...

Страница 41: ... the desired language 6 To confirm the setting press ENTER 7 To exit from the menu press ON SCREEN X The information on the front display is provided in English only ENTER RETURN POP UP MENU TOP MENU 3 2 1 AUDIO 2 4 3 1 6 V AUX 7 5 AV BLUETOOTH NET PHONO USB TUNER 4 3 2 1 8 7 6 5 9 0 4 3 2 1 SCENE MUTE OPTION ON SCREEN DISPLAY MODE MOVIE MUSIC INFO SLEEP ENT PRESET TUNING VOLUME PROGRAM HDMI OUT P...

Страница 42: ...g bi amp connection or Zone2 speakers select Power Amp Assign p 123 then select your speaker system When using the surround speakers for front 5 1 channel system Virtual CINEMA FRONT select Configuration Layout Surround p 124 then select Front When using the presence speakers for Dolby Atmos or DTS X playback select Configuration Layout Front Presence p 125 then select your front presence speaker ...

Страница 43: ... now press RETURN and proceed to Step 3 3 Turn on the subwoofer and set the volume to half If the crossover frequency is adjustable set it to maximum 4 Place the YPAO microphone at your listening position and connect it to the YPAO MIC jack on the front panel X Place the YPAO microphone at your listening position same height as your ears We recommend the use of a tripod as a microphone stand You c...

Страница 44: ...e speaker settings will be optimized to suit the area defined by those positions multi measure No default Select this option if your listening position will always be fixed Take the measurements at only one position The speaker settings will be optimized to suit that position single measure a b a a b c d e c d d e bac Multi measure 5 listening positions Multi measure 2 listening positions front ba...

Страница 45: ...ES or NO to enable disable YPAO Volume and press ENTER X If YPAO Volume is enabled the high and low frequency levels are automatically adjusted according to the volume so that you can enjoy natural sounds even at low volume You can also enable disable YPAO Volume in YPAO Volume p 107 in the Option menu 5 Disconnect the YPAO microphone from the unit This completes optimization of the speaker settin...

Страница 46: ...ct CANCEL and press ENTER When you have taken measurements at 8 listening positions the following screen appears automatically X To check the measurement results select Result For details see Checking the measurement results p 47 4 Use the cursor keys to select Save Cancel and press ENTER 5 To save the measurement result use the cursor keys to select SAVE and press ENTER The adjusted speaker setti...

Страница 47: ...YPAO microphone is sensitive to heat so should not be placed anywhere where it could be exposed to direct sunlight or high temperatures such as on top of AV equipment Wiring Polarity of each speaker Reverse The speaker cable may be connected with the reverse polarity Size Size of each speaker cross over frequency of the subwoofer Large The speaker can reproduce low frequency signals effectively Sm...

Страница 48: ... UP MENU TOP MENU 3 2 1 AUDIO 2 4 3 1 6 V AUX 7 5 AV BLUETOOTH NET PHONO USB TUNER 4 3 2 1 8 7 6 5 9 0 4 3 2 1 SCENE MUTE OPTION ON SCREEN DISPLAY MODE MOVIE MUSIC INFO SLEEP ENT PRESET TUNING VOLUME PROGRAM HDMI OUT PARTY BAND SUR DECODE STRAIGHT ENHANCER PURE DIRECT MEMORY MAIN ZONE 2 RETURN POP UP MENU TOP MENU 3 2 1 AUDIO 2 4 3 1 6 V AUX 7 5 AV BLUETOOTH NET PHONO USB TUNER 4 3 2 1 8 7 6 5 9 0...

Страница 49: ...cted E 6 Check Sur Surround back speakers are connected but no surround speakers are connected Surround speakers need to be connected in order to use surround back speakers Follow the on screen instructions to exit YPAO turn off the unit and then reconnect the speakers E 7 No MIC The YPAO microphone has been removed Connect the YPAO microphone to the YPAO MIC jack firmly and follow the on screen i...

Страница 50: ...he speaker is connected correctly Depending on the type of speakers or room environment this message may appear even if the speakers are connected correctly In this case you can ignore the message W 2 Over Distance A speaker is placed more than 24 m 80 ft from the listening position Select Distance in Result p 47 and move the speaker identified by 24 00m 80 0ft within 24 m 80 ft of the listening p...

Страница 51: ...ess router access point Connect a mobile device to the unit directly You can use the application for smartphone tablet AV CONTROLLER p 9 to control the unit from mobiles devices or enjoy music files stored on mobiles devices on the unit For details on connection see Connecting a mobile device to the unit directly Wireless Direct p 57 Y You cannot use Wireless Direct simultaneously with the wired n...

Страница 52: ...ion method 1 Press z receiver power to turn on the unit 2 Turn on the TV and switch the TV input to display video from the unit HDMI OUT jack Y Operations with TV screen are available only when your TV is connected to the unit via HDMI 3 Press ON SCREEN 4 Use the cursor keys to select Setup and press ENTER 5 Use the cursor keys e r to select Network 6 Use the cursor keys q w to select Network Conn...

Страница 53: ...oint When the connection process finishes Completed appears on the front display If Not connected appears repeat from Step 1 or try another connection method The name of the unit Tap here to start setup The network currently selected About WPS WPS Wi Fi Protected Setup is a standard established by the Wi Fi Alliance which allows easy establishment of a wireless home network ENTER RETURN POP UP MEN...

Страница 54: ...ng the iOS device setting p 52 Access Point Scan You can set up a wireless connection by searching for an access point For details on settings see Searching for an access point p 55 Manual Setting You can set up a wireless connection by entering the required information such as SSID manually For details on settings see Setting up the wireless connection manually p 55 PIN Code You can set up a wire...

Страница 55: ...hod the wireless connection setting screen appears on the TV You need to setup the SSID network name encryption method and security key for your network 1 Use the cursor keys and ENTER to enter the SSID of the access point and select NEXT 2 Use the cursor keys q w and ENTER to check the security method of the access point and select NEXT Settings None WEP WPA2 PSK AES Mixed Mode ENTER RETURN POP U...

Страница 56: ...ars on the TV screen 2 Enter the unit s PIN code into the wireless router access point For details on settings refer to the instruction manual of the wireless router access point 3 Use the cursor keys e r to select CONNECT and press ENTER to start the connection process When the connection process finishes Completed appears on the TV screen If Not connected appears repeat from Step 1 or try anothe...

Страница 57: ...ER 7 Use the cursor keys q w and ENTER to check Wireless Direct and select OK X The checkmark indicates the current setting 8 Use the cursor keys q w and ENTER to check the desired security method and select NEXT Settings None WPA2 PSK AES Y If you select None the connection may be insecure since the communication is not encrypted ENTER RETURN POP UP MENU TOP MENU 3 2 1 AUDIO 2 4 3 1 6 V AUX 7 5 A...

Страница 58: ... Select the SSID displayed in Step 10 from the list of available access points 3 When you are prompted for a password enter the security key displayed in Step 10 12To exit from the menu press ON SCREEN ENTER RETURN POP UP MENU TOP MENU 3 2 1 AUDIO 2 4 3 1 6 V AUX 7 5 AV BLUETOOTH NET PHONO USB TUNER 4 3 2 1 8 7 6 5 9 0 4 3 2 1 SCENE MUTE OPTION ON SCREEN DISPLAY MODE MOVIE MUSIC INFO SLEEP ENT PRE...

Страница 59: ...MusicCast CONTROLLER application icon on your mobile device and tap Setup X If you have already connected other MusicCast compatible devices to the network tap Settings and then Add New Device 3 Operate the MusicCast CONTROLLER application following the on screen instructions then hold down CONNECT on the front panel of the unit for 5 seconds 4 Operate the MusicCast CONTROLLER application followin...

Страница 60: ...I output jack 1 Press HDMI OUT to select an HDMI OUT jack Each time you press the key the HDMI OUT jack to be used for signal output changes X You can also select an HDMI output jack by selecting a scene p 61 When OUT 1 2 is selected the unit outputs video signals at the highest resolution supportedbybothTVs orprojectors connectedtotheunit Forexample ifyouhave connected a 1080p TV to the HDMI OUT ...

Страница 61: ... Use the cursor keys to select a desired scene and press ENTER SCENE SCENE key Input Input p 60 AV 1 AUDIO 1 NET RADIO TUNER Audio Select p 109 Auto Auto HDMI Output HDMI Output p 60 OUT 1 2 OUT 1 2 OUT 1 2 OUT 1 2 Mode DSP Program p 63 Sci Fi STRAIGHT 7ch Stereo 7ch Stereo Pure Direct Mode p 128 Auto Auto Auto Auto Enhancer p 68 Off On On On Enhancer Hi Res Mode p 109 On On On On 1 2 3 4 ENTER RE...

Страница 62: ...ollowing setting items as the scene assignments in Detail p 114 in the Scene menu X When the input source is TUNER USB or NET the selected radio station or content is assigned SET Complete SCENE1 SBL SBR SL SW SR C L R VOL Sound Tone Control YPAO Volume Adaptive DRC Extra Bass Surround CINEMA DSP 3D Mode Dialogue Lift Dialogue Level Subwoofer Trim Video Video Mode Volume Master Volume Lipsync Lips...

Страница 63: ...g PROGRAM You can change the settings of the surround programs and surround decoders in the DSP Program menu p 116 The sound mode can be applied separately to each input source You can check which speakers are currently outputting sound by looking at the speaker indicators on the unit s front panel p 12 or at the Audio Signal screen in the Information menu p 140 Precaution for enjoying Dolby Atmos...

Страница 64: ...rrounded by beautiful reverberations from the left right and rear Spectacle This program delivers the scale and grandeur of spectacular movie productions It delivers an expansive sound space to match the cinemascope wide screen and boasts a broad dynamic range providing everything from small delicate sounds to powerful loud booms Sci Fi This program clearly reproduces the finely elaborated sound d...

Страница 65: ...timum level and emphasizes the depth and clarity of human voices to offer the reverberations of an orchestra box in front the listener at the same time as providing the acoustic positioning and feeling of presence on the stage The surround sound field is relatively moderate but the data for concert hall effects are used to represent the inherent beauty of music The listener will not be fatigued ev...

Страница 66: ...hannel speaker system with stereo headphones by connecting the headphones to the PHONES jack and selecting a sound program or a surround decoder Village Vanguard The Jazz club is on 7th Avenue New York This small club with the low ceiling makes the powerful reflections converge toward the stage located in the center Warehouse Loft The warehouse resembles some lofts in Soho Sound reflects off the c...

Страница 67: ... Neural X decoder is selected virtual surround processing such as Virtual CINEMA FRONT p 64 does not work STRAIGHT SBL SBR SL SW SR C L R VOL Auto Uses the decoder automatically selected by input source The DTS Neural X decoder is selected for DTS sources and the Dolby Surround decoder is selected for other sources bDsur Uses the Dolby Surround decoder suitable for your speaker layout A real acous...

Страница 68: ...r enhances the quality of uncompressed digital audio such as 2 channel PCM and FLAC when Hi Res Mode p 109 in the Option menu is set to On default 1 Press ENHANCER Each time you press the key Compressed Music Enhancer is enabled or disabled Y Compressed Music Enhancer does not work on the following audio sources Signals whose sampling frequency is over 48 kHz DSD audio X You can also use Enhancer ...

Страница 69: ...UNING Increase decrease the frequency Hold down the key for about a second to search stations automatically Numeric keys Enter a frequency directly For example to select 98 50 MHz press 9 8 5 and 0 or ENT TUNED lights up when a signal is received from a radio station STEREO also lights up when a stereo signal is received Y Wrong Station appears when you enter a frequency that is out of reception r...

Страница 70: ...put source 2 Press PRESET repeatedly to select the desired radio station You can also enter a preset number 01 to 40 directly by using the numeric keys after pressing PRESET once Y No Presets appears when no radio stations are registered Wrong Num appears when an invalid number is entered Empty appears when a preset number not in use is entered X To clear preset stations use Clear Preset or Clear ...

Страница 71: ...shows the background Press one of the Menu operation keys to redisplay it a b c Menu Submenu Function Utility Memory Registers the current station to the preset number selected in the list Auto Preset Automatically registers FM radio stations with strong signals up to 40 stations Clear Preset Clear the preset station selected in the list Clear All Preset Clear all the preset stations 1 Page Up Mov...

Страница 72: ... some DAB radio stations are stored select Init Scan p 106 in the Option menu If you perform an initial scan again the DAB radio stations currently registered to the preset numbers will be cleared Selecting a DAB radio station for reception You can select a DAB radio station from the stations stored by the initial scan 1 Press TUNER to select TUNER as the input source 2 Press BAND to select the DA...

Страница 73: ...ct TUNER as the input source 2 Press BAND to select the DAB band 3 Press PRESET repeatedly to select the desired DAB radio station You can also enter a preset number 01 to 40 directly by using the numeric keys after pressing PRESET once Y No Presets appears when no DAB radio stations are registered Wrong Num appears when an invalid number is entered Empty appears when a preset number not in use is...

Страница 74: ...ogram Type Station genre Date And Time Current date and time Audio Mode Audio mode monaural stereo and bit rate CH Label Freq Channel label and frequency Signal Quality Signal reception quality 0 none to 100 best DSP Program Sound mode name Audio Decoder Decoder name Info Program Type VOL SBL SBR SL SW SR C L R Item name Classic FM Classic Music DAB VOL SBL SBR SL SW SR C L R Information Tune AID ...

Страница 75: ... 352 MHz 7C 194 064 MHz 7D 195 936 MHz 8A 197 648 MHz 8B 199 360 MHz 8C 201 072 MHz 8D 202 928 MHz 9A 204 640 MHz 9B 206 352 MHz 9C 208 064 MHz 9D 209 936 MHz 10A 211 648 MHz 10B 213 360 MHz 10C 215 072 MHz 10D 216 928 MHz 11A 218 640 MHz 11B 220 352 MHz 11C 222 064 MHz 11D 223 936 MHz 12A 225 648 MHz 12B 227 360 MHz 12C 229 072 MHz 12D 230 784 MHz 13A 232 496 MHz 13B 234 208 MHz 13C 235 776 MHz 1...

Страница 76: ...using Auto Preset p 79 Registering a radio station Select a radio station manually and register it to a preset number 1 Follow Selecting a frequency for reception p 76 to tune into the desired radio station 2 Hold down MEMORY for seconds The first time that you do register a station the selected radio station will be registered to the preset number 01 Thereafter each radio station you select will ...

Страница 77: ...d X To clear preset stations use Clear Preset or Clear All Preset p 79 01 FM 98 50MHz Preset VOL SBL SBR SL SW SR C L R STEREO TUNED ENTER RETURN POP UP MENU TOP MENU 3 2 1 AUDIO 2 4 3 1 6 V AUX 7 5 AV BLUETOOTH NET PHONO USB TUNER 4 3 2 1 8 7 6 5 9 0 4 3 2 1 SCENE MUTE OPTION ON SCREEN DISPLAY MODE MOVIE MUSIC INFO SLEEP ENT PRESET TUNING VOLUME PROGRAM HDMI OUT PARTY BAND SUR DECODE STRAIGHT ENH...

Страница 78: ...de the Radio Data System service Info Program Type SBL SBR SL SW SR C L R VOL STEREO TUNED Item name FM 98 50MHz CLASSICS SBL SBR SL SW SR C L R VOL STEREO TUNED Information Frequency always displayed Program Service Program service name Program Type Current program type Radio Text Information on the current program Clock Time Current time DSP Program Sound mode name Audio Decoder Decoder name ENT...

Страница 79: ...ing stations are stored automatically by Auto Preset Menu Function Browse Moves to the browse screen preset station list Screen Off Closes the screen display and shows the background Press one of the menu operation keys to redisplay it 仮画面 a b c Menu Submenu Function Utility Memory Registers the current station to the preset number selected in the list Auto Preset Automatically registers FM radio ...

Страница 80: ...oth device select a song and start playback The playback screen artist name album name and song title is displayed on the TV X If the unit detects the Bluetooth device previously connected the unit automatically connects to the Bluetooth device after Step 1 To establish another Bluetooth connection first terminate the current Bluetooth connection To terminate the Bluetooth connection perform one o...

Страница 81: ...s to select CONNECT and press ENTER When the connection process finishes audio played back on the unit will be reproduced from the Bluetooth speakers headphones 6 To exit from the menu press ON SCREEN X To terminate the Bluetooth connection perform the disconnect operation on the Bluetooth speakers headphones Y AirPlay and DSD audio cannot be delivered When the Pure Direct mode is enabled input so...

Страница 82: ...ontents and start playback You can control the USB memory device with the menu displayed on the TV screen 1 Press USB to select USB as the input source The browse screen is displayed on the TV X If playback is ongoing on your USB storage device the playback screen is displayed DISPLAY RETURN YPAO MIC PHONES USB SILENT CINEMA CONNECT PROGRAM ENTER 5V 1A The unit front USB storage device Connected U...

Страница 83: ...ss the cursor key r and then use the cursor keys q w to select an item Press ENTER to confirm the selection Menu Function 1 Page Up Moves to the previous next page of the list 1 Page Down 10 Pages Up Moves 10 pages forward backward 10 Pages Down Return Returns to the higher level list Now Playing Moves to the playback screen Screen Off Closes the screen display and shows the background Press one o...

Страница 84: ... to the browse screen Screen Off Closes the screen display and shows the background Press one of the menu operation keys to redisplay it a c b Item Setting Function Shuffle Shuffle Off Off Turns off the shuffle function On On Plays back songs in the current album folder in random order x appears on the TV screen Repeat Repeat Off Off Turns off the repeat function One One Plays back the current son...

Страница 85: ...haring setup Toplayback music files stored on yourPC orDLNA compatible NAS first youneedtoconfigure the media sharing setting on each music server For a PC with Windows Media Player installed The setting procedure may vary depending on the PC and Windows Media Player version The following procedure is a setup example for Windows Media Player 12 1 Start Windows Media Player 12 on your PC 2 Select S...

Страница 86: ...ETURN Files not supported by the unit cannot be selected If the unit detects a series of unsupported files such as images and hidden files during playback playback stops automatically You can register your favorite items as shortcuts and access them directly by selecting the shortcut numbers p 100 ENTER RETURN POP UP MENU TOP MENU 3 2 1 AUDIO 2 4 3 1 6 V AUX 7 5 AV BLUETOOTH NET PHONO USB TUNER 4 ...

Страница 87: ...r DMC to control playback For details see DMC Control p 112 Menu Function 1 Page Up Moves to the previous next page of the list 1 Page Down 10 Pages Up Moves 10 pages forward backward 10 Pages Down Return Returns to the higher level list Now Playing Moves to the playback screen Screen Off Closes the screen display and shows the background Press one of the menu operation keys to redisplay it a e c ...

Страница 88: ...Repeat Repeat Off Off Turns off the repeat function One One Plays back the current song repeatedly c appears on the TV screen All All Plays back all songs in the current album folder repeatedly v appears on the TV screen ENTER RETURN POP UP MENU TOP MENU 3 2 1 AUDIO 2 4 3 1 6 V AUX 7 5 AV BLUETOOTH NET PHONO USB TUNER 4 3 2 1 8 7 6 5 9 0 4 3 2 1 SCENE MUTE OPTION ON SCREEN DISPLAY MODE MOVIE MUSIC...

Страница 89: ... select an item and press ENTER If an Internet radio station is selected playback starts and the playback screen is displayed X To return to the previous screen press RETURN You can register your favorite items as shortcuts and access them directly by selecting the shortcut numbers p 100 ENTER RETURN POP UP MENU TOP MENU 3 2 1 AUDIO 2 4 3 1 6 V AUX 7 5 AV BLUETOOTH NET PHONO USB TUNER 4 3 2 1 8 7 ...

Страница 90: ...page of the list 1 Page Down 10 Pages Up Moves 10 pages forward backward 10 Pages Down Return Returns to the higher level list Now Playing Moves to the playback screen Screen Off Closes the screen display and shows the background Press one of the menu operation keys to redisplay it a e c b d Menu Function Add to favorites Adds the current station to the Favorites folder p 91 Browse Moves to the br...

Страница 91: ...lder Radio stations registered to favorites are displayed with S Browse screen X To remove a station that is registered to favorites select the station and then select Remove from favorites ENTER RETURN POP UP MENU TOP MENU 3 2 1 AUDIO 2 4 3 1 6 V AUX 7 5 AV BLUETOOTH NET PHONO USB TUNER 4 3 2 1 8 7 6 5 9 0 4 3 2 1 SCENE MUTE OPTION ON SCREEN DISPLAY MODE MOVIE MUSIC INFO SLEEP ENT PRESET TUNING V...

Страница 92: ...he icon does not appear check whether the unit and PC iPod are connected to the router properly 2 On the iTunes iPod click tap the AirPlay icon and select the unit network name of the unit as the audio output device 3 Select a song and start playback The unit automatically selects AirPlay as the input source and starts playback The playback screen is displayed on the TV X You can turn on the unit ...

Страница 93: ... menu operation keys to redisplay it a c b ENTER RETURN POP UP MENU TOP MENU 3 2 1 AUDIO 2 4 3 1 6 V AUX 7 5 AV BLUETOOTH NET PHONO USB TUNER 4 3 2 1 8 7 6 5 9 0 4 3 2 1 SCENE MUTE OPTION ON SCREEN DISPLAY MODE MOVIE MUSIC INFO SLEEP ENT PRESET TUNING VOLUME PROGRAM HDMI OUT PARTY BAND SUR DECODE STRAIGHT ENHANCER PURE DIRECT MEMORY MAIN ZONE 2 POP UP MENU TOP MENU 3 2 1 AUDIO 2 4 3 1 6 V AUX 7 5 ...

Страница 94: ...room You can enjoy music using speakers placed in another room Connections Speakers connecting to the unit directly p 30 Speakers using an external amplifier p 95 Enjoying videos music in another room You can enjoy videos music using a TV placed in another room Enjoying videos music using a TV and speakers Connections TV p 96 Speakers connecting to the unit directly p 30 Speakers using an external...

Страница 95: ...p 135 in the Setup menu to Fixed Caution Remove the unit s power cable from the AC wall outlet before connecting speakers or an external amplifier Ensure that the bare wires of the speaker cable do not touch one another or come into contact with the unit s metal parts Doing so may damage the unit or the speakers If the speaker cables short circuit Check SP Wires will appear on the front display wh...

Страница 96: ...l code for each device For details refer to Supplement for Remote Control on the supplied CD ROM HDMI OUT ARC ZONE OUT 1 2 1 B AV 1 R L AV 1 AV 2 AV 3 AV 4 AUDIO 1 AUDIO 2 AUDIO 3 2 TV 1 BD DVD OPTICAL 4 OPTICAL 3 COAXIAL COAXIAL 2 COAXIAL 1 PHONO VIDEO GND FM 75ȍ ANTENNA 4 RADIO OPTICAL ZO 5 6 AM Y Y HDCP2 2 R L HDMI HDMI OUT ZONE OUT 2 HDCP2 2 HDMI HDMI The unit rear HDMI OUT 2 ZONE OUT jack Mai...

Страница 97: ...ort remote connections as the unit does You can transmit remote control signals by connecting the REMOTE IN OUT jacks with monaural mini jack cables and an infrared signal receiver IN OUT REMOTE IN OUT REMOTE Remote control Infrared signal receiver Yamaha products up to six including the unit REMOTE IN OUT jacks REMOTE IN OUT jacks Zone2 ...

Страница 98: ...red on a USB storage device p 82 Playing back music stored on media servers PCs NAS p 85 Listening to Internet radio p 89 Playing back iTunes iPod music with AirPlay p 92 Y The on screen operations are not available for Zone2 Use the front display or web control p 101 to control Zone2 AirPlayisavailableinZone2onlywhenAirPlayplaybackisongoinginthemain zone X The Zone2 input automatically switches i...

Страница 99: ...utomatically selected for all zones Utilize this function when you want to use main zone music as background music for a house party 1 Press PARTY Each time you press the key the party mode is turned on or off When the party mode is turned on PARTY lights up in the front display Y If the party mode does not work on Zone2 set Party Mode Set p 136 in the Setup menu to Enable default ENTER RETURN POP...

Страница 100: ...e registered network content is temporarily unavailable or out of service The registered item file has been deleted or moved to another location A Bluetooth connection cannot be established When you register music files stored on a USB storage device or a PC NAS the unit memorizes the relative position of the music files in the folder If you have added or deleted any music files to or from the fol...

Страница 101: ...of the unit in the address bar of the web browser Example X You can check the IP address of the unit in Network p 141 in the Information menu You can bookmark the unit s IP address in the browser or create a shortcut link p 103 to access the web control screen quickly in the future However if you are using a DHCP server the IP address of the unit may change each time the unit is turned on If you h...

Страница 102: ...ct the increments used for volume adjustment g RELOAD Reloads the current status of the unit Control screen a PLAY INFO Selects an input source or controls playback for the selected zone b TOP MENU Moves to the top menu screen c SCENE Selects a scene for the selected zone d POWER Turns on off the power for the selected zone e VOLUME Adjusts the volume or mutes the audio output for the selected zon...

Страница 103: ...downloaded on the PC Follow the on screen instructions to start the firmware update Create Link Creates a shortcut link to the desired control screen Tips Displays tips for use of the web control Licenses Displays the licenses of the software used in the unit Google Analytics Displays an explanation of data collection by Google Analytics Data collection can be enabled or disabled at any time b BAC...

Страница 104: ...s only See Displaying the DAB information p 74 for details Bluetooth USB Song song title Artist artist name Album album name DSP Program sound mode name Audio Decoder decoder name SERVER AirPlay Song song title Artist artist name Album album name DSP Program sound mode name Audio Decoder decoder name IP Address IP address Ethernet MAC Ethernet MAC address Wi Fi MAC Wi Fi MAC address NET RADIO Song...

Страница 105: ...1 6 V AUX 7 5 AV BLUETOOTH NET PHONO USB TUNER 4 3 2 1 8 7 6 5 9 0 4 3 2 1 SCENE MUTE OPTION ON SCREEN DISPLAY MODE MOVIE MUSIC INFO SLEEP ENT PRESET TUNING VOLUME PROGRAM HDMI OUT PARTY BAND SUR DECODE STRAIGHT ENHANCER PURE DIRECT MEMORY MAIN ZONE 2 ENTER RETURN POP UP MENU TOP MENU 3 2 1 AUDIO 2 4 3 1 6 V AUX 7 5 AV BLUETOOTH NET PHONO USB TUNER 4 3 2 1 8 7 6 5 9 0 4 3 2 1 SCENE MUTE OPTION ON ...

Страница 106: ...ency range individually 107 YPAO Volume YPAO Volume YPAO Volume YPAO Vol Enables disables YPAO Volume 107 Adaptive DRC A DRC Sets whether the dynamic range from maximum to minimum is automatically adjusted when the volume is adjusted 107 Dialogue Dialog Dialogue Level Dialog Lvl Adjusts the volume of dialogue sounds 108 DTS Dialogue Control DTS Dialog Adjusts the volume of dialogue sounds for DTS ...

Страница 107: ... when the volume level is adjusted When it is set to On it is useful for listening to playback at a low volume at night Settings If On is selected the dynamic range becomes narrow at a low volume and wide at a high volume Input Settings Input Settings Input Trim In Trim Corrects volume differences between input sources 109 Audio Select A Sel Selects the audio input jack to use when more than one a...

Страница 108: ...en one of the following conditions is met One of the sound programs except for 2ch Stereo and 7ch Stereo is selectedwhen front presence speakers are used Virtual Presence Speaker VPS p 64 is working You may hear dialogue sounds from the surround speakers depending on the listening position Setting range 0 to 5 The bigger the value the higher the position Lipsync Adjustment Lipsync Adj Adjusts the ...

Страница 109: ... input source Input Trim In Trim Corrects volume differences between input sources If you are bothered by volume differences when switching between input sources use this function to correct it Setting range 6 0 dB to 0 0 dB to 6 0 dB 0 5 dB increments Audio Select A Sel Selectstheaudioinputjackto usewhenmorethanoneaudioconnectionismade foroneinput source Settings Off Off Disables Compressed Music...

Страница 110: ...e FM Mode Switches between stereo and monaural for FM radio reception Settings Off Off Does not output video AV 1 7 AV1 7 VIDEO AUX V AUX Outputs video input through the corresponding video input jacks Stereo Stereo Receives FM radio in stereo sounds Mono Mono Receives FM radio in monaural sounds ...

Страница 111: ...t an item and press ENTER X To return to the previous screen during menu operations press RETURN 5 Use the cursor keys to select a setting and press ENTER 6 To exit from the menu press ON SCREEN Input menu items X Available items vary depending on the selected input source Default settings are underlined Item Function Page Rename Icon Select Changes the input source name and icon 112 Decoder Mode ...

Страница 112: ...l audio playback to DTS For example if the unit does not detect DTS audio and outputs noise set Decoder Mode to DTS Input sources AV 1 7 VIDEO AUX AUDIO 1 3 available only when any audio digital input jack is assigned Settings Volume Interlock Enables disables volume controls from iTunes iPod via AirPlay Input sources AirPlay Settings DMC Control Selects whether to allow DLNA compatible Digital Me...

Страница 113: ... ON SCREEN Scene menu items Save Registers the unit s current settings such as input source and sound program in the selected scene X If you have changed theinput assignment fora scene youalso need tochange theexternaldeviceassigned to the corresponding SCENE key p 62 Item Function Page Save Registers the current settings in the selected scene 113 Load Loads the settings registered for the selecte...

Страница 114: ...and include Volume in the assignments for SCENE4 X The scene assignments can include radio stations or the content on a selected USB storage device and a network device Choices Default Input HDMI Output Mode selected Sound Surround Video Volume Lipsync Speaker Setup not selected Off Disables the SCENE link playback function HDMI Control Enables SCENE link playback using HDMI Control signals Select...

Страница 115: ...is selected Playback is available 3 If Input is unchecked press ENTER to check the box 4 To exit from the menu press ON SCREEN Rename Icon Select Changes the scene name and icon displayed on the front display or TV screen Setup procedure 1 Use the cursor keys e r to select an icon and press the cursor key w 2 Press ENTER to enter the name edit screen 3 Use the cursor keys and ENTER to rename and s...

Страница 116: ...ys e r to select a sound program to be configured and press the cursor key q X You can still switch the sound program by using cursor keys e r after Step 3 4 Use the cursor keys q w to select an item and press ENTER X To return to the previous screen during menu operations press RETURN To restore the default settings for the selected sound program select Reset 5 Use the cursor keys to select a set...

Страница 117: ...the delay between the direct sound and surround back sound field generation Room Size Adjusts the broadening effect of the presence sound field 0 1 to 2 0 Higher to enhance the broadening effect and lower to reduce it Surround Room Size Adjusts the broadening effect of the surround sound field Surround Back Room Size Adjusts the broadening effect of the surround back sound field Liveness Adjusts t...

Страница 118: ...Balance Adjust the height volume balance using the front presence speakers 0 to 5 to 10 Higher to enhance the upside and lower to enhance the downside The front presence speakers do not produce sounds when Height Balance is set to 0 Monaural Mix Enables disables monaural sound output Off On Decode Type Item Function Settings bDsur Center Spread Selects whether to spread the center channel signals ...

Страница 119: ...ress ON SCREEN 2 Use the cursor keys to select Setup and press ENTER 3 Use the cursor keys e r to select a menu 4 Use the cursor keys q w to select an item and press ENTER X To return to the previous screen during menu operations press RETURN 5 Use the cursor keys to select a setting and press ENTER 6 To exit from the menu press ON SCREEN ...

Страница 120: ...h an equalizer 126 Test Tone Enables disables the test tone output 126 Sound Lipsync Delay Enable Enables disables the Lipsync adjustment for each input source 127 Auto Manual Select Selects the method to adjust the delay between video and audio output 127 Adjustment Adjusts the delay between video and audio output manually 127 Dynamic Range Selects the dynamic range adjustment method for bitstrea...

Страница 121: ...luetooth Standby Selects whether to enable disable the function that turns on the unit from Bluetooth devices Bluetooth standby 133 Audio Send Transmitter Enables disables the Bluetooth audio transmitter function 134 Device Search Searches available Bluetooth devices speakers headphones when the unit is used as a Bluetooth audio transmitter 81 Multi Zone Main Zone Set Zone Rename Changes the zone ...

Страница 122: ... the unit is operated 137 Wallpaper Selects the image to be used as wallpaper on the TV 138 Trigger Output1 Trigger Output2 Trigger Mode Specifies the condition for the TRIGGER OUT jack to function 138 Target Zone Specifies the zone with which the TRIGGER OUT jack functions are synchronized 138 Memory Guard Prevents accidental changes to the settings 139 ECO Auto Power Standby Sets the amount of t...

Страница 123: ...ttern parameters in the specified direction Choices Power Amp Assign Selects a speaker system The unit has 7 built in amplifiers You can connect 2 to 9 speakers and up to 2 subwoofers with built inamplifier tocreate the favorite acousticspaceinyourroom Youcanalso applybi amp connections channel expansion using an external power amplifier or multi zone configurations to enhance your system Settings...

Страница 124: ...s The subwoofer or front speakers will produce center channel low frequency components lower than the specified crossover frequency default 80 Hz None Select this option when no center speaker is connected The front speakers will produce center channel audio Large Select this option for large speakers The surround speakers will produce all of the surround channel frequency components Small Select ...

Страница 125: ...ront Presence R Subwoofer Setting range 0 30 m to 3 00 m to 24 00 m 1 0 ft to 10 0 ft to 80 0 ft 0 05 m 0 2 ft increments Large Select this option for large speakers Small Select this option for small speakers None Select this option when no front presence speakers are connected Use Normal Select this option when a subwoofer is connected phase not reversed The subwoofer will produce LFE low freque...

Страница 126: ... w to adjust the gain Setting range Gain 20 0 dB to 6 0 dB 5 To fine adjust the center frequency or Q factor bandwidth press ENTER repeatedly to select an item Frequency Use the cursor keys e r to adjust the center frequency of the selected band and the cursor keys q w to adjust the gain Q Use the cursor keys e r to adjust the Q factor bandwidth of the selected band and the cursor keys q w to adju...

Страница 127: ...ustment p 108 in the Option menu Dynamic Range Selects the dynamic range adjustment method for bitstream audio Dolby Digital and DTS signals playback Settings Max Volume Sets the limit value of the volume Setting range 30 0 dB to 15 0 dB 5 0 dB increments 16 5 dB Disable Disable the Lipsync adjustment for the selected input source Enable Enables the Lipsync adjustment for the selected input source...

Страница 128: ...el content is played back Object Decode Mode Enables disables playback of object based audio signals such as Dolby Atmos or DTS X contents Settings X If audio output is not available when Dolby Atmos or DTS X signals are input set Object Decode Mode to Enable Off Sets the level to the volume level of the unit when it last entered standby mode On Sets at Mute or the specified volume level 80 dB to ...

Страница 129: ...again Note that the output video may not be displayed on your TV normally Aspect Selects an aspect ratio to output HDMI video signals when Video Mode is set to Processing Settings X This setting functions only when 480i 576i or 480p 576p signals are converted into 720p 1080i 1080p or 2160p 4K signals Direct Disables the video signal processing Processing Enables the video signal processing Select ...

Страница 130: ...a ARC are not supported by the unit set ARC to Off and use the TV s speakers Standby Sync Select whether to use HDMI control to link the standby behavior of the TV and the unit when HDMI Control is set to On Settings Audio Output Selects a device to output audio X The HDMI OUT1 setting is available only when HDMI Control is set to Off The HDMI OUT2 setting is available only when HDMI OUT2 Assign p...

Страница 131: ...to the TV The unit consumes more power than when Off is selected Auto Outputs videos audio to the TV If no signals are detected the unit is set to the power saving mode Wired Select this option when you want to connect the unit to a network with a commercially available network cable p 39 Wireless Wi Fi Select this option when you want to connect the unit to a network via the wireless router acces...

Страница 132: ...access to the unit when Filter is set to On Setup procedure 1 Use the cursor keys q w to select MAC Address 1 5 or MAC Address 6 10 and press ENTER 2 Use the cursor keys q w to select an MAC address number and press ENTER 3 Use the cursor keys e r to move the edit position and the cursor keys q w to select a value 4 To confirm the setting press ENTER 5 To save the changes use the cursor keys to se...

Страница 133: ...ettings Bluetooth Enables disables the Bluetooth function p 80 Settings Audio Receive Configures the Bluetooth settings when the unit is used as the Bluetooth audio receiver Bluetooth Standby Selects whether to enable disable the function that turns on the unit from Bluetooth devices Bluetooth standby If this function is set to On the unit automatically turns on when a connect operation is perform...

Страница 134: ...in Zone Set Configures the main zone setting Zone Rename Changes the zone name for main zone displayed on the front display or TV screen Setup procedure 1 Press ENTER to enter the name edit screen 2 Use the cursor keys and ENTER to rename and select ENTER to confirm the entry X To clear the entry select CLEAR 3 Use the cursor keys to select OK and press ENTER X To restore the default setting selec...

Страница 135: ... Music Enhancer p 68 for Zone2 output Settings Tone Control Adjusts the level of high frequency range Treble and low frequency range Bass for Zone2 output Settings Fixed Disables volume adjustments for Zone2 output Variable Enables volume adjustments for Zone2 output Off Sets the level at the volume level of the unit when it last entered standby mode On Sets at Mute or the specified volume level 8...

Страница 136: ...DMI OUT2 Assign Select the zone for which the HDMI OUT 2 ZONE OUT jack is used Settings Main Zone2 X For details on audio signals that can be output to Zone2 see Multi zone output p 165 Zone2 Audio Output Enables disables the audio output from the HDMI OUT 2 jack when HDMI OUT2 Assign is set to Zone2 Party Mode Set Enables disables switching to the party mode p 99 Choice Target Zone2 Settings Off ...

Страница 137: ...related to the front display and TV screen display Dimmer Front Display Adjusts the brightness of the front display Setting range 4 to 0 higher to brighten Y The front display may become dark when ECO Mode p 140 is set to On Short Message Selects whether to display short messages on the TV screen when the unit is operated such as input selection and volume adjustment Settings DSP Program Selection...

Страница 138: ...ce The TRIGGER OUT jack functions in sync with the input switching in the zone specified with Target Zone An electronic signal is transmitted according to the setting made in Source Manual Select this to manually switch the output level for electronic signal transmission with Manual Low Stops the electronic signal transmission when you switch to the input source specified in this option High Trans...

Страница 139: ...models 20 Minutes Other models Off X Just before the unit enters standby mode AutoPowerStdby appears and then countdown starts in the front display Off Does not protect the settings On Protects the settings until Off is selected Icon Off Does not set the unit to standby mode automatically 20 Minutes Sets the unit to standby mode when you have not operated the unit and no input signals are detected...

Страница 140: ...nch German Spanish Russian Italian Chinese X The information on the front display is provided in English only Viewing information about the unit Information menu You can view information about the unit using the TV screen X If new firmware is available mail icon appears at the upper right of the Information For details see Updating the unit s firmware via the network p 147 1 Press ON SCREEN 2 Use ...

Страница 141: ...number of samples per second of the input digital signal Dialogue The dialogue normalization level of the input bitstream signal Output Channel The number of signal output channels for example 5 1 2 denotes standard 5 1 channel plus 2 for overhead speaker channels and the speaker terminals from which signals are output HDMI Signal Presence or absence of HDMI signal input output HDMI Resolution Res...

Страница 142: ... Press PROGRAM to select an item 4 Press STRAIGHT to select a setting 5 Press MAIN ZONE z to set the unit to standby mode and turn it on again The new settings take effect SSID The SSID of the wireless network Security Security method Security Key Security key IP Address IP address Subnet Mask Subnet mask MAC Address Wi Fi MAC address MusicCast Network The status of the MusicCast network connectio...

Страница 143: ... and General models only Changes the FM AM tuning frequency setting 144 TV FORMAT Switches the video signal type 144 MONITOR CHECK Removes the limitation on HDMI video output 144 4K MODE Selects the HDMI 4K 60 Hz 50 Hz signal format 145 DTS MODE Switches the DTS format notification setting 145 RECOV BACKUP Creates backup of the settings of the unit or recovers the settings from the backup 145 INIT...

Страница 144: ...nd General models NTSC Other models PAL Removing the limitation on HDMI video output MONITOR CHECK The unit automatically detects resolutions supported by a TV connected to the HDMI OUT jack Disable the monitor check function if you want to specify a resolution in Resolution p 129 when the unit cannot detect the TV s resolution or when you want to specify a different resolution than the detected r...

Страница 145: ...s MODE 1 Inputs outputs 4K signals shown in the table below Depending on the connected device or HDMI cables video may not be displayed correctly In this case select MODE 2 MODE 2 Inputs outputs 4K signals shown in the table below MODE 1 MODE 2 8 bit 10 bit 12 bit 8 bit 10 bit 12 bit 4K 60 50 Hz RGB 4 4 4 YCbCr 4 4 4 YCbCr 4 2 2 YCbCr 4 2 0 4K 30 25 24 Hz RGB 4 4 4 YCbCr 4 4 4 YCbCr 4 2 2 MODE 1 4...

Страница 146: ...B or NETWORK and press INFO to start firmware update Choices X If the unit detects newer firmware over the network the corresponding message will be displayed after ON SCREEN is pressed In this case you can also update the unit s firmware by following the procedure in Updating the unit s firmware via the network p 147 Checking the firmware version VERSION Check the version of firmware currently in...

Страница 147: ...yed in the System screen p 142 You can update the unit s firmware by pressing ENTER in the System screen Note Do not operate the unit or disconnect the power cable or network cable during firmware update Firmware update takes about 20 minutes or more depending on your Internet connection speed If the unit is connected to the wireless network network update may not be possible depending on the cond...

Страница 148: ...date if you turn off the unit with AV CONTROLLER or MusicCast CONTROLLER If the firmware update is complete the unit turns off automatically UPDATE ENTER NETWORK Firmware update indicator flashes ENTER RETURN POP UP MENU TOP MENU 3 2 1 AUDIO 2 4 3 1 6 V AUX 7 5 AV BLUETOOTH NET PHONO USB TUNER 4 3 2 1 8 7 6 5 9 0 4 3 2 1 SCENE MUTE OPTION ON SCREEN DISPLAY MODE MOVIE MUSIC INFO SLEEP ENT PRESET TU...

Страница 149: ...s BD DVD players to the unit enable HDMI Control on each device and perform the HDMI Control link setup This setup is required every time you add a new HDMI Control compatible device to your system For information on how HDMI Control works between your TV and playback devices refer to the instruction manuals for each device I want to turn off the on screen messages displayed during operations By d...

Страница 150: ...10 seconds to initialize and reboot the unit If the problem persists disconnect the power cable from the AC wall outlet and plug it again The power turns off standby mode immediately The unit was turned on while a speaker cable was shorted Twist the bare wires of each speaker cable firmly and reconnect to the unit and speakers p 25 The unit enters standby mode automatically The sleep timer worked ...

Страница 151: ... Setup menu to adjust the maximum volume p 127 A device connected to the output jacks of the unit is not turned on Turn on all devices connected to the output jacks of the unit No sound is coming from a specific speaker The playback source does not contain a signal for the channel To check it use Audio Signal in the Information menu p 141 The currently selected sound program decoder does not use t...

Страница 152: ...does not match the actual connection Use TV Audio Input in the Setup menu to select the correct audio input jack p 130 If you are trying to use ARC ARC is disabled on the unit or TV Set ARC in the Setup menu to On p 130 Also enable ARC on the TV Only the front speakers work on multichannel audio The playback device is set to output 2 channel audio such as PCM only To check it use Audio Signal in t...

Страница 153: ...tection Refer to the instruction manuals for the TV and check the TV s specifications If you want to play back contents that require HDCP 2 2 compatible devices both the TV and playback device must support HDCP 2 2 The playback device that supports HDCP 2 2 is connected to the VIDEO AUX HDMI IN jack To play back contents that require HDCP 2 2 compatible devices connect the playback device to the H...

Страница 154: ...d AM antenna AM radio stations cannot be registered as presets Auto Preset has been used Auto Preset is for registering FM radio stations only Register AM radio stations manually p 70 Problem Cause Remedy No DAB radio reception An initial scan has not been performed Perform an initial scan to receive DAB radio p 72 No DAB radio reception even after performing an initial scan Reception strength of ...

Страница 155: ...egistered on the Bluetooth device is not working for some reason Delete the connection information on the Bluetooth device and then establish a connection between the Bluetooth device and the unit again p 80 No sound is produced or the sound is interrupted during playback The volume of the Bluetooth device is set too low Turn up the volume of the Bluetooth device The Bluetooth device is not set to...

Страница 156: ...t Move the unit and the wireless router access point in a location where there are no obstacles between them Wireless network is not found Microwave ovens or other wireless devices in your neighborhood might disturb the wireless communication Turn off these devices Access to the network is restricted by the firewall settings of the wireless router access point Check the firewall setting of the wir...

Страница 157: ...lter is enabled on the unit In MAC Address Filter in the Setup menu disable the MAC address filter or specify the MAC address of your smartphone tablet to allow it to access to the unit p 132 No sound from the MusicCast compatible device The MusicCast compatible device is turned off Turn on the MusicCast compatible device The MusicCast compatible device is not connected to the MusicCast network Co...

Страница 158: ... If the message stays more than 3 minutes turn off the unit and turn it on again RemID Mismatch The remote control IDs of the unit and the remote control are not identical Change the remote control ID of the unit or the remote control p 144 Remote Off The unit cannot be operated from remote control because the remote control sensor on the main unit is turned off Use the controls on the front panel...

Страница 159: ...master Dolby TrueHD can carry up to eight channels of 96 kHz 24 bit audio up to six channels of 192 kHz 24 bit audio simultaneously This technology is used for audio on BD Blu ray discs DSD Direct Stream Digital DSD Direct Stream Digital technology stores audio signals on digital storage media such as SACD Super Audio CDs The signals are stored at a high frequency sampling rate such as 2 8224 MHz ...

Страница 160: ...ng upmixing and spatial remapping technology from DTS It is built in to DTS X to provide upmix of Neural X encoded and non encoded PCM data In DTS X for AVRs and Sound Bars Neural X can produce up to 11 x channels PCM Pulse Code Modulation PCM is a signal format under which an analog audio signal is digitized recorded and transmitted This technology is the basis of all other audio format This tech...

Страница 161: ...hronization data signals are combined and transmitted with a single cable Deep Color Deep Color is a technology that HDMI specification supports Deep Color increases the number of available colors within the boundaries defined by the RGB or YCbCr color space Conventional color systems process the color using 8 bits Deep Color processes the color with 10 12 or 16 bits This technology allows HDTVs a...

Страница 162: ...und images so that it creates the accurate and intensive stereoscopic sound fields in a listening room Compressed Music Enhancer The Compressed Music Enhancer feature compensates for missing harmonics in compression music formats such as MP3 As a result this technology provides improved performance for the overall sound system SILENT CINEMA Yamaha has developed a natural realistic sound effect DSP...

Страница 163: ... or later and PC with iTunes 10 2 2 or later Made for iPhone 7 Plus iPhone 7 iPhone SE iPhone 6s Plus iPhone 6s iPhone 6 Plus iPhone 6 iPhone 5s iPhone 5c iPhone 5 iPhone 4s iPad Pro 9 7 and 12 9 iPad mini 4 iPad Air 2 iPad mini 3 iPad Air iPad mini 2 iPad mini iPad 3rd and 4th generation iPad 2 iPod touch 5th and 6th generation as of March 2017 File formats For information about specifications of...

Страница 164: ...he resolution and the aspect ratio applied to HDMI output video processing in Video Mode p 129 in the Setup menu The unit does not convert 480 line and 576 line video signals interchangeably m Available HDMI out Resolution 480i 576i 480p 576p 720p 1080i 1080p 4K HDMI in 480i 576i m m m m m m 480p 576p m m m m m 720p m m m m 1080i m m m m 1080p 50 60 Hz m m m m 1080p 24 Hz m m 4K m COMPONENT VIDEO ...

Страница 165: ...emote control operations You can also control playback devices such as HDMI Control compatible BD DVD players connected to the unit with an HDMI cable For details on connections see Connecting a TV and playback devices p 32 and Connecting video devices such as BD DVD players p 34 Operations available from the TV s remote control Standby synchronization Volume control including mute Switching to in...

Страница 166: ...ys to select On 7 Press ON SCREEN 3 Enable HDMI Control on the TV and playback devices such as HDMI Control compatible BD DVD players 4 Turn off the main power of the TV and then turn off the unit and playback devices 5 Turn on the unit and playback devices and then turn on the TV 6 Switch the TV input to display the video from the unit 7 Check the followings Ontheunit The inputtowhich the playbac...

Страница 167: ...nnected to the ARC compatible HDMI jack HDMI jack marked ARC on the TV Some HDMI jack on the TV is not compatible with ARC For details refer to the instruction manual for the TV Y If the audio is interrupted while using ARC set ARC p 130 in the Setup menu to Off and use an audio cable digital optical or stereo pin cable to input TV audio to the unit p 33 When using ARC connect a TV with an HDMI ca...

Страница 168: ...or is a trademark of Sony Corporation DLNA and DLNA CERTIFIED are trademarks or registered trademarks of Digital Living Network Alliance All rights reserved Unauthorized use is strictly prohibited Windows Windows is a registered trademark of Microsoft Corporation in the United States and other countries Internet Explorer Windows Media Audio and Windows Media Player are eitherregistered trademarkso...

Страница 169: ...YPAO MIC x 1 REMOTE IN x 1 REMOTE OUT x 1 TRIGGER OUT x 2 RS 232C x 1 HDMI HDMI Features 4K UltraHD Video include 4K 60 50Hz 10 12bit 3D Video ARC Audio Return Channel HDMI Control CEC Auto Lip Sync 21 9 Aspect Ratio Deep Color x v Color BT 2020 Colorimetry HDR High Dynamic Range HD audio playback Selectable HDMI input in HDMI standby mode HDMI Zone Output Video Format Repeater Mode VGA 480i 60 Hz...

Страница 170: ... DTS 96 24 DTS ES Matrix 6 1 DTS ES Discrete 6 1 DTS Digital Surround Post Decoding Format Dolby Surround Neural X DTS Neo 6 Music DTS Neo 6 Cinema Audio Section Rated Output Power 2 channel driven 20 Hz to 20 kHz 0 06 THD 6 Ω Front L R 120 W 120 W Center 120 W Surround L R 120 W 120 W Surround Back L R 120 W 120 W 20 Hz to 20 kHz 0 06 THD 8 Ω Front L R 110 W 110 W Center 110 W Surround L R 110 W ...

Страница 171: ...nic Distortion IHF 1 kHz Mono Stereo 0 5 0 6 Antenna Input 75 Ω unbalanced AM section except Australia U K Europe and Russia models Tuning Range U S A and Canada models 530 kHz to 1710 kHz Brazil Asia and General models 530 531 kHz to 1710 1611 kHz Other models 531 kHz to 1611 kHz DAB section Australia U K Europe and Russia models only Tuning Range 174 MHz to 240 MHz Band III Support Audio Format ...

Страница 172: ...Manual Development Group 2017 Yamaha Corporation Published 04 2017 AM A0 Yamaha Global Site https www yamaha com Yamaha Downloads http download yamaha com YJ290A0 EN1 ...

Отзывы: