7. DISK COMMANDS
182
Chapter 7 DISK Mode
• A5000/A4000
● ● ● ● ● ● ● ● ● ● ● ● ● ● ● ● ● ● ● ● ● ● ● ● ● ● ● ● ● ● ● ● ● ● ● ● ● ● ● ● ● ● ● ● ● ● ● ● ● ● ● ● ● ● ● ●
SYSTEM FILE
[DISK] Button
→
[COMMAND/EXIT] Button
→
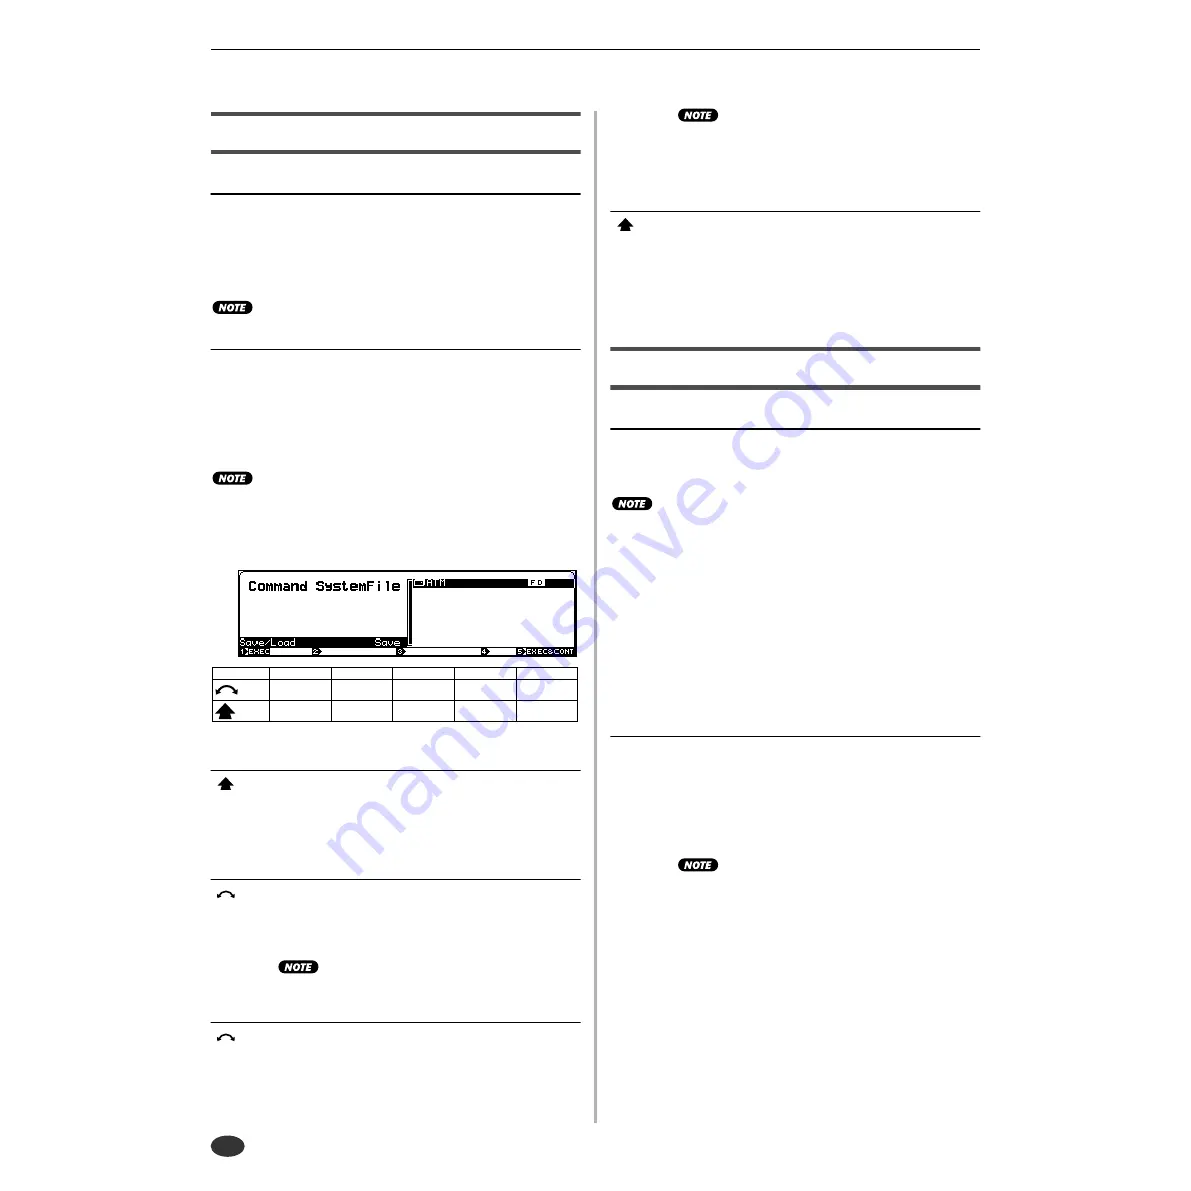
Knob 1 to highligh display line 1, Press Knob 5
Allows saving all system parameters to disk, or loading them
from disk (for information on system parameters see MIDI
Data Format).
Use this feature when you want to save or load the A5000/
A4000 operating environment.
• Only 1 system data file can be saved to 1 disk or partition.
[Operation]
1.
Use Knob 3 to specify whether the system file is to be saved or
loaded.
2.
Use Knob 4 to select the disk to or from which the system file is to
be saved or loaded.
3.
Use Knob 1 (EXEC) or Knob 5 (EXEC&CONT) to initiate execu-
tion. When the confirmation display appears, press Knob 5 (YES)
to execute the system file save or load operation.
• If Knob 1 (EXEC) is used to execute the command, the command
menu will be recalled after execution has finished. If Knob 5
(EXEC&CONT) is used to execute the command, the system file
display will be retained so you can continue and execute the save/
load operation.
Knob 1
[
Press] EXEC (Execute)
Press this knob to call the system file confirmation dis-
play. Press Knob 5 (YES) to actually execute the save/
load operation.
Knob 3
[
Turn] Save/Load
Specifies whether the system file is to be saved or
loaded.
[Range] Save, Load
• The system file can only be loaded from a disk to
which it has previously been saved.
Knob 4
[
Turn] Disk
Selects the disk to or from which the system file is to be
saved or loaded.
[Range] All connected/mounted disks.
• If a connected SCSI or IDE device (hard disk, ZIP
drive, etc.) cannot be selected, go to the disk select
display (DISK-DISK-Disk) and check the mount/
unmount status and SCSI ID settings of the device
(page 173).
Knob 5
[
Press] EXEC (Execute)
Press this knob to call the system file confirmation dis-
play. Press Knob 5 (YES) to actually execute the save/
load operation.
BACKUP
[DISK] Button
→
[COMMAND/EXIT] Button
→
Knob 1 to highlight display line 2
→
Press Knob 2
Allows the entire contents of a hard disk, ZIP disk, or other
disk to be backed up to CD-R or CD-RW. Up to 8 disks can
be backed up to a single CD-R or CD-RW disk.
• In order to use this function an appropriate CD-R or CD-RW drive
must be connected to the A5000/A4000 SCSI bus.
• CD-RW disks are written using the “Disk at Once” method, so once
a disk has been written, further data cannot be written to that disk.
• CD-R and CD-RW disks can only be written to from disks formatted
by the A5000/A4000.
• Use a Yamaha CD-R/CR-RW drive such as the CRW4416SX to
write CD-R/CD-RW disks.
• Errors may occur if you attempt to write to a CD-R or CD-RW disk
while a computer is connected to the sampler’s SCSI bus.
• A sufficient amount of parameter memory must be available in the
sampler in order to use this function. Ideally, the BACKUP function
should be used after turning the unit’s power on, and before any
data has been loaded or recorded.
[Operation]
1.
Use Knob 4 to specify the CD-R drive ID.
2.
Use Knob 5 to set the write speed.
3.
Use Knob 4 to specify the disks to be backed up for each backup
number in the backup list (Knob 2)
4.
Use Knob 1 (EXEC) or Knob 5 (EXEC&CONT) to initiate execu-
tion. When the confirmation display appears, press Knob 5 (YES)
to execute the backup operation.
• If Knob 1 (EXEC) is used to execute the command,
the command menu will be recalled after execution
has finished. If Knob 5 (EXEC&CONT) is used to
execute the command, the backup display will be
retained so you can continue and execute the
backup operation.
Knob 1
Knob 2
Knob 3
Knob 4
Knob 5
Turn
action
—
—
Save / Load
Disk
—
Press
action
EXEC
—
—
—
EXEC&CONT
Содержание A4000
Страница 1: ......
Страница 30: ...Sound Check 30 Chapter 1 Setting Up A5000 A4000 ...
Страница 116: ...PLAY CONTROL 116 Chapter 4 PLAY Mode A5000 A4000 ...
Страница 296: ......


