background image

CLP-370: Keyboard Stand Assembly

CLP-370/340/330, CLP-S308/S306


Owner’s Manual

ENGLISH

83

5.

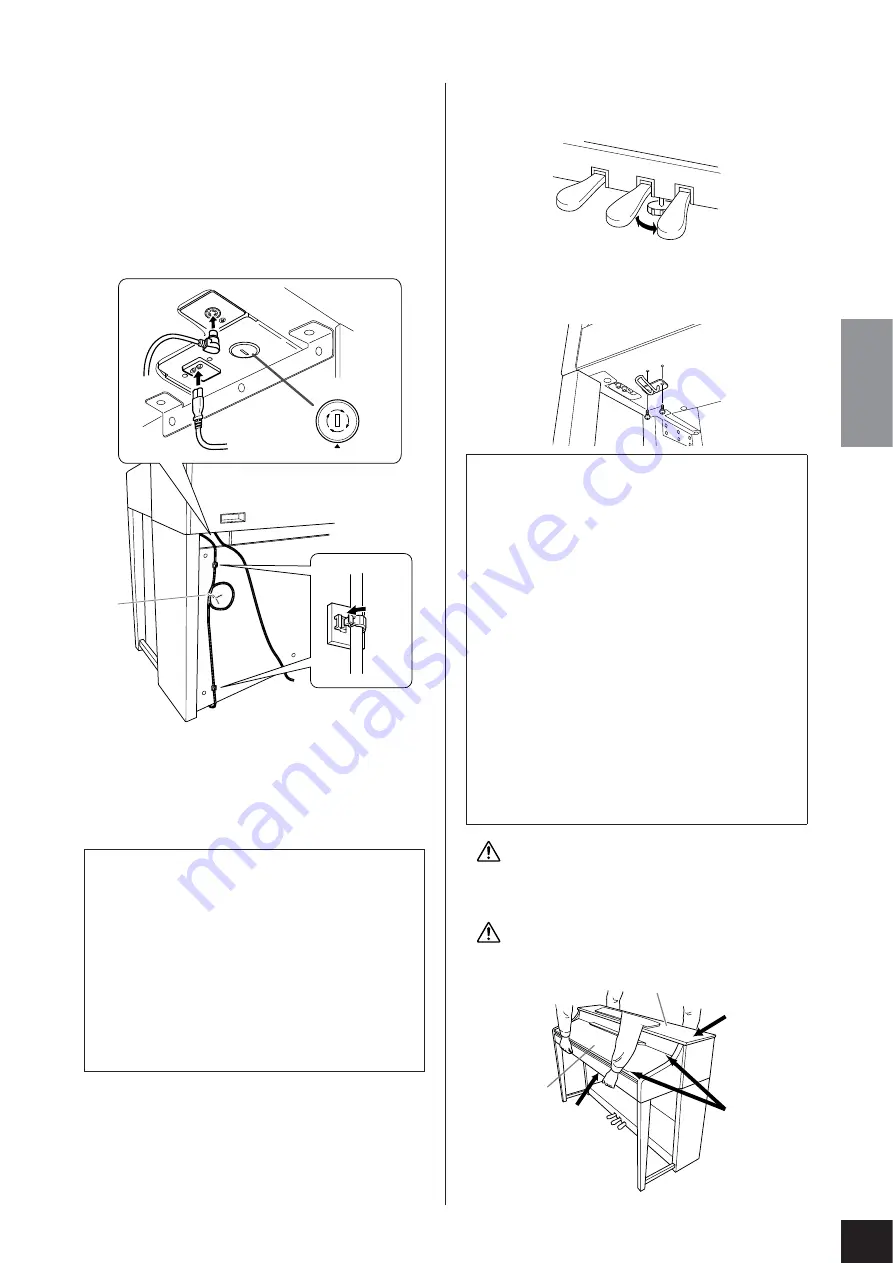
Connect the pedal cord.

5-1

Pass the pedal cord from the rear and insert the 
plug into the pedal connector.

5-2

Attach the cord holders to the rear panel as 
shown, then clip the cord into the holders.

5-3

Use a vinyl tie to take up any slack in the pedal 
cord.

6.

Connect the power cord.

6-1

Set the voltage selector (for models that feature a 
voltage selector).

6-2

Pass the power cord from the rear and insert the 
plug into the power connector.

7.

Set the adjuster.

Rotate the adjuster until the pedal box comes in 
firm contact with the floor surface.

8.

Attach the headphone hanger.

Use the included two screws (4 x 10 mm) to 
attach the hanger as shown in the illustration.

CAUTION

When moving the instrument after assembly, always hold 
instrument by the lower surface in the front of the main unit 
and by the handles in the rear of the main unit.

CAUTION

Do not hold the key cover or top portion. Improper handling 
can result in damage to the instrument or personal injury.

Voltage Selector

Before connecting the AC power cord, check the setting
of the voltage selector which is provided in some
areas. To set the selector for 110V, 127V, 220V or 240V
main voltages, use a “minus” screwdriver to rotate the
selector dial so that the correct voltage for your region
appears next to the pointer on the panel. The voltage
selector is set at 240V when the unit is initially
shipped. After the proper voltage has been selected,
connect the AC power cord to the AC IN and an AC
wall outlet. A plug adaptor may be also provided in
some areas to match the pin configuration of the AC
wall outlets in your area.

PED

AL

240

127

110

220

6-1

5-2

5-3

6-2

5-1

After completing the assembly, please check the fol-
lowing.
• Are there any parts left over?

Review the assembly procedure and correct any 
errors.

• Is the instrument clear of doors and other movable 

fixtures?

Move the instrument to an appropriate location.

• Does the instrument make a rattling noise when you 

shake it?

Tighten all screws.

• Does the pedal box rattle or give way when you step 

on the pedals?

Turn the adjuster so that it is set firmly against the floor.

• Are the pedal and power cords inserted securely into 

the sockets?

Check the connection.

• If the unit creaks or is otherwise unsteady when you 

play on the keyboard, refer to the assembly diagrams 
and retighten all screws.

Key cover

Hold here.

Do not hold 
here.

Top portion

Содержание 330

Страница 1: ...tion Vérifiez que la tension spécifiée sur le panneau inférieur correspond à la tension du secteur Dans certaines régions l instrument peut être équipé d un sélecteur de tension situé sur le panneau inférieur du clavier à proximité du cordon d alimentation Vérifiez que ce sélecteur est bien réglé en fonction de la tension secteur de votre région Le sélecteur de tension est réglé sur 240 V au dépar...

Страница 2: ...ly friendly We sincerely believe that our products and the production methods used to produce them meet these goals In keeping with both the letter and the spirit of the law we want you to be aware of the following Battery Notice This product MAY contain a small non rechargable battery which if applicable is soldered in place The average life span of this type of battery is approximately five year...

Страница 3: ...ays shown in this owner s manual are for instructional purposes only and may appear somewhat dif ferent from those on your instrument The panel illustrations shown in this owner s manual are taken from the CLP 370 Copying of the commercially available musical data including but not limited to MIDI data and or audio data is strictly prohibited except for your personal use CLP 370 340 CLP S308 S306 ...

Страница 4: ...instrument inspected by qualified Yamaha service personnel CAUTION Always follow the basic precautions listed below to avoid the possibility of physical injury to you or others or damage to the instrument or other property These precautions include but are not limited to the following When removing the electric plug from the instrument or an outlet always hold the plug itself and not the cord Pull...

Страница 5: ... the instrument device or headphones for a long period of time at a high or uncomfortable volume level since this can cause permanent hearing loss If you experience any hearing loss or ringing in the ears consult a physician Do not place the bench in an unstable position where it might accidentally fall over Do not play carelessly with or stand on the bench Using it as a tool or step ladder or for...

Страница 6: ...ike an acoustic piano the Clavinova does not need to be tuned It always stays perfectly in tune Transporting If you move to another location you can transport the Clavinova along with your other belongings You can move the unit as it is assembled or you can disassemble the unit Transport the keyboard horizontally Do not lean it up against a wall or stand it up on its side Do not subject the instru...

Страница 7: ... a sampling system that creates sounds close to those of an acoustic instrument by digitally recording the sounds of an instrument and applying high quality digital filtering technology to the recorded audio samples The sound waveform created by an acoustic piano differs depending on the player s strength of touch from pianissimo to fortissimo AWM Dynamic Stereo Sampling can create extremely dynam...

Страница 8: ...AMPER RES 22 Touch Sensitivity TOUCH 24 Transposition TRANSPOSE 25 Combining Two Voices Dual mode 26 Splitting the Keyboard Range and Playing Two Different Voices Split mode CLP 370 340 27 Using the Metronome 29 Recording Your Performance 30 Recording a performance quickly 30 Playing back a recorded song 32 Re recording a previously recorded song 32 Recording to RIGHT LEFT parts 33 Changing the In...

Страница 9: ...S306 CLP 330 Other Functions 66 F6 CLP 370 340 F5 CLP S308 S306 CLP 330 Metronome Volume 67 F7 CLP 370 340 F6 CLP S308 S306 CLP 330 MIDI Functions 67 F8 CLP 370 340 F7 CLP S308 S306 CLP 330 Backup Functions 70 F8 5 CLP 370 340 F7 5 CLP S308 S306 CLP 330 Character Code 70 F9 CLP 370 340 F8 CLP S308 S306 LAN Settings 70 Connections 71 Connectors 71 Connection to a USB storage device 73 Connecting a ...

Страница 10: ...L L R R L L R R AUX OUT º The panel illustrations shown are taken from the CLP 370 This illustration shown is taken from the CLP 370 Front Pedal jack for CLP 340 330 is next to the MIDI jacks Pedal jack for CLP S308 S306 is next to the LAN Jack Shows the jacks as seen when viewed from below the instrument Shows the jacks as seen when viewed from below the instrument CLP 370 340 only CLP 370 340 on...

Страница 11: ...ether Only the CLP 370 and CLP 340 has the VARIATION button SPLIT button CLP 370 340 page 27 For playing different voices on the left and right hand sections of the keyboard BRILLIANCE REVERB EFFECT buttons page 22 For adjusting the brightness of the sound and adding reverb effects to the sound TOUCH button page 24 For adjusting the touch response DAMPER RES button page 23 For turning the Damper R...

Страница 12: ...e key cover top with both hands then open the key cover slowly CAUTION Be careful not to pinch your fingers or those of children when opening or closing it 2 Close the edge of the key cover Fold it down so that it is flat with the cover To close the key cover 1 If the music rest is unfolded fold it back 2 Unfold the edge of the key cover 3 Hold the key cover with both hands and close it slowly CAU...

Страница 13: ...8 S306 Unfold the music rest When opening the key cover unfold the music rest Fold the music rest When closing the key cover fold the music rest CAUTION Be careful not to pinch your fingers or the fingers of child when opening or closing it CAUTION Do not place objects such as a piece of metal or paper on top of the key cover Small objects placed on the key cover may fall inside the unit when the ...

Страница 14: ...nd needs to be replaced contact your Yamaha dealer The use of an inappropriate replacement can pose a fire and shock hazard The type of AC power cord provided with the Clavinova may be different depending on the country in which it is purchased In some areas a plug adaptor may be provided to match the pin configuration of the AC wall outlets in your area Do NOT modify the plug provided with the Cl...

Страница 15: ...hone hanger is included in the Clavinova pack age so that you can conveniently hang the headphones on the Clavinova Install the headphone hanger using included two screws 4 x 10mm as shown in the figure CAUTION Do not hang anything other than the headphones on the hanger Doing so may damage the Clavinova or the hanger Using the Speaker Switch This switch turns the internal speakers on or off NORMA...

Страница 16: ...ONG PLAY PAUSE button instead of a voice button or only waiting not press any keys a short while the GRAND PIANO 1 demo tune will begin playback 4 Stop the Voice demo and exit from Demo mode Press the DEMO or SONG STOP button CLP 370 3 4 3 1 2 4 Procedure NOTE For a list of the demo songs see page 95 NOTE MIDI reception is not possible in Demo Song mode Demo song data is not transmitted via the MI...

Страница 17: ...nuously see procedure 2 above 4 Exit from Preset Song mode Press the SONG SELECT button to exit Preset Song mode The indicator turns off and the unit returns to normal play mode How to use the practice functions You can turn the left and right hand parts on or off as required so you can practice the corresponding part part cancel function and continuously repeat a specified phrase within a song so...

Страница 18: ...tomatically as you start playing the keyboard Sync Start When the Sync Start function is engaged playback of the selected preset song will begin automatically as soon as you start playing on the keyboard To engage the Sync Start function simultaneously hold down the SONG STOP and press the PLAY PAUSE button Repeat the previous operation to disengage the Sync Start function Playback will then start...

Страница 19: ...e This sets the B point will appear on the dis play At this point repeat playback will begin between the specified A and B points 2 Stop playback Press the SONG STOP button to stop playback while retaining the specified A and B points A B repeat playback will resume if you press the SONG PLAY PAUSE button To cancel the A and B points press the TEMPO FUNCTION button once CLP 370 1 2 Procedure NOTE ...

Страница 20: ...edure NOTE To learn characteristics of the voices listen to demo songs for each voice page 16 Refer to Preset Voice List on page 92 for more information on the charac teristics of each preset voice TERMINOLOGY Voice On the Clavinova a voice means a tone or tonal color NOTE You can control the loudness of a voice by adjusting the force with which you strike the keys although different playing style...

Страница 21: ... makes it possible to sustain a chord for example while other notes are played staccato Soft Left Pedal The soft pedal reduces the volume and slightly changes the timbre of notes played while the pedal is pressed The soft pedal will not affect notes that are already playing when it is pressed NOTE If the damper pedal doesn t work make sure that the pedal cord is properly plugged into the jack page...

Страница 22: ...epth and expression to the sound to create a realistic acoustic ambience OFF When no reverb effect is selected no REVERB indicator is lit ROOM This setting adds a continuous reverb effect to the sound similar to the acoustic reverberation you would hear in a room HALL 1 For a bigger reverb sound use the HALL 1 setting This effect simulates the natural reverberation of a small size concert hall HAL...

Страница 23: ...usting Effect Depth You can adjust the effect depth for the selected voice by using the NO and YES buttons while holding the EFFECT button The depth range is from 0 through 20 The current depth setting appears on the LED display while the EFFECT button is held DAMPER RES The Damper Resonance lets you hear a simulation of the sustain sound of the damper pedal on a grand piano as you press the dampe...

Страница 24: ...n FIXED is selected Changing the volume when FIXED is selected When you select FIXED you can set the volume for notes played in FIXED mode by using the NO and YES buttons while you hold the TOUCH button The current volume level appears on the display The volume range is from 1 through 127 The default setting is 64 NOTE This setting does not change the weight of the keyboard NOTE Normal setting MED...

Страница 25: ...ll transpose it to F major Use the NO and YES button while holding the TRANSPOSE button to transpose down or up as required The amount of transposition appears on the LED display while the TRANSPOSE button is held The default transpose setting is 0 The TRANSPOSE button indicator remains lit when a transpose setting other than 0 is selected If a value other than 0 is selected the TRANSPOSE button c...

Страница 26: ...play mode To return to the normal single voice play mode press any single voice button CLP 370 2 1 Procedure NOTE CLP 370 340 Dual and Split page 27 modes cannot be engaged at the same time NOTE VARIATION in Dual Mode CLP 370 340 The VARIATION button s indica tor will light if the variation is engaged for either or both of the Dual mode voices While Dual mode is engaged the VARIA TION button can b...

Страница 27: ...n the right and left hand range The split point is initially set at the F 2 key by default If you do not need to change the split point skip this procedure You can change the split point to any other key by pressing the key while hold ing the SPLIT button the name of the current split point key appears on the LED display while the SPLIT button is held An example of split point key display CLP 370 ...

Страница 28: ... lights in Split mode The VARIATION can be used to turn the variation for the right voice on or off as required While the SPLIT button is held however the voice indicator of the left voice lights In this state the VARIA TION button turns the variation for the left voice on or off NOTE REVERB in Split Mode The reverb type assigned to the right voice will take priority over the other If the reverb o...

Страница 29: ...sing the NO and YES buttons while holding the METRONOME ON OFF button You can set the beat from 0 to 15 The current setting appears on the LED display while you are holding the METRONOME ON OFF button A beat setting of 0 plays a low click sound for all beats while a setting of 1 plays a high click sound for all beats other beat settings play a high click for the first beat in a measure and a low c...

Страница 30: ...ng solo piano pieces In this way the performance is automatically recorded to right part CAUTION To avoid erasing previously recorded song s If the song contains data the part indicator lights up green when you select a song Note that recording new data on this part will erase the existing data You cannot record the performance to the connected USB storage device directly The recorded songs are sa...

Страница 31: ...ved to the instrument automatically After the data is saved the song name U01 U03 appears in the display The recorded part s indicator will glow green to indicate that it now contains data Record mode is disen gaged automatically CAUTION Do not turn off the power of the instrument when dashes appear in the display in suc cession Doing so may delete all song data in the instrument including externa...

Страница 32: ...eat Step 1 on page 31 if you wish to change the previous settings For more information of the recorded data see page 34 2 Re engage Record Ready mode Press the REC button again The selected part s indicator lights in red Follow the procedure from Step 3 in Recording a performance quickly on page 31 to re record Procedure Procedure NOTE If you want to change the tempo reverb type or effect type whe...

Страница 33: ...ton again 4 Start and stop recording Same as step 3 4 in Recording a performance quickly on page 31 NOTE Part button indications Off Contains no data On green Contains data On red Part is enabled for recording NOTE The amount of memory avail able for recording This value in kilobytes a unit used of measurement for data indicates how much space remains available for recording on the Clavinova You c...

Страница 34: ...idual Parts and Entire Song See below Individual Parts Notes played Voice selection VARIATION ON OFF CLP 370 340 Pedal Damper Soft Sostenuto REVERB depth EFFECT depth Dual mode voices Dual balance F3 Dual detune F3 Dual octave shift F3 Split mode voices F4 CLP 370 340 Split balance F4 CLP 370 340 Split octave shift F4 CLP 370 340 Entire Song Tempo Time signature beat REVERB type including OFF EFFE...

Страница 35: ...B depth EFFECT depth Dual mode voices Split mode voices CLP 370 340 Damper soft pedal depth Entire Song Tempo REVERB type including OFF EFFECT type including OFF 1 Change the settings via the panel controls For example if you wish to change the recorded voice from E PIANO 1 to E PIANO 2 press the E PIANO 2 button 2 Engage Record mode and select a part to change the initial settings The indicator g...

Страница 36: ... protected If the device is protected you cannot access it NOTE If there is not enough capacity left on the USB storage device to save or export the data an appro priate message will appear on the display and you will not be able to save or export the data Delete unwanted files from the device to make more memory available page 39 or use another device NOTE The file numbers which can be handled in...

Страница 37: ...ppears in the display again to confirm whether you wish to overwrite the file or not press the YES button once more CAUTION While the instrument is accessing data such as during Save Load Delete and Format operations or is mounting the USB storage device shortly after the connection until the FILE LOAD LED flash stops do NOT unplug the USB cable do NOT remove the media from the device and do NOT t...

Страница 38: ...n display indicating that save oper ation is in process CAUTION While the instrument is accessing data such as during Save Load Delete and Format operations or is mounting the USB storage device shortly after the connection until the LOAD TO USER LED flash stops do NOT unplug the USB cable do NOT remove the media from the device and do NOT turn the power off to either devices Doing so may corrupt ...

Страница 39: ...data such as during Save Delete Load and Format operations or is mounting the USB storage device shortly after the connec tion until the LOAD TO USER LED flash stops do NOT unplug the USB cable do NOT remove the media from the device and do NOT turn the power off to either devices Doing so may corrupt the data on either or both devices 3 Exit from the file operation mode Press the FILE button to e...

Страница 40: ...n After n y no yes appears in the display press the YES button After n y appears in the display again to confirm whether you wish to format the device or not press the YES button once more If you do not want to format the device press the NO button CAUTION While the instrument is accessing data such as during Save Delete Load and Format operations or is mounting the USB storage device shortly afte...

Страница 41: ...B storage device Before removing the media from the device make sure that the instrument is not accessing data such as in the Save Copy and Delete operations CAUTION Avoid frequently turning the power on off to the USB storage device or connecting disconnecting the device too often Doing so may result in the operation of the instrument freezing or hanging up While the instrument is accessing data ...

Страница 42: ...floppy disk drive Be sure to remove the floppy disk from the disk drive before turning off the power A floppy disk left in the drive for extended periods can easily pick up dust and dirt that can cause data read and write errors Cleaning the Disk Drive Read Write Head Clean the read write head regularly This instrument employs a precision magnetic read write head which after an extended period of ...

Страница 43: ...F Format 0 and most commercially available MIDI sequence data is provided in SMF Format 0 The SMF format for sequence files allows you to exchange song data between different sequencers User songs recorded in this instrument are saved as SMF Format 0 ESEQ This sequence format is compatible with many of Yamaha s MIDI devices including the Clavinova series instruments This is a common format used wi...

Страница 44: ... Adjust the tempo You can use the TEMPO FUNCTION buttons to adjust the playback tempo as required before or during playback The default tempo the song s original tempo is set when you press the and buttons simultaneously 3 Stop playback When playback is complete the Clavinova automatically stops and locates the top of the song To stop playback in the middle of a song press the SONG STOP button You...

Страница 45: ... in green While the Clavinova is playing or stopped pressing these part buttons turns off the indicators and the data on those parts is not played Pressing the part buttons toggles part playback on and off Starting playback automatically when you start playing the keyboard Sync Start You can start playback as soon as you start playing the keyboard This is called the Sync Start function To engage t...

Страница 46: ...ttp music yamaha com idc To use the Internet connection you will first need to subscribe to an Internet service or provider Connection example 1 Connecting by cable using a modem with out router NOTE Depending on the Internet con nection you may not be able to connect to two or more devices for example a computer and the instrument depending on the contract with the provider This means you cannot ...

Страница 47: ...optical network unit ONU or cable modem NOTE Connect the wireless game adap tor to the LAN port NOTE In addition to the modem or an access point this connection requires a router Modem Access point LAN port Wireless Game Adaptor Here modem refers to an ADSL modem optical network unit ONU or cable modem NOTE Connect the USB wireless LAN adaptor to the USB TO DEVICE terminal NOTE In addition to the ...

Страница 48: ...tings see About the Internet Settings on page 49 If you are using a wireless LAN using a wireless game adaptor You do not need to make settings on the instrument You can access the Internet simply by connecting a wireless game adaptor to the instrument The wireless game adaptor requires settings such as the access point For information about how to make settings read the owner s manual for the pro...

Страница 49: ...your computer before making the Internet settings For information about how to create the Internet setting files read the instructions on the Yamaha webpage http music yamaha com idc Loading the Internet Setting Files This procedure lets you make Internet settings by loading the Internet setting files created on the special Yamaha webpage to the instrument 1 Engage the Function mode Make sure that...

Страница 50: ...he YES button once more If you do not want to load the file press the NO button When loading from the USB flash memory device is completed an End message will appear on the dis play Press NO or YES button to exit from this display Once loading is completed you are now ready to access the Internet Once the instrument is successfully connected to the Internet currently selected channel will be shown...

Страница 51: ...uctions on page 49 1 Select Function F9 3 on the CLP 370 340 or F8 3 on the CLP S308 S306 Use the TEMPO FUNCTION buttons to select Function F9 3 CLP 370 340 or F8 3 CLP S308 S306 2 Press the NO or YES button The field strength indication will appear on the display for about three seconds Field Strength Indications NOTE The field strength can be dis played after making the Internet connection NOTE ...

Страница 52: ... button A n y message will appear on the display if a USB flash memory device con tains a file with the same name as the one you are attempting to export Press the YES button to execute the overwriting operation Press the NO button to cancel exporting When exporting to the USB flash memory device is completed an End message will appear on the dis play Press NO or YES button to exit from this displ...

Страница 53: ... Selection mode Press the YES button to exit from the sub modes 4 Exit from the Function mode Press the TEMPO FUNCTION button to exit from function modes Checking the version number of the LAN Port driver You can check the version number of the LAN Port driver Engage the function mode then select the function number and enter the desired Sub modes Selection mode refer to steps 1 3 for similar inst...

Страница 54: ...similar instructions on page 49 1 Select Function F9 6 on the CLP 370 340 or F8 6 on the CLP S308 S306 Use the TEMPO FUNCTION buttons to select Function F9 6 CLP 370 340 or F8 6 CLP S308 S306 2 Call up the version number Press the YES button so that the version number appears on the display A L A message and version number x x x will appear alternately on the display 3 Return to the Sub modes Sele...

Страница 55: ...t If you do not want to initialize press the NO button 4 Execute the initialization Press again the YES buttons Start the initialization When initialization is completed an End message appears on the display 5 Return to the Sub modes Selection mode Press the YES button to exit from the Sub modes 6 Exit from function mode Press the TEMPO FUNCTION button to exit from the Function modes CAUTION Initi...

Страница 56: ...ess lamp flashes in red during Internet access 4 Stop playback Press the SONG STOP button CLP 370 1 3 4 2 Procedure NOTE You cannot select the INTER NET lamp while voice demo song playback is in use or the REC button is on NOTE The LED displays shown in this owner s manual are for instruc tional purposes only and may appear somewhat different from those on your instrument NOTE You can adjust the E...

Страница 57: ...ngs on a web page When the place with the link is clicked the page selection jumps to the relevant link Modem A device which connects and allows data transfer between a conventional telephone line and a computer It converts the digital signals from the computer to analog audio for sending over the phone line and vice versa Provider A communications business that offers Internet connection services...

Страница 58: ...d and reset to the default settings Yamaha recommends you that you back up the data before initial izing refer on page 78 Turn off the power to the instrument Then turn the power on while holding the C7 key highest key CAUTION Do not turn off the power to this instrument while data in internal memory is being ini tialized in other words while the CLr indication is shown Doing so may corrupt the al...

Страница 59: ...4 Voice 1 Effect Depth F3 5 F3 5 F3 5 64 Voice 2 Effect Depth F3 6 F3 6 F3 6 64 Reset F3 7 F3 7 F3 7 64 Split mode functions Split Point F4 1 65 Split Balance F4 2 65 Right Voice Octave Shift F4 3 65 Left Voice Octave Shift F4 4 65 Right Voice Effect Depth F4 5 65 Left Voice Effect Depth F4 6 65 Damper Pedal Range F4 7 65 Reset F4 8 65 Other Functions Left Pedal Mode F5 1 F4 1 F4 1 66 Soft Pedal E...

Страница 60: ...des jump to Step 4 If the function includes sub modes press the YES button once to enter the respective sub mode LAN Settings Loading Internet Setting File F9 1 F8 1 49 Exporting The Connection Informa tion F9 2 F8 2 52 Checking the Field Strength F9 3 F8 3 51 Program Version Program Version F9 4 F8 4 53 LAN Functions LAN port driver version F9 5 F8 5 53 USB LAN Adapter version F9 6 F8 6 54 Initia...

Страница 61: ...t turn on the power to the Clavinova is recalled by pressing the NO and YES buttons simultaneously Operation Example 1 F1 Fine tuning of the pitch Operation Example 2 F3 1 Dual Balance 5 After using the function exit the function mode To exit the Function mode press the TEMPO FUNCTION button so that its TEMPO indicator lights Engage the Function mode LED indication Change the value LED indication ...

Страница 62: ...out 0 2Hz steps Hold the A 1 B 1 and C 0 keys two white keys and a black key simultaneously and press any key between C3 and B3 To restore standard pitch Hold the A 1 B 1 C0 and C 0 three white keys and a black key simultaneously and press any key between C3 and B3 Each key has a note name for example the lowest farthest left key on the keyboard corresponds to A 1 and the highest farthest right ke...

Страница 63: ... 18th century and was used by Handel Werckmeister Kirnberger These scales combine Mean Tone and Pythagorean in different ways With these scales modulation changes the impression and feel of the songs They were often used in the era of Bach and Beethoven They are often used today to reproduce the music of that era on harpsichords 1 Engage the Function mode and select 2 Press the YES button to engag...

Страница 64: ...d F3 3 Voice 1 Octave Shift F3 4 Voice 2 Octave Shift Setting range 1 0 1 Normal setting Different for each voice combination You can shift the pitch up and down in octave steps for Voice 1 and Voice 2 independently Depending on which voices you combine in Dual mode the combination may sound better if one of the voices is shifted up or down an octave F3 5 Voice 1 Effect Depth F3 6 Voice 2 Effect D...

Страница 65: ...3 Right Voice Octave Shift F4 4 Left Voice Octave Shift Setting range 1 0 1 Normal setting Different for each voice combination You can shift the pitch up and down in octave steps for the Right Voice and Left Voice independently Make a setting depending on the note range of the songs you play You can make this setting for each combination of voices individually F4 5 Right Voice Effect Depth F4 6 L...

Страница 66: ... left pedal functions in the same manner as the VARIATION button on the panel Normal setting 1 Soft Pedal F5 2 CLP 370 340 F4 2 CLP S308 S306 CLP 330 Soft Pedal Effect Depth Setting range 1 5 Normal setting 3 This function sets the depth of the soft pedal effect F5 3 CLP 370 340 Sustain Sample Depth Setting range 0 20 Normal setting 12 The GRAND PIANO 1 voice features special Sustain Samples that ...

Страница 67: ... 16 OFF not transmitted Normal setting 1 F6 CLP 370 340 F5 CLP S308 S306 CLP 330 Metronome Volume NOTE SHORTCUT You can jump directly to the metronome functions CLP 370 340 CLP S308 S306 CLP 330 by pressing the TEMPO FUNCTION button while holding the METRONOME ON OFF button To exit the Function mode you still need to press the TEMPO FUNCTION button so that the TEMPO indicator lights up F7 CLP 370 ...

Страница 68: ...cel program change number reception and transmission so that voices can be selected on the instrument without affect ing the external MIDI device Setting range ON OFF Normal setting ON F7 5 CLP 370 340 F7 5 CLP S308 S306 CLP 330 Control Change ON OFF Normally the CLP 370 340 330 CLP S308 S306 will respond to MIDI control change data received from an external MIDI device or keyboard causing the voi...

Страница 69: ...nstrument Procedure 1 Set up the panel controls as desired 2 Connect the Clavinova to a sequencer via MIDI and set up the sequencer so it can receive the setup data 3 Engage the Function mode and select CLP 370 340 CLP S308 S306 CLP 330 4 Press the YES button to transmit the panel status data will appear on the LED display when the data has been successfully transmitted The following data can be s...

Страница 70: ...on CLP 370 340 for each voice Touch Sensitivity including the FIXED volume Metronome Beat Volume CLP 370 340 CLP S308 S306 CLP 330 settings F9 2 CLP 370 340 F7 2 CLP S308 S306 CLP 330 MIDI The MIDI functions CLP 370 340 CLP S308 S306 CLP 330 settings expect for the F7 6 and F7 7 CLP 370 340 and CLP S308 S306 CLP 330 F9 3 CLP 370 340 F7 3 CLP S308 S306 CLP 330 Tuning Transpose Tuning settings Scale...

Страница 71: ...r condition automatically see below USB TO DEVICE SELECT USB TO DEVICE TO HOST MIDI IN OUT THRU AUX IN L L R R L L R R AUX OUT 5 4 3 CLP 370 340 330 3 1 6 2 CLP 370 340 only Show the jacks as seen when viewed from below the instrument CLP 370 340 only CLP 370 340 only On the left of the panel CLP S308 S306 4 5 2 1 6 Right Left NOTE Use cables and plugs with no resistance NOTE Do not input the soun...

Страница 72: ...s but the BRILLIANCE REVERB and EFFECT set tings do not NOTE If you connect the Clavinova to a monaural device use only the AUX IN L L R jack AUX IN L L R R Clavinova AUX OUT Tone Generator Plug shape depends on the device OUT PUT EMR1 AUX IN Phone plug standard Audio cable AUX IN Phone plug standard Audio cable Phone plug standard NOTE There are two different types of USB terminals on the instrum...

Страница 73: ...onnection until the FILE LOAD LED flash stops do NOT use the SELECT switch Doing so may corrupt the media or data CAUTION Disconnect the optional USB storage device connected to the USB TO DEVICE A terminal before closing the key cover Closing the cover with the device still connected may damage the device Formatting USB storage media When executing a file related operation with a connected USB st...

Страница 74: ...ned on the hard disk of a computer can be transferred to the instrument by first copying them to the storage media then connecting inserting the media to the instrument Not only files created on the instrument itself but also Standard MIDI files created on other devices can be copied to a USB storage device from the hard disk of the computer Once you ve copied the data connect the device to the US...

Страница 75: ...your computer make the connec tion directly without passing through a USB hub For information on setting up your sequence software refer to the owner s manual of the relevant software Precautions when using the USB TO HOST terminal When connecting the computer to the USB TO HOST terminal make sure to observe the following points Failing to do so risks freezing the computer and corrupting or losing...

Страница 76: ...Do not turn off the power to this instrument or unplug the instrument during data transmission Otherwise the data being transmitted will not be saved Furthermore flash memory operation may become unstable causing the entire memory to be erased when you turn the power to the instrument on or off NOTE You can download free Musicsoft Downloader from the Yamaha website NOTE Do not manually change the ...

Страница 77: ... song in this instrument to a computer For more information on transferring song data from this instrument to a computer please refer to Transferring Data Between the Computer and Instrument for unprotected data in the Help file that came with Musicsoft Downloader Data you can transfer from this instrument to a computer User song your recorded songs Back up data panel settings Song data once it ha...

Страница 78: ...P xxx BUP file from System Drive under Electronic Musical Instruments to the computer The CLP xxx BUP file contains the panel settings and recorded User songs Also if you store the external songs in the instrument from the computer move the songs from Flash Memory under Electronic Musical Instruments to the computer via the MSD For instruction on using the MSD see the Help in the MSD To recall the...

Страница 79: ...d while starting Musicsoft Downloader on a computer con nected to the instrument FCL Indicates that internal memory has been cleaned up Recorded songs and external songs which have been loaded from a computer are cleared because the power has been turned off before the song save or load operations were completed CAUTION Do not turn off the power of the instrument when FCL appears in the display Do...

Страница 80: ...insert the pedal plug into the proper jack pages 83 86 The speaker sound is changed The AUX OUT jack may be connected Make sure to disconnect the plug see page 71 Even though a USB storage device is con nected the SONG SELECT USB indicator does not turn on when pressing the SONG SELECT button The USB storage device may not be recognized by the instrument depending on the device itself or the timin...

Страница 81: ...duct Be sure to tighten all screws upon completing assembly of the unit To disassemble the unit reverse the assembly sequence given below Remove all parts from the package and make sure you have all of the items Have a Philips head screwdriver of the appropriate size ready A B C D E Foamed styrol pads Remove foamed styrol pads from the package position them on the floor then place A on top of them...

Страница 82: ... to D and E by finger tighten ing two thin screws 4 x 12 mm 2 2 Secure the bottom end of B using four tapping screws 4 x 20 mm 2 3 Securely tighten the screws on the top of B that were attached in Step 2 1 3 Mount A Make sure that you mount the main unit by holding the front bottom in areas that are at least 15 cm towards the center from either end and by the handles on the rear panel CAUTION Be e...

Страница 83: ...ing of the voltage selector which is provided in some areas To set the selector for 110V 127V 220V or 240V main voltages use a minus screwdriver to rotate the selector dial so that the correct voltage for your region appears next to the pointer on the panel The voltage selector is set at 240V when the unit is initially shipped After the proper voltage has been selected connect the AC power cord to...

Страница 84: ...e product Be sure to tighten all screws upon completing assembly of the unit To disassemble the unit reverse the assembly sequence given below Remove all parts from the package and make sure you have all of the items Have a Philips head screwdriver of the appropriate size ready A B C E D Foamed styrol pads Remove foamed styrol pads from the package position them on the floor then place A on top of...

Страница 85: ... by finger tightening two thin screws 4 x 12 mm 2 3 While pushing the lower part of D and E from outside secure the bottom end of B using four tapping screws 4 x 20 mm 2 4 Securely tighten the screws on the top of B that were attached in Step 2 2 3 Mount A Be sure to place your hands at least 15 cm from either end of the main unit when positioning it CAUTION Be extra careful not to drop or let you...

Страница 86: ...rovided in some areas To set the selector for 110V 127V 220V or 240V main voltages use a minus screwdriver to rotate the selector dial so that the correct voltage for your region appears next to the pointer on the panel The voltage selector is set at 240V when the unit is initially shipped After the proper voltage has been selected connect the AC power cord to the AC IN and an AC wall outlet A plu...

Страница 87: ...bly sequence given below Remove all parts from the package and make sure you have all of the items Have a Philips head screwdriver of the appropriate size ready B C D E F A A Foamed styrol pads Remove foamed styrol pads from the package position them on the floor then place A on top of them Position the pads so that they will not hide the connectors on the bottom of A Pedal cord 6 x 20 mm long scr...

Страница 88: ...14 mm Insert the screw into the smaller hole on the bracket 3 Mount A 3 1 Place your hands at least 15 cm from either end of A to mount it 3 2 Position A so that the stopper wood on the rear side of the bottom of A will be located behind the front panel then slide A slowly toward the rear CAUTION Be extra careful not to drop or let your fingers be pinched by the main unit CAUTION Do not hold the k...

Страница 89: ... voltage selector to an appropriate voltage WARNING An improper voltage setting can cause serious damage to the Clavinova or result in improper operation 8 2 Insert the AC power cord plug into the AC IN connector 9 Set the adjuster to secure the pedals Rotate the adjuster until the pedal box comes in firm contact with the floor surface 10 Attach the headphone hanger Use the included two screws 4 x...

Страница 90: ...leting the assembly please check the fol lowing Are there any parts left over Review the assembly procedure and correct any errors Is the instrument clear of doors and other movable fixtures Move the instrument to an appropriate location Does the instrument make a rattling noise when you shake it Tighten all screws Does the pedal box rattle or give way when you step on the pedals Turn the adjuster...

Страница 91: ...ing the floppy disk drive with these models simply put the drive on the top panel Make sure to remove the connected disk cable before you close the key cover 1 Remove the three backing papers from the adhesive tape in the case and fit the floppy disk drive into the case 2 Fold the USB cable inside the case as shown 3 Attach the drive and case assembly to the left underside of the instrument using ...

Страница 92: ...rings there is no touch response There is however a characteristic additional sound when the keys are released VARIATION Mixes the same voice an octave higher for a more brilliant tone E CLAVICHORD A hammer struck keyboard instrument that utilizes an elec tric pickup that is often heard in funk and soul music Its tone is noted for the unique sound produced when the keys are released VARIATION Incl...

Страница 93: ...mbal voice to the bass sound Ideal for walking bass lines in jazz tunes E BASS Electric bass for a wide range of music styles jazz rock popular and more VARIATION A fretless bass good for styles such as jazz fusion etc 1 Dynamic Sampling provides multiple velocity switched samples to accurately simulate the timbral response of an acoustic instrument 2 Contains a very subtle sample that is produced...

Страница 94: ...instrument for baroque music Since harpsi chord uses plucked strings there is no touch response There is however a characteristic additional sound when the keys are released HARPSICHORD 2 Mixes the same voice an octave higher for a more brilliant tone VIBRAPHONE Vibraphone played with relatively soft mallets The tone becomes more metallic the harder you play CHURCH ORGAN 1 This is a typical pipe o...

Страница 95: ...umbard Lyriske stykker IV op 47 2 E H Grieg HARPSICHORD Concerto a cembalo obbligato 2 violini viola e continuo No 7 BWV 1058 J S Bach HARPSICHORD1 HARPSICHORD2 Gigue Französische Suiten Nr 5 BWV 816 CHURCH ORGAN Herr Christ der ein ge Gottes Sohn BWV 601 CHURCH ORGAN1 CHURCH ORGAN2 Triosonate Nr 6 BWV 530 Voice Name Piano Voice Demo GRAND PIANO1 Stereo sampling GRAND PIANO2 Monaural sampling E PI...

Страница 96: ...nnectors 71 D Damper Pedal 21 Damper Pedal Range 65 DAMPER RES button 23 Damper Resonance 23 Delete 39 DEMO button 16 Demo Song List 95 Demonstration Tunes 16 Display 14 Dual mode 26 64 E EFFECT button 22 23 Equal Temperament 63 Export 36 F Factory Setting List 98 FILE button 37 Fine Tuning of the Pitch 62 Floppy Disk Drive 42 Installation 91 Format 40 41 42 Function 62 Basic Procedure 60 Paramete...

Страница 97: ...re Minor 63 Pythagorean 63 R REC button 31 Recording 30 Initial Settings 35 RIGHT LEFT parts 33 Re recording 32 34 REVERB button 22 RIGHT button 18 33 Right Pedal 21 rnd LED display 17 45 S Save 36 37 Scale 63 SELECT switch 73 SMF Standard MIDI File 36 Soft Pedal 21 66 Soft Pedal Effect Depth 66 Song 17 SONG PLAY PAUSE button 16 17 44 SONG SELECT button 17 44 SONG STOP button 17 44 SPEAKER switch ...

Страница 98: ...3 CLP 370 340 CLP 330 CLP S308 S306 Function Default Backup Group CLP 370 340 CLP 330 CLP S308 S306 F1 F1 Tuning A3 440Hz F8 3 F7 3 F2 1 F2 1 Scale 1 Equal Temperament F2 2 F2 2 Base Note C F3 1 F3 1 Dual Balance Preset for each voice combination F8 1 F7 1 F3 2 F3 2 Dual Detune Preset for each voice combination F3 3 F3 4 F3 3 F3 4 Dual Octave Shift Preset for each voice combination F3 5 F 3 6 F3 5...

Страница 99: ...eceive Channel ALL F7 3 F6 3 Local Control ON F7 4 F6 4 Program Change Send Receive ON F7 5 F6 5 Control Change Send Receive ON F8 F7 Backup Voice OFF MIDI Others ON Always backed up F8 5 F7 5 Character Code Int CLP 370 340 CLP 330 CLP S308 S306 Function Default Backup Group CLP 370 340 CLP 330 CLP S308 S306 ...

Страница 100: ...g 171lbs 15 oz Control Interface Number of Keys 88 Keyboard Type NW Natural Wood with Synthetic ivory keytops Wood is used for the white keys GH3 Graded Hammer 3 with Synthetic ivory keytops GH3 Graded Hammer 3 NW Natural Wood with Synthetic ivory keytops Wood is used for the white keys GH3 Graded Hammer 3 with Synthetic ivory keytops Touch Sensitivity Yes Number of Pedal 3 Half Pedal Yes Pedal Fu...

Страница 101: ...etario tienen sólo el propósito de servir como información Yamaha Corp se reserva el derecho a efectuar cambios o modificaciones en los productos o especificaciones en cualquier momento sin previo aviso Puesto que las especifica ciones equipos u opciones pueden no ser las mismas en todos los mercados solicite información a su distribuidor Yamaha Songs Number of Preset Songs 50 Recording Number of ...

Страница 102: ...CLP 370 340 330 CLP S308 S306 Owner s Manual 102 MEMO ...

Страница 103: ...CLP 370 340 330 CLP S308 S306 Owner s Manual 103 MEMO ...

Страница 104: ...CLP 370 340 330 CLP S308 S306 Owner s Manual 104 MEMO ...

Страница 105: ...and a third grounding prong The wide blade or the third prong are provided for your safety If the provided plug does not fit into your outlet consult an electrician for replacement of the obsolete outlet 10 Protect the power cord from being walked on or pinched particularly at plugs convenience receptacles and the point where they exit from the apparatus 11 Only use attachments accessories specifi...

Страница 106: ...eorient the antenna If the antenna lead in is 300 ohm ribbon lead change the lead in to co axial type cable If these corrective measures do not produce satisfactory results please contact the local retailer authorized to distribute this type of product If you can not locate the appropriate retailer please contact Yamaha Corporation of America Electronic Service Division 6600 Orangeth orpe Ave Buen...

Страница 107: ... SWEDEN Yamaha Scandinavia AB J A Wettergrens Gata 1 Box 30053 S 400 43 Göteborg Sweden Tel 031 89 34 00 DENMARK YS Copenhagen Liaison Office Generatorvej 6A DK 2730 Herlev Denmark Tel 44 92 49 00 FINLAND F Musiikki Oy Kluuvikatu 6 P O Box 260 SF 00101 Helsinki Finland Tel 09 618511 NORWAY Norsk filial av Yamaha Scandinavia AB Grini Næringspark 1 N 1345 Østerås Norway Tel 67 16 77 70 ICELAND Skifa...

Страница 108: ...l Instrument Division Yamaha Corporation 2008 Yamaha Corporation WN75950 806MWAP1 4 01A0 Printed in China Yamaha Home Keyboards Home Page http music yamaha com homekeyboard Yamaha Manual Library http www yamaha co jp manual DIC 2164 ...

Отзывы: