22
Tyros2
MO
TR
OWNE
BEDIE
MODE
Hook
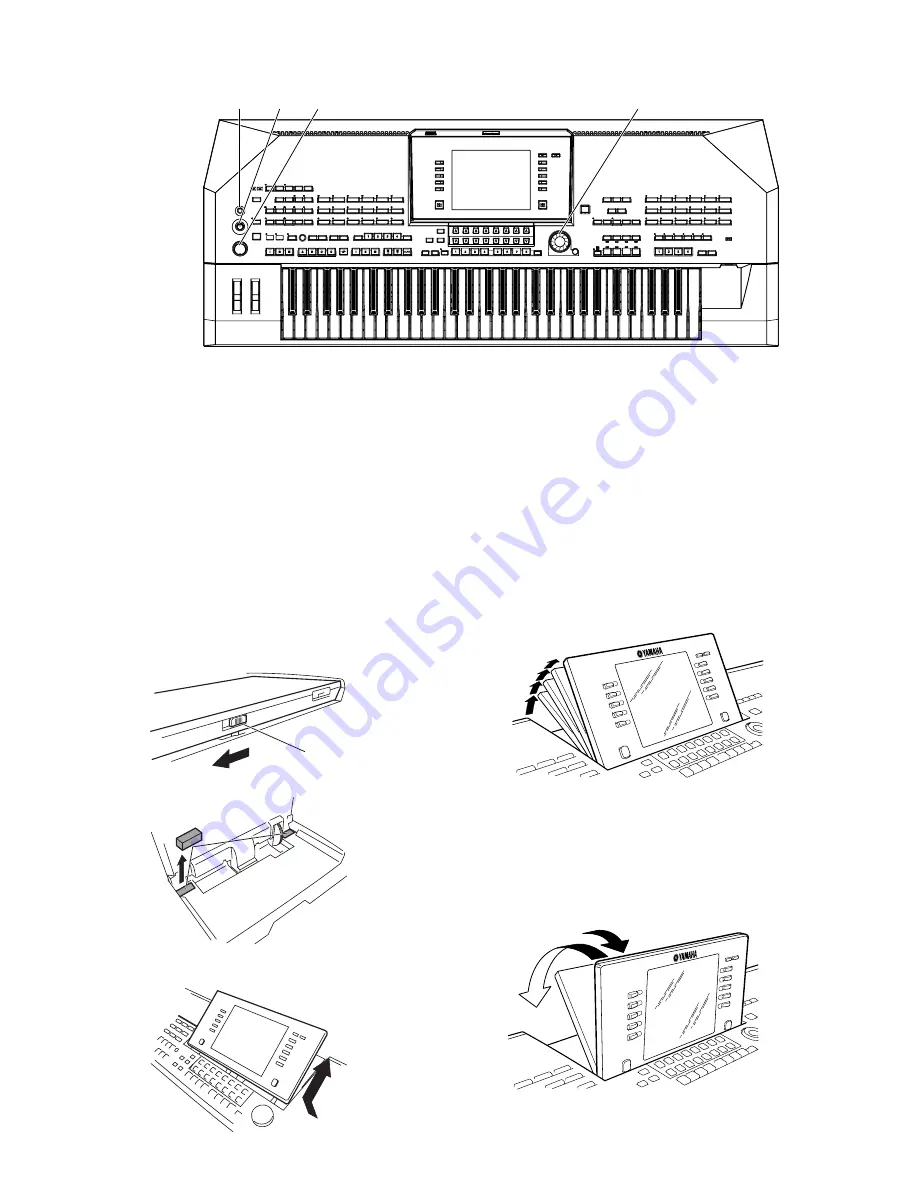
(Fig.15)
Dust proof foam
(Fig.16)
(Fig.17)
(Fig.18)
(Fig.19)
[30]
[40]
[50]
[60]
(Fig.12)
[30]: Push Knob BLACK (V7151200)
[40]: Knob (V2300100)
[50]: Knob PSR-310 (VQ218900)
[60]: Encoder Knob SILVER (V7761500)
26.
LCD Panel Assembly
(Time required: About 6 minutes)
26-1
Separate the unit into the upper case assembly and the
lower case assembly. (See procedure 1.)
26-2
Remove the two (2) screws marked [620A] to remove
the stay bar. (Fig.14)
26-3
Remove the four (4) screws marked [620B]. (Fig.14)
26-4
Remove the screw marked [470]. The two GND wires
can then be removed. (Fig.10)
26-5
Lay the upper case assembly right side up, unlock the
hook of LCD panel assembly and raise the LCD unit
upright. (Fig.15)
26-6
Remove the two (2) dust proof foams. (Fig.16)
26-7
Pull out the LCD panel assembly to remove. (Fig.17)
*
After removing the LCD panel assembly, take care not to
lose the two dust proof foams.
*
After installing the LCD panel assembly, follow the
procedure below and confirm that its angle can be
adjusted correctly.
(1) Lay the upper case assembly right side up.
(2) Unlock the hook, raise the panel forward, and
confirm that the panel can be steadied at four
notches. (Fig.18)
(3) After raising the panel assembly completely, confirm
that it can be laid down smoothly. (Fig.19)
Содержание 2
Страница 47: ...47 Tyros2 2NA WE84370 2 2 F F to DAC2A CN101 to LCL CN1 to AJK CN7 Pattern Side ...
Страница 57: ...57 Tyros2 Note See parts list for details of circuit board component parts P P Pattern Side 2NA WE81690 4 ...
Страница 61: ...61 Tyros2 Note See parts list for details of circuit board component parts R R Pattern Side 2NA WE81690 4 ...
Страница 64: ...64 Tyros2 Note See parts list for details of circuit board component parts PNR Circuit Board T T ...


