background image

45

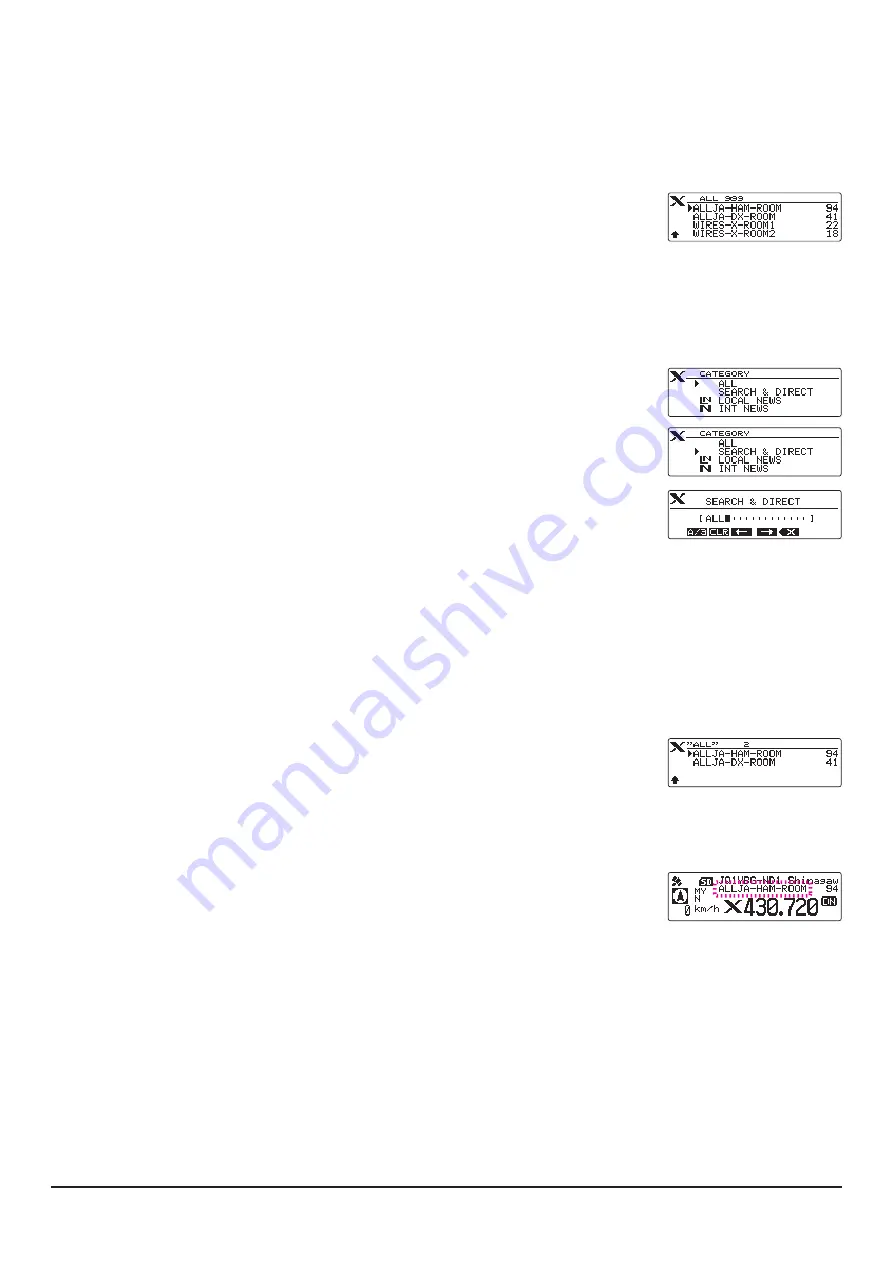
2. Rotate the DIAL knob to select [

ALL

], and press the [

DISP

] (SETUP) key.


Displays the list of accessible nodes and rooms.

•  Connection destinations are displayed from the room list and then node list.
•  On the connection destination room columns, the number of activities (the 

number of nodes connected to each room) appears on the right side.

3. Rotate the DIAL knob to select the node or room you want to establish a con-

nection and press the [

DISP

] (SETUP) key to start the connection.


By pressing the PTT switch, you may also establish the connection while 

talking.


Once connection is successfully established, “

Connected

” will appear on the LCD.

  If connection is unsuccessful, an error message appears and the screen re-

turns to the list of nodes and rooms.

② 

Searching by node or room ID

1.  Press the [

BAND

] (MHz) key.


Displays the category list.

2. Rotate the DIAL knob to select [

SEARCH & DIRECT

], and press the [

DISP

(SETUP) key.


Displays the character input screen.

3.  Enter all or part of the Room ID or the Node ID.
 The list is searched for the matching foreword part of the ID.

4.  Press the [

DISP

] (SETUP) key.

  If connection destinations with the foreword of the ID matching the entered ID 

are found, they will be listed.
•  Connection destinations are displayed from the room list and then node list.
•  On the connection destination room columns, the number of activities (the 

number of nodes connected to each room) appears on the right side.

•  If there is no connection destination matching the entered name, “No Data” 

appears and then the screen returns to the character input screen.

•  If the entered ID is found, the transceiver establishes connection immediately.

5. Rotate the DIAL knob to select the node or room you want to connect, then 

press the [

DISP

] (SETUP) key to start the connection.

•  Once connection is successfully established, “

Connected

” will appear on the LCD.

•  If connection is unsuccessful, an error message appears and the screen re-

turns to the list of nodes and rooms.

③ 

Connecting to the node or room you have most recently connected

1.  If a node ID or a room ID has been previously connected to on the Internet, it 

appears and flashes on the LCD.
•  Press the [

BAND

] (MHz) key to start connection, and once connection is es-

tablished, the menu list of the node (room) you are connected to will appear. 

•  If connection is unsuccessful, an error message appears and the name flash-

es again.

④ 

Entering the DTMF ID number (5 digits) of the node or the room

1.  Press and hold the [

#

] key on the microphone.


Displays the DTMF ID input screen.

2.  Enter the 5-digit DTMF ID.
3.  Press the [

#

] key on the microphone to start a connection.

•  Once connection is successfully established, “

Connected

” will appear on the LCD.

•  If connection is unsuccessful, an error message appears and the screen returns to the DTMF ID input screen.
•  Press the [

] key on the microphone to cancel the DTMF input screen.

Содержание WIRES-X TM-400XDE

Страница 1: ... transceivers that support the Portable Digital Node Function are FT5D FT3D FT2D FTM 400XD D FTM 300D FTM 200D and FTM 100D As of Feb 2022 Other C4FM digital transceivers do not require WIRES X user registration and may immediately enjoy Internet communications by connecting to a WIRES X local node that is within radio range ...

Страница 2: ... in the portable HRI mode via the Internet SCU 40 WIRES X Connection Cable Kit The SCU 40 includes the SCU 20 and an audio cable FTM 300DR DE or FTM 200DR DE SCU 40 WIRES X Connection Cable Kit The SCU 40 includes the SCU 20 and an audio cable User registration acquire an ID number Access the WIRES X web page and register with the Radio ID of the transceiver to be used for the Portable Digital Nod...

Страница 3: ... Portable Node 27 Connecting to a node or a room on the Internet 36 Communicating with other station 46 Disconnecting from the node or room 46 Closing the WIRES X software 46 Using the Portable HRI Mode 49 Connecting the transceiver and the PC 49 Starting the WIRES X software 49 Starting the transceiver in special mode 49 Connecting a node or a room by operating the WIRES X software on the PC 50 C...

Страница 4: ... X Access are supported Access Point and Direct Operation In Access Point the Portable Node station FT5D FT3D FT2D FTM 400XD D FTM 300D FTM 200D or FTM 100D can be used to communicate On Air and relay nearby local C4FM digital transceivers while simultaneously connected with the Internet WIRES X digital rooms and digital node stations In Direct Operation the Portable Node FT5D FT3D FT2D FTM 400XD ...

Страница 5: ...USB Connection Cable audio cables and a PC with WIRES X Software and Internet connection The HRI 200 interface is not used In the Portable HRI Mode configuration either the Access Point operation or the Direct operation may be activated Access Point Portable HRI Mode In this mode WIRES X C4FM and Analog communications are made via another local C4FM transceiver communicating on frequency with the ...

Страница 6: ... signals are heard only from the PC speaker In this Direct Operation the Portable Digital Node Station transceiver does not transmit or receive over the air Direct Operation Portable HRI Mode Illustration WIRES X Node Station C4FM Digital Analog FM WIRES X Room Digital Node Station C4FM Digital Digital Node Station Analog Node Station Analog FM Analog Node Station Press the PTT switch on the trans...

Страница 7: ...Ver 1 0 or later DSP Ver 7 10 or later FTM 200D MAIN Ver 1 0 or later SUB Ver 1 0 or later DSP Ver 7 11 or later FTM 100D MAIN Ver 2 40 or later PANEL Ver 2 10 or later DSP Ver 4 31 or later PC OS Microsoft Windows 8 1 10 Processor Clock Frequency 2 0 GHz or faster HDD 1 GB or more of available space RAM 2 GB or more Display resolution 1366 x 768 16 bit high color or higher 32 bit true color is re...

Страница 8: ...the HRI 200 Serial Number RADIO ID field enter the RADIO ID of the transceiver used for the node station RADIO ID 5 digit alphanumeric ID unique to the transceiver The transceiver s RADIO ID is a combination of five letters and numbers Since the RADIO ID is distinguished between uppercase and lowercase letters of the alphabet please input the RADIO ID displayed on the screen exactly as it is If it...

Страница 9: ...UP key 3 Rotate the DIAL knob to select 4 RADIO ID CHECK and then press the DISP SETUP key The RADIO ID is displayed 7 When registration is completed an e mail with the Node ID and the Room ID will be sent to the e mail address Member registration is completed Completion of registration usually takes 2 to 3 business days Install latest WIRES X software to the PC This is not necessary if the latest...

Страница 10: ...ation where the WIRES X software will install and click Next The Ready to install WIRES X window will appear If a check mark is placed in the Enable WIRES X Auto Start check box the WIRES X software will run automatically when Windows starts Even if the WIRES X software is terminated for some reason it will reboot automatically 7 Click Install Software installation will start When installation com...

Страница 11: ... Refer to the Driver Installation Manual PDF file in the folder and install the USB driver on the PC Update the firmware of the transceiver This procedure is not necessary if the firmware of the transceiver used for the Portable Digital Node station is the latest version already posted on YAESU website 1 To check the firmware version of the transceiver use the following procedure FT5DR DE 1 Press ...

Страница 12: ...nd hold the DISP SETUP key to display SETUP MENU 2 Rotate the DIAL knob to select 13 RST CLONE 3 Press the DISP SETUP key 4 Rotate the DIAL knob to select 8 SOFTWARE VERSION then press the DISP SETUP key The firmware version of MAIN CPU and PANEL CPU DSP CPU will be displayed For details on checking the firmware version of the transceiver other than the above refer to the owner s manual of each tr...

Страница 13: ...DE 1 Refer to the figure and connect the PC connection cable SCU 19 The SCU 19 is included in the optional SCU 39 kit It is not necessary to connect the microphone speaker terminal USB DATA Jack SCU 19 Included in the optional SCU 39 To prevent RF interference keep the antenna of the transceiver as far away from the connecting cables and PC as possible It is recommended to set the transmit output ...

Страница 14: ...tion is complete After completing Initial Setting setting is required only once at the beginning page 15 the volume level of the microphone and PC speaker must be set by referring to Adjusting Audio Level in the Access Point Portable HRI Mode page 57 When operating in Direct Operation 1 For the WIRES X Direct mode connection use the SCU 19 USB Connection Cable the CT 44 adapter one of the audio ca...

Страница 15: ...figure to connect the SCU 20 PC connection cable supplied with the SCU 40 WIRES X connection cable kit sold separately and the audio cable Speaker MIC DATA Jack USB SCU 20 The connection is complete When communicating via the Internet in Portable HRI Mode refer to Adjusting Audio Level in the Access Point Portable HRI Mode page 57 or Adjusting Audio Level in the Direct Operation Portable HRI Mode ...

Страница 16: ...D screen Portable HRI Mode Supports Internet communication in digital mode and analog mode FT5DR DE 1 Press and hold the GM X key F MENU key and the POWER switch to turn the transceiver ON WIRES X is displayed on the LCD screen FT3DR DE 1 Press and hold the X key BACK key and the POWER switch to turn the transceiver ON WIRES X is displayed on the LCD screen FT2DR DE 1 Press and hold the X key BACK...

Страница 17: ...et the communication port with the transceiver connected to the PC 1 Connect the transceiver to the PC using the SCU 19 or SCU 20 PC connection cable For details on the connection procedure refer to Connect the transceiver and the PC page 12 2 Click in the Serial Port Selection column and click the COM port displayed as Prolific USB to Serial Comm Port COMX connected to the transceiver A communica...

Страница 18: ...d in the e mail received when the user registration is completed The Radio ID is automatically entered when a transceiver started in Portable digital node mode or Portable HRI mode is connected to the PC Enter the 5 digits of the WIRES X ID Number and WIRES X ROOM ID Number that are included in the WIRES X new registration email When the Serial No and DTMF ID fields are filled you can click the ID...

Страница 19: ...peration Default Unchecked DG ID Select the DG ID Digital Group ID number 00 to 99 default setting 00 When the DG ID number is set to 00 the node becomes an open node The subcode on the right can be set from 00 to 26 When DG ID number is set to 00 and subcode is set to 00 C4FM digital signals of all DG ID numbers are relayed When DG ID number is set to 00 and subcode is set from 01 to 26 C4FM digi...

Страница 20: ...list It takes about 10 minutes for the setting to be reflected in the node list Default Checked This is the only item that may be set when using Access Point in the Portable Digital Node Mode 3 Click the OK The Transceiver window closes and the Main Screen will appear When a microphone is connected or built in the PC there may be cases where the sound around the PC is relayed be sure to remove the...

Страница 21: ...layed on the LCD screen 2 Press the A B key to select Access Point or Direct Operation Depending on the operation mode chosen the frequency display will show as follows Access Point Frequency display Direct Operation DIRECT FT2DR DE 1 Press and hold the X key BAND key and the POWER switch to turn the transceiver ON PDN is displayed on the LCD screen 2 Press the A B key to select Access Point or Di...

Страница 22: ...mode DN mode only with the transceiver FT5D On the frequency setting screen you can set and operate the following with the transceivers key and DIAL knob settings Function Key or Dial Switches between the Access Point and the Direct Operation Press the A B key Starts operation for the Portable Digital Node Press and hold the GM X key Sets the operation frequency Rotate the DIAL knob or press the N...

Страница 23: ...hese settings cannot be used FTM 400XD D On the frequency setting screen you can set and operate the following with the transceivers key and DIAL knob settings Function Key or Dial Switches between the Access Point and the Direct Operation Press the B Band DIAL knob Lower Starts operation for the Portable Digital Node Press the D X key or press the P3 key on the microphone by default setting Sets ...

Страница 24: ...L OFF function is necessary for P2 P4 keys in set mode Adjusts the squelch level Press the SQL key then rotate the A Band DIAL knob FTM 300D or the DIAL knob FTM 200D Reverses the transmit and receive frequencies Press and the P2 key P4 key on the microphone Setting of REVERSE function is necessary for P2 P4 keys in set mode SwitchesBusydetectionbetween Noisesquelch and DG IDnumbermatch Press and ...

Страница 25: ...other 00 set the transmit DG ID number to the same DG ID number Note that setting to a different number will not work properly When setting the receive DG ID number to 00 and then setting the transmission DG ID number to anything other than 00 the audio of all received C4FM digital stations will be heard on the speaker but for the transmission DG ID Only the matched communication is relayed to the...

Страница 26: ...to set the receive DG ID DG ID RX 5 Press and hold the DISP key to save the setting and return to normal opera tion The setting of the FT3D FT2D transceiver is complete FTM 400XD D 1 Press and hold the GM key The DG ID SETUP screen is displayed on the LCD DG ID TX 00 00 DG ID RX DG ID SETUP BACK BACK 2 Touch DG ID TX The numbers of the set value will turn orange in color 3 Rotate the A Band DIAL k...

Страница 27: ...o set the transmit DG ID DG ID TX When setting the DG ID number pressing and holding the DIAL knob will set the transmit and the receive DG ID numbers to 00 DG ID SETUP DG ID TX DG ID RX 3 Press the DIAL knob then rotate the DIAL knob to set the DG ID RX DG ID SETUP DG ID TX DG ID RX 4 Press the DIAL knob then rotate the DIAL knob to set the receive DG ID DG ID RX DG ID SETUP DG ID TX DG ID RX 5 P...

Страница 28: ...d If the portable node is not connected to a node or a room on the Internet When connection history is not stored The lower connection destination display will be blank SEARCH DIRECT JQ1YBG ND1 Shinagawa When connection history is stored The ID of the previous connected the Node or Room will blink Press the PTT switch or touch blinking connection ID to connect SEARCH DIRECT JQ1YBG ND1 Shinagawa JA...

Страница 29: ...uelch level Press the SQL key then rotate the VOL knob Some items in the Set mode and Function menu are automatically set for the Portable Digital Node function so the settings cannot be used Setting the speaker mute The audio output to the speaker of the node station FT5D transceiver can be muted it cannot be set in Direct Operation Press A B key each time toggles the mute mode as follows MUTE OF...

Страница 30: ...nnection destination display will be blank When connection history is stored The ID of the previous connected the Node or Room will blink Press the PTT switch or touch blinking connection ID to connect If the portable node is already connected to a node or a room on the Internet When connected to the same nodeor room as the ID of theprevious connectionhistory The current connection ID is displayed...

Страница 31: ...b Some items in the Set mode and Function menu are automatically set for the Portable Digital Node function so the settings cannot be used Setting the speaker mute The audio output of the speaker of the node station FT3D FT2D transceiver cannot be muted it cannot be set in Direct Operation Press A B key each time toggles the mute mode as follows MUTE OFF MUTE ALL MUTE TX MUTE RX MUTE OFF MUTE OFF ...

Страница 32: ... When connection history is stored The ID of the previous connected Node or Room will display in gray Press the PTT switch or touch connection ID to connect Upon being connected the text will light up in white ᲸᲸ 76 5 12 8 53 5 7 6 5 7 4 5 0 9 7 3 6 5 7 6 7 4 6 4 If the portable node is already connected to a node or a room on the Internet When connected to the same node or room as the ID of the p...

Страница 33: ...y on the microphone By default setting Selects Speaker Mute Press the MUTE on the LCD screen Disconnects a node or a room on the Internet Press the key on the microphone Press and hold Some items in the Function menu are automatically set for the Portable Digital Node function so the settings cannot be used Setting the speaker mute The audio output to the speaker of the node station FTM 400XD D tr...

Страница 34: ...he connection destination display will be blank JQ1YBG ND Shinagawa SEARCH DIRECT When connection history is stored The ID of the previously connected ID will blink Press the PTT switch to connect to the previously connected ID JQ1YBG ND Shinagawa JA1YOE ROOM12345 SEARCH DIRECT If the portable node is already connected to a node or a room on the Internet When connected to the same node or room as ...

Страница 35: ...ey on the microphone each time toggles the mute mode as follows MUTE OFF MUTE ALL MUTE TX MUTE RX MUTE OFF MUTE OFF Disable mute MUTE ALL Mute both the received voice from the C4FM digital station and the voice from the node station on the Internet MUTE RX Mute the received voice from the C4FM digital station MUTE TX Mute the voice from the node station on the Internet FTM 100D 1 Press the D X key...

Страница 36: ... portable node FTM 100D transceiver Function Key or Dial Return to the transceiver setting screen Press and hold the D X key Adjusts the squelch level Press the SQL VOICE key then rotate the DIAL knob Enters the BACKTRACK screen Press the DISP SETUP key Selects the Transmission Power Level Press the TX PO key or press the P4 key on the microphone By default setting Selects Speaker Mute Press the A...

Страница 37: ...sily connect to the desired room or node station 1 Click the Digital Node or Digital Room to connect Icon of a digital room or a digital node Digital Open room Only the Digital Nodes may be connected Digital Node Station Portable Digital Node Station 2 Right click on the selected Digital Node or Digital Room The command list is displayed 3 Click the connect When a connection is successfully establ...

Страница 38: ...nagawa 2 Touch ALL Displays the list of accessible nodes and rooms Connection destinations are displayed from the room list and then node list On the connection destination room columns the number of activities the number of nodes connected to each room appears on the right side C1 C2 C3 C4 C5 3 Touch the node or room to connect and establish the connection By pressing the PTT switch the connectio...

Страница 39: ...cessful an error message appears and the screen re turns to the list of nodes and rooms JA1YOE TKY ROOM 21 JA1YOE ROOM A 4 JA1YOE ROOM B 3 JA1YOE ROOM C 0 JQ1YBG ND JA1Y 24 Connecting to registered nodes or rooms to the category list 1 Touch SEARCH DIRECT Displays the category list SEARCH DIRECT JQ1YBG ND1 Shinagawa 2 Touch one of C1 to C5 Displays the node and room lists For details on registerin...

Страница 40: ...ears and the name flashes again SEARCH DIRECT JQ1YBG ND1 Shinagawa JA1YOE ROOM12345 Entering the DTMF ID number 5 digits of the node or the room 1 Touch SEARCH DIRECT Displays the category list SEARCH DIRECT JQ1YBG ND1 Shinagawa 2 Touch SEARCH DIRECT Displays the character input screen C1 C2 C3 C4 C5 3 Touch ID Displays the DTMF ID input screen 4 Enter the 5 digit DTMF ID 5 Touch ENT to start a co...

Страница 41: ... 8 53 5 7 6 5 7 4 5 0 9 7 3 6 6 4 2 Touch ALL twice Displays the list of accessible nodes and rooms Connection destinations are displayed from the room list and then node list On the connection destination room columns the number of activities the number of nodes connected to each room appears on the right side Ჰ4 6 5 4 612 3 Touch the node or room you want to connect to establish the connection B...

Страница 42: ...an error message appears and the screen re turns to the list of nodes and rooms 116 Ჾ Ჺ Ჺ Ჺ Ჹ 116 116 7 116 20 116 0 Ჰ4 6 5 4 612 Connecting to registered nodes or rooms to the category list 1 Touch Displays the category list ᲸᲸ 76 5 12 8 53 5 7 6 5 7 4 5 0 9 7 3 6 6 4 2 Touch one of C1 to C5 Displays the node and room lists For details on registering nodes and rooms see Registering the connected ...

Страница 43: ...ge 43 Connecting to the node or room you have most recently connected page 44 Entering the DTMF ID number 5 digits of the node or the room page 44 Another C4FM digital transceiver accessing the portable node frequency and using the WIRES X DG ID number may also connect a node or a room For details refer to the Operating Manual WIRES X Edition of each transceiver Searching from the node room lists ...

Страница 44: ... connection destination room columns the number of activities the number of nodes connected to each room appears on the right side If there is no connection destination matching the entered name No Match es appears and then the screen returns to the character input screen If the entered ID is found the transceiver establishes connection immediately 5 Rotate the DIAL knob to select a node or room a...

Страница 45: ...he screen Rotate the DIAL knob to select the blinking node or room and press the DIAL knob or the PTT switch to start connection If connection is unsuccessful an error message appears and the name flash es again JQ1YBG ND Shinagawa JA1YOE ROOM12345 SEARCH DIRECT Entering the DTMF ID number 5 digits of the node or the room 1 Press and hold the key on the microphone Displays the DTMF ID input screen...

Страница 46: ...ns the number of activities the number of nodes connected to each room appears on the right side If there is no connection destination matching the entered name No Data appears and then the screen returns to the character input screen If the entered ID is found the transceiver establishes connection immediately 5 Rotate the DIAL knob to select the node or room you want to connect then press the DI...

Страница 47: ...ation is relayed to the opposite station on the Internet Disconnecting from the node or room To disconnect a connected Internet node or room use the transceiver below or select Disconnect from the Connect menu of the WIRES X software FT5D FT3D or FT2D Press and hold the BAND key FTM 400XD D FTM 300D FTM 200D or FTM 100D Press and hold the key on the microphone Closing the WIRES X software 1 From t...

Страница 48: ...will not register C1 TOKYO AREA C2 FISHING C3 C4 C5 JA1YOE ROOM A 15 JQ1YBG ND YOKOHAMA JA1YOE ROOM12345 2 C1 TOKYO AREA 4 Press the BACK key twice to return to the connection screen FTM 400XD D 1 Touch the node or room be connect to Displays the category list ᲸᲸ 76 5 12 8 53 5 7 6 5 7 4 5 0 9 7 1 6 5 7 6 7 4 6 4 2 Touch the desired category twice The name of the node or room that is currently con...

Страница 49: ... DIAL knob to select the desired category and then press the DIAL knob The name of the node or room currently connected is added to the list of the registered nodes and rooms If the selected category is already registered with the same node or room a beep sounds and it will not register C1 TOKYO C2 FISHING C3 C4 JA1YOE ROOM12345 2 C5 3 Press the BACK key to return to the connection screen ...

Страница 50: ...ress the A B key to select Access Point or Direct Operation The set operation mode is indicated on the frequency display as follows Access Point Frequency Display Direct Operation DIRECT To communicate with an analog node station via Direct Operation using the FT5D transceiver press the V M key to turn ON the analog voice output uplink An will appear on the screen at the right side of the call sig...

Страница 51: ... change to the NET indicator and the User ID of the connected Node station or Room is displayed Connected will appear on the LCD of the portable node station s transceiver or the transceiver accessing the portable node station in WIRES X mode Room Pop up Window When connecting to the room a window will pop up displaying the operational status of the room For details refer to Room pop up window pag...

Страница 52: ...ompass screen Press the Fmenu key again to return to the normal screen FT3D or FT2D Press the DISP key to display the compass screen Press the DISP key again to return to the normal screen FTM 400XD D Press the DISP SETUP key to display the compass screen Press the DISP SETUP key twice to return to the normal screen FTM 300D or FTM 200D Press the DISP key on the connection screen to display the co...

Страница 53: ...e A B key BACKTRACK screen compass screen Press the DISP key Direct Operation only Transmission sound monitor function on or off Press the V M key Direct Operation only SQL open Press the MONI key SQL level setting Press the SQL key then rotate the VOL knob FT3D or the DIAL knob FT2D Switching TX RX LED on or off Press and hold the V M key Dimmer setting Press and hold the BAND key Lamp setting Pr...

Страница 54: ... Band DIAL knob FTM 300D Rotate the DIAL knob FTM 200D Change of the busy detection noise squelch DG ID number match Press and hold the A B key FTM 100D Function Key Switching between Access Point and Direct Operation Press the A B DW key SQL level setting Press the SQL VOICE key and rotate the DIAL knob Selects the contents of sub frequency display Press the DISP SETUP key Turning the display ON ...

Страница 55: ...nodes and rooms arranging the list based on the setting Active node window Active WIRES X nodes are listed The node station type and connection status are indicated by icons Node Icons Idling Connecting Type Portable Digital Node Station Digital Node Station Analog Node Station GM Node Station Active room window Active WIRES X rooms are listed The room type and connection status are indicated by i...

Страница 56: ...tatus of the node and the repeating status of the received signal are shown Not receiving Receiving an analog signal or digital signal whose DG ID number does not match not relaying Receiving a digital signal whose DG ID number matches not relaying It receives reception of a digital signal whose DG ID number matches and relays it to other node stations or rooms via the Internet Transmission timeou...

Страница 57: ...er of nodes connecting to the room Transmission node information display area Displays information of a node or digital node which is currently transmitting Node ID display area Lists the IDs of nodes connecting to the room Refresh button Click to update the active ID list window on the main screen Close button Click to close the room pop up window Even after closing the room pop up window the roo...

Страница 58: ... or room Receive audio level adjustment PC microphone input level Adjust the volume level so that the VOL bar graph is 50 by turning the VOL knob of FT5D FT3D FT2D and then make the following adjustments Also when using FT5D FT3D FT2D as a transceiver of a Portable Digital Node station adjust it so that it is almost the same volume level 1 From the View menu click Audio adjustment The Audio adjust...

Страница 59: ... frequency and DG ID number as the Portable Digital Node station move the Slider to adjust so that the peak is not over the dotted line If the microphone input is muted click the icon on the right side of the slider to cancel mute 8 Press the OK button several times to close all Windows setting screens Completes the microphone input level adjustment of the personal computer Continue to adjust the ...

Страница 60: ...the sound may be distorted 5 Click TX to stop transmitting 6 Click the button at the top right of the Volume Mixer window to close The audio level adjustment of Access Point is completed Adjusting Audio Level in the Direct Operation Portable HRI Mode Audio level adjustment should be done with no connection to the node station or room When communicating with an analog node station via direct operat...

Страница 61: ...lect area Waveform monitor is enabled 3 Click Sound Property The WINDOWS Sound window opens 4 Click the Recording tab in the WINDOWS Sound window 5 Click Microphone then click the Properties button The microphone properties will open ...

Страница 62: ...nitor does not exceed the dotted line or the peak of the waveform does not col lapse 8 This setting is necessary only when using the FT5D FT3D or FT2D transceiver Click the Listen tab and check Listen to this device Depending on the computer there may be a no Listen tab In that case proceed to step 9 as it is 9 Press the OK button several times to close all Windows setting screens The microphone i...

Страница 63: ...ck the Start button again to stop the test sound If the speaker output is muted click the icon at the bottom of the slider to release the mute If the volume level of Speaker Headphone is too low adjust the volume so that it is easy to hear 4 This setting is necessary only when using the FT5D FT3D FT2D transceiver Adjust the volume level of the Microphone on the Volume Mixer Speakers screen so that...

Страница 64: ...tches between ON and OFF OFF Does not output sound to the analog station Default setting Turn it OFF to do Internet communication only in digital mode ON Audio output to the analog station Is displayed on the right side of the call sign of the screen Always turn on Internet communication when using the analog communication in the analog mode When set to OFF the other station operating in the analo...

Страница 65: ...ved they are displayed in the group window so you can easily access them Bookmarking Nodes or Rooms 1 Click on the node station or room you want to bookmark in Active node window or Active room window 2 Right click the selected Node or Room to display the command list 3 Click the Add to Bookmark ...

Страница 66: ...produced without the permission of YAESU MUSEN CO LTD YAESU MUSEN CO LTD Tennozu Parkside Building 2 5 8 Higashi Shinagawa Shinagawa ku Tokyo 140 0002 Japan YAESU USA 6125 Phyllis Drive Cypress CA 90630 U S A YAESU UK Unit 12 Sun Valley Business Park Winnall Close Winchester Hampshire SO23 0LB U K ...

Отзывы: