background image

26

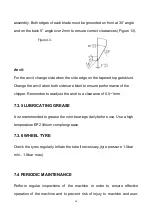
assembly. Both edges of each blade must be grounded on front at 30° angle

and on the back 5° angle over 2mm to ensure correct clearances (Figure 13).

Anvil:

For the anvil, change side when the side edge on the tapered top gets blunt.

Change the anvil when both sides are blunt to ensure performance of the

chipper. Remember to readjust the anvil to a clearance of 0.5~1mm.

7.3.5 LUBRICATING GREASE

It is recommended to grease the rotor bearings daily before use. Use a high

temperature EP2 lithium complex grease.

7.3.6 WHEEL TYRE

Check the tyres regularly. Inflate the tube if necessary.(tyre pressure 1.5 bar

min., 1.9 bar max.)

7.4 PERIODIC MAINTENANCE

Perform regular inspections of the machine in order to ensure effective

operation of the machine and to prevent risk of injury to machine and user.

Figure 13.

Содержание JONCO Series

Страница 1: ...LE R08PL R12PL Model CP20 CP30 Please read through this owner s manual carefully before using the product to ensure the safety of yourself and others Due to continuing improvements actual product may...

Страница 2: ......

Страница 3: ...LY 10 5 OPERATING INSTRUCTIONS 12 5 1 CONDITIONS OF USE 12 5 2 FUEL AND OIL 13 5 3 FILLING THE FUEL TANK 14 5 4 ENGINE OIL 15 5 5 STARTING THE MACHINE 16 6 USING THE MACHINE 19 6 1 CHIPPING BRANCHES 1...

Страница 4: ...f you want to shred roots remove the sand mud or other residues before shredding Any other use of the shredder not described here voids the warranty responsibility of the manufacturer Save all instruc...

Страница 5: ...the most secure way possible or if you see danger do not use the machine 2 1 USERS This machine has been designed to be manipulated by users who have read and understood these instructions This machin...

Страница 6: ...users must ensure that nobody is injured with the material expelled from the machine Mark the working area with for example with red and white beacons Always place the switch in the off position when...

Страница 7: ...ONMENT SECURITY Do not use this machine in an explosive place or nearby flammable liquid gas or dust The machine should only be used outdoor Do not use the machine at night in a foggy day or any situa...

Страница 8: ...d warning signs to mark the security area Maintain children and curious persons away from the work area while operating this machine Distractions can cause a loss of control Make sure the children peo...

Страница 9: ...area unless you have properly ventilated the area and are certain that ventilation is sufficient so this does not happen again Petrol and oil are extremely flammable and explosive under certain condi...

Страница 10: ...other residues before shredding Any other use of the shredder not described here voids the warranty responsibility of the manufacturer Check that all the safety devices are installed and in good condi...

Страница 11: ...hilst introducing the wood into the machine for shredding maintain both feet at the same level as those of the wheels Turn off the machine disconnect the spark plug and make sure that the cutting tool...

Страница 12: ...9 Please periodically check your machine by a qualified repair service agent using only original replacement parts This will ensure that the safety of this machine is maintained 3 WARNING SIGNS...

Страница 13: ...process of installation do not touch the blades with your hands or any other body parts All bolts nuts and washers have been fixed on the machine in the factory please remove them before assembly and...

Страница 14: ...11 Step 1 Wheels and wheel axle Step 2 Support feet and discharge chute Step 3 Feeding chute and hopper tray Figure 1 Figure 2 Figure 3...

Страница 15: ...e emergency cable Fix the switch box by tightening the two bolts A and then connect the cable plug 5 OPERATING INSTRUCTIONS 5 1 CONDITIONS OF USE The chipper is only designed to shred pieces of wood I...

Страница 16: ...perator is responsible for the dangers and accidents caused to other people or things The manufacturer and distributors shall not be in any case responsible for damages caused by improper or incorrect...

Страница 17: ...ful chemicals In case of a large amount of gases produced by poor ventilation stop the engine safely Do not return to the working area unless you have properly ventilated the area and are certain that...

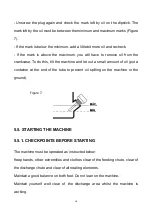
Страница 18: ...factory without any oil in it Before starting the engine for the first time you must put oil the engine This engine uses quality 4 stroke Briggs and Stratton SAE30 or Honda 10W30 oil depending on the...

Страница 19: ...chine and let out a small amount of oil put a container at the end of the tube to prevent oil spilling on the machine or the ground 5 5 STARTING THE MACHINE 5 5 1 CHECKPOINTS BEFORE STARTING The machi...

Страница 20: ...s of wood that might have got stuck transversally must only be removed when the machine has been stopped completely and the blades have stopped rotating Transportation of the machine should be carried...

Страница 21: ...le or damage to machine Put the branches into the chute and when they are pulled in let them go The branches will be pulled in automatically Tips The hardness of the wood varies of different wood type...

Страница 22: ...ton and the chipper will stop Tips Keep the machine running for another 3 5 seconds after feeding the last branch and then turn the throttle lever to the lowest position before stopping the engine If...

Страница 23: ...rk plug wire before moving the machine emptying the bag unclogging the inlets or outlets filling the fuel tank or performing maintenance and repairs Chipping Tips DO NOT feed materials in excess of th...

Страница 24: ...holes and loose bolts 2 Check the frame and base of the machine for cracks or damages 3 Check all the bolts and screws to ensure tightness 4 Wear gloves and check the blades are not cracked or loose...

Страница 25: ...OF ENGINE 7 3 1 SPARK PLUG After every 100 hours of running the spark plug should be replaced Check the colour of the deposits on the end of the spark plug It should be a brown colour Remove all depos...

Страница 26: ...filler cap as seen in Figure 10 3 Place an oil pan under the engine to catch the oil Remove the oil drain plug as displayed in Figure 11 to drain the oil fully A tube or similar device is recommended...

Страница 27: ...S AND ANVIL CAUTION Blades are extremely sharp take care please Torque scale 60 70Nm for blade and 35 45Nm for anvil Blades and anvil need cleaning after every chipping job to protect it from corrosio...

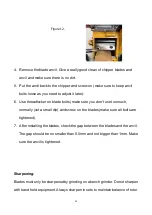
Страница 28: ...ake sure you don t use too much normally just a small dip and screw on the blades make sure all bolts are tightened 7 After installing the blades check the gap between the blades and the anvil The gap...

Страница 29: ...e chipper Remember to readjust the anvil to a clearance of 0 5 1mm 7 3 5 LUBRICATING GREASE It is recommended to grease the rotor bearings daily before use Use a high temperature EP2 lithium complex g...

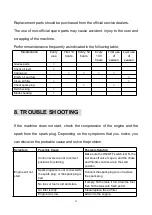
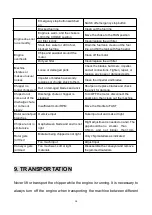
Страница 30: ...ession of the engine and the spark from the spark plug Depending on the symptoms that you notice you can discover the probable cause and solve the problem Symptom Possible Cause Possible Solution Engi...

Страница 31: ...rs impeller and all connections Tighten repair or replace any loose or damaged parts Impeller or blades have woody residues or chunks stuck to them Clean the impeller and blades Chipper no longer chip...

Страница 32: ...itched off wait for 5 minutes for it to cool down before storing the machine The machine s exhaust pipe will remain hot after turning the engine off Never store the machine in places near flammable ma...

Страница 33: ...et rid of machines with domestic waste Plastic and metal components can be classified according to their nature and recycled 12 WARRANTY CONDITIONS 12 1 WARRANTY PERIOD The warranty period for the chi...

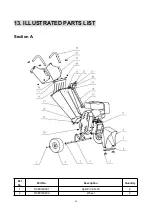
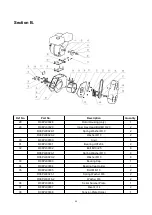
Страница 34: ...31 13 ILLUSTRATED PARTS LIST Section A Ref No Part No Description Quantity 1 R08PL00001 Split Pin 2 5 30 2 2 R08PL00002 Wheel 2...

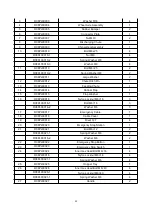
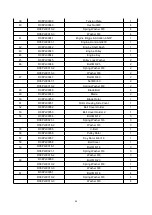
Страница 35: ...4 Rubber Flap 1 15 R08PL00015 Flap Washer 1 16 R08PL00016 Nylon Locknut M6 16 3 R08PL00016 1 Bolt M6 16 3 R08PL00016 2 Washer 6 3 17 R08PL00017 Emergency Cable 1 18 R08PL00018 Cable Cover 1 19 R08PL00...

Страница 36: ...30 R08PL00030 Anvil 1 31 R08PL00031 Bearing UCF204 2 32 R08PL00032 Bolt M10 25 8 R08PL00029 1 Spring Washer 10 8 R08PL00029 2 Washer 10 8 33 R08PL00033 Bearing Cap 1 34 R08PL00034 Bearing Cap Holder...

Страница 37: ...PL00010 2 Spring Washer 8 2 48 R08PL00048 Blade Bolt 4 49 R08PL00049 Blade 2 50 R08PL00050 Blade Rotor 1 51 R08PL00051 Rotor Housing Side Cover 1 52 R08PL00052 Belt Cover Holder 1 53 R08PL00053 Belt C...

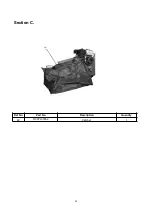
Страница 38: ...35 Section C Ref No Part No Description Quantity 62 R08PL00062 Catcher 1...

Страница 39: ...36...

Страница 40: ...Customer Service Website www YAAHKIEH com Email INFO JONCOLTD com Spare parts are available from our dealers and our official website Search JONCO CHIPPER on FACKBOOK or YAAHKIEH on INSTAGRAM...

Отзывы: