background image

4

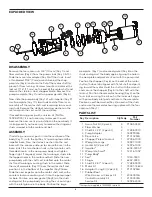
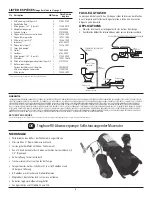
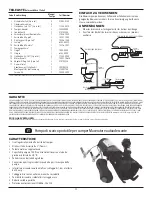
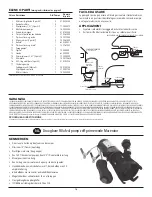
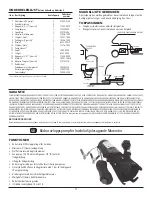
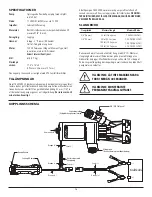
EXPLODED VIEW

DISASSEMBLY

Remove the four acorn nuts 3/8” (10 mm) (Key 1) and 
fiber washers (Key 2) from the pump studs (Key 3 & 14). 
Slide the macerator adapter (Key 4) off the studs. Insert 
a thin bladed 9/32” (7mm) wrench behind the chop-
per plate (Key 6) and onto the flat of the motor shaft to 
prevent it from turning. Unscrew (counter-clockwise) the 
locknut 7/16” (11 mm) on the end of the motor shaft and 
remove the stainless steel chopper blade. Remove the 
pump wearplate (Key 7) and two paper gaskets (Key 8).
Now slide the pump body (Key 12) with impeller (Key 9), 
small wearplate (Key 10), two studs and shaft seal as an 
assembly off the motor shaft and remaining two mount-
ing studs. Remove the starlock retaining washer on the 
seal and push the seal out of the seal bore.
If reconditioning pump with a service kit (Part No. 
18598-2000), it is not necessary to remove the seal 
because the new seal is pre-installed in the new body. It 
is also generally not necessary to remove the slinger or 
studs screwed into the motor end bell.

ASSEMBLY

If installing a new seal, push it into the seal bore of the 
body (Key 11) with the lip (Key 12) pointing toward the 
impeller bore. Press the starlock washer into the seal 
bore with the concave side up to secure the seal in the 
bore. Install the two shorter studs in the two holes with 
threaded inserts in the new pump body and tighten 
finger tight. If required, screw the two longer studs into 
the tapped holes in the motor end bell. Slide the new 
pump body with the shaft seal installed onto the motor 
shaft and two long mounting studs in the motor. Slide 
the small wearplate (Key 10) over the motor shaft and 
position it in the bottom of the impeller (Key 9) bore. 
Slide the new impeller onto the motor shaft and, with a 
counter-clockwise motion, push it into the pump impel-
ler bore. Position one new gasket (Key 8) on the studs 
and against the pump body assuring the cut-out aligns 
with the inlet groove in the body. Position the large 

wearplate  (Key 7) and second gasket (Key 8) on the 
studs and against the body again aligning the hole in 
the wearplate and gasket cut-out with the pump inlet.
Position the chopper (Key 6) on the end of the motor 
shaft with drive tab aligned with flat of shaft and point-
ing toward the motor. Hold the shaft with the wrench 
and secure the chopper (Key 6) to the shaft with the 
locknut. Position the macerator housing (Key 4) on the 
four studs ensuring the cut-out in the inner wall aligns 
with pump body inlet port and hole in the wearplate. 
Position a new fiber washer (Key 2) on each of the studs 
and secure the macerator housing in place with the four 
acorn nuts (Key 1).

PARTS LIST

91085-0340

17288-0010
18599000A
91010250A
37056-1000
18597-1000
18596-1000
6303-0003-P
12316-1002

1040-0000
6342-0000
17288-0000
74001-1863A
91010253A

20030415A
21000378A
18598-2000

Acorn Nut Kit (4 per kit)
Fiber Washer
Stud Kit, 3.23” (2 per kit)
Pump Adapter
Rinse Valve
Chopper Plate w/Locknut
Wearplate, Large
Gasket Kit (2 per kit)*
Impeller*
Wearplate, Small*
Pump Body*
Seal*
Slinger
Stud Kit, 3.87” (2 per kit)
Motor Kit
Adapter O-ring Kit (2 per kit)
Rubber Boot
Wire Harness w/Clamps Kit
Control Assembly Kit
Service Kit

1
2
3
4
5
6
7
8
9

10
11
12
13
14
15
16
17

4
4
2
1
1
1
1
2
1
1
1
1
1
2
1
1
1
1
1
1

Key

Qty/Pump

Description

Part

Number

*These parts are supplied in 18598-2000 service kit

1

2

16

4

5

7

9

6

8

3

10

11

15

12

13

14

17

Содержание Flojet 18555000

Страница 1: ...ets portable pour VR Macerator auto amor ant MANUEL D INSTRUCTIONS Pompa di scarico portatile per camper Maceratore autoadescante MANUALE DI ISTRUZIONI Draagbare RV afval pomp zelf primerende Macerato...

Страница 2: ...ordance with EPA Sanitation Regulations WARNING DO NOT RUN DRY FOR MORE THAN 30 SECONDS WARNING DO NOT MOUNT PERMANENTLY TO THE RV WASTE PORT APPLICATION The Flojet 18555000 DC portable waste pump is...

Страница 3: ...cal drawing above Connect the 6 1 8 m control assembly to RV waste pump motor wires with butt connectors connect the orange motor wire to the orange switch wire and the black motor wire to the black c...

Страница 4: ...small wearplate Key 10 over the motor shaft and position it in the bottom of the impeller Key 9 bore Slide the new impeller onto the motor shaft and with a counter clockwise motion push it into the pu...

Страница 5: ...OF PROFIT LOSS OFANTICIPATED SAVINGS OR REVENUE LOSS OF INCOME LOSS OF BUSINESS LOSS OF PRODUCTION LOSS OF OPPORTUNITYOR LOSS OF REPUTATION THIS WARRANTYIS ONLYAREPRESENTATION OFTHE COMPLETE LIMITED...

Страница 6: ...uissent tre facilement pomp s par un tuyau d arrosage Ne pas faire fonctionner plus de 30 minutes en continu La pompe d chets 18555000 mac rera et pompera tous les d chets et tissus que l on trouve no...

Страница 7: ...ur cl 4 hors des goujons Ins rez une cl lame fine de 7 mm derri re la plaque du broyeur cl 6 et sur le plat de l arbre du moteur pour l emp cher de tourner D vissez dans le sens inverse des aiguilles...

Страница 8: ...SAUF DISPOSITION CONTRAIRE DE LALOI LE RECOURS EXCLUSIF DE L ACHETEUR ETLARESPONSABILIT GLOBALE DUVENDEUR EN CAS DEVIOLATION DE L UNE DES GARANTIES PR C DENTES SONTLIMIT S LAR PARATION OUAU REMPLACEM...

Страница 9: ...r leicht durch einen Gartenschlauch gepumpt werden kann Nicht l nger als 30 Minuten ununterbrochen laufen lassen HOSE TABLE Schlauch Gr e 5 8 16 mm 3 4 19 mm Maximale Schlauchl nge 25 Fu 7 6m max 50 F...

Страница 10: ...ackerplatte Code 6 und auf die flache Seite der Motorwelle um zu verhindern dass sie sich dreht L sen Sie gegen den Uhrzeigersinn die Kontermutter 7 16 11 mm am Ende der Motorwelle und entfernen Sie d...

Страница 11: ...ER MARKTG NGIGKEITUND EIGNUNG F R EINEN BESTIMMTEN ZWECK DIE HIERMITAUSDR CKLICHABGELEHNTUNDAUSGESCHLOSSEN WERDEN VORBEHALT LICHANDERSLAUTENDER GESETZLICHER BESTIMMUNGEN BESCHR NKEN SICH DASAUSSCHLIES...

Страница 12: ...possano essere facilmente pompati attraverso un tubo da giardino TABELLA DEI TUBI Dimensioni del tubo 5 8 16 mm 3 4 19 mm Lunghezza massima 25 piedi 7 6 m max 50 piedi 15 2m max 100 piedi 30 5m max 1...

Страница 13: ...i perni Inserire una chiave a lama sottile da 9 32 7 mm dietro la piastra del tritatutto Chiave 6 e sul piatto dell albero del motore per impedirne la rotazione Svitare in senso antiorario il controda...

Страница 14: ...I NATURARELATIVIALLE MERCI FORNITE IN QUESTO CONTESTO COMPRESE SENZALIMITAZIONE LE GARANZIE IMPLICITE DI COMMERCIABILIT E DI IDONEIT AUNO SCOPO PARTICOLARE CHE SONO QUI ESPRESSAMENTE DISCONOSCIUTE ED...

Страница 15: ...8 3 mm zodat het gemakkelijk door een tuinslang kan worden gepompt SLANGENTABEL Slangmaat 5 8 16 mm 3 4 19 mm Maximale lengte 25 voet 7 6 m max 50 voet 15 2m max 100 voet 30 5m max 150 voet 45 7m max...

Страница 16: ...kant van de motoras om te voorkomen dat deze gaat draaien Schroef tegen de klok in de borg moer 7 16 11 mm op het uiteinde van de motoras los en verwijder het roestvrijstalen hakmes Verwijder de pomp...

Страница 17: ...TILZWIJGENDE GARANTIESVANVERKOOPBAARHEID EN GESCHIKTHEIDVOOR EEN BEPAALD DOEL DIE HIERBIJ UITDRUKKELIJKWORDENAFGEWEZEN EN UITGESLOTEN BEHALVE INDIEN WETTELIJKANDERS BEPAALD IS HETEXCLUSIEVE RECHTSMIDD...

Страница 18: ...p h gst 3 mm 1 8 s att det enkelt kan pumpas genom en tr dg rdsslang K r inte mer n 30 minuter kontinuerligt SLANGBORD Slangstorlek 5 8 16 mm 3 4 19 mm Maximal l ngd 25 fot 7 6 m max 50 fot 15 2m max...

Страница 19: ...ed pumphjul kod 9 liten slitplatta kod 10 tv tappar och axelt tning som en enhet fr n motoraxeln och de terst ende tv monteringstapparna Ta bort den stj rnl sade h llbrickan p t tningen och tryck ut t...

Страница 20: ...VF RV NTADE BESPARINGAR ELLER INT KTER INKOMSTF RLUST F RLUSTAVAFF RSVERKSAMHET PRODUKTIONSF RLUST F RLUSTAV M JLIGHETER ELLER F RLUSTAVANSEENDE DENNAGARANTI R ENDASTEN REPRESENTATIONAVDEN FULLST NDIG...

Страница 21: ...r bombeados f cilmente a trav s de una manguera de jard n No haga funcionar m s de 30 minutos de forma continua TABLA DE MANGUERAS Tama o de manguera 5 8 16 mm 3 4 19 mm Longitud m xima 25 pies 7 6m m...

Страница 22: ...m detr s de la placa del triturador Clave 6 y en la parte plana del eje del motor para evitar que gire Desenrosque en sentido contrario a las agujas del reloj la contratuerca de 7 16 11 mm en el extre...

Страница 23: ...ANT A LAGARANT ALIMITADADE XYLEM GARANTIZAQUE ESTE PRODUCTO EST LIBRE DE DEFECTOSYMANO DE OBRADURANTE UN PER ODO DE 1A OAPARTIR DE LAFECHADE FABRICACI N LAGARANT AES EXCLUSIVAYSUSTITUYEATODASYCADAUNAD...

Страница 24: ...ries 81000 373 Rev J 01 2023 Xylem Inc USA 17942 Cowan Irvine CA 92614 Xylem Inc HUNGARY KFT 2700 Cegl d K lso K tai t 41 Xylem Inc UK Harlow Innovation Park London Road Harlow Essex CM17 9LX Xylem In...

Отзывы: