background image

42 Caring for the Pen

Chapter 3

  Caring for the L10 Tablet

Caring for the Pen 

If you use an active (digitizer) pen with your tablet:


Store the active (digitizer) pen in the pen holder when not in use. 

Avoid storing the pen vertically on its tip. It can damage the pen-to-digitizer function. 

Keep the pen away from any liquid, because the pen contains electronic components that 
can be damaged when wet. 

In certain environments, particles or debris can stick to the pen tip or the tablet display. 
Make sure you wipe off the pen with a soft cloth to avoid scratching the display. 

If you need a new active pen or a stylus tip kit, check the 

Accessories

 page for the L10 

tablet on the Xplore web site. Open the 

Input Devices

 section to see the pens and the 

Stylus Tip Kit for tip replacement. There art two passive pens as well. Check with your 
authorized reseller to order. 

If you use a capacitive pen with your tablet, the pens are listed on the 

Accessories

 page in the 

Input 

Devices

 section. 

Cleaning the Fingerprint Reader 

Under normal circumstances, you should clean the fingerprint reader once a month, or whenever 
necessary.  

To clean the fingerprint reader, gently rub the sensor surface with the cloth that is included with the 
tablet or any microfiber cloth. 

You can use a small amount of alcohol or warm soapy water from time to time to clean the reader 
surface. Dry it off after cleaning. 

Warning: 

Don’t use bleach, solvents, or abrasives.    

Conditioning the Battery 

To maximize the performance of the battery, condition the battery once a month. To condition it, run 
the tablet on battery power until the battery’s charge level drops below 20%. Then use AC power 
until it is fully charged. 


For more information about batteries, see 

Using the Battery

  on page 14.

Содержание iX101L1

Страница 1: ...L10 Platform for the XSLATE and XPAD Tablets Models iX101L1 and iX10101L2 User Guide...

Страница 2: ...patents including patent numbers 5 315 448 and 6 836 549 and other intellectual property rights The use of the Macrovision copy protection technology in the product must be authorized by Rovi Corporat...

Страница 3: ...ard 9 Powering Up the Tablet 10 Optional Setup Tasks 11 Backing Up Files and Creating a Recovery Drive 11 Attaching the Pen Tether 11 Connecting the Tablet to an External Monitor 11 For More Informati...

Страница 4: ...a 30 Putting the Camera Icon on Your Taskbar 30 Using the Built in Microphones 31 Using Integrated Optional Features 32 Using the Barcode Scanner XPAD Only 32 Using the RFID NFC Reader 33 Using the Fi...

Страница 5: ...ower Issues 45 Shutting Down Issues 46 Display Issues 47 Pen Issues 48 Keyboard Issues 49 Network Issues 49 Ethernet Issues 50 Wi Fi Issues 50 Bluetooth Issues 50 Bluetooth Tips 50 Mobile Broadband Is...

Страница 6: ...vi Table of Contents...

Страница 7: ...to support any mobile work flow The L10 Platform supports these features Available with one of these processors Intel Pentium Intel Core 8th Gen i5 or i7 4 8 or 16 GB of system memory RAM depending o...

Страница 8: ...of the XPAD L10 tablet See Using the Barcode Scanner XPAD Only on page 32 Integrated active Wacom digitizer display that provides precision pen input and hover features Integrated pass through antenn...

Страница 9: ...rimarily for taking pictures or video of the tablet user Camera indicator Is illuminated when either the front or rear facing camera is active Fingerprint reader Can read your fingerprint to let you l...

Страница 10: ...ixel camera Kensington lock slot Provides a metal reinforced hole for use with a cable and lock to secure the tablet Fan intake Where ambient air is pulled in by the fan Do not block or cover Fan exha...

Страница 11: ...erial port or HDMI in Fan exhaust Allows air flow Memory card slot Reads and writes micro SD cards USB type C port Provides access to USB 3 1 and DisplayPort output through a USB type C connector USB...

Страница 12: ...ot need a battery The long capacitive pen uses a AAAA battery These two pens do not require a pen digitizer in the tablet They work with the tablet s touchscreen directly Active Digitizer Pens If the...

Страница 13: ...ent place on the XPAD tablet Front of the XPAD L10 Function button P1 Default setup Tap to open the Know Your Tablet application Press and hold to open the Microsoft OneNote Function button P2 Default...

Страница 14: ...he tablet via tether Barcode scanner Optical interface for reading barcodes Battery latch 13 megapixel camera Camera light Battery Tether post for pen Expansion Fan intake Fan output port cover Kensin...

Страница 15: ...ards and switching between SIMs is done within Windows Most people will need only one SIM To add or change a SIM follow these instructions 1 Shut down and turn off the tablet 2 Remove the battery if i...

Страница 16: ...port Plug in the AC adapter 3 Plug the power cord into an outlet The battery charging indicator on the front of the L10 tablet blinks green to indicate that the battery is charging It is solid green w...

Страница 17: ...f the tether through the attach point on the tablet then pull the pen through the loop until it is tight Connecting the Tablet to an External Monitor There is no dedicated port for an external monitor...

Страница 18: ...g three chapters of this user guide includes Chapter 2 Using Your L10 Tablet on page 13 Provides instructions for basic tasks including how to customize your tablet to fit the way you work Chapter 3 C...

Страница 19: ...g to Bluetooth Devices on page 21 Connecting to a Mobile Broadband Network on page 22 Inserting a SIM Card on page 22 Setting Up Mobile Broadband on page 23 Switching to a Second Broadband Provider on...

Страница 20: ...by indicating the battery saver mode green flame and by showing whether the battery is charging plug 1 In the notification area of the taskbar tap the Battery icon to display the remaining charge The...

Страница 21: ...or the performance of your tablet in a few different ways If the tablet is plugged in then you can optimize for performance instead of battery If you are on battery you can use these settings to exten...

Страница 22: ...open and the battery pops out slightly 3 Insert your finger under the finger tab and pull to remove the battery from the battery compartment Replacing the Battery 1 Place the tabbed end of the batter...

Страница 23: ...atteries will discharge at a rate of 10 of the total capacity per month Battery and Power Management Tips To lengthen the usable life of the battery use AC power when you can The battery charges autom...

Страница 24: ...gs menu opens 2 Tap the Network Internet icon 3 In the left pane tap Airplane mode The right pane displays the Airplane mode menu shown here 4 In the right pane turn Airplane mode on When airplane mod...

Страница 25: ...ap the Network Internet icon The Network Internet menu opens and displays the network status as shown here 3 In the left pane tap Wi Fi to display the Wi Fi status 4 In the right pane if the Wi Fi is...

Страница 26: ...onnect automatically The box is checked c Tap the Connect button d If prompted enter the network security key Tap Next to verify the key e If you are asked to make your tablet discoverable tap Yes if...

Страница 27: ...re turned on you can tap them and tap Pair to begin the pairing process 6 To make sure that your tablet is visible to other devices find the Related Settings section a To find it you need to scroll do...

Страница 28: ...d option If inserting only one SIM card place it in the holder labeled SIM1 If inserting two SIM cards put the card for the primary carrier in SIM1 and the card for the secondary carrier in the other...

Страница 29: ...h the SIM card inserted properly and an active account with a cellular network provider you can connect to a mobile broadband network 1 Tap the Start icon and tap the Settings icon 2 Tap the Network I...

Страница 30: ...e Connections If you let Windows manage your connections it will automatically connect you to your cellular network When you are NOT connected to another kind of network Windows will automatically use...

Страница 31: ...e information in this section to enable location services To use location services you do not need a network connection or an account with a mobile broadband network carrier Enabling Location Services...

Страница 32: ...rk print and download the documentation for of Xplore tablets and accessories The PDF files are best viewed with Adobe Acrobat Reader DC Support online Tap this tile to open the Xplore web site where...

Страница 33: ...will start to blink when the system has entered sleep mode 3 You can wake the tablet up by pressing the Power button again Using the Power Icon Menu 1 Tap the Start icon and tap the Power icon just ab...

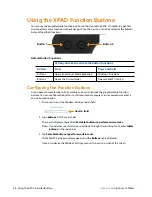
Страница 34: ...d or enter a keystroke combination 1 Put your cursor in the Windows Settings search field 2 Type buttons into the search bar The search displays a topic titled Set tablet buttons to perform certain ta...

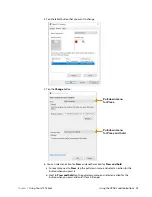
Страница 35: ...ct an action for Press and another action for Press and hold a For example next to Press tap the pull down menu and select an action for the button when you press it b Next to Press and hold tap the p...

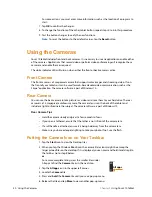
Страница 36: ...mera You can use the back camera to take pictures or videos and save them to your hard drive The rear camera is a 13 megapixel autofocus camera The camera lens is on the back of the tablet and include...

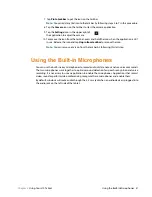
Страница 37: ...n and tap Unpin from taskbar to remove the icon Note You can remove any icon from the taskbar by following this last step Using the Built in Microphones You can use the built in array microphones to r...

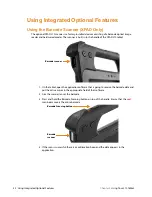
Страница 38: ...handle of the XPAD L10 tablet 1 On the tablet open the application software that is going to receive the barcode data and put the active cursor in the appropriate field of that software 2 Aim the scan...

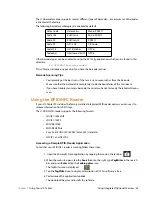
Страница 39: ...ncludes the factory installed integrated RFID reader option you can use it to retrieve information from RFID tags The L10 RFID NFC reader supports the following formats ISO IEC 14443A B ISO IEC 15693...

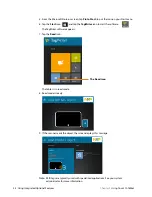
Страница 40: ...ap the Start icon and tap the TagWriter icon to start the software The TagWriter software appears 7 Tap the Read icon The tablet is in read mode 8 Read mode is ready 9 If the scanner reads the object...

Страница 41: ...the Windows Start icon and tap the Settings icon The Settings window appears 2 Tap the Accounts icon The Accounts window appears 3 In the left pane tap Sign in options 4 In the right pane of the Sign...

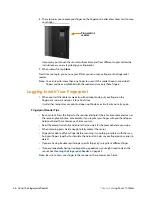
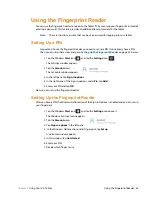
Страница 42: ...gnize your print and open up Windows or it will ask you to try again Fingerprint Reader Tips Be consistent Press the finger to the scanner and hold it there for a moment and scan at the same angle eac...

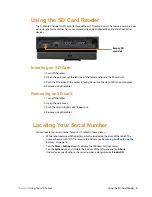
Страница 43: ...into place 4 Resume using the tablet Removing an SD card 1 Turn off the tablet 2 Open the port cover 3 Push the card in slightly until it pops out 4 Resume using the tablet Locating Your Serial Number...

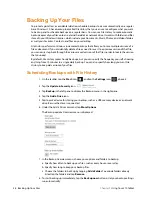
Страница 44: ...ion that you need By default File History makes hourly back ups but you can specify the frequency yourself choosing anything from 10 minutes to a single daily back up You can also specify how long you...

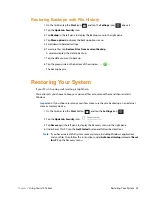
Страница 45: ...kup begins Restoring Your System If your PC isn t running well resetting it might help This action lets you choose to keep your personal files or to remove them and then reinstalls Windows Important I...

Страница 46: ...40 Restoring Your System Chapter 2 Using Your L10 Tablet...

Страница 47: ...e are no user serviceable components inside Opening the housing will void your warranty Caring for the Display Follow these suggestions to keep your display clean Clean fingerprints and smudges from t...

Страница 48: ...acement There art two passive pens as well Check with your authorized reseller to order If you use a capacitive pen with your tablet the pens are listed on the Accessories page in the Input Devices se...

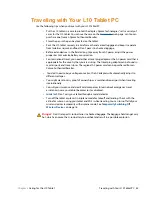
Страница 49: ...untry that you are visiting The travel plug adapter can be found in most airports and travel stores The regional AC power cord can be purchased from an Xplore Authorized Reseller You don t need to buy...

Страница 50: ...44 Traveling with Your L10 Tablet PC Chapter 3 Caring for the L10 Tablet...

Страница 51: ...t does not power on Before powering up the L10 tablet for the first time you need to connect the tablet to AC Power to charge it up The system will ship with all batteries in Ship Mode to prevent disc...

Страница 52: ...at isn t responding 4 Tap the End task button in the lower right corner 5 When it stops you can try using the tablet or shutting down 6 To shut down the tablet tap the Start icon and the Power icon ab...

Страница 53: ...ess Use the battery icon Power mode menu 1 Tap the Battery icon in the Notification area of the taskbar The Power mode menu pops up 2 Tap the Brightness tile in the lower left corner Tap it until you...

Страница 54: ...ck while the Tablet PC is still turned on The possibilities include The tablet might have turned off the display to save power To restore the display tap the screen with your finger or the pen The tab...

Страница 55: ...the keyboard You ll see a pop up menu of keyboards to choose from 3 Tap the one on the left for the default 4 Tap the icon in the upper right for the most complete keyboard which has traditional Ente...

Страница 56: ...21 Bluetooth Tips Xplore Technologies and its Bluetooth partners have worked to ensure a positive experience with this technology and to ensure Bluetooth interoperability In doing so we have found the...

Страница 57: ...audio device such as a USB or Bluetooth device the integrated audio might stop working If this happens reinstall the audio drivers After you install these if you still have issues with audio contact...

Страница 58: ...Will scratches affect the performance of the display or digitizer Our testing has not found appreciable loss of performance on a scratched display How sensitive is the screen to various elements As w...

Страница 59: ...y tablet To learn more about the L10 tablet see our Training tutorials and Knowledge base articles Check out our SUPPORT site for everything from phone support to training Xplore Technologies also off...

Страница 60: ...54 Frequently Asked Questions Chapter 4 Troubleshooting and FAQs...

Страница 61: ...green 10 battery power extending slider menu 45 battery settings 46 battery hot swappable 4 battery inserting 10 battery latch 4 BIOS password forgot 51 blinking power button 45 Bluetooth interference...

Страница 62: ...5 intake 4 features optional 2 overview 1 file history backup 38 fingerprint reader 3 setting up set up a PIN Windows Hello sign in op tions log in 35 tips scanning your finger 36 function buttons XP...

Страница 63: ...mart card and CAC reader RS232 serial port external UHF RFID reader 2 optional mobile broadband with GNSS GPS GNSS with SBAS 25 overview of XPAD 7 back side 8 bottom side docking connectors 6 front si...

Страница 64: ...not responding force shut down 46 SIM card for broadband 23 24 inserting two cards 22 SIMs SIM card port inserting SIM card holder 9 sleep mode power button 27 saving power 17 speaker 4 51 speaker XPA...

Страница 65: ...base 12 L10 overview 12 support 12 videos 12 Wi Fi connecting 19 show available networks 19 troubleshooting 50 turn off 18 49 wireless network show available networks 19 turn off unwanted connection...

Страница 66: ...60 Index...
Отзывы: