background image

4

.

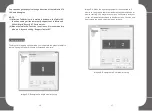
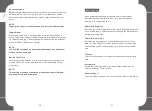
Pen Buttons


Pen Button 1 & 2:

Select the function for pen button 1 and button 2 from these options:”No 

Action”, “Left Button Down”, “Left Button Double Click”, “Right Button 

Down”, “Right Button Double Click”, “Middle Button Down”, “Middle 

Button Double Click”, “Toggle Eraser” and “User defined”.

Pen/Eraser toggle function:

The Pen/Eraser toggle function allows you to configure the button’s 

command function. When the stylus is inside the working area press the 

barrel button to toggle between pen/eraser modes.  The screen will 

indicate the current mode.

NOTE:

The Pen/Eraser toggle switch will only toggle between the pen tip 

and eraser, not as “brush”. 

Image 6-4: Pen Buttons

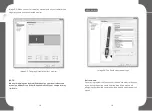
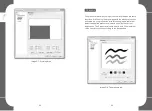
5.Working Area


Move and drag the working area scale points to adjust your 

desired working area size. If you want to assign a working area 

location move the working area to the assigned location as 

required. 

Inch, cm and Line: 

You can choose different measurement systems when changing 

the Origin X, Origin Y, Width and Height. 

Origin X & Origin Y:

Indicates the current height and width of the Pen area dimensions. 

You may also type in new values here to change the dimensions of 

the tablet working area.

Width & Height: 

Indicates the horizontal and vertical distances of the upper left 

corner of the pen area. You may also set their values by typing in 

the numerical values here.

Left Hand: 

Choosing “Left-hand” mode will change the physical usage 

direction of the tablet to adapt to your preference.

Full area:

Tap on the full area button to select the largest possible working 

area.

28

29

Содержание Star G430

Страница 1: ...Manual...

Страница 2: ...Star G430 Graphic Tablet User Manual...

Страница 3: ...that requires a high degree of safety and reliability In such a system this product could negatively affect other electronic devices and could malfunction due to the effect of those devices Turn the...
Страница 4: ...Express Key button and keep any objects from covering the pen to avoid potential damage Keep the pen away from areas of high dust contaminants or any particulate matter that can effect or damage the...

Страница 5: ...t Description 25 26 26 27 28 29 VI Mac Setup Assistant 1 Tablet setting 2 About 3 Display 4 Pen Buttons 5 Working Area 6 Pressure VII Uninstall Driver 1 Windows operation system 2 Mac OS VIII FAQ 1 32...

Страница 6: ...tional mouse 3 Active Display Area 4 Inch x 3 Inch utilizing our 2048 level pen pressure sensitivity 4 Ultrathin design of all XP Pen Tablets that is portable and convenient to carry 5 Compatible with...

Страница 7: ...1 Under the normal working state when a stylus is above the working area within the induction scope the light will blink once per five seconds 2 When a stylus is touching the working area the blue in...

Страница 8: ...III Accessories introductions 6 7 1 Stylus Image 3 1 Stylus and accessories 1 The second barrel button 2 The first barrel button 3 Pen tip...

Страница 9: ...lick the digital pen equivalent to double clicking with a mouse you must keep the pen tip away from the tablet s surface or try to lift the pen tip as fast as possible before the second tap to avoid m...

Страница 10: ...ver folder and run the install exe file 1 Windows driver install Image4 1 Windows driver installation NOTES 1 Suspend Disable Anti virus software firewall or any other security software you are using...

Страница 11: ...l Panel and double tap the Tablet Setting icon For Windows Vista or Windows 7 Tap Start Control Panel and double tap the Tablet Setting icon For Windows 10 8 Move your cursor to screen bottom left cor...

Страница 12: ...the system tray Image5 1 Info 3 Tablet Image5 2 Tablet Displays basic information of the tablet including working area size pen sensitivity level and resolution settings Support Tablet PC Check suppo...

Страница 13: ...Support Tablet PC 4 Monitor Mapping The Monitor mapping option allows you to operate the graphic tablet to work with single or dual monitors or extended monitors Image5 3 Example of a single monitor s...

Страница 14: ...an be modified to assign your desired screen area size however the Driver Requirements of your computer may limit this 5 Pen Buttons Image5 6 The Pen Button tab settings Button Name You may reprogram...

Страница 15: ...r Fast depending on your preference NOTE This setting will change the speed of the graphic tablet s digital pen double click time and mouse 6 Working Area Move and drag the working area scale points t...

Страница 16: ...ile using the digital pen with the pressure function activated as you press down with force the graphic tablet will detect the applied pressure value and send it to the current application The Pressur...

Страница 17: ...ton to clean delete the space within the pressure test area Pressure Test color adjustment You may customize your preferred color setting within the options under the Pressure setting tab Click Sensit...

Страница 18: ...blet setting version info Obtain current version of driver Image6 2 About 3 Display Monitor Mapping Select Map to all Displays Map by user or Map to Display 1 Image 6 3 Display When your installation...

Страница 19: ...ea Move and drag the working area scale points to adjust your desired working area size If you want to assign a working area location move the working area to the assigned location as required Inch cm...

Страница 20: ...llocate space for the tablet Image 6 5 Working Area 6 Pressure There is a test area to alter the thickness of the line according to the pressure applied by the pen on the tablet Clear Tap on the clear...

Страница 21: ...ram find Tablet Driver V8 0 select Add Remove and follow the instructions until the process is completed 2 Mac OS Explore Finder Application Touch Tablet Uninstall Pen Tablet Driver and follow the ins...

Страница 22: ...determine whether it s caused by a hardware or software malfunction A3 If your graphic tablet is malfunctioning do the following 1 Connect your graphic tablet to different computer than the one previ...

Отзывы: