background image

Parts of the Printer

Phaser® 6360 Color Laser Printer

1-3

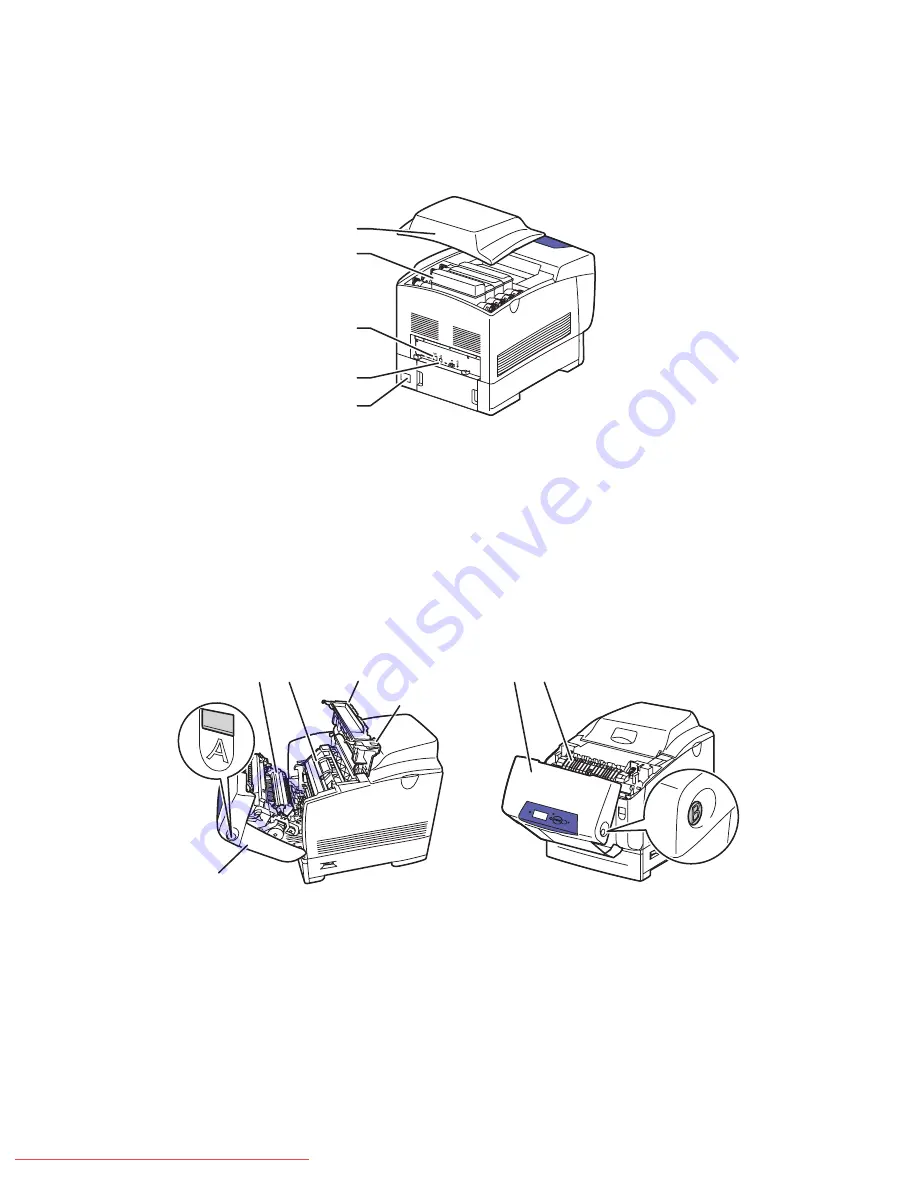
Rear-Left View 

Inside View 

1.

Top cover

2.

Toner cartridges (high capacity)

3.

USB connection

4.

Ethernet 10/100 Base-Tx connection

5.

Power cord connection

Doors A and C Open

Door B Open

1.

Front Door A

2.

Transfer roller

3.

Imaging unit

4.

Door C

5.

Door C latch

1.

Front Door B

2.

Fuser

6360-041 

6360-042

4

3

2

1

5

6360-043

2

1

Downloaded From ManualsPrinter.com Manuals

Содержание Phaser 6360

Страница 1: ...bok Gebruikershandleiding Guia do Usu rio Gu a del usuario Benutzerhandbuch Guida dell utente Guide d utilisation UserGuide www xerox com support Phaser 6360 c o l o r l a s e r p r i n t e r Download...

Страница 2: ...L are trademarks of Hewlett Packard Corporation in the United States and or other countries IBM and AIX are trademarks of International Business Machines Corporation in the United States and or other...

Страница 3: ...Resources 1 9 Xerox Support Centre 1 10 2 Network Basics Overview of Network Setup and Configuration 2 2 Choosing a Connection Method 2 3 Connecting via Ethernet Recommended 2 3 Connecting via USB 2 4...

Страница 4: ...ting Printing Options 3 19 Selecting Printing Preferences Windows 3 19 Selecting Options for an Individual Job Windows 3 20 Selecting Options for an Individual Job Macintosh 3 21 Printing on Both Side...

Страница 5: ...ettings Not Applied 4 13 Printed Colors Do Not Match Monitor Colors 4 14 PANTONE Colors Do Not Match 4 14 Print Area Is Not Centered on the Paper 4 15 5 Maintenance Cleaning the Printer 5 2 Cleaning t...

Страница 6: ...6 2 Misfeed at Trays 2 5 6 5 Jam at the Fuser 6 7 Jam at the Duplex Unit 6 9 Jam at the Registration Roller 6 10 Getting Help 6 13 Control Panel Messages 6 13 PrintingScout Alerts 6 13 PhaserSMART Tec...

Страница 7: ...ser Printer 1 1 This chapter includes Parts of the Printer on page 1 2 Printer Configurations on page 1 4 Control Panel on page 1 6 More Information on page 1 9 Printer Features Downloaded From Manual...

Страница 8: ...age 1 3 Inside View on page 1 3 Printer Configurations on page 1 4 Front Right View 1 Top cover 2 Control panel 3 Front door 4 Handle to open Tray 1 Multi Purpose Tray 5 Tray 2 6 Trays 3 4 and 5 optio...

Страница 9: ...s high capacity 3 USB connection 4 Ethernet 10 100 Base Tx connection 5 Power cord connection Doors A and C Open Door B Open 1 Front Door A 2 Transfer roller 3 Imaging unit 4 Door C 5 Door C latch 1 F...

Страница 10: ...i 2400 Fonts PostScript and PCL Trays Tray 1 MPT 150 sheet capacity Tray 2 550 sheet capacity Connection USB 2 0 Ethernet 10 100 Base Tx Available Configurations Features Printer Configurations 6360N...

Страница 11: ...ng combinations One 550 Sheet Feeder Tray 3 One 1100 Sheet High Capacity Feeder Trays 3 and 4 One 550 Sheet Feeder Tray 3 and one 1100 Sheet High Capacity Feeder Trays 4 and 5 Memory All configuration...

Страница 12: ...l Panel Layout 1 Status Indicator LED Green Printer is ready to print Yellow Warning condition printer continues to print Red Startup sequence or error condition Blinking Printer is busy or warming up...

Страница 13: ...ation about your printer do the following 1 On the control panel select Information and then press the OK button 2 Select Information Pages and then press the OK button 3 Select Configuration Page or...

Страница 14: ...int the sampler pages select the appropriate PostScript Setup settings for the default print quality mode and color correction from the Printer Setup menu on the control panel To print the color sampl...

Страница 15: ...erox com office 6360support Quick Start Tutorials www xerox com office 6360support Video Tutorials www xerox com office 6360support Recommended Media List Recommended Media List United States Recommen...

Страница 16: ...ms Printer and supplies status Supplies ordering and recycling Answers to frequently asked questions Default printer driver settings Windows only To start the Xerox Support Centre utility See also Usi...

Страница 17: ...nection Method on page 2 3 Configuring the Network Address on page 2 5 Installing the Printer Drivers on page 2 9 This chapter provides basic information about setting up and connecting to your printe...

Страница 18: ...entation CD ROM to automatically set the printer s IP address if the printer is connected to an established TCP IP network You can also manually set the printer s IP address on the control panel Macin...

Страница 19: ...connection It also allows you direct access to CentreWare Internet Services IS The CentreWare IS web interface enables you to manage configure and monitor networked printers from your desktop Network...

Страница 20: ...acintosh users must use Mac OS X version 10 2 and higher USB Connection A USB connection requires a standard A B USB cable This cable is not included with your printer and must be purchased separately...

Страница 21: ...protocols each printer and computer must have a unique IP address It is important that the addresses are similar but not the same only the last digit needs to be different For example your printer can...

Страница 22: ...control panel or use CentreWare IS to turn on off DHCP Note You can view the printer s IP address at any time On the control panel select Information press the OK button select Printer Identification...

Страница 23: ...control panel select Printer Setup and then press the OK button 2 Select Connection Setup and then press the OK button 3 Select Network Setup and then press the OK button 4 Select TCP IP Setup and the...

Страница 24: ...the CentreWare IS Online Help After setting the printer s IP address you can modify TCP IP settings using CentreWare IS 1 Launch your web browser 2 Enter the printer s IP address in the browser s Addr...

Страница 25: ...stScript driver is recommended to take full advantage of your system s custom features and genuine Adobe PostScript Default printer driver PCL5c Web only The Printer Command Language driver can be use...

Страница 26: ...on 10 2 and higher Macintosh OS X Version 10 2 and 10 3 Bonjour Rendezvous Connection To install the printer driver from the Software and Documentation CD ROM 1 Insert the CD ROM into the CD ROM drive...

Страница 27: ...the printer software 2 Once installation is complete select one of the following options Open the Print Center utility for Mac OS X version 10 2 x Open the Printer Setup Utility for Mac OS X version...

Страница 28: ...he list of available printers 8 Click the Add button USB Connection To install the printer driver from the Software and Documentation CD ROM 1 Insert the CD ROM into the CD ROM drive 2 Open the Printe...

Страница 29: ...Once installation is complete open the Printer Setup Utility Note To locate utilities on the Macintosh hard drive open the Applications folder and then open the Utilities folder 3 Click the Add butto...

Страница 30: ...oading Paper on page 3 9 Selecting Printing Options on page 3 19 Printing on Both Sides of the Paper on page 3 23 Printing on Specialty Media on page 3 25 Creating Custom Paper Types on page 3 47 See...

Страница 31: ...d size or change it as required 3 From the software application access the Print dialog box and then select printing options in the printer driver 4 Send the job to the printer from the software appli...

Страница 32: ...r your Phaser 6360 printer They are guaranteed to produce excellent results with your printer To order paper transparencies or other specialty media contact your local reseller or go to www xerox com...

Страница 33: ...Do not use envelopes with windows metal clasps or adhesives with release strips All envelopes should be printed single sided only Some wrinkling and embossing may occur when printing envelopes Do not...

Страница 34: ...mitted by the sun and fluorescent bulbs is particularly damaging to paper items The intensity and length of exposure to visible light on paper items should be reduced as much as possible Maintain cons...

Страница 35: ...trays For more detailed information about paper and other media print the Paper Tips page 1 On the control panel select Information and then press the OK button 2 Select Information Pages and then pr...

Страница 36: ...mm 3 5 8 5 in Long edge 140 914 mm 5 5 36 in Executive 7 25 x 10 5 in Letter 8 5 x 11 in US Folio 8 5 x 13 in Legal 8 5 x 14 in A4 210 x 297 mm A5 148 x 210 mm A6 105 x 148 mm B5 JIS 182 x 257 mm ISO...

Страница 37: ...and Weights for Trays 2 5 Trays 2 5 65 163 g m2 17 40 lb Bond 50 60 lb Cover Executive 7 25 x 10 5 in Letter 8 5 x 11 in US Folio 8 5 x 13 in Legal 8 5 x 14 0 in A4 210 x 297 mm A5 148 x 210 mm B5 JIS...

Страница 38: ...including Plain paper heavy plain paper letterhead colored paper and prepunched paper Card stock Labels Envelopes Transparencies Glossy paper Specialty media including business cards postcards trifold...

Страница 39: ...paper or other media in Tray 1 MPT 1 Open Tray 1 MPT by pulling out on the handle 2 Pull out the tray extension and open the paper guides 3 Fan the paper to release sheets that are stuck together 636...

Страница 40: ...you are using preprinted or prepunched paper follow these guidelines For single sided printing place the side to be printed facedown with the top of the paper entering the printer first For 2 sided pr...

Страница 41: ...etup press the OK button on the control panel If you load a new type or size of paper in the tray do the following a Select Change setup and then press the OK button b Select the paper type and then p...

Страница 42: ...etermine which tray contains the paper type and size each print job requires The paper type and size of your print job must match the Tray 1 MPT paper type and size settings on the control panel to pr...

Страница 43: ...panel remove the paper from Tray 1 MPT 5 Load the appropriate paper for your job into the tray See also Loading Paper in Tray 1 MPT on page 3 9 Loading Paper in Trays 2 5 Use Trays 2 5 for a wide rang...

Страница 44: ...r into Trays 2 5 1 Pull out the tray 2 If necessary open the paper guides Squeeze the green tab on the length guide and then slide it back The guide clicks into place Slide the green side guides outwa...

Страница 45: ...single sided printing place the side to be printed faceup with the top of the page toward the front of the tray For 2 sided printing place the first side to be printed with the odd numbered pages fac...

Страница 46: ...on Do not load paper above the fill line indicated on the tray Overloading the tray may cause jams In the following illustration 1 indicates the maximum fill line for paper and 2 indicates the maximum...

Страница 47: ...y into the tray slot and push the tray completely into the printer 7 To use the current tray setup press the OK button on the control panel If you load a new type of paper in the tray a Select Change...

Страница 48: ...if you want to use automatic 2 sided printing for most jobs set this option in printer settings To select printer preferences 1 Select one of the following options Windows 2000 and Windows Server 200...

Страница 49: ...to other print jobs Select Saved Settings at the bottom of the tab Click the Help button for more information 4 Click the OK button to save your selections 5 Print the job See the following table for...

Страница 50: ...ings To print jobs using specific printer settings click the applicable saved preset in the Presets list 3 Click Print to print the job See the following table for specific printing options Macintosh...

Страница 51: ...all odd even ColorSync Color matching Cover Page Cover pages Paper Feed Paper source Job Types Secure prints personal prints proof prints and saved prints Image Quality Print quality RGB color correct...

Страница 52: ...configurations Before printing a 2 sided document verify that the paper is a supported size for the tray For a list of supported paper sizes see Supported Paper and Media on page 3 3 For a list of pa...

Страница 53: ...on To select automatic 2 sided printing Note If your driver does not display the options listed in the table above go to the website at www xerox com drivers to download the latest driver See also Loa...

Страница 54: ...upported paper transparencies and other specialty media is not covered by the Xerox warranty service agreement or Total Satisfaction Guarantee The Total Satisfaction Guarantee is available in the Unit...

Страница 55: ...g Transparencies from Tray 1 MPT 1 Open Tray 1 MPT by pulling out on the handle 2 Pull out the tray extension and open the paper guides 3 Fan the transparencies to release sheets that are stuck togeth...

Страница 56: ...sparencies 5 On the control panel select the transparency type and size a Select Change setup and then press the OK button b Select Transparency and then press the OK button c Select the transparency...

Страница 57: ...ut of the printer 2 If necessary open the paper guides Squeeze the green tab on the length guide and then slide it back The guide clicks into place Slide the green side guides outward 3 Fan the transp...

Страница 58: ...he tray may cause jams In the following illustration 2 indicates the maximum fill line for transparencies labels glossy paper and thin card stock 5 If necessary press the guides inward to fit the tran...

Страница 59: ...to the printer 7 On the control panel select the transparency type a Select Change setup and then press the OK button b Select Transparency and then press the OK button 8 In the printer driver select...

Страница 60: ...re can cause the envelopes to seal before or during printing Avoid padded envelopes purchase envelopes that lie flat on a surface Remove air bubbles from the envelopes before loading by setting a heav...

Страница 61: ...sert the envelopes into Tray 1 MPT and adjust the paper guides to fit the envelopes For 10 Commercial C5 and B5 envelopes place the envelopes in the tray flap side up with the top of the envelopes tow...

Страница 62: ...first 4 On the control panel select the envelope type and size a Select Change setup and then press the OK button b Select Envelope as the paper type and then press the OK button c Select the envelope...

Страница 63: ...ing it may damage the printer Store unused labels flat in their original packaging Leave the sheets of labels inside the original packaging until ready to use Return any unused sheets of labels to the...

Страница 64: ...s 3 Fan the labels to release sheets that are stuck together 4 Insert the labels into Tray 1 MPT and adjust the paper guides to fit the sheets Place the side to be printed facedown with the top of the...

Страница 65: ...l sheet size and then press the OK button 6 In the printer driver select either Labels as the paper type or Tray 1 MPT as the paper source Printing Labels from Trays 2 5 1 Pull the tray out of the pri...

Страница 66: ...the side to be printed faceup with the top of the page toward the front of the printer Note Do not load the paper above the fill line indicated on the tray Overloading the tray may cause jams In the...

Страница 67: ...e labels and the guides 6 Insert the tray into the tray slot and push the tray completely into the printer 7 On the control panel select the paper type a Select Change setup and then press the OK butt...

Страница 68: ...per in the original wrapper and leave the packages in the shipping carton until ready to use Remove all other paper from the tray before loading glossy paper Load only the amount of glossy paper you a...

Страница 69: ...the paper guides 3 Fan the glossy paper to release sheets that are stuck together 4 Insert the glossy paper into Tray 1 MPT and adjust the paper guides to fit the paper Place the side to be printed fa...

Страница 70: ...paper size and then press the OK button 6 In the printer driver select either Glossy Paper as the paper type or Tray 1 MPT as the paper source Printing Glossy Paper from Trays 2 5 1 Pull the tray out...

Страница 71: ...Insert the paper into the tray Note Do not load the paper above the fill line indicated on the tray Overloading the tray may cause jams In the following illustration 2 indicates the maximum fill line...

Страница 72: ...d the guides 6 Insert the tray into the tray slot and push the tray completely into the printer 7 On the control panel select the glossy paper type a Select Change setup and then press the OK button b...

Страница 73: ...nt on custom size paper within the following dimensions Note You can only print custom size paper from Tray 1 MPT Printing Custom Size Paper from Tray 1 MPT 1 Open Tray 1 MPT by pulling out on the han...

Страница 74: ...printer first For automatic 2 sided printing if you are using preprinted or prepunched paper place the first side to be printed faceup with the bottom of the page entering the printer first 4 On the c...

Страница 75: ...Up Arrow and Down Arrow buttons to select the direction you are feeding the paper into the tray Note When you define a new custom size it is stored in the printer so it can be used again Up to five cu...

Страница 76: ...tine print jobs such as monthly reports To create custom paper types 1 Launch your web browser 2 Enter the printer s IP address in the browser s Address field http xxx xxx xxx xxx 3 Click Properties 4...

Страница 77: ...er 6360 Color Laser Printer 4 1 This chapter includes Controlling the Quality of Your Prints on page 4 2 Solving Print Quality Problems on page 4 6 Print Quality Downloaded From ManualsPrinter com Man...

Страница 78: ...4 The print quality mode and color correction directly control the quality of your prints The print quality mode and paper type directly control the print speed You can change these settings in the pr...

Страница 79: ...nting on Glossy Paper and Standard print quality mode is used when printing on Plain Paper This setting is only available in the printer driver Standard General purpose mode for crisp bright color pri...

Страница 80: ...OP Press Matches Specifications for Web Offset Publications Euroscale Matches FOGRA glossy paper specification Commercial Approximates U S commercial press target SNAP Press Matches Specifications for...

Страница 81: ...est driver Operating System Steps Windows Vista Windows 2000 Windows XP or Windows Server 2003 1 Select the Color Options tab 2 Select the desired color correction Some of the color corrections are gr...

Страница 82: ...ly on page 4 9 Fusing Is Incomplete on page 4 10 All Colors Are Too Light or Too Dark on page 4 11 Grays Are Not Neutral on page 4 12 Colors Vary Between Computers on page 4 12 Color Settings Not Appl...

Страница 83: ...l panel select Information and then press the OK button b Select Information Pages and then press the OK button c Select Paper Tips Page and then press the OK button Verify that the paper loaded in th...

Страница 84: ...ting Defects page 1 On the control panel select Troubleshooting and then press the OK button 2 Select Print Quality Problems and then press the OK button 3 Select Repeating Defects and then press the...

Страница 85: ...r with halos Verify that the printer is on a solid level flat surface On the control panel print the Color Registration page a Select Troubleshooting and then press the OK button b Select Print Qualit...

Страница 86: ...ay Setup menu See Loading Paper on page 3 9 If the problem continues 1 Do one of the following Tray 1 MPT Remove and re insert the paper Trays 2 5 Open and close the selected paper tray The control pa...

Страница 87: ...ows 2000 or later select the Color Options tab click the More Color Adjustments button and then adjust the Lightness level 4 If the problem continues calibrate the colors using the procedures on the C...

Страница 88: ...blems and then press the OK button 3 Select Calibrate Colors and then press the OK button 4 Select Tutorial Page and then press the OK button 5 Follow the instructions on the page Colors Vary Between...

Страница 89: ...or settings on the control panel it does not affect the colors in the printed document Solution To change color settings 1 In the printer driver change the settings for Print Quality and Color Correct...

Страница 90: ...sing other color matching software while matching PANTONE Colors can cause unpredictable color output If you choose to use a Color Management software set the printer s color correction to none and do...

Страница 91: ...to shift the print area on the paper The print area appears as a dashed rectangle on the Calibrate Margins page the printer does not print outside this rectangle a On the control panel select Troubles...

Страница 92: ...5 Recycling Supplies on page 5 6 Requesting a Maintenance Kit on page 5 7 Moving and Repacking the Printer on page 5 8 See also Maintenance video tutorials at www xerox com office 6360support Replaci...

Страница 93: ...d with a mild neutral detergent Do not spray detergent directly onto the printer Warning To prevent electric shock turn the printer off and unplug the power cord from the electrical outlet before clea...

Страница 94: ...at both sides of the transfer roller and gently lift it out of the printer Caution Avoid touching the surface of the roller 3 Use a dry towel or cotton swab to clean the density sensor Caution Do not...

Страница 95: ...ller Insert the rounded ends of the transfer roller into the curved black guides inside the printer Lock the transfer roller into the printer by pushing down on the tabs until you hear a click 5 Close...

Страница 96: ...stallation instructions Consumables Genuine Xerox Toner Cartridges Cyan Magenta Yellow and Black Standard capacity High capacity Note Each toner cartridge includes installation instructions on the box...

Страница 97: ...en press the OK button 3 Select Supplies Usage Page to print To order supplies contact your local reseller or go to the Xerox Supplies website at www xerox com office 6360supplies Caution Use of non X...

Страница 98: ...ur printer reaches 300 000 pages The long life maintenance kit contains Developers Cyan Magenta Yellow and Black Feed Roller Kit Registration Roller When you receive a warning message contact a Xerox...

Страница 99: ...he Printer for Shipment Caution Do not remove the toner cartridges leave them locked in the normal operating position If the printer is shipped without the toner cartridges locked in place toner can s...

Страница 100: ...s chapter includes Clearing Paper Jams on page 6 2 Getting Help on page 6 13 See also Troubleshooting video tutorials at www xerox com office 6360support Print Quality on page 4 1 Troubleshooting Down...

Страница 101: ...gistration Roller on page 6 10 See also User Safety on page A 1 Preventing Jams To reduce the occurrence of paper jams follow the guidelines and instructions in the Printing Basics chapter in this gui...

Страница 102: ...haser 6360 Color Laser Printer 6 3 2 Push up the latch on the front of the printer to open Front Door A 3 Remove any jammed paper 4 Close Front Door A 6360 010 6360 011 6360 059 Downloaded From Manual...

Страница 103: ...o release sheets that are stuck together 6 Load the paper in Tray 1 MPT Verify that the paper is clean and not stuck together Do not load the paper above the fill line Adjust the paper guides to fit t...

Страница 104: ...ll the tray specified on the control panel completely out of the printer 2 Remove any crumpled paper from the tray 3 Verify that the paper is loaded correctly in the tray below the fill line Adjust th...

Страница 105: ...nside the printer tray slot Verify that all scraps of paper are removed 5 Insert the tray into the tray slot and push it completely into the printer 6 Push up the latch on the front of the printer to...

Страница 106: ...ser Printer 6 7 7 Remove any jammed paper 8 Close Front Door A Jam at the Fuser To clear the jam 1 Press the button on the right side of the printer to open Front Door B 6360 011 6360 059 6360 001 Dow...

Страница 107: ...two levers at both ends of the fuser Warning The fuser is hot To prevent burns only touch the fuser handles 3 Remove the jammed paper 4 Completely push down the two levers at both ends of the fuser 6...

Страница 108: ...Printer 6 9 5 Close Front Door B Jam at the Duplex Unit To clear the jam 1 Press the button on the right side of the printer to open Front Door B 2 Remove the jammed paper 6360 005 6360 001 6360 006...

Страница 109: ...er Printer 6 10 3 Close Front Door B Jam at the Registration Roller To clear the jam 1 Pull Tray 2 completely out of the printer 2 Remove any crumpled paper from the tray 6360 005 6360 007 6360 015 Do...

Страница 110: ...inside the tray slot Confirm that all scraps of paper are removed 4 Insert Tray 2 into the tray slot and push the tray completely into the printer 5 Push up the latch on the front of the printer to o...

Страница 111: ...Clearing Paper Jams Phaser 6360 Color Laser Printer 6 12 6 Remove any jammed paper 7 Close Front Door A 6360 011 6360 059 Downloaded From ManualsPrinter com Manuals...

Страница 112: ...he control panel also displays an animated graphic showing the location of the problem such as the location of a paper jam Press the Help button on the control panel to view additional information abo...

Страница 113: ...echnical Support assists you in opening a Service Request with Xerox Customer Support To access PhaserSMART Technical Support 1 Open your browser and go to www phaserSMART com 2 Enter your printer s I...

Страница 114: ...ine Technical Support Recommended Media List Online Support Assistant driver downloads documentation video tutorials and much more www xerox com office 6360support Supplies for your printer www xerox...

Страница 115: ...nsion cord or power strip Verify that the printer is plugged into an outlet that is capable of providing the correct voltage and power Review the printer s electrical specification with an electrician...

Страница 116: ...cord is damaged or frayed Liquid is spilled into the printer The printer is exposed to water If any of these conditions occur do the following 1 Turn off the printer immediately 2 Disconnect the powe...

Страница 117: ...0 Sheet Feeder Add 341 mm 13 6 in for the 1100 Sheet High Capacity Feeder Other Clearances 100 mm 4 in behind the printer 600 mm 24 in in front of the printer 100 mm 4 in on the left side of the print...

Страница 118: ...materials may cause poor performance and a possible safety hazard Follow all warnings and instructions marked on or supplied with the printer options and supplies Caution Use of non Xerox supplies is...

Страница 119: ...e internal components Always use two people to lift the printer Always lift the printer from the designated lift points Do not place any food or liquids on the printer Caution Damage to the printer re...

Страница 120: ...on to a particular component See the manual s for information Hot surface on or in the printer Use caution to avoid personal injury Do not touch the item Do not burn the item It may take 30 minutes fo...

Страница 121: ...r Xerox product please note that the product may contain lead mercury perchlorate and other materials whose disposal may be regulated due to environmental considerations The presence of lead mercury a...

Страница 122: ...using CentreWare IS 2 8 choosing a network connection 2 3 cleaning 5 2 density sensor 5 2 the printer 5 2 clearance location of the printer A 3 color correction 4 4 automatic 4 4 selecting in the pri...

Страница 123: ...ort Centre 1 10 duplex unit paper jam 6 9 dynamically setting the printer s IP address 2 6 E electrical safety A 1 enabling AutoIP on the printer 2 6 enabling DHCP on the printer 2 6 enhanced print qu...

Страница 124: ...20 selecting a print quality mode 4 3 selecting printing options Windows 3 20 L labels 3 34 guidelines 3 34 printing from Tray 1 MPT 3 34 printing from Trays 2 5 3 36 laser safety A 2 lifting the prin...

Страница 125: ...ustom sizes 3 44 3 47 damaging to the printer 3 5 envelopes 3 31 feeding manually in Tray 1 MPT 3 13 glossy 3 39 labels 3 34 loading in the paper trays 3 9 printing on specialty media 3 25 storage gui...

Страница 126: ...paring for shipment 5 8 registration 6 15 repacking 5 8 setting the IP address 2 6 side view 1 3 standard features 1 4 supplies A 4 trays 1 4 upgrades 1 5 views 1 2 1 3 printer driver available 2 9 co...

Страница 127: ...he printer s IP address automatically Windows only 2 6 setting Tray 1 MPT mode 3 13 setting up the network 2 2 solving print quality problems 4 6 specialty media 3 25 custom size paper 3 44 3 47 envel...

Страница 128: ...area does not fit on the paper 4 15 printed colors do not match monitor colors 4 14 repeating defects 4 8 technical support 1 9 turning off the printer A 5 two sided printing 3 23 automatic 3 23 bind...

Отзывы: