background image

Loading Paper

2-14

DocuPrint N24, N32, and N40 System Administrator Guide

Using the 50 Sheet

Bypass Feeder

The DocuPrint N40’s 50 Sheet Bypass Feeder holds up to 
50 sheets of 20 lb (80 g/m

2

) paper. Refer to the section 

“Selecting Paper” (page 2-2) for acceptable media sizes 
and weights.

1

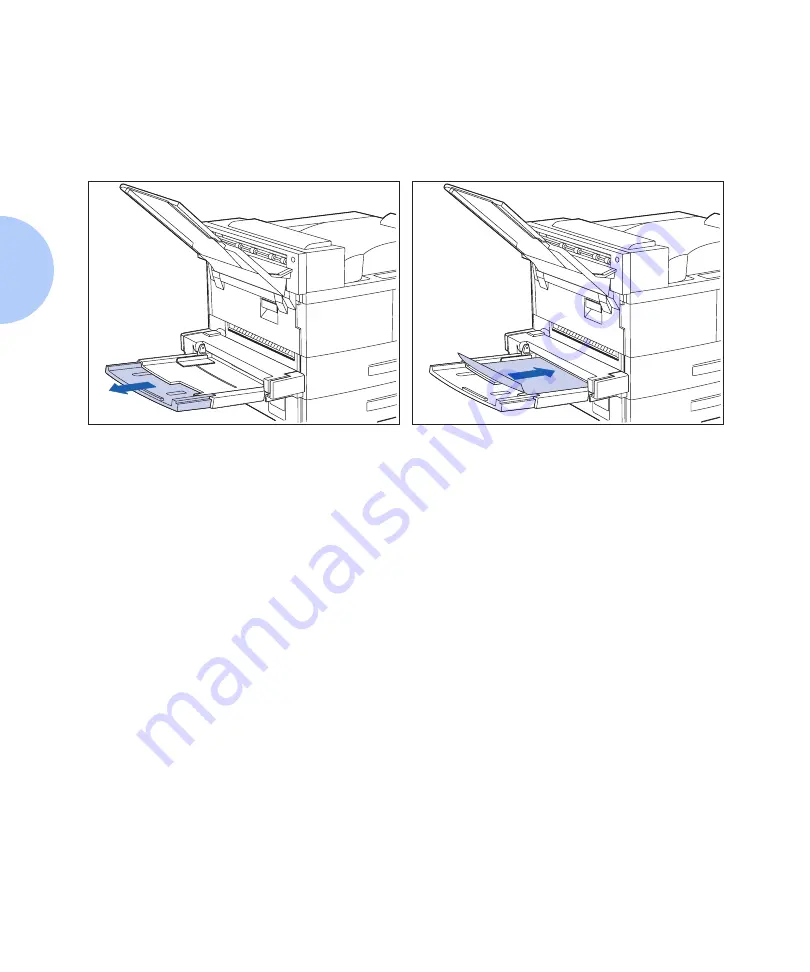
If necessary, pull out the extension tray to 
fit the length of paper to be used.

2

Place the paper along the right side of the 
Bypass Feeder (refer to Figure 2.4 on 
page 2-16
 and Figure 2.5 on page 2-17 for 
paper orientation, and Figure 2.6 on page 
2-18
 for envelope orientation).

Содержание DocuPrint N24

Страница 1: ...The Xerox DocuPrint N24 N32 and N40 Network Laser Printers System Administrator Guide Version 1 8...

Страница 2: ...iness Machines Corporation Microsoft Microsoft Windows Microsoft Word MS and MS DOS are trademarks of Microsoft Corporation Univers is a trademark of Linotype AG or its subsidiaries WordPerfect is a t...

Страница 3: ...Printer Components 1 6 Special Features 1 8 Connectivity 1 8 Power Saver 1 9 High Resolution Printing 1 9 Edge to Edge Printing 1 9 Automatic Tray Sequencing 1 10 Automatic Language Sensing and Switch...

Страница 4: ...You Begin 1 19 Space Requirements 1 19 Precautions 1 21 Lifting and Carrying the Printer 1 23 Installation Steps 1 24 Maintaining the Printer 1 32 Cleaning the Printer 1 32 Replacing the Toner Cartri...

Страница 5: ...Tray Sequence Examples 2 25 Paper Size Type Mismatch 2 26 Offsetting Output 2 27 Using the 10 bin Mailbox Collator 2 28 Printing to the Mailbox Collator 2 28 Duplex Two Sided Printing 2 29 Print Orie...

Страница 6: ...cript Printer Driver 4 5 Driver Features 4 6 Chapter 5 Using the Hard Disk Drive Downloading Fonts and Jobs 5 1 Hard Drive Considerations 5 2 Disk Initialization 5 2 Downloading Fonts and Macros 5 3 F...

Страница 7: ...ation A 1 Appendix B Maintaining the Printer B 1 Replacing the Toner Cartridge B 2 Standard Configuration B 3 Duplex Configuration B 7 Installing the Maintenance Kit B 11 Replacing the Fuser Cartridge...

Страница 8: ...g C 44 Memory SIMM C 46 Installing C 47 Removing C 49 Xerox Network Interface Card XNIC C 51 Installing the XNIC C 51 Removing the XNIC C 56 Appendix D Printer Resident Fonts D 1 Base Printer Fonts D...

Страница 9: ...cations G 1 The Xerox Commitment to Environmental Quality G 2 Acoustic Noise Figures G 2 FCC Compliance Statement for United States Users G 3 Compliance Statement for International Users G 4 Operation...

Страница 10: ...viii DocuPrint N24 N32 and N40 System Administrator Guide...

Страница 11: ...9 High Resolution Printing 1 9 Edge to Edge Printing 1 9 Automatic Tray Sequencing 1 10 Automatic Language Sensing and Switching 1 10 Automatic Font Macro Saving 1 11 Secure Printing 1 11 Proof Print...

Страница 12: ...1 19 Space Requirements 1 19 Precautions 1 21 Lifting and Carrying the Printer 1 23 Installation Steps 1 24 Maintaining the Printer 1 32 Cleaning the Printer 1 32 Replacing the Toner Cartridge 1 32 Re...

Страница 13: ...en referring to these printers And it refers to all features not found on the base printer as options This guide also identifies two different configurations for the DocuPrint N40 The tabletop configu...

Страница 14: ...ures Special Features page 1 8 Printer memory issues Memory Considerations page 1 17 Instructions for installing the printer Installing the Printer page 1 19 Tips on taking care of the printer Maintai...

Страница 15: ...A DocuPrint N40 Ordering Information Replacing consumables and cleaning the printer Appendix B Maintaining the Printer Installing and removing printer options Appendix C Installing and Removing Printe...

Страница 16: ...e printer components Front View 1 Face up Output Bin 2 Door A 3 50 Sheet Bypass Feeder 4 Door B 5 Face down Output Bin 6 Power switch 7 Control Panel 8 Front cover 9 Paper Tray 1 10 Paper Tray 2 Rear...

Страница 17: ...th options Front View 1 10 bin Mailbox Collator 2 Face up Output Bin 3 Duplex Module 4 100 Envelope Feeder 5 2 500 Sheet Feeder with Paper Trays 3 4 and 5 Figure 1 3 Customer replaceable components Fr...

Страница 18: ...ontrol Panel for more information about the Control Panel and its menu system Connectivity The N40 includes the following physical connectivity interfaces on board IEEE 1284 Bi directional parallel RS...

Страница 19: ...stem Menu to set Draft Mode to On The printer automatically reduces the amount of toner by two thirds and prints a draft quality output Draft Mode can be selected on a per job basis from the Xerox pri...

Страница 20: ...tic Tray Switching page 2 20 in Chapter 2 Paper Handling Automatic Language Sensing and Switching The printer can process both PCL and PostScript jobs When the printer s Language Sensing option is on...

Страница 21: ...printer drivers or via a sequence of PJL commands see Chapter 5 Using the Hard Disk Drive Downloading Fonts and Jobs page 5 8 for an example This feature requires the Hard Disk Drive option Proof Prin...

Страница 22: ...are currently available The list includes resident fonts fonts stored on the hard disk and permanent fonts downloaded to system memory The PostScript Font List shows which PostScript fonts are current...

Страница 23: ...Increased Paper Handling Two adjustable 500 sheet input trays and a 50 Sheet Bypass Feeder are standard To this you can add an optional 2 500 Sheet Feeder consisting of one 500 sheet tray and two 1000...

Страница 24: ...of the Face down Bin is also available Output can be directed to any one of its 10 bins and each bin has a capacity of 100 sheets of 20 lb paper All capacities are based on 20 lb paper Click for Upda...

Страница 25: ...hapter 5 Using the Hard Disk Drive Downloading Fonts and Jobs for more information about the Hard Disk Drive See Appendix A DocuPrint N40 Ordering Information to order more printer memory or the Hard...

Страница 26: ...ed data will require If there is sufficient memory it will perform Raster Image Processing RIP only once and hold the rasterized pages in memory for use in printing each successive copy Rasterizing is...

Страница 27: ...ed too If you plan to print highly complex jobs you may need to add printer memory Click for Updated Information The DocuPrint N40 accepts memory SIMMs with the following specifications 8 MB SIMM 72 p...

Страница 28: ...ory will provide the following enhanced DocuPrint N40 capabilities Additional font cache Additional download space for fonts macros and images Increased throughput for complex pages duplex pages and l...

Страница 29: ...g on to the installation steps This section contains important information concerning your safety and the safety of the printer Space Requirements For easy operation maintenance and replacing of consu...

Страница 30: ...uPrint N24 N32 and N40 System Administrator Guide Figure 1 5 Space requirements when options are installed Top View 1 60 inches 1525 mm 2 32 inches 815 mm 3 4 inches 100 mm 4 12 inches 305 mm 5 36 inc...

Страница 31: ...nd 1 5 for space requirements Do not place the printer near alcohol benzene or other volatile and flammable materials To avoid electric shock or fire hazard Do not connect the printer to any power sou...

Страница 32: ...r under temperature conditions of 10 to 35 C 50 to 95 F with humidity 15 to 85 Be sure to keep the temperature below 28 C 82 F if the humidity is 85 If the temperature changes significantly condensati...

Страница 33: ...elf THE PRINTER SHOULD ALWAYS BE CARRIED BY TWO PEOPLE To carry the printer grasp the bottom corners on the right side as shown in Figure 1 6 not from the front where the control panel is located and...

Страница 34: ...move the plastic bag and pieces of tape from the printer 3 Complete the registration card See Step on page 1 25 for the location of the serial number 4 If you are setting up the printer in its console...

Страница 35: ...orizontally and gently shake it 5 to 6 times to evenly distribute the toner inside Print quality may be degraded if the toner is not evenly distributed If the toner is not freed by shaking the cartrid...

Страница 36: ...ted in the printer 12 Gently pull the sealing tape straight out in the direction of the arrow If the tape is pulled out at an angle it may break 13 Close Door A and the front cover When closing Door A...

Страница 37: ...re are two sets of screws a longer pair 3 and a shorter pair 4 SAVE ALL OF THESE PARTS Some are used with the Duplex Module 16 Attach the bracket to the printer with the supplied longer screws Tighten...

Страница 38: ...l out Paper Tray 1 shown above or Tray 2 until it stops 20 Prepare a stack of paper making sure the tops of the sheets are aligned 21 Gently lift up the width guide and slide it all the way until it s...

Страница 39: ...ed mark 24 Adjust the side guide to the paper length 25 Align the edges of the paper stack 26 Adjust the width guide to the paper width To avoid paper jams make sure the guide stopper is locked firmly...

Страница 40: ...latches For complete paper size and loading information refer to Chapter 2 Paper Handling 28 Repeat the paper loading steps for the other paper tray s 29 If you have other options to install refer to...

Страница 41: ...do not use the GFI power cord Xerox does not guarantee the successful operation of your machine Go to Step 34 33 Attach the 220V GFI Ground Fault Interrupt and power cord and plug into AC outlet If yo...

Страница 42: ...ing Do not use strong detergents Wipe the printer with a soft dry cloth when finished Always power the printer off before cleaning See Appendix B Maintaining the Printer for more details Replacing the...

Страница 43: ...d Feedrolls three for each paper input tray In order to support all possible configurations fifteen feedrolls are shipped in each kit The Fuser Cartridge feedrolls and BTR have average useful lives of...

Страница 44: ...the Maintenance Kit for a fee See Appendix A DocuPrint N40 Ordering Information for ordering information and Appendix B Maintaining the Printer for instructions on replacing the Maintenance Kit items...

Страница 45: ...ing it and be sure to notify all users that it will be offline during the move If in the tabletop configuration be sure to use two people as shown in the section Lifting and Carrying the Printer page...

Страница 46: ...urdy packing box and generous amount of cushioning or packing materials To prepare your printer for transportation follow the instructions below 1 Power off the printer and disconnect the GFI power co...

Страница 47: ...Before contacting your dealer or Xerox please have the following information available Printer Serial No located inside the front cover A Configuration Sheet described on page 3 85 Any error code or...

Страница 48: ...Technical Support 1 38 DocuPrint N24 N32 and N40 System Administrator Guide...

Страница 49: ...eet Bypass Feeder 2 14 Using the 100 Envelope Feeder 2 19 Automatic Tray Switching 2 20 Tray Sequence Settings 2 21 Paper Handling Exception Conditions 2 22 Tray Sequence Rules 2 24 Tray Sequence Exam...

Страница 50: ...e 50 Sheet Bypass Feeder 17 24 lbs 64 90 g m2 with duplex The optional 2 500 Sheet Feeder supports 18 24 lbs 68 90 g m2 Using sizes other than those listed in Table 2 1 or paper not recommended for la...

Страница 51: ...dling 2 3 Paper with special coating Paper unable to withstand a temperature of 150 C 302 F Thermal paper Carbon paper Paper with paper fasteners ribbons tape etc attached Heavily textured paper Label...

Страница 52: ...in 10 bin Mail box Collator A3 297x420 mm A4 210x297 mm A5 148x210 mm A6 105x148 mm Statement 5 5x8 5 140x216 mm Executive 7 25x10 5 184x267 mm Letter 8 5x11 216x279 mm Folio 8 5x13 216x330 mm Legal 8...

Страница 53: ...torage ensures optimum print quality and trouble free printer options Store the paper on a flat surface in a relatively low humidity environment Avoid storing paper in such a way as to cause wrinkling...

Страница 54: ...heet Feeder see page 2 11 The 50 Sheet Bypass Feeder in the printer see page 2 14 The optional 100 Envelope Feeder see page 2 19 Do not attempt to load paper during printing into a tray that is curren...

Страница 55: ...n Selecting Paper page 2 2 for acceptable paper sizes and weights 1 Pull out the tray Tray 1 is shown above until it stops 2 Prepare a stack of paper making sure the tops of the sheets are aligned 3 G...

Страница 56: ...ge 2 10 for orientation Do not stack paper above the indicated mark 6 Adjust the side guide to the paper length 7 Align the edges of the paper stack 8 Adjust the width guide to the paper width Make su...

Страница 57: ...per size slot on the front of the tray 10 Push the tray all the way back into the printer until it latches Figure 2 1 Trays 1 2 3 paper orientation long edge feed Top View 1 Duplex printing 2 Simplex...

Страница 58: ...ge feed Top View 1 Duplex printing 2 Simplex printing Load the following paper sizes with the short edge on the left leading into the printer Legal Folio Ledger A3 The paper in this illustration looks...

Страница 59: ...optional 2 500 Sheet Feeder hold up to 1 000 sheets of 20 lb 80 g m2 paper each in A4 Letter and Executive size only The following procedure uses Tray 4 as an example but can be used for Tray 5 as wel...

Страница 60: ...N24 N32 and N40 System Administrator Guide 3 Place paper in the tray against the left side refer to Figure 2 3 on page 2 13 for orientation Slide back the stop Do not stack paper above the indicated...

Страница 61: ...ray 4 1 Duplex printing 2 Simplex printing Load the following sizes with the long edge on the left leading into the printer Letter Executive A4 Top View Tray 5 1 Duplex printing 2 Simplex printing Loa...

Страница 62: ...b 80 g m2 paper Refer to the section Selecting Paper page 2 2 for acceptable media sizes and weights 1 If necessary pull out the extension tray to fit the length of paper to be used 2 Place the paper...

Страница 63: ...sure contact with the paper sensor 4 Push the paper as far as it can go into the printer 5 When finished printing from the Bypass Feeder remove any remaining paper from the tray and push back the exte...

Страница 64: ...ystem Administrator Guide Figure 2 4 50 Sheet Bypass Feeder paper orientation long edge feed Top View 1 Simplex printing 2 Duplex printing Load the following paper sizes with the long edge leading int...

Страница 65: ...Handling 2 17 Figure 2 5 50 Sheet Bypass Feeder paper orientation short edge feed Top View 1 Simplex printing 2 Duplex printing Load the following paper sizes with the short edge leading into the pri...

Страница 66: ...eeder envelope orientation1 Top View 1 Envelope 2 DL Envelope 3 C5 Envelope 1 Some PostScript applications require that the envelopes be loaded with the return address corner on the right side of the...

Страница 67: ...es 1 Prepare a stack of envelopes making sure all flaps are closed and the envelopes are not stuck together 2 Lift the envelope stopper and insert the stack with the flap side up and the long edges le...

Страница 68: ...the next tray is the same size and type as that in the current tray Searching for the correct paper size and type If the paper size and type specified in your software application does not match the p...

Страница 69: ...pass Feeder in the Control Panel s Tray Sequence settings Table 2 2 Tray switching options in the Tray Menu Tray Sequence Settings Description MBF 1 MBF 1 2 1 2 Off Tray Sequence settings available wi...

Страница 70: ...ified Not specified Not specified Default size Default type Not specified Not specified Specified not manual feed Default size Type configured in specified tray Not specified Not specified Specified m...

Страница 71: ...the fourth column of Table 2 3 does not list a paper source to use even though the paper source may be specified If the paper source is specified and the other parameters can be satisfied by that pape...

Страница 72: ...then it is used If the tray does not contain the correct paper e g it contains other paper or is empty the other trays in the sequence are searched If any of these trays contains the correct paper the...

Страница 73: ...ested paper in at least one tray in the sequence The Tray Sequence is set to 1 2 3 A Tray 2 paper source is requested All trays meet the size type requirement The printer feeds paper from Tray 2 becau...

Страница 74: ...size and type in the appropriate tray After the tray is loaded printing continues If the request is for paper that is not configured in the printer you are prompted to load the requested paper in the...

Страница 75: ...he PostScript job If the banner sheet is directed to the Face up Bin no offset capability and the PostScript job is directed to the Face down Bin offset does not occur between the banner sheet and the...

Страница 76: ...ndix C Installing and Removing Printer Options for installation instructions The Mailbox Collator offers the following capabilities Directing output to a specific mailbox bin Sorting by sending indivi...

Страница 77: ...label paper for duplex jobs Refer to Figure 2 1 on page 2 9 and Figure 2 4 on page 2 16 for the proper orientation of drilled paper and letterhead when printing duplex Table 2 5 Paper sizes that can...

Страница 78: ...ystem Menu to the appropriate setting see Figure 2 7 The Duplex settings for both PCL and PostScript are as follows Duplex Off Duplex Short Edge or Duplex Long Edge Figure 2 7 Duplex binding orientati...

Страница 79: ...ights 3 4 The Keys 3 6 Navigating the Menu System 3 10 Menu Indicators 3 11 Control Panel Locks 3 11 Setting a Menu Option 3 13 Main Menu 3 15 Job Menu 3 16 Password Menu 3 18 Tray Menu 3 21 PCL Menu...

Страница 80: ...Using the Control Panel 3 2 DocuPrint N24 N32 and N40 System Administrator Guide Test Menu 3 84 Reset Menu 3 89...

Страница 81: ...provides the means for changing printer settings and printer defaults to control how the DocuPrint N40 operates As shown in Figure 3 1 your printer s Control Panel will either have icons and text or i...

Страница 82: ...he display will also show Processing when processing data Waiting when waiting for more data 2 It presents a hierarchy of menu options and settings to configure and control the printer For example whe...

Страница 83: ...artial pages and consequently the Form Feed light is not turned On The Form Feed light is turned Off when either an actual Form Feed character is received or the Form Feed function is invoked by press...

Страница 84: ...aper jam or an open cover Pressing On Line under the following conditions results in the actions stated If the printer is online and in the Menu system the printer remains online and an exit from the...

Страница 85: ...it may preempt menu navigation Menu scrolling is available without going offline Menu scrolling wraps if the displayed menu is the last menu If not in the Menu system pressing this key enters the Menu...

Страница 86: ...t menu navigation Scrolling wraps if the displayed item is the first item Press Value Up for more than one second to scroll continuously through numeric values for items that have numeric values such...

Страница 87: ...n does not exist this key is ignored If a paper mismatch condition exists pressing this key scrolls down through the alternate paper that may by used instead of the requested paper If in the Password...

Страница 88: ...n Ring Menu requires the Token Ring Card Novell Menu Test Menu Press Menu Up or Menu Down to access the Main Menu Each of the submenus may have other submenus settings actions or functions Reset Menu...

Страница 89: ...line Table 3 3 Indicators found in the Control Panel Menu systems Indicator Purpose Example This indicator only appears after options which take a specific setting it indicates that a value or setting...

Страница 90: ...DocuPrint N24 N32 and N40 System Administrator Guide The following menus cannot be locked Job Menu Password Tray Menu Test Menu Reset Menu If you do not want users to have access to the Reset Menu pow...

Страница 91: ...ubmenu all submenus except the Password Menu You will see Menu Name Item Name Where Item Name is the current item displayed For the Job Test and Reset with the exception of the Language option Menus t...

Страница 92: ...pt a value the menu will display Menu Name Item Name You may either continue to work in the Menu system by repeating the steps above or exit and return to normal operation by pressing On Line If you p...

Страница 93: ...Job Menu page 3 16 Password Menu1 See Password Menu page 3 18 Tray Menu See Tray Menu page 3 21 PCL Menu See PCL Menu page 3 28 PostScript Menu See PostScript Menu page 3 33 System Menu See System Me...

Страница 94: ...partially formatted job in PCL The Job Menu hierarchy is shown in Figure 3 2 Tasks performed with Job Menu items are listed in Table 3 5 on page 3 17 Click for Updated Information Figure 3 2 Job Menu...

Страница 95: ...nting 1 Press Menu Up or Menu Down until you see Menus Job Menu 2 Press Item Up or Item Down until you see Job Menu Cancel Job 3 Press Enter You will see Ready Form Feed Force a form feed on a partial...

Страница 96: ...nu Enter Password No Jobs Press Menu Tray Menu _xxx PCL Menu All Jobs Print PostScript Menu Delete System Menu Parallel Menu Job n Print Serial Menu Delete Ethernet Menu Token Ring Menu Novell Menu Te...

Страница 97: ...ter You will see Ready Job n Print Print one or more jobs out of several sent with a specific password A job with a name assigned to it will replace the Job n with that name 1 Press Menu Up or Menu Do...

Страница 98: ...e Delete one or more jobs out of several sent with a specific password 1 Press Menu Up or Menu Down until you see Menus Password Menu 2 Press Item Up or Item Down You will see Enter Password _xxx 3 En...

Страница 99: ...ray Menu allows you to access tray settings that are common to all system languages PCL and PostScript The Tray Menu hierarchy is shown in Figure 3 4 on page 3 22 Tasks performed with the Tray Menu ar...

Страница 100: ...2 35 1 Envelope Size and MBF Size are mutually exclusive because the Envelope Feeder replaces the Multi Bypass Feeder 2 Defaults to Com10 if the Defaults item in the System Menu is set to USA and to D...

Страница 101: ...4 Press Enter You will see Tray Menu Envelope Size 5 Press On Line You will see Ready MBF Size Set the paper size that is loaded in the 50 Sheet Bypass Feeder MBF The available values are Statmt 5 5x...

Страница 102: ...Value 4 Press Enter You will see Tray Menu MBF Type 5 Press On Line You will see Ready Tray 1 Type Set the type of paper that is loaded in Tray 1 The available values are Plain Color Preprinted Cards...

Страница 103: ...Type 5 Press On Line You will see Ready Tray 3 Type Set the type of paper that is loaded in Tray 3 The available values are Plain Color Preprinted Cardstock Letterhead User Type 1 if loaded Transparen...

Страница 104: ...Press Enter You will see Tray Menu Tray 4 Type 5 Press On Line You will see Ready Tray 5 Type Set the type of paper that is loaded in Tray 5 The available values are Plain Color Preprinted Cardstock L...

Страница 105: ...00 Sheet Feeder The first tray of a sequence is used until it runs out of paper at which time the next tray in the sequence is used if it has the correct paper size and type See the section Automatic...

Страница 106: ...L Menu PostScript Menu Point Size1 4 00 999 75 by 25 12 00 System Menu Parallel Menu Form Length 005 128 60 for U S 64 for Europe Serial Menu Ethernet Menu Symbol Set Desktop ISO 69 PS Text Token Ring...

Страница 107: ...enu Down until you see Menus PCL Menu 2 Press Item Up or Item Down until you see PCL Menu Font Number 3 Press Value Up or Value Down until you see Font Number New Value 4 Press Enter You will see PCL...

Страница 108: ...Up or Value Down is pressed Holding down Value Up or Value Down causes continuous scrolling through the point sizes 1 Press Menu Up or Menu Down until you see Menus PCL Menu 2 Press Item Up or Item Do...

Страница 109: ...h 6 The Form Length value changes incrementally by 1 each time either Value Up or Value Down is pressed Holding down Value Up or Value Down causes continuous scrolling through the Form Length values T...

Страница 110: ...u Down until you see Menus PCL Menu 2 Press Item Up or Item Down until you see PCL Menu Symbol Set 3 Press Value Up or Value Down until you see Symbol Set New Value 4 Press Enter You will see PCL Menu...

Страница 111: ...nd instructions to the printer The PostScript Menu hierarchy is shown in Figure 3 6 Tasks performed with the PostScript Menu are listed in Table 3 9 on page 3 34 Click for Updated Information Figure 3...

Страница 112: ...You will see PostScript Menu Print Errors 5 Press On Line You will see Ready Binary PS Enable or disable the binary mode of PostScript The available values are Off On The parameter applies to all prot...

Страница 113: ...Password Menu Exec 7 25x10 5 A3 297x420 C5 162x229 Tray Menu Letter 8 5x11 2 A4 210x297 2 DL 110x220 PCL Menu Legal 8 5x14 A5 148x210 Monarc 3 87x7 5 PostScript Menu Folio 8 5x13 A6 105x148 System Me...

Страница 114: ...5 90 30 120 Defaults USA Europe 1 Defaults to Letter when the Defaults item is set to USA Defaults to A4 when the Defaults item is set to Europe 2 The factory default for paper size depends on the def...

Страница 115: ...aper Size 3 Press Value Up or Value Down until you see Paper Size New Value 4 Press Enter You will see System Menu Paper Size 5 Press On Line You will see Ready Paper Type Set the default paper type u...

Страница 116: ...e Menus System Menu 2 Press Item Up or Item Down until you see System Menu Page Policy 3 Press Value Up or Value Down until you see Page Policy New Value 4 Press Enter You will see System Menu Page Po...

Страница 117: ...ress Value Up or Value Down until you see Copies New Value 4 Press Enter You will see System Menu Copies 5 Press On Line You will see Ready Orientation Set the default orientation used in PCL and Post...

Страница 118: ...e Down until you see Duplex New Value 4 Press Enter You will see System Menu Duplex 5 Press On Line You will see Ready Draft Mode Enable or disable the reduced toner mode for draft printing The availa...

Страница 119: ...Press Enter You will see System Menu Edge to Edge 5 Press On Line You will see Ready Output Timeout Determine how many seconds the system will wait after a bin is filled before directing output to th...

Страница 120: ...ut Dest Set the default paper output destination The available values are Face Down Bin Face Up Bin Mailbox 1 Mailbox 10 Sorter Mailbox bins 1 through 10 are only available when the optional 10 bin Ma...

Страница 121: ...hen set to Europe the default Paper Size value is set to A4 the default MBF Size is set to A4 and the default Envelope Size is set to DL When set to USA the default Paper Size value is set to Letter t...

Страница 122: ...formed with the Parallel Menu are listed in Table 3 11 on page 3 45 Click for Updated Information Figure 3 8 Parallel Menu hierarchy with factory settings Job Menu Port Enable On Password Menu Off Tra...

Страница 123: ...print job and poll the next port in the polling sequence The available values are 5 300 seconds 30 This item also causes an implicit job end such as Control D in PostScript or ESC E in PCL and invokes...

Страница 124: ...u will see Parallel Menu Parallel PDL 5 Press On Line You will see Ready Bidirectional Enable or disable bidirectional communications through the parallel port The available values are On Off 1 Press...

Страница 125: ...hierarchy with factory settings1 Job Menu Port Enable On Password Menu Off Tray Menu PCL Menu Port Timeout 5 300 30 PostScript Menu System Menu Serial PDL Auto Parallel Menu PCL Serial Menu PostScrip...

Страница 126: ...plete print job and poll the next port in the polling sequence The available values are 5 300 seconds 30 This item also causes an implicit job end such as Control D in PostScript or ESC E in PCL and i...

Страница 127: ...u Down until you see Menus Serial Menu 2 Press Item Up or Item Down until you see Serial Menu Handshake 3 Press Value Up or Value Down until you see Handshake New Value 4 Press Enter You will see Seri...

Страница 128: ...13 on page 3 52 Click for Updated Information Figure 3 10 Ethernet Menu hierarchy with factory settings Job Menu Novell Enable On Password Menu Off Tray Menu PCL Menu LPR Enable On PostScript Menu Off...

Страница 129: ...Off IP Address Res Control Panel DHCP BOOTP RARP IP Address xxx xxx xxx xxx Subnet Mask xxx xxx xxx xxx Default Gateway xxx xxx xxx xxx Port Timeout 5 300 30 Speed1 Auto 100 Mbit 10 Mbit 1 This option...

Страница 130: ...Enable 3 Press Value Up or Value Down until you see Novell Enable New Value 4 Press Enter You will see Ethernet Menu Novell Enable 5 Press On Line You will see Ready LPR Enable Enable or disable the E...

Страница 131: ...e Ethernet Menu LPR Banner 5 Press On Line You will see Ready LPR PDL Set the default emulation for the Ethernet LPR protocol The available values are Auto PCL PostScript 1 Press Menu Up or Menu Down...

Страница 132: ...Enter You will see Ethernet Menu DLC LLC Enable 5 Press On Line You will see Ready DLC PDL Set the default emulation for the DLC protocol The available values are Auto PCL PostScript 1 Press Menu Up...

Страница 133: ...Ethernet Menu NetBEUI Enable 5 Press On Line You will see Ready NetBEUI PDL Set the default emulation for the NetBEUI protocol The available values are Auto PCL PostScript 1 Press Menu Up or Menu Dow...

Страница 134: ...l New Value 4 Press Enter You will see Ethernet Menu AppSocket Enabl 5 Press On Line You will see Ready AppSocket PDL Set the default emulation for the Ethernet AppSocket protocol The available values...

Страница 135: ...will see Ethernet Menu ETalk Enable 5 Press On Line You will see Ready HTTP Enable Enable or disable the Ethernet HTTP Server protocol The available values are On Off 1 Press Menu Up or Menu Down unt...

Страница 136: ...RARP DHCP 1 Press Menu Up or Menu Down until you see Menus Ethernet Menu 2 Press Item Up or Item Down until you see Ethernet Menu IP Address Res 3 Press Value Up or Value Down until you see IP Addres...

Страница 137: ...l you see Ethernet Menu IP Address 3 Press Value Up or Value Down You will see IP Address xxx xxx xxx xxx 4 Press Value Up or Value Down to change the value of the character above the cursor The value...

Страница 138: ...own until you see Ethernet Menu Subnet Mask 3 Press Value Up or Value Down You will see Subnet Mask xxx xxx xxx xxx 4 Press Value Up or Value Down to change the value of the character above the cursor...

Страница 139: ...Ethernet Menu Default Gateway 3 Press Value Up or Value Down You will see Default Gateway xxx xxx xxx xxx 4 Press Value Up or Value Down to change the value of the character above the cursor The value...

Страница 140: ...wn until you see Menus Ethernet Menu 2 Press Item Up or Item Down until you see Ethernet Menu Port Timeout 3 Press Value Up or Value Down until you see Port Timeout New Value 4 Press Enter You will se...

Страница 141: ...iscussed in Table 3 14 on page 3 65 Click for Updated Information Figure 3 11 Token Ring Menu hierarchy with factory settings Job Menu Novell Enable On Password Menu Off Tray Menu PCL Menu LPR Enable...

Страница 142: ...k Enable On Off HTTP Enable On Off IP Address Res Control Panel DHCP BOOTP RARP IP Address xxx xxx xxx xxx Subnet Mask xxx xxx xxx xxx Default Gateway xxx xxx xxx xxx Port Timeout 5 300 30 Source Rout...

Страница 143: ...ess Value Up or Value Down until you see Novell Enable New Value 4 Press Enter You will see Token Ring Menu Novell Enable 5 Press On Line You will see Ready LPR Enable Enable or disable the Token Ring...

Страница 144: ...will see Token Ring Menu LPR Banner 5 Press On Line You will see Ready LPR PDL Set the default emulation for the Token Ring LPR protocol The available values are Auto PCL PostScript 1 Press Menu Up or...

Страница 145: ...will see Token Ring Menu DLC LLC Enable 5 Press On Line You will see Ready DLC PDL Set the default emulation for the DLC protocol The available values are Auto PCL PostScript 1 Press Menu Up or Menu D...

Страница 146: ...ill see Token Ring Menu NetBEUI Enable 5 Press On Line You will see Ready NetBEUI PDL Set the default emulation for the NetBEUI protocol The available values are Auto PCL PostScript 1 Press Menu Up or...

Страница 147: ...4 Press Enter You will see Token Ring Menu AppSocket Enabl 5 Press On Line You will see Ready AppSocket PDL Set the default emulation for the Token Ring AppSocket protocol The available values are Au...

Страница 148: ...en Ring Menu 2 Press Item Up or Item Down until you see Token Ring Menu HTTP Enable 3 Press Value Up or Value Down until you see HTTP Enable New Value 4 Press Enter You will see Token Ring Menu HTTP E...

Страница 149: ...you see Token Ring Menu IP Address 3 Press Value Up or Value Down You will see IP Address xxx xxx xxx xxx 4 Press Value Up or Value Down to change the value of the character above the cursor The valu...

Страница 150: ...wn until you see Token Ring Menu Subnet Mask 3 Press Value Up or Value Down You will see Subnet Mask xxx xxx xxx xxx 4 Press Value Up or Value Down to change the value of the character above the curso...

Страница 151: ...oken Ring Menu Default Gateway 3 Press Value Up or Value Down You will see Default Gateway xxx xxx xxx xxx 4 Press Value Up or Value Down to change the value of the character above the cursor The valu...

Страница 152: ...ues 1 Press Menu Up or Menu Down until you see Menus Token Ring Menu 2 Press Item Up or Item Down until you see Token Ring Menu Port Timeout 3 Press Value Up or Value Down until you see Port Timeout N...

Страница 153: ...own until you see Menus Token Ring Menu 2 Press Item Up or Item Down until you see Token Ring Menu Speed 3 Press Value Up or Value Down until you see Speed New Value 4 Press Enter You will see Token R...

Страница 154: ...ress Item Up or Item Down until you see Token Ring Menu LAA 3 Press Value Up or Value Down You will see LAA xxxx xxxx xxxx 4 Press Value Up or Value Down to change the value of the character above the...

Страница 155: ...nformation Figure 3 12 Novell Menu hierarchy with factory settings Job Menu Novell PDL Auto PostScript Password Menu PCL Tray Menu PCL Menu Novell Mode NDS NDS BEM PostScript Menu BEM System Menu Para...

Страница 156: ...u Novell PDL 3 Press Value Up or Value Down until you see Novell PDL New Value 4 Press Enter You will see Novell Menu Novell PDL 5 Press On Line You will see Ready Novell Mode Set the PServer mode for...

Страница 157: ...olling Interval Set the rate in seconds at which the PServer issues polling requests for assigned queues The available values are 1 255 2 The Polling Interval changes incrementally by 1 each time eith...

Страница 158: ...r 1 Press Menu Up or Menu Down until you see Menus Novell Menu 2 Press Item Up or Item Down until you see Novell Menu PServer Name 3 Press Value Up or Value Down You will see PServer Name xxx xxx 4 Pr...

Страница 159: ...nu Down until you see Menus Novell Menu 2 Press Item Up or Item Down until you see Novell Menu Primary Server 3 Press Value Up or Value Down You will see Primary Server xxx xxx 4 Press Value Up or Val...

Страница 160: ...1 Press Menu Up or Menu Down until you see Menus Novell Menu 2 Press Item Up or Item Down until you see Novell Menu NDS Tree 3 Press Value Up or Value Down You will see NDS Tree xxx xxx 4 Press Value...

Страница 161: ...or Menu Down until you see Menus Novell Menu 2 Press Item Up or Item Down until you see Novell Menu NDS Context 3 Press Value Up or Value Down You will see NDS Context xxx xxx 4 Press Value Up or Valu...

Страница 162: ...Menu are listed in Table 3 16 on page 3 85 Click for Updated Information Figure 3 13 Test Menu hierarchy Job Menu Password Menu Tray Menu PCL Menu PostScript Menu Config Sheet System Menu Demo Page P...

Страница 163: ...figuration Sheet prints you will see Ready Demo Page Print a sample page demonstrating the printer s capabilities The Demo Page is printed using the PCL default paper size and type at 600x600 dpi 1 Pr...

Страница 164: ...t Menu PS Font List 3 Press Enter You will see Processing PS Font List 4 After the PostScript Font List prints you will see Ready Menu Map Print a page showing the configuration of the Control Panel M...

Страница 165: ...tem Down until you see Test Menu Test Print 3 Press Enter You will see Processing Test 4 After the Test Print prints you will see Ready Disk Directory Print a copy of the disk directory One copy is pr...

Страница 166: ...You will see Ready Restart Printer Reboot the printer without powering it off and powering it on again The available values are Yes No You must select Yes and press Enter for this function to take ef...

Страница 167: ...chy Tasks performed with the Reset Menu are listed in Table 3 17 on page 3 90 Click for Updated Information Figure 3 14 Reset Menu hierarchy with factory settings Job Menu Language Deutsch Fran ais Ru...

Страница 168: ...alues are Deutsch English Espa ol Fran ais Italiano Portugu s Bra Russian Language is not affected by resetting Factory Defaults and therefore does not have a default value apart from the initial valu...

Страница 169: ...il you see Factory Defaults Yes 4 Press Enter You will see Reset Menu Factory Defaults 5 Press On Line You will see Ready Network Defaults Reset parameters in the Ethernet Token Ring and Novell Menus...

Страница 170: ...Key 1 Press Menu Up or Menu Down until you see Menus Reset Menu 2 Press Item Up or Item Down until you see Reset Menu Demo Mode 3 Press Value Up or Value Down until you see Demo Mode Yes 4 Press Enter...

Страница 171: ...Reset Menu Init Disk 5 Press On Line You will see Ready Disk Format Format the Hard Disk Drive The available values are Yes No This function is ignored if the disk is locked write protected via a PJL...

Страница 172: ...Reset Menu 3 94 DocuPrint N24 N32 and N40 System Administrator Guide...

Страница 173: ...are and Drivers 4 1 Printer Management Software and Drivers C h a p t e r 4 Using CentreWare DP with the DocuPrint N40 4 2 DocuPrint N40 PCL Emulation Printer Driver 4 4 DocuPrint N40 PostScript Print...

Страница 174: ...Table 4 1 lists CentreWare DP key features and benefits For more specific information about CentreWare DP use and operation see The CentreWare DP User Guide Table 4 1 CentreWare DP key features and be...

Страница 175: ...inter Management Software and Drivers 4 3 Centreware Sun OS Solaris Services are also available to allow you to set up queues and also contain your N40 Drivers for Sun OS Solaris All the CentreWare so...

Страница 176: ...rint N40 supports the PCL printer drivers listed in Table 4 2 To take full advantage of all the printer s features when printing PCL jobs install the appropriate DocuPrint N40 PCL emulation printer dr...

Страница 177: ...l advantage of all the printer s features when printing PostScript jobs install the appropriate DocuPrint N40 printer driver s Table 4 3 DocuPrint N40 PostScript printer drivers Environment Printer Dr...

Страница 178: ...bin selection Duplex selection Paper size orientation and media Number of copies Collating Table 4 4 on page 4 7 lists a general overview of features supported by the DocuPrint N40 drivers Actual dri...

Страница 179: ...Windows NT 4 0 Uni Y N N N Y N N PS Windows 3 1 x Custom Y Y Y Y Y Y Y Windows 95 Custom Y Y Y Y Y Y Y Windows NT 3 5 1 Uni Y N N N N N N Windows NT 4 0 Custom Y Y Y Y Y N Y MAC PS N N N N N N N OS 2...

Страница 180: ...Driver Features 4 8 DocuPrint N24 N32 and N40 System Administrator Guide...

Страница 181: ...and Jobs C h a p t e r 5 Hard Drive Considerations 5 2 Disk Initialization 5 2 Downloading Fonts and Macros 5 3 FSDOWNLOAD Command 5 4 FSDELETE Command 5 7 Using the Hard Disk Drive for Secure and Pr...

Страница 182: ...rmation such as fonts macros and jobs The hard disk is used for the following Support of the PostScript file system Support of the PJL PCL file system Received raw data for secure jobs proof jobs and...

Страница 183: ...tories remain there until you delete them They are not cleared from the hard disk when the printer is powered off You can only delete a macro from the hard disk if you know the name of the macro Since...

Страница 184: ...I 01 thru 255 N A SIZE integer The size variable indicates the number of bytes in the file to be downloaded The size indicates the number of bytes immediately following the LF to the next UEL command...

Страница 185: ...e macro is positioned at x 900 and y 1500 by this macro ESC 12345X is the UEL command which ends this sequence Executing this macro requires the following PCL sequence Notes 1 The macro ID must be the...

Страница 186: ...and which ends this sequence Invoking this font requires the following PCL sequence Notes 1 The case of the string ID must be the same as the case of the fontname in the FSDOWNLOAD command 2 The byte...

Страница 187: ...E Command The FSDELETE command is used to delete files from the DocuPrint N40 file system Syntax PJL FSDELETE NAME pathname CR LF Parameters Parameter Functional Range Default NAME pathname ASCII 01 t...

Страница 188: ...ollowing completion of the currently printing job If more than one job is requested jobs are placed on the print queue in the order requested Secure or proof jobs having the same priority are printed...

Страница 189: ...signed or the password contains syntax errors the job is not printed and is discarded The following example creates a Secure Job named Bond with a password of 0007 ESC 12345X PJL XSECUREJOB PJL XJOBPA...

Страница 190: ...lete the job after entering your password on the Printer Control Panel Proof jobs if not sent by a driver with the proof job feature may be invoked in both PCL and PostScript by preceding the job with...

Страница 191: ...no name or a name with a syntax error is called out The job name is the name displayed on the Control Panel Password Menu when the associated password is entered If no password is assigned or there i...

Страница 192: ...y using the Password Menu as described in the section Password Menu page 3 18 They may also be deleted by using the Delete Jobs function in the Reset Menu as described in the section Reset Menu page 3...

Страница 193: ...nostic LED Flash Sequences 6 26 Paper Jams 6 28 What Causes a Paper Jam 6 28 Clearing Paper Jams 6 28 Clearing Area A No Duplex Module 6 32 Clearing Area A With Duplex Module 6 35 Clearing Area B 6 38...

Страница 194: ...c 3 If the port parallel or network the printer is connected to is disabled enable it Check the Configuration Sheet for the port you are using to see if the Port Enable item in the appropriate Interfa...

Страница 195: ...or in your command sequence operator A missing downloaded font A mismatched printer option against your host formatting Command errors may be identified by looking at your input file You can determine...

Страница 196: ...e job may require additional memory A PostScript or PCL job fails to print 1 Check that you are using a DocuPrint N32 PostScript printer driver 2 For a PostScript job set the Print Errors item in the...

Страница 197: ...left corner of the display A fault condition has occurred ACTION Power OFF and power ON the printer If this code appears again at power ON contact your dealer or Xerox 0003 ESS Appears in the upper l...

Страница 198: ...code appears again at power ON contact your dealer or Xerox 0010 DISK Appears in the upper left corner of the display A fault condition has occurred ACTION Power OFF and power ON the printer If this c...

Страница 199: ...act your dealer or Xerox 0104 SIMM4 Appears in the upper left corner of the display A fault condition has occurred in SIMM4 ACTION If there is a memory SIMM in slot SIM4 remove it Move the memory SIMM...

Страница 200: ...is message appears for secure printing You can delete all secure jobs in your queue ACTION Press Value Up or Value Down to toggle between Delete and Print Select Delete to delete all jobs and press En...

Страница 201: ...rocedures to clear Area A Clearing Area A No Duplex Module page 6 32 Clearing Area A With Duplex Module page 6 35 Then reseat Tray 1 Clear Area B Reset Tray 2 A paper jam has occurred in Area B Use th...

Страница 202: ...t Tray 3 Clear Area A B C Reset Tray 4 A paper jam has occurred in Areas A B and C Use one of the following procedures to clear Area A Clearing Area A No Duplex Module page 6 32 Clearing Area A With D...

Страница 203: ...Power Off On A Toner Cartridge memory failure has occurred ACTION Power OFF and ON the printer If the problem returns printing cannot resume Power OFF the printer and contact your dealer or Xerox Del...

Страница 204: ...job is cancelled and deleted after printing the first copy of the partial job Delete fonts macros or secure and proof jobs to make space Duplex Unit Fail Power Off On The Duplex Module has failed Pri...

Страница 205: ...g flushed is complete which may require additional data to be sent from the host ACTION None Fuser Fan Failure The printer s fuser fan has failed ACTION Power OFF and ON the printer If this message re...

Страница 206: ...nter cannot feed from Tray 4 ACTION Make sure Tray 4 is properly inserted in the printer Insert Tray 5 The printer cannot feed from Tray 5 ACTION Make sure Tray 5 is properly inserted in the printer I...

Страница 207: ...to be deleted If the job was given a name that name appears in place of Job n ACTION Press Value Up or Value Down to toggle between Delete and Print Select Delete to delete the job and press Enter Jo...

Страница 208: ...equests 11x17 in paper and a tray is not configured for 11x17 you are prompted to load the requested paper in the first tray designated by the Tray Sequence parameter If you do not want to load the re...

Страница 209: ...A4 210x297 and paper type e g Plain Preprinted Letterhead etc ACTION Add the requested paper size and paper type to the manual tray MCU Failure Power Off On The printer control program has been destro...

Страница 210: ...printer To order a Toner Cartridge for this printer see Appendix A DocuPrint N40 Ordering Information Offline The printer is offline not in menu mode and without any fault conditions Offline does not...

Страница 211: ...earing Paper Jams page 6 28 and the procedures Clearing Area A No Duplex Module page 6 32 or Clearing Area A With Duplex Module page 6 35 and Clearing Area B page 6 38 Paper Jam Clear Area A B C A pap...

Страница 212: ...ng Area D page 6 39 Paper Jam Clear Duplx Unit A paper jam has occurred in the Duplex Module ACTION Open the Duplex Module and remove jammed paper Refer to the section Clearing Paper Jams page 6 28 an...

Страница 213: ...acceptable load the requested paper size and type and print the job again Processing job name This message appears when a job is being processed The job s name appears on the second line ACTION None P...

Страница 214: ...e Mailbox 2 output bin is full Printing cannot continue ACTION Remove the output from the Mailbox 2 output bin Remove Output From Mailbox 3 The Mailbox 3 output bin is full Printing cannot continue AC...

Страница 215: ...e output from the Mailbox 10 output bin Replace Print Cartridge The Toner Cartridge has reached its end of life Printing cannot resume ACTION Replace the Toner Cartridge as per the instructions in App...

Страница 216: ...sed to print because it is empty ACTION Refill the tray if it is to be used again Tray 4 Empty This tray is no longer being used to print because it is empty ACTION Refill the tray if it is to be used...

Страница 217: ...e timeout expires The PostScript waittimeout expires ACTION None Warming Up The Fuser has not warmed up yet This message disappears when the printer is ready The message displays at power ON and may d...

Страница 218: ...Sequence Description Corrective Action 1 flash 1 second 1 flash etc System controller CPU fault ACTION Contact your dealer or Xerox 2 flashes 1 second 2 flashes etc Base RAM fault ACTION Contact your...

Страница 219: ...ashes indicate SIMM2 fault 9 flashes indicate SIMM3 fault 10 flashes indicate SIMM4 fault 11 flashes indicate SIMM5 fault ACTION Perform the corrective actions listed under 0101 to 0105 in Table 6 2 o...

Страница 220: ...engine will be reprinted when the jam is cleared and printing resumes What Causes a Paper Jam Paper jams occur most often when The paper stock does not meet specification See Chapter 2 Paper Handling...

Страница 221: ...A paper jam has occurred in Area B Use the procedure Clearing Area B page 6 38 Then reseat Tray 2 Clear Area C Reset Tray 4 A paper jam has occurred in Area C Use the procedure Clearing Area C page 6...

Страница 222: ...e the procedure Clearing Area B page 6 38 to clear Area B Then use the procedure Clearing Area C page 6 38 to clear Area C Then reset Tray 4 Clear Area A B C Reset Tray 5 A paper jam has occurred in A...

Страница 223: ...A paper jam has occurred in Areas B and C First use the procedure Clearing Area B page 6 38 to clear Area B Then use the procedure Clearing Area C page 6 38 to clear Area C Paper Jam Clear Area C A pa...

Страница 224: ...per jam from Area A when the Control Panel display reads Clear Area A and the printer does not have the Duplex Module installed 1 Remove the Face up Bin by lifting it up and out 2 Open Door A 3 Remove...

Страница 225: ...becomes difficult to pull out the paper locate the green knob at the same time press it in and turn it until the paper is adequately out and easy to pull Never touch the Fuser area where a label indic...

Страница 226: ...ms 6 34 DocuPrint N24 N32 and N40 System Administrator Guide 4 Close Door A then reattach the Face up Bin If the Control Panel message indicates an Area B jam continue to the section Clearing Area B p...

Страница 227: ...when the Control Panel display reads Clear Area A and there is a Duplex Module installed on the printer 1 Remove any paper from the Face up Tray then open the Duplex Module 2 Open Door A 3 Remove any...

Страница 228: ...the Fuser If it becomes difficult to pull out the paper locate the green knob at the same time press it in and turn it until the paper is adequately out and easy to pull Never touch the heater area w...

Страница 229: ...Paper Jams Chapter 6 Troubleshooting 6 37 4 Close Door A then close the Duplex Module If the Control Panel message indicates an Area B jam continue to the section Clearing Area B page 6 38...

Страница 230: ...ea C of the 2 500 Sheet Feeder when the Control Panel display reads Clear Area C 1 Open Door B and remove any jammed paper For easier access to Door B you can fold up the 50 Sheet Bypass Feeder shown...

Страница 231: ...Troubleshooting 6 39 Clearing Area D Follow the procedure below to clear a paper jam from Area D Mailbox Collator when the Control Panel display reads Clear Area D 1 Open Door D 2 Remove any jammed p...

Страница 232: ...y reads Reset Tray 5 1 Open Door C and remove any jammed paper Then close Door C 2 Open and remove Tray 3 by lifting the tray from the front Carefully pull out any jammed paper Reseat the paper then r...

Страница 233: ...o clear a paper jam from the Duplex Module when the Control Panel display reads Clear Duplx Unit 1 Open the Duplex Module 2 Open the inside cover of the Duplex Module 3 Remove any jammed paper in the...

Страница 234: ...tive Action s Light faint prints Overall image is lighter than normal Toner Saver mode Turn off Toner Saver Toner level low empty Remove the Toner Cartridge carefully and vigorously shake it several t...

Страница 235: ...le data received from computer Print a Test Print If the Test Print is normal check the following Interface cable between computer and printer Printer set up and application software If the Test Print...

Страница 236: ...end of life Replace the Toner Cartridge Vertical line deletions Localized print deletions forming narrow lines running in the direction of paper movement Toner Cartridge not installed correctly Remov...

Страница 237: ...treaks Black lines running across the print in the direction of paper movement Defective Toner Cartridge or the Toner Cartridge is at its end of life Replace the Toner Cartridge Defective Fuser Replac...

Страница 238: ...aper movement Contaminated paper path Print several blank sheets of paper to remove any toner accumulations Defective Toner Cartridge or the Toner Cartridge is at its end of life Replace the Toner Car...

Страница 239: ...tion for ordering information and Appendix B Maintaining the Printer for removal and installation instructions Wrinkled prints Prints are wrinkled creased or torn Poor paper condition Inspect replace...

Страница 240: ...er condition Inspect replace the paper stock Paper is damp Replace the paper stock Random deletions Random light areas and deletions Poor paper condition Inspect replace the paper stock Paper is damp...

Страница 241: ...uate memory Refer to the section Memory Considerations page 1 17 for memory requirements Broken Page Page Too Complex The printed image is missing all of the image print after a straight line The prin...

Страница 242: ...Print Quality Problems 6 50 DocuPrint N24 N32 and N40 System Administrator Guide...

Страница 243: ...Appendix A DocuPrint N40 Ordering Information A 1 DocuPrint N40 Ordering Information A p p e n d i x A...

Страница 244: ...Staple Cartridge 108R00158 Staple Cartridge Paper Handling Options 2 500 Sheet Feeder 97K24860 Includes one 500 sheet universal tray and two 1 000 sheet trays A4 and Letter only Duplex Module 97K2488...

Страница 245: ...Memory SIMM 97K15300 SIMM specifications No parity 70 nanosecond access time 4M x 32 bits 72 pin 32 MB Memory SIMM 97K22330 SIMM specifications No parity 70 nanosecond access time 8M x 32 bits 72 pin...

Страница 246: ...DocuPrint N40 Ordering Information A 4 DocuPrint N24 N32 and N40 System Administrator Guide...

Страница 247: ...ing the Toner Cartridge B 2 Standard Configuration B 3 Duplex Configuration B 7 Installing the Maintenance Kit B 11 Replacing the Fuser Cartridge and BTR B 12 Replacing the Feedrolls B 17 Resetting th...

Страница 248: ...guration page B 7 Do not expose the Toner Cartridge to direct sunlight or artificial light for more than 15 minutes Overexposure will permanently damage the photosensitive imaging drum Do not open the...

Страница 249: ...aintaining the Printer B 3 Standard Configuration Follow this procedure to replace the Toner Cartridge on a standard configuration printer 1 Open Door A 2 Open the front cover which is spring loaded y...

Страница 250: ...ove the Toner Cartridge by lifting the amber handle and gently pulling it out Wrap the used Toner Cartridge in its original packing and return it as per directions in the packaging 4 Remove the new To...

Страница 251: ...ridge horizontally and gently shake it 5 to 6 times to evenly distribute the toner inside 6 Hold the amber handle with one hand and gently push the Toner Cartridge all the way into the printer Do not...

Страница 252: ...ide 7 Gently pull the sealing tape straight out in the direction of the arrow If the tape is pulled out at an angle it may break 8 Close the front cover and Door A When closing Door A follow the instr...

Страница 253: ...dge Appendix B Maintaining the Printer B 7 Duplex Configuration Follow this procedure to replace the Toner Cartridge on a printer with the Duplex Module installed 1 Open the Duplex Module by pulling o...

Страница 254: ...shut 4 Remove the Toner Cartridge by lifting the amber handle and gently pulling it out Wrap the used Toner Cartridge in its original packing and return it as per directions on the packaging 5 Remove...

Страница 255: ...one hand and gently push the Toner Cartridge all the way into the printer Do not touch any parts inside the printer Make sure the cartridge is firmly seated in the printer 8 Gently pull the sealing t...

Страница 256: ...N40 System Administrator Guide 9 Close the front cover and Door A When closing Door A do not use the latch on the cover Instead follow the instruction label on the cover for the correct location at w...

Страница 257: ...ce Kit Ideally all three items of the Maintenance Kit should be replaced at the same time to maintain a consistent maintenance cycle It is your responsibility to install the Maintenance Kit to keep th...

Страница 258: ...d BTR 1 Power OFF the printer 2 Disconnect the GFI power cord from the printer 3 While the printer is cooling unpack the Maintenance Kit and gather its parts 1 Cleaning Pad 2 Feedrolls 15 3 BTR Bias T...

Страница 259: ...enance Kit Appendix B Maintaining the Printer B 13 4 Open Door A 5 Open the front cover 6 Loosen the two locking screws by turning them counterclockwise You cannot remove the screws completely 7 Pull...

Страница 260: ...trator Guide 8 Pull out the Fuser Cartridge by the two rings as indicated above 9 Remove the new Fuser Cartridge from its packaging and holding it by the two rings push it into the printer 10 Push in...

Страница 261: ...ing the Printer B 15 12 Unlock the BTR by lifting up its handles 13 Remove the BTR 14 Unpack and insert a new BTR pressing down to hold the roller in place Be very careful NOT to touch the rubber roll...

Страница 262: ...strator Guide 16 Close the front cover and Door A When closing Door A do not use the latch on the door Instead follow the instruction label on the door for the correct location at which to push the do...

Страница 263: ...n printer it does not have the 2 500 Sheet Feeder installed you only need to replace the feedrolls for paper input Trays 1 and 2 Procedures for all trays standard and optional are included in this sec...

Страница 264: ...ide 1 Remove paper input Trays 1 2 and 3 and pull out Trays 4 and 5 Make sure trays 4 and 5 are all the way out Do not place the trays on carpet place them on a hard surface 2 Locate the feedrolls for...

Страница 265: ...Replace the upper two feedrolls Refer to Figure B 1 on page B 17 if necessary For a tabletop configuration printer complete the procedure by repeating Steps 2 to 4 for Tray 2 Replace and close Trays 1...

Страница 266: ...24 N32 and N40 System Administrator Guide 5 Open Door C 6 Replace the two outer feedrolls for Tray 4 Refer to Figure B 1 on page B 17 if necessary 7 Close Door C 8 Replace the third feedroll for Tray...

Страница 267: ...place and close all paper input trays 12 Reattach the power cord to the printer 13 To reset the Maintenance Kit counter Hold down keys and at the same time and power ON the printer Keep holding down k...

Страница 268: ...er OFF the printer Press down both Key 2 Item Up and Key 6 Item Down at the same time and Power ON the printer Keep holding down both keys until this message appears IOT Then within five seconds after...

Страница 269: ...d detergent solution before cleaning Always finish by wiping the printer again with a soft dry cloth Use only water or mild detergent on exterior surfaces Do not use cleaning alcohol or other volatile...

Страница 270: ...40 System Administrator Guide Interior Cleaning After removing a paper jam or replacing the Toner Cartridge remove any paper scraps and wipe off paper dust with a dry clean cloth as shown in Figure B...

Страница 271: ...500 Sheet Feeder C 4 Installing C 4 Removing C 8 Duplex Module C 11 Installing C 11 Removing C 17 10 bin Mailbox Collator C 21 Installing Console Configuration C 21 Removing Console Configuration C 26...

Страница 272: ...and N40 System Administrator Guide Hard Disk Drive C 40 Installing C 41 Removing C 44 Memory SIMM C 46 Installing C 47 Removing C 49 Xerox Network Interface Card XNIC C 51 Installing the XNIC C 51 Re...

Страница 273: ...inter Therefore for proper operation you must power OFF the printer before installing removing an option then power it back ON after installing removing an option DISCONNECT THE GFI POWER CORD Never r...

Страница 274: ...Feeder This section contains two sets of instructions Installing below Removing page C 8 Installing If a 10 bin Mailbox Collator is installed remove it before installing the 2 500 Sheet Feeder See pag...

Страница 275: ...ing brackets and screws to be used in Step 8 on page C 6 4 Lock the two front wheels 5 Remove all packing tape and the plastic from around the connecting cord and make sure that the connecting cord is...

Страница 276: ...r Guide 7 Remove Tray 2 from the printer by pulling it out all the way then lifting it up and out of the printer Repeat for Tray 3 in the 2 500 Sheet Feeder 8 Attach the left and right mounting bracke...

Страница 277: ...e 2 500 Sheet Feeder s connector cord to the printer 11 Reattach the GFI power cord to the printer 12 Power ON the printer 13 Print a Configuration Sheet see page 3 85 and confirm that Trays 3 4 and 5...

Страница 278: ...2 500 Sheet Feeder C 8 DocuPrint N24 N32 and N40 System Administrator Guide Removing 1 Power OFF the printer 2 Disconnect the GFI power cord from the printer...

Страница 279: ...Disconnect the connector cord from the printer 4 Remove Tray 2 from the printer by pulling it out all the way then lifting it up and out of the printer Repeat for Tray 3 in the HCF 5 Loosen the screws...

Страница 280: ...wo people lift away the printer from the HCF 8 Reattach the GFI power cord to the printer 9 Power ON the printer 10 Print a Configuration Sheet see page 3 85 and confirm that Trays 3 4 and 5 no longer...

Страница 281: ...ns Installing page C 11 Removing page C 17 Installing Follow the procedure below to install the Duplex Module onto a printer that is already in service If installing onto a printer that has not been s...

Страница 282: ...Guide 3 Remove the Face up Bin and its connecting plate from the printer 4 Detach the Face up Bin from the connecting plate 5 Remove the mounting bracket from the printer 6 Gather the Face up Bin hold...

Страница 283: ...le and remove any packing material 8 With both hands position the Duplex Module at the printer placing the smaller hooks over the mounting pins on both sides 9 After engaging the closest hook and pin...

Страница 284: ...pping it into place 12 Attach the connecting cord to the printer 13 Insert the Face up Bin support bracket into one of the three connecting tabs on the lower end of the filler panel 14 Use the support...

Страница 285: ...Installing and Removing Printer Options C 15 15 Lift the filler panel up to break it off 16 Insert the support bracket into the Duplex Module 17 Attach the Face up Bin holder to the Duplex Module and...

Страница 286: ...rojecting part of the Duplex Module into the opening in the left side of the bin Make sure the Face up Bin is firmly seated 19 Reattach the GFI power cord to the printer 20 Power ON the printer 21 Pri...

Страница 287: ...g Printer Options C 17 Removing 1 Power OFF the printer 2 Disconnect the GFI power cord from the printer 3 Lift the Face up Bin to unlock it and pull it away from the Duplex Module 4 Loosen and remove...

Страница 288: ...5 Remove the support bracket and store it with the Face up Bin holder and screws in a safe place should you ever need to reinstall the bin in the Duplex Module 6 Disconnect the Duplex Module connector...

Страница 289: ...up the Duplex Module and pull it away from the printer 10 Gather the Face up Bin bracket connecting plate and screws two pairs from the original printer packaging 11 Attach the bracket to the printer...

Страница 290: ...and connecting plate on the bracket Make sure they are firmly seated 14 Reattach the GFI power cord to the printer 15 Power ON the printer 16 Print a Configuration Sheet see page 3 85 and confirm that...

Страница 291: ...his section contains four sets of instructions Installing Console Configuration page C 21 Removing Console Configuration page C 26 Installing Tabletop Configuration page C 29 Removing Tabletop Configu...

Страница 292: ...Print N24 N32 and N40 System Administrator Guide 3 Unpack the Mailbox from its two boxes 1 and 2 remove any tape and gather its parts for installation 4 Attach the two lower stands to the printer and...

Страница 293: ...he lower stands and snap into place Be sure the upper stand is facing in the correct direction 6 If the Face up Bin is installed remove it Then with two people lower the Mailbox Collator onto the prin...

Страница 294: ...n Be sure that you have another person helping you perform this step 8 Open Door D and remove all packing tape 9 Press the indicated button and remove the blue haze handle from the Mailbox Collator by...

Страница 295: ...Mailbox connector cord to the printer 13 Reattach the Face up Bin if it was removed 14 Reattach the GFI power cord to the printer 15 Power ON the printer 16 Print a Configuration Sheet see page 3 85 a...

Страница 296: ...int N24 N32 and N40 System Administrator Guide Removing Console Configuration 1 Power OFF the printer 2 Disconnect the GFI power cord from the printer 3 Disconnect the Mailbox connector cord from the...

Страница 297: ...the Mailbox stopper by pressing the button down and pulling out the handle 6 Open Door D Insert the handle in its original position 7 Press the button down and retract the Mailbox stopper 8 With two p...

Страница 298: ...then lift it from the lower stand to remove it 10 Loosen the two screws and remove the two lower stands 11 Reattach the power cord to the printer and power ON the printer 12 Print a Configuration Shee...

Страница 299: ...nd Removing Printer Options C 29 Installing Tabletop Configuration 1 Power OFF the printer 2 Disconnect the GFI power cord 3 Detach the interface cable 4 Unpack the Mailbox Collator and accessory boxe...

Страница 300: ...llator support base 6 Remove Tray 2 and install the brackets Secure with supplied screws 7 Insert the upper stand into the lower stands and snap into place Be sure the upper stand is facing in the cor...

Страница 301: ...C 31 9 Align with the connecting pin as shown 10 Open Door D and remove all packing tape 11 Press the indicated button and remove the handle from the Mailbox Collator by pushing the handle down 12 Ins...

Страница 302: ...tach the Mailbox Collator connector cord to the printer 15 Reattach the GFI power cord and interface cable to the printer 16 Power ON the printer 17 Print a Configuration Sheet see page 3 85 and confi...

Страница 303: ...Installing and Removing Printer Options C 33 Removing Tabletop Configuration 1 Power OFF the printer 2 Disconnect the GFI power cord from the printer 3 Detach the interface cable 4 Disconnect the Mail...

Страница 304: ...tem Administrator Guide 5 Remove the paper stopper 6 Remove the Mailbox Collator handle from the Mailbox stopper by pressing the button and pulling out the handle 7 Insert the handle in its original p...

Страница 305: ...le lift up the Mailbox and carry it away from the printer Be sure to grasp the handle and support brace as shown above 10 Press the stopper on either side of the upper stand to unlock it then lift it...

Страница 306: ...Mailbox Collator support base Set the printer down in its new location 13 Reattach the GFI power cord and interface cable to the printer 14 Power ON the printer 15 Print a Configuration Sheet see page...

Страница 307: ...C 37 100 Envelope Feeder This section contains two sets of instructions Installing below Removing page C 38 Installing 1 Unpack the Envelope Feeder and remove packing tape 2 Rotate the 50 Sheet Bypass...

Страница 308: ...der was installed Make sure it is securely attached 4 Power OFF and ON the printer 5 Print a Configuration Sheet see page 3 85 and confirm that the Envelope Size item appears in the Tray Menu section...

Страница 309: ...t UP and OUT 2 Hold the 50 Sheet Bypass Feeder horizontally and insert it into the bracket where the Envelope Feeder was installed Make sure it is securely attached 3 Power OFF and ON the printer 4 Pr...

Страница 310: ...r s controller board are sensitive to static electricity Before installing or removing the drive discharge static electricity from your body by touching something metal such as the metal back plate on...

Страница 311: ...Hard Disk Drive Appendix C Installing and Removing Printer Options C 41 Installing Follow the procedure below to install the Hard Disk Drive 1 Power OFF the printer 2 Disconnect the GFI power cord...

Страница 312: ...Push the two long posts up through the controller board from the bottom B Insert the two short posts into the holes in the top of the controller board by inserting them at a 45 angle and then rocking...

Страница 313: ...Options C 43 6 Replace the controller board and tighten the screws by hand 7 Reattach the GFI power cord to the printer 8 Power ON the printer 9 Print a Configuration Sheet see page 3 85 and confirm...

Страница 314: ...Follow the procedure below to remove the Hard Disk Drive 1 Power OFF the printer 2 Disconnect the GFI power cord 3 Loosen the thumbscrews and pull out the controller board Set it down on a flat surfa...

Страница 315: ...ons C 45 5 Replace the controller board and tighten the screws by hand 6 Reattach the GFI power cord to the printer 7 Power ON the printer 8 Print a Configuration Sheet see page 3 85 and confirm that...

Страница 316: ...Flash Memory SIMM is available in an 8MB size See Appendix A to order additional memory Memory SIMMs and the printer s controller board are sensitive to static electricity Before installing or removi...

Страница 317: ...to install a memory SIMM 1 Power OFF the printer 2 Disconnect the GFI power cord 3 Loosen the thumbscrews and pull out the controller board Set it down on a flat surface 4 Insert the SIMM into the sl...

Страница 318: ...ntil it clicks into place 6 Replace the controller board and tighten the screws by hand 7 Reattach the GFI power cord to the printer 8 Power ON the printer 9 Print a Configuration Sheet see page 3 85...

Страница 319: ...edure below to remove a memory SIMM 1 Power OFF the printer 2 Disconnect the GFI power cord 3 Loosen the thumbscrews and pull out the controller board Set it down on a flat surface 4 Carefully pull ou...

Страница 320: ...the controller board and tighten the screws by hand 6 Reattach the GFI power cord to the printer 7 Power ON the printer 8 Print a Configuration Sheet see page 3 85 and confirm that the total system m...

Страница 321: ...e XNIC Follow the procedure below to install a NIC To install the card you will need either a Phillips head screwdriver or a hex head nut driver These instructions apply to both the 10 100 Ethernet an...

Страница 322: ...N24 N32 and N40 System Administrator Guide 3 Unpack the NIC kit It should include these items 1 Two hex head screws notched for a Phillips head screwdriver 2 The NIC 4 Loosen the thumbscrews and pull...

Страница 323: ...the same as the screws packed with the NIC You will not need the cover plate when the NIC is installed but you should keep it in a safe place in case you remove the card in the future 6 Insert the NI...

Страница 324: ...r is firmly seated into the 96 pin receptacle 8 Align the two screw receptacles on the NIC with the slots in the front of the controller board and insert the screws Tighten the screws using either a n...

Страница 325: ...nfiguration Sheet page 3 85 and confirm that the proper Network Interface appears on the sheet If the proper NIC does not appear on the Configuration Sheet or if an error message appears perform steps...

Страница 326: ...ocedure below to remove the XNIC To remove the card you will need either a Phillips head screwdriver or a hex head nut driver 1 Power OFF the printer 2 Disconnect the printer GFI power cord Disconnect...

Страница 327: ...board Set it on a flat surface 4 Use the screw driver nut driver to remove the two screws that hold the NIC in place as illustrated Set the screws aside 5 Remove the NIC by gently lifting it away fro...

Страница 328: ...lace the controller board and tighten the thumbscrews by hand 2 Reattach the GFI power cord to the printer Reattach any cables to printer ports 3 Power ON the printer 4 Print a Configuration Sheet pag...

Страница 329: ...Appendix D Printer Resident Fonts D 1 Printer Resident Fonts A p p e n d i x D Base Printer Fonts D 2 Printing a PCL Font List D 3 PostScript Fonts D 4 Printing a PostScript Font List D 5...

Страница 330: ...w Bold Italic Symbol Wingdings Antique Olive Antique Olive Bold Antique Olive Italic Albertus Medium Albertus Extra Bold CG Times CG Times Bold CG Times Italic CG Times Bold Italic CG Omega CG Omega B...

Страница 331: ...fonts in your printer print a PCL Font List as described below 1 Press Menu Up or Menu Down until you see Menus Test Menu 2 Press Item Up or Item Down until you see Test Menu PCL Font List 3 Press En...

Страница 332: ...rier Bold Courier BoldOblique Courier Oblique Helvetica Helvetica Bold Helvetica BoldOblique Helvetica Oblique Helvetica Narrow Helvetica Narrow Bold Helvetica Narrow BoldOblique Helvetica Narrow Obli...

Страница 333: ...a PostScript Font List 1 Press Menu Up or Menu Down until you see Menus Test Menu 2 Press Item Up or Item Down until you see Test Menu PS Font List 3 Press Enter to print the PostScript Font List The...

Страница 334: ...PostScript Fonts D 6 DocuPrint N24 N32 and N40 System Administrator Guide...

Страница 335: ...Appendix E Printer Specifications E 1 Printer Specifications A p p e n d i x E...

Страница 336: ...y Duty Cycle Up to 150 000 prints Nominal Voltage 117 127 V or 220 240 V Nominal Frequency 50 Hz or 60 Hz Power Consumption Less than 1180 W during operation Power Saver mode operational after specifi...

Страница 337: ...tion software Unidirectional Windows drivers Windows 3 11 and Windows 95 Internet Printer Administration Embedded HTTP Server PostScript LanguageLevel 3 Click for Updated Information Available Options...

Страница 338: ...Printer Specifications E 4 DocuPrint N24 N32 and N40 System Administrator Guide...

Страница 339: ...int N40 Unique Printer Commands F 1 DocuPrint N40 Unique Printer Commands A p p e n d i x F Overview F 2 Paper Size Selection F 3 Paper Type Selection F 4 Input Tray Selection F 5 Output Selection F 6...

Страница 340: ...dded some unique settings for the DocuPrint N40 in the following areas Paper Size See the section Paper Size Selection page F 3 Paper Type See the section Paper Type Selection page F 4 Input Tray See...

Страница 341: ...ox Duplex Long Edge Feed Executive 7 25x10 5 Ec l1A Trays 1 5 Bypass Feeder Mailbox Duplex Long Edge Feed Letter 8 5x11 Ec l2A Trays 1 5 Bypass Feeder Mailbox Duplex Long Edge Feed Folio 8 5x13 Ec l10...

Страница 342: ...d Ec n11WdLetterhead Transparency Ec n13WdTransparency Prepunched Ec n11WdPrepunched Labels Ec n7WdLabels Bond Ec n5WdBond Recycled Ec n9WdRecycled Color Ec n6WdColor Card Stock Ec n11WdCardStock User...

Страница 343: ...Ec l1H n a Tray 2 Ec l4H n a Tray 3 Ec l5H Tray 1 Tray 4 Ec l20H Tray 1 Tray 5 Ec l21H Tray 1 Manual MBF2 Ec l2H Envelope Feeder Manual Envelopes MBF Ec l3H Envelope Feeder MBF multi sheet Ec l8H Env...

Страница 344: ...ic no request Ec l0G Top Face down Bin Ec l1G FACEDOWN or UPPER Face Up Bin Ec l2G FACEUP or LOWER or OPTIONALOUTPUTBIN1 Bin 1 Mailbox Ec l4G OPTIONALOUTPUTBIN2 Bin 2 Mailbox Ec l5G OPTIONALOUTPUTBIN3...

Страница 345: ...LETE NAME pathname Hard Disk Drive File Download PJL FSDOWNLOAD Hard Disk Drive Initialize PJL FSINIT VOLUME pathname Hard Disk Drive Directory Create PJL FSMKDIR NAME pathname Line Termination PJL SE...

Страница 346: ...PJL Commands F 8 DocuPrint N24 N32 and N40 System Administrator Guide...

Страница 347: ...e n d i x G The Xerox Commitment to Environmental Quality G 2 Acoustic Noise Figures G 2 FCC Compliance Statement for United States Users G 3 Compliance Statement for International Users G 4 Operation...

Страница 348: ...t easy for you to return selected printer equipment and empty print cartridges to Xerox We recondition the print cartridges and refill them with Xerox toner and developer All products we manufacture m...

Страница 349: ...interference will not occur in a particular installation If this equipment does cause harmful interference to radio or television reception which can be determined by turning the equipment off and on...

Страница 350: ...93 68 EEC approximation of the laws of the member states related to low voltage equipment January 1 1996 Council Directive 89 336 EEC approximation of the laws of the member states related to electro...

Страница 351: ...ort surface with adequate strength for the weight of the machine Always exercise care in moving or relocating the equipment Always place the equipment in an area which provides adequate room area for...

Страница 352: ...ment or materials contact your dealer or Xerox WARNING Use of controls adjustments or performance of procedures other than those specified herein may result in a hazardous radiation exposure This prod...

Страница 353: ...tions laser danger labels may be visible These labels are for your dealer or service technician and are placed on or near panels or shields which require a tool for removal THESE PANELS ARE NOT TO BE...

Страница 354: ...Environmental Specifications G 8 DocuPrint N24 N32 and N40 System Administrator Guide...

Страница 355: ...Tabletop configuration C 29 to C 32 Location on printer 1 7 Ordering A 2 34 Paper sizes supported 2 4 Removing from printer Console configuration C 26 to C 28 Tabletop configuration C 33 to C 36 Sett...

Страница 356: ...ypes 3 22 Initializing the Hard Disk Drive 5 2 Locking menus 3 11 Offsetting output 2 27 Com10 size envelopes Dimensions 2 4 Supported trays bins 2 4 Configuration Sheet In Test Menu hierarchy 3 84 Pr...

Страница 357: ...s 5 3 Macros 5 3 to 5 7 Draft Mode In System Menu hierarchy 3 36 Setting 3 40 Drivers Obtaining latest versions 1 37 PCL emulation Description 4 4 Features 4 6 PostScript Description 4 5 Features 4 6...

Страница 358: ...ion 3 42 Face up Bin Capacity 2 4 Installing on Duplex Module C 15 to C 16 Installing on printer 1 27 Location on printer 1 6 1 7 Paper sizes supported 2 4 Removing from Duplex Module C 17 Removing fr...

Страница 359: ...tting 3 58 3 70 J Job Menu Description 3 16 Hierarchy 3 16 Items Cancel Job 3 16 3 17 Form Feed 3 16 3 17 L LAA 3 64 In Token Ring Menu hierarchy 3 64 Setting 3 76 Labels Sizes supported 2 4 Supported...

Страница 360: ...em Menu See System Menu Test Menu See Test Menu Tray Menu See Tray Menu Monarch size envelopes Dimensions 2 4 Supported trays bins 2 4 N NDS Context In Novell Menu hierarchy 3 77 Setting 3 83 NDS Tree...

Страница 361: ...bin Mailbox Collator 2 4 50 Sheet Bypass Feeder 2 4 Face down Bin 2 4 Face up Bin 2 4 Tray 1 2 4 Tray 2 2 4 Tray 3 2 4 Tray 4 2 4 Tray 5 2 4 Storing 2 5 Unacceptable for use 2 2 Weights supported 2 2...

Страница 362: ...escription 4 5 Fonts D 5 PostScript Font List In Test Menu hierarchy 3 84 Printing 3 86 PostScript Menu Description 3 33 Hierarchy 3 33 Items Binary PS 3 34 Print Errors 3 33 3 34 Power receptacle Loc...

Страница 363: ...iguration Sheet 3 84 3 85 Demo Page 3 84 3 85 Disk Directory 3 84 3 87 Hex Mode 3 84 3 88 Menu Map 3 84 PCL Font List 3 84 3 85 PostScript Font List 3 84 3 86 Restart Printer 3 84 3 88 Test Print 1 2...

Страница 364: ...on 2 13 Paper sizes supported 2 4 Tray 5 Type In Tray Menu hierarchy 3 22 Setting 3 26 Tray Menu Description 3 21 Hierarchy 3 22 Items Envelope Size 3 22 3 23 MBF Size 3 22 3 23 MBF Type 3 22 3 24 Tra...

Страница 365: ...Xerox DocuPrint N24 N32 N40 Documentation Update 5 This document contains new information about your Xerox DocuPrint N24 N32 N40 printer Please read it carefully then store it with your other printer...

Страница 366: ...11 PCL Menu 12 PostScript Menu 12 System Menu 13 Parallel Menu 16 Serial Menu 17 Ethernet Menu 18 Token Ring Menu 20 Novell Menu 22 Print Menu 23 Reset Menu 25 Driver Features 26 Downloading Fonts an...

Страница 367: ...re listed below SIMM Specifications by Printer Option N24 N32 N40 8 MB DRAM SIMM No parity 70 nanosecond access time 2M x 32bits 72 pin No parity 50 nanosecond access time 2M x 32bits EDO 72 pin 16 MB...

Страница 368: ...accommodated Using the hard disk drive the printer utilizes the Intelligent RIP Once feature First the printer will determine if the job will fit into the available memory If the job will fit into me...

Страница 369: ...updates information contained in Chapters 1 and 2 of the System Administrator Guide There are two different Mailbox Sorter modes provided by the 10 Bin Collator Mailbox Mode Each mailbox bin can be a...

Страница 370: ...has been changed or updated is indicated in Bold Italics on the Menu Map This chapter updates menu options contained in Chapter 3 of the System Administrator Guide on a menu by menu basis Default val...

Страница 371: ...Feeder installed the printer follows this order MBF 4 5 1 2 3 With an Envelope Feeder installed the printer follows this order 1 2 With an Envelope Feeder and High Capacity Feeder installed the print...

Страница 372: ...Menu PostScript menu functions have been moved and now appear in these menus System Menu page 13 Parallel Menu page 16 Ethernet Menu page 18 Token Ring Menu page 20 Novell Menu page 22 PCL menu update...

Страница 373: ...ges etc Note The Language setting is not changed by resetting to factory defaults This item was moved from the Reset Menu Deutsch English Espa ol Fran ais Italiano Portugu s BRA Russian Policy Timeout...

Страница 374: ...bins When the value is set to ON and the selected bin becomes full the printer immediately starts sending output to the next available bin When the value is set to OFF and the selected bin becomes ful...

Страница 375: ...lt Paper Size is set to Letter the default MBF Size is set to Letter and the default Envelope Size is set to Com10 The default Form Length value in the PCL Menu is adjusted to match the Paper Size Not...

Страница 376: ...Menu The Parallel Menu has a new option It is described below Parallel menu updates Menu item and function Values Binary PS Enable or disable binary PostScript mode for print jobs arriving via the par...

Страница 377: ...item and function Values Binary PS Enable or disable binary PostScript mode for print jobs arriving via the Serial port On enables it Off disables it On Off Baud Rate Set the baud rate for the Serial...

Страница 378: ...Menu item and function Values LPR Binary PS Enable or disable binary PostScript mode for print jobs arriving via the LPR protocol Off On DLC LLC Bin PS Enable or disable DLC LLC binary PostScript mod...

Страница 379: ...l Off On IP Address Res Set the method used to assign the IP address including subnet mask and default gateway Note Values have changed for this option Static BOOTP RARP DHCP Speed Select speed and ha...

Страница 380: ...updates Menu item and function Values LPR Binary PS Enable or disable binary PostScript mode for print jobs arriving via the LPR protocol Off On DLC LLC Bin PS Enable or disable DLC LLC binary PostScr...

Страница 381: ...f On IP Address Res Set the method used to assign the IP address including subnet mask and default gateway Note Values have changed for this item Static BOOTP RARP DHCP Source Routing Set the Source R...

Страница 382: ...Menu item and function Values Novell Enable Enable or disable Novell protocol Note This item was moved from the Ethernet and Token Ring menus On Off Novell Binary PS Enable or disable Novell binary Po...

Страница 383: ...function PCL Demo Print a sample page demonstrating the printer s capabilities Note This item used to be called Demo Page Use the Enter key to initiate this function PCL Font List Print a list of PCL...

Страница 384: ...nted Use the Enter key to initiate this function Hex Mode Set print output as hexadecimal codes instead of normal print data This mode may be enabled remotely via a PJL command and stays in effect unt...

Страница 385: ...u only if the hard disk option is installed Use the Enter key to initiate this function Disk Initialize Initialize the hard drive Note This item used to be called Init Disk Use the Enter key to initia...

Страница 386: ...dows 3 x Custom Y Y Y N Y N Windows 95 98 Custom Y Y Y N Y N Windows NT 3 51 Uni N N N N N N Windows NT 4 0 Uni N N N N N N PCL6 XL Windows 3 x Custom Y Y Y Y Y N Windows 95 98 Custom Y Y Y Y Y N Wind...

Страница 387: ...unctional Range Default SIZE integer 0 to 231 1 N A NAME pathname ASCII 01 thru 255 N A SIZE integer The size variable indicates the number of bytes in the file to be downloaded The size indicates the...

Страница 388: ...the macro is positioned at x 900 and y 1500 by this macro ESC 12345X is the UEL command which ends this sequence Executing this macro requires the following PCL sequence Notes The macro ID must be the...

Страница 389: ...command which ends this sequence Invoking this font requires the following PCL sequence Notes The case of the string ID must be the same as the case of the fontname in the FSDOWNLOAD command The byte...

Страница 390: ...ide either to continue printing the sets or to delete the job after entering your password on the Printer Control Panel Proof jobs if not sent by a driver with the proof job feature may be invoked in...

Страница 391: ...ith a syntax error is called out The job name is the name displayed on the Control Panel Password Menu when the associated password is entered If no password is assigned or there is a password syntax...

Страница 392: ...em occurred during downloading printer operating code Printing may continue but use of the disk is locked out ACTION Try loading again Format Failed Disk Locked A problem occurred during disk formatti...

Страница 393: ...zes The Finisher supports these media sizes A3 297 x 420 mm A4 210 x 297 mm A5 148 x 210 mm Statement 5 5 x 8 5 140 x 216 mm Executive 7 25 x 10 5 184 x 267 mm Letter 8 5 x 11 216 x 279mm Folio 8 5 x...

Страница 394: ...60 Includes one 500 sheet universal tray and two 1 000 sheet trays A4 and Letter only Duplex Module 97K24880 Requires Face up Tray mounting hardware from original printer packaging 10 bin Mailbox Coll...

Страница 395: ...fications No parity 70 nanosecond access time 2M x 32 bits 72 pin 16 MB Memory SIMM 97K15300 SIMM specifications No parity 70 nanosecond access time 4M x 32 bits 72 pin 32 MB Memory SIMM 97K22330 SIMM...

Страница 396: ...DO 72 pin 16 MB Memory SIMM 97S02241 SIMM specifications No parity 50 nanosecond access time 4M x 32 bits EDO 72 pin 32 MB Memory SIMM 97S02242 SIMM specifications No parity 50 nanosecond access time...

Страница 397: ...Documentation Update 37 E N G L I S H New Specifications These specifications update the printer specifications in Appendix E of the System Administrator Guide Factory Provided Features 24 Mbyte RAM M...

Страница 398: ...able F 5 in the DocuPrint N24 N32 and N40 System Administrator Guide Output selection Destination PCL Commanda PJL Value for variable OUTBIN Finisher Bin 1 Ec l4G OPTIONALOUTPUTBIN2 Finisher Bin 2 Ec...

Отзывы: