background image

July 2019

5-9

Xerox® B210 Service Manual

PL 4.4

Parts List

Initial Release

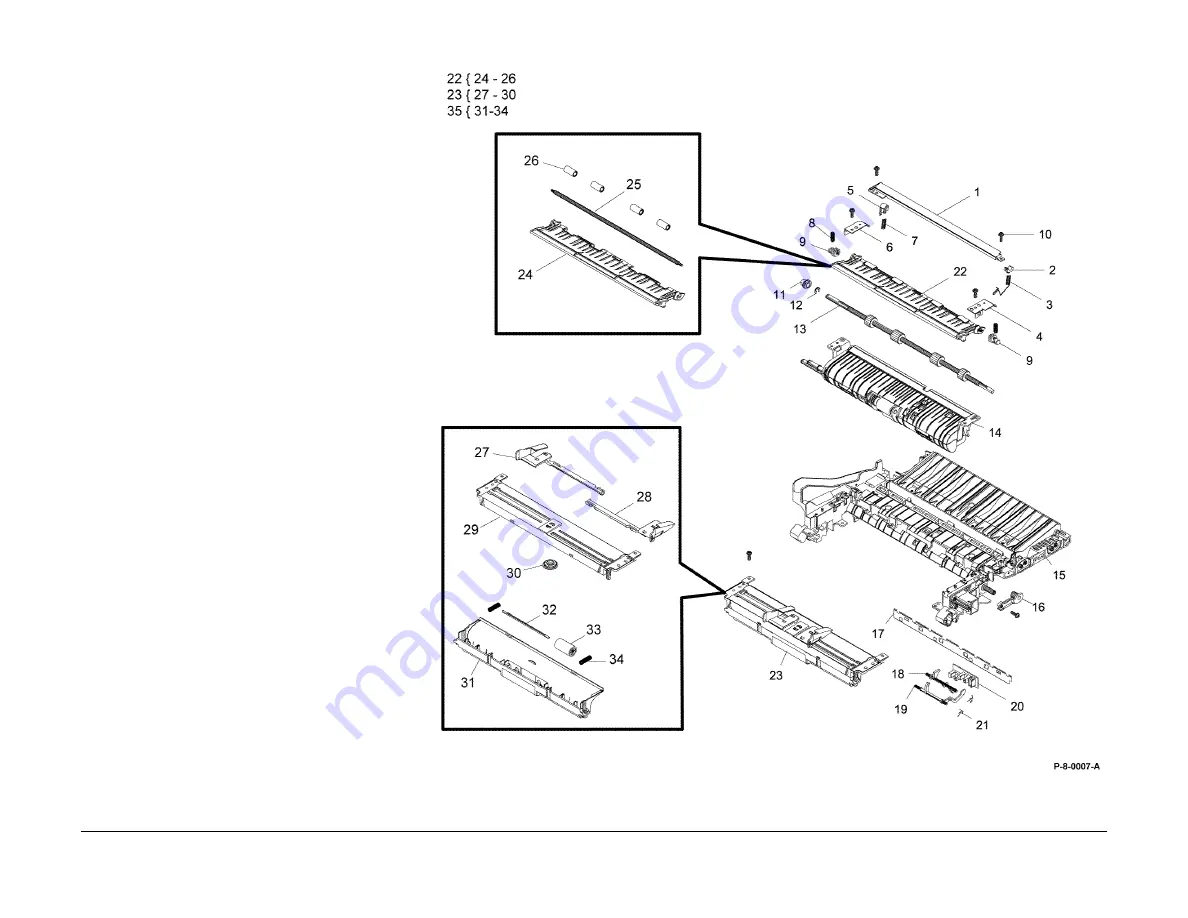
PL 4.4 Paper Path

Item

Part

Description

1

Earth Transfer Plate

2

Bushing

3

Spring

4

Right Push Brush Plate

5

Bushing

6

Left Push Brush Plate

7

Spring

8

Spring

9

Feed Bushing

10

Screw

11

Exit Shaft Bushing

12

E-Ring

13

022N02797

Registration Roll (

REP 4.9

)  

14

Pickup Frame Base

15

Middle Frame

16

Registration Holder

17

P SAW Plate

18

120N00545

Feed Sensor Actuator (

REP 4.10

)  

19

120N00548

Registration Sensor Actuator (

REP 

4.10

20

130N01759

Feed Sensor PWB (

REP 4.10

)  

21

Spring

22

Registration Base Assembly

23

050N00681

Manual Paper Tray (

REP 4.11

)  

24

Paper Guide Cover

25

Registration Idle Shaft

26

Registration Idle Roller

27

Manual Left Adjust

28

Manual Right Adjust

29

Lower Paper Guide

30

Pinion Gear

31

Roller Cover

32

Pin

33

Idle Roller

34

Spring

35

Sub-Holder Idle

Содержание B210

Страница 1: ...Xerox B210 Service Manual 702P07530 July 2019 Initial Release ...

Страница 2: ...red by Xerox with respect to such equipment You should consult the applicable warranty for its terms regarding customer or third party provided service WARNING This equipment generates uses and can radiate radio frequency energy and if not installed and used in accordance with the instructions documentation may cause inter ference to radio communications It has been tested and found to comply with...

Страница 3: ...0 0 00 2 No Product Name Assigned Preliminary Working Document Section Name ...

Страница 4: ...Introduction About This Manual iii How to Use this Manual iv Service Safety Summary v Reference Symbology vi Voltage Specifications vii Health and Safety Incident Reporting viii Regulatory Specifications ix Translation of Warnings x Tag Usage xi Xerox B210 Overview xii ...

Страница 5: ...July 2019 ii Xerox B210 Service Manual Initial Release Introduction ...

Страница 6: ...tion contains the Adjustment and Repair procedures Repairs include procedures for removal and replacement of parts which have the following special conditions When there is a personnel or machine safety issue When removal or replacement cannot be determined from the exploded view of the Parts List When there is a cleaning or a lubricating activity associated with the procedure When the part requir...

Страница 7: ...her reference is unique amongst different configu rations of the machine the appropriate configuration designator is indicated Any artwork is also specific NOTE This manual services all configurations of the machine Ignore references to options not installed on the machine Warnings Cautions and Notes WARNING A warning is used whenever an operating or maintenance procedure practice condi tion or st...

Страница 8: ... for details Maintenance Safety Do not attempt any maintenance procedure that is not specifically described in the docu mentation supplied with the printer Do not use aerosol cleaners The use of supplies that are not approved may cause poor performance and could create a hazardous condition Do not burn any consumables or routine maintenance items For information on Xerox supplies recycling program...

Страница 9: ...e machine is closed and operat ing Use caution when reaching in the machine ESD Certain components in this product are susceptible to damage from Electrostatic Discharge Observe all ESD procedures to avoid component damage The following reference symbols are used throughout the Xerox B210 Service Manual 1 Flag This symbol indicates a reference point into a circuit diagram from a RAP 2 Note This sy...

Страница 10: ...gnostic procedure Table 2 DC Voltage Measurements in RAPs The RAPs have been designed so that when it is required to use the DMM to measure a DC voltage the first test point listed is the location for the red meter lead and the second test point is the location for the black meter lead For example the following statement may be found in a RAP There is 5 VDC from TP7 to TP68 In this example the red...

Страница 11: ...n American North and Latin American South Phone Xerox EH S at 1 800 828 6571 Electronic mail Xerox EH S at USA XEROX EHS xerox com Fax Xerox EH S at 1 585 216 8817 intelnet 8 219 68817 For incidents in Europe and Developing Markets East Middle East Africa India China and Hong Kong Phone Xerox EH S at 44 0 1707 353434 intelnet 8 668 3434 Electronic mail Xerox EH S at EH S Europe xerox com Fax Xerox...

Страница 12: ...ser is encouraged to try to correct the interference by one or more of the following measures Reorient or relocate the receiver Increase the separation between the equipment and receiver Connect the equipment into an outlet on a circuit different from that to which the receiver is connected Consult the dealer or an experienced radio television technician for help Any changes or modifications not e...

Страница 13: ...ando elimine el módulo Consulte el GP 16 El módulo es pesado WARNING Follow the service procedure exactly as written Use of controls or adjustments other than those specified in this manual may result in an exposure to invisible laser radia tion During servicing the invisible laser radiation can cause eye damage if looked at directly DANGER Les procédures de dépannage doivent être suivies à la let...

Страница 14: ...Komponenten anderer Hersteller setzt möglicherweise das Sicherheitszertifikat außer Kraft AVISO Utilice solo los materiales y componentes Xerox Este producto dispone de un certificado de seguridad si se utilizan los materiales y componentes Xerox Este certifi cado de seguridad no será válido si se utilizan materiales y componentes que no sean de Xerox WARNING Do not touch the fuser while it is hot...

Страница 15: ...led descrip tions and illustrations of Control Panel functions machine features and options Table 1 Product Configurations Component B210 Paper Tray 250 Sheets Standard Manual Feed Slot 1 sheet Standard Output Tray 150 Sheets Standard AirPrint Standard Google Cloud Print Standard Network Printing Standard USB Device Standard USB Host Not Applicable Wi Fi Standard Wi Fi Direct Standard ...

Страница 16: ...ial Release 1 Service Call Procedures Call Flow Service Call Overview 1 3 Safety Precautions 1 3 SCP 01 Introduction to Service Call Procedures 1 4 SCP 02 Initial Actions 1 4 SCP 03 Corrective Actions 1 5 SCP 04 Final Actions 1 5 System Subsystem Maintenance HFSI s 1 6 ...

Страница 17: ...July 2019 1 2 Xerox B210 Service Manual Initial Release Service Call Procedures ...

Страница 18: ...d the root cause of the problem Use diagnostics to check the printer and components Use the BSDs and wiring diagrams to locate test points Take voltage readings as instructed in the troubleshooting procedure 4 Correct the problem Use the Parts List to locate part numbers Use the Repair Procedures to replace parts 5 Final Actions Test the printer to verify that the problem has been corrected and th...

Страница 19: ...ons is to help organize the service call Customer input machine observations and print samples are all used to gather information about the condition of the system Gather a list of symptoms error codes or other information concerning the problem that the customer may provide This information may help identify and correct intermittent or unusual problems During each service call perform all Primary...

Страница 20: ...r associated fault codes that have the same or nearly the same time stamp as the primary fault code Troubleshoot fault codes with the lowest chain number first 2 If the problem is IQ related refer to Section 3 Image Quality Entry RAP 3 When the primary problem is resolved proceed to Final Actions SCP 04 Final Actions Purpose Final Actions verify total operation of the machine ensures that the HSFI...

Страница 21: ...ng sheet Service Maintenance Inter vals If necessary and if the customer agrees clean replace any secondary HFSI s that are due or may cause a return service call Be sure to continually update and review the Printer Service Log and Customer Maintenance Log for all maintenance actions to avoid any unnecessary actions that increase customer equipment down times service time and costs Table 1 Custome...

Страница 22: ... 09 100 Toner Cartridge Near End of Life RAP 2 10 09 200 Toner Cartridge Empty RAP 2 11 09 300 Imaging Unit Near End of Life RAP 2 11 09 400 Imaging Unit End of Life RAP 2 12 09 500 Toner Cartridge Not Installed RAP 2 12 09 800 Incompatible Toner Cartridge RAP 2 13 09 600 09 900 Imaging Unit RAP 2 13 10 100 Fuser Temperature Open RAP 2 14 10 200 300 Fuser Under Over Temperature RAP 2 14 17 100 IP ...

Страница 23: ...July 2019 2 2 Xerox B210 Service Manual Initial Release Status Indicator RAPs ...

Страница 24: ...3 HVPS PL 4 1 Item 2 Check the connection between the Main PWB and the HVPS The connection is secure Y N Verify there is no contamination present Check for broken or defective wires or cables Secure the connection between the Main PWB and the HVPS Install a new HVPS PWB PL 4 1 Item 2 02 100 02 200 USB Error RAP BSD ON BSD 1 02 100 Invalid Unknown USB device 02 200 Check USB memory WARNING Do not p...

Страница 25: ...ay size setting Procedure 1 Switch off the machine then switch On the power 2 If the fault persists install a new Main PWB PL 1 1 Item 7 03 450 Paper Mismatch at Manual Feed Slot BSD ON BSD 1 The size setting for the Manual Feed Slot does not match the paper size loaded Initial Actions Using Easy Printer Manager Device Settings check the media size settings for the tray Adjust the Paper Tray Guide...

Страница 26: ...he specified time after the ready signal was sent Initial Actions Switch off the machine then switch On the power Procedure Remove the Right Cover REP 2 2 then check the motor connector on the Main PWB The connector on the Main PWB is securely connected Y N Verify there is no contamination present Check for broken and defective wires or cables Securely reconnect the motor connector Manually rotate...

Страница 27: ...ORSICHT Folgende Verfahren dürfen nicht ohne Schutzbrille angewandt werden Die Nichteinhaltung dieser Regel kann zu ernsthaften körperlichen Verletzungen führen AVISO Use gafas de protección para realizar el procedimiento siguiente No proteger los ojos puede ocasionar daños personales graves Procedure Check the Main Wire Harness and connectors on the Laser Module The connections are secure Y N Ver...

Страница 28: ...eck for 3 3 VDC on the Main PWB The voltage is present on the Main PWB Y N Verify all voltages are present between the HVPS PWS and the Main PWB The voltages between the HVPS PWB and the Main PWB are present Y N Install a new HVPS PWB PL 4 1 Item 2 Install a new Main PWB PL 1 1 Item 7 Install a new Feed Sensor PWB PL 4 4 Item 20 Install a new Feed Sensor PWB PL 4 4 Item 20 Install a new Feed Senso...

Страница 29: ... 1 1 Item 7 Install a new Feed Sensor PWB PL 4 4 Item 20 Perform SCP 4 Final Actions 07 530 Paper Feed Fault Manual Feed Slot RAP BSD ON BSD 1 The lead edge was not detected by the Paper Feed Sensor Initial Actions Clear any jammed sheets Refer to Section 7 Troubleshooting in the Xerox B210 User Guide for detailed instructions on clearing paper jams Procedure Check the position of the jammed sheet...

Страница 30: ... Repair as necessary Install a new Feed Sensor PWB PL 4 4 Item 20 Perform SCP 4 Final Actions If the problem is intermittent check the cables for binding 08 500 Paper Jam in Exit Area RAP BSD ON BSD 1 The machine has detected a paper jam in the Exit Area Initial Actions Open the Rear Cover and remove jammed sheets from exit area Refer to Section 7 Trouble shooting in the Xerox B210 User Guide for ...

Страница 31: ...t circuit Install a new Exit Sensor PL 4 5 Item 3 Check the following parts for wear or damage Duplex Paper Guide PL 4 2 Item 6 Duplex Upper Guide PL 4 2 Item 5 Spring PL 4 2 Item 4 Roller Bushing PL 4 2 Item 9 Duplex Gate PL 2 1 Item 7 NOTE Verify the Duplex Gate is seated correctly and moves freely without binding Exit Paper Guide PL 2 1 Item 6 Install new components as required Duplex Assembly ...

Страница 32: ...he remaining life of the Toner Cartridge 3 If the Toner Cartridge has reached end of life Switch off the machine and Install a new Toner Cartridge 09 300 Imaging Unit Near End of Life RAP The Imaging Unit life is less than 10 Procedure 1 Check the remaining life of the Imaging Unit by using one of the methods listed below Print a Supplies Information Report GP 2 Open Easy Printer Manager select Ma...

Страница 33: ...maging Unit 3 If the Imaging Unit has reached end of life Switch off the machine and Install a new Imag ing Unit 09 500 Toner Cartridge Not Installed RAP BSD ON BSD 1 The Toner Cartridge has not been installed or machine software is unable to detect the Toner Cartridge Initial Actions Ensure that the Toner Cartridge has been installed and the cover is fully closed and latched Procedure 1 Switch of...

Страница 34: ...vate and cause serious personal injury when the power is on or electrical power is supplied DANGER Ne pas effectuer de dépannage avec le contact principal activé ou avec l ali mentation électrique appliquée à la machine celle ci pourrait démarrer et causer de graves blessures AVVERTENZA Non effettuare alcuna riparazione con la macchina accesa o con l ali mentazione elettrica inserita La macchina p...

Страница 35: ...o the Over Heat Thermostat The voltage is present Y N Check for AC line voltage to the LVPS PWB PL 4 4 Item 3 Check the Over Heat thermostat for contamination Check the wire harness from the LVPS PWB for open or short circuits Install a new LVPS PWB PL 4 4 Item 3 Check the circuits and connectors for the Fuser Module Check the Heat Lamp for an open circuit Install a new Fuser Module PL 5 1 Item 26...

Страница 36: ...ttings are correct for the customer network 17 130 Login Error The machine can not login to the designated server Request the customer verify connectivity and network setup settings are correct for the customer network 17 140 Access Denied A permissions error occurred Request the customer verify the user has correct permissions to perform the task requested of the machine 17 150 Lock Exists The lc...

Страница 37: ...uration settings Procedure 1 Ensure that the connectors are fully seated between the Main PWB PL 1 1 Item 7 and the WiFi PWB PL 1 1 Item 8 2 If the problem persists replace parts in the following order WiFi PWB PL 1 1 Item 8 Main PWB PL 1 1 Item 7 17 562 Auto Registration Process Fails to Communicate Error RAP The auto registration process failed to communicate Procedure Perform the steps that fol...

Страница 38: ...he steps that follow 1 Ensure that the Xerox SMart eSolutions settings are correct 2 Check the network cable and connection 3 Check that the machine IP address is correct 4 Check the SMart eSolutions edge host is connected and operational 17 700 710 BOOTP Error RAP The machine displays the error message DHCP or BOOTP causing a machine communica tion error Procedure 1 Switch off then switch on the ...

Страница 39: ...age DHCP or BOOTP causing a machine communica tion error Procedure 1 Switch off then switch on the machine 2 Check DHCP and network configuration 17 900 802 1X Network Authentication Error RAP The the 802 1X network authentication failed Procedure Ensure that the 802 1X EAP Type User name and Password for the Machine Authentication Switch and Authentication Server match ...

Страница 40: ... Initial Release 17 910 Firmware Upgrade RAP The firmware upgrade aborted due to an invalid file Initial Actions 1 Check the USB connection 2 Verify that the correct firmware file is being used Procedure 1 Switch off then switch on the machine 2 Upgrade the firmware GP 6 ...

Страница 41: ...July 2019 2 20 Xerox B210 Service Manual 17 910 Initial Release Status Indicator RAPs ...

Страница 42: ...Band RAP 3 4 IQ2 Vertical White Line and Band RAP 3 4 IQ3 Horizontal Black Bands RAP 3 5 IQ4 Spots RAP 3 5 IQ5 Low Image Density RAP 3 6 IQ6 Black or Dark Image RAP 3 6 IQ7 Uneven Density RAP 3 7 IQ8 Background RAP 3 8 IQ9 Residual Image Ghosting RAP 3 9 IQ10 Side 2 Staining 3 9 IQ11 Blank Page RAP 3 10 IQ12 Partial Image Deletions RAP 3 11 ...

Страница 43: ...July 2019 3 2 Xerox B210 Service Manual Initial Release Image Quality ...

Страница 44: ...en AVISO No realice reparaciones con la máquina encendida o conectada a la corriente Algunos componentes de la máquina contienen voltajes eléctricos peligrosos que pueden producir una descarga eléctrica y causar daños graves Defects Associated with Specific Components To aid with diagnosis the list below outlines image defects associated with specific compo nents lLaser Scanner Unit Black Print Ve...

Страница 45: ...lines and bands IQ2 Vertical White Line and Band RAP Thin white vertical lines or white vertical bands occur in the printed image Figure 1 Initial Actions Check the life of the Drum Cartridge refer to GP 2 Machine Reports Install a new Drum Cartridge if it is at end of life refer to the Xerox B210 User Guide Section 6 Maintenance General Care for detailed instructions on how to Install a new Drum ...

Страница 46: ...ntal black bands IQ4 Spots RAP Random or periodic dark areas in the low density areas of a print or voids in the dark areas of a print Figure 1 Initial Actions Ensure that the Drum Cartridge and the Toner Cartridge is firmly seated Procedure Switch off the machine Check the Transfer Roller for wear damage and remaining life The Transfer Roller is OK Y N Install a new Transfer Roll PL 4 1 Item 10 C...

Страница 47: ...de dépannnage avec le contact principal activé ou avec l ali mentation électrique appliquée à la machine Certains éléments de la machine compor tent des tensions électriques dangereuses qui peuvent causer un choc électrique et de graves blessures AVVERTENZA Non effettuare alcuna riparazione con l alimentazione elettrica inserita Alcuni componenti contengono corrente ad alta tensione che può provoc...

Страница 48: ...s effectuer de dépannnage avec le contact principal activé ou avec l ali mentation électrique appliquée à la machine Certains éléments de la machine compor tent des tensions électriques dangereuses qui peuvent causer un choc électrique et de graves blessures AVVERTENZA Non effettuare alcuna riparazione con l alimentazione elettrica inserita Alcuni componenti contengono corrente ad alta tensione ch...

Страница 49: ...specifications Procedure Switch off the machine Clean the contacts on the Drum Cartridge Toner Cartridge and the HVPS PWB PL 4 1 Item 2 Check the life of the Toner Cartridge and Drum Cartridge refer to GP 2 Machine Reports Install a new Toner Cartridge and or Drum Cartridge if they have reached end of life Refer to Tabe 5 in Section 6 Product Specifications for toner cartridge specifica tions Swit...

Страница 50: ...ing order Refer to the Xerox B210 User Guide Section 6 Maintenance General Care for detailed instructions on how to Install a new Toner Cartridge or Drum Cartridge 1 Drum Cartridge 2 Toner Cartridge 3 Fuser Module PL 5 1 Item 26 4 HVPS PWB PL 4 1 Item 2 Figure 1 Ghost Image IQ10 Side 2 Staining Side 2 of a simplex or duplex print is stained Figure 1 Procedure Switch off the machine Check the Trans...

Страница 51: ...PWB PL 4 1 Item 2 Switch on the power then make a test print The problem continues Y N Perform SCP 04 Final Actions Install a new Drum Cartridge refer to the Xerox B210 User Guide Section 6 Maintenance General Care for detailed instructions on how to Install a new Drum Cartridge The problem continues Y N Perform SCP 04 Final Actions Check the circuit between the Main PWB PL 1 1 Item 7 and the HVPS...

Страница 52: ...ocedure Procedure Switch off the machine Remove the Toner Cartridge Rotate the Toner Cartridge side to side for 5 to 6 full rotations to redistribute the toner Reinstall the Toner Cartridge and print 10 test copies The problem continues Y N Perform SCP 04 Final Actions Switch off the machine Check the Transfer Roll PL 4 1 Item 10 for the following Wear or damage The left and right tension springs ...

Страница 53: ...July 2019 3 12 Xerox B210 Service Manual IQ12 Initial Release Image Quality ...

Страница 54: ... Feed and Registration Clutches Paper Feed PWB 4 15 REP 4 4 Transfer Roll 4 15 REP 4 5 LSU and Cables 4 16 REP 4 6 Duplex Assembly 4 17 REP 4 7 Output Tray Full Sensor 4 18 REP 4 8 Exit Roll and Bushings 4 19 REP 4 9 Registration Roll 4 20 REP 4 10 Feed and Registration Sensors PWB and Actuators 4 27 REP 4 11 Manual Paper Tray 4 29 REP 4 12 Exit Sensor 4 30 REP 4 13 Paper Drive Roll 4 31 REP 4 14 ...

Страница 55: ...July 2019 4 2 Xerox B210 Service Manual Initial Release Repairs Adjustments ...

Страница 56: ...oltajes eléctricos peligrosos que pueden producir una descarga eléctrica y causar daños graves 1 Record the machine serial number from the Data Plate located on the rear cover beneath the bar code or from a Configuration Report printed prior to installing the new PWB To print a Configuration Report select from the PWS Easy Print Manager Machine Set ting Print Information Configuration NOTE Verify ...

Страница 57: ... Memory Clear operation a Machine should be in IDLE state no pending jobs in Job Q b Open the Front door and Press the Stop key for 15 20 Seconds c Close the front door and device will perform a Memory Clear d The process may take 1 2 mins to complete the Memory Clear the device will then reboot e The device will print Config report after reboot 6 Print a Configuration Report and check that the or...

Страница 58: ...ts Initial Release 5 Disconnect the FFCs and harnesses Figure 2 Figure 2 Disconnect FFCs and harnesses 6 Release two hooks then remove the Top Cover Figure 3 Figure 3 Top Cover removal 7 Release the hook then remove the SUB PWB WiFi Figure 4 Figure 4 SUB PWB removal ...

Страница 59: ...ough the hole of the SUB PWB then press the SUB PWB into the guide boss until the hook latches Figure 5 Figure 5 SUB PWB replacement REP 2 1 Front Cover Parts List on PL 2 1 Removal 1 Switch off the machine then disconnect the power cord 2 Remove the Left and Right Side Covers REP 2 2 3 Disconnect the wire harness to the Front Cover Figure 1 Figure 1 Front Cover P J Connector Connector ...

Страница 60: ...t Arm 5 Release two Front Cover Pivots then remove the Front Cover Figure 3 NOTE A wide blade flat screwdriver can be used to help release the Front Cover Pivot Figure 3 Front Cover Removal NOTE Remove the Tag Matrix from the old front cover then place on the new front cover Figure 4 Figure 4 Tag Matrix on new Front Cover Assembly Front Cover Support Arm Pivots ...

Страница 61: ...Open the Front Cover remove the Toner Cartridge and the Drum Cartridge Figure 1 Figure 1 Toner Cartridge and Photoreceptor Handles 3 Remove the Right Side Cover See NOTE Figure 2 a Release pull the upper front latch hook b Release the top latch hooks then the bottom latch hooks c Release the front lower latch hook and remove the cover 4 Remove the Left Side Cover See NOTE Figure 2 a Release pull t...

Страница 62: ...age Release the latches pressing the hook end of the latch away from the part Figure 2 Figure 2 Plastic Latches Replacement Replacement is the reverse of the removal procedure REP 2 3 Rear Cover Parts List on PL 2 1 Removal 1 Remove the Left and Right Side Covers REP 2 2 2 Remove four screws securing the Rear Cover Figure 1 Figure 1 Rear Cover Screws and Data Plate Label Screws Drive Gear ...

Страница 63: ...ure NOTE If the Rear Cover is being replaced remove the Data Plate Label from the old Rear Cover and install it onto the new Rear Cover Figure 1 REP 2 4 Manual Feed Cover Parts List on PL 2 1 Removal 1 Release two pivot pins then remove the Manual Feed Cover Figure 1 Figure 1 Manual Feed Cover Top View Replacement Replacement is the reverse of the removal procedure NOTE Replacement of the Manual F...

Страница 64: ...el PWB Figure 1 Figure 1 Control Panel PWB Underside of Top Covers Replacement Replacement is the reverse of the removal procedure REP 3 2 Top Cover Parts List on PL 3 1 Removal 1 Switch off the machine then disconnect the power cord 2 Remove the Front Cover REP 2 1 3 Remove the Left and Right Side Covers REP 2 2 4 Remove the Rear Cover REP 2 3 5 Disconnect the Control Panel and WiFi connectors fr...

Страница 65: ...two screws at the front door securing the Top Cover Figure 2 Figure 2 Top Cover Screws Front View 7 Release two latches at the rear of the printer then remove the Top Cover Figure 3 Figure 3 Top Cover Latch Hooks Replacement Replacement is the reverse of the removal procedure Screws Latch Hooks ...

Страница 66: ...rovocare forti scosse e gravi ferite VORSICHT Es dürfen erst Reparaturarbeiten durchgeführt werden wenn das Gerät aus geschaltet ist oder der Netzstecker nicht mehr mit der Stromquelle verbunden ist Einige Komponenten des Gerätes sind stromführend und können daher zu ernsthaften Verletzungen oder Stromschlägen führen AVISO No realice reparaciones con la máquina encendida o conectada a la corriente...

Страница 67: ...ti scosse e gravi ferite VORSICHT Es dürfen erst Reparaturarbeiten durchgeführt werden wenn das Gerät aus geschaltet ist oder der Netzstecker nicht mehr mit der Stromquelle verbunden ist Einige Komponenten des Gerätes sind stromführend und können daher zu ernsthaften Verletzungen oder Stromschlägen führen AVISO No realice reparaciones con la máquina encendida o conectada a la corriente Algunos com...

Страница 68: ...h c Remove the Feed Clutch 5 Remove the Registration Clutch Figure 1 a Disconnect CN1 on the Paper Feed PWB b Remove the E ring and Washer from the Registration Clutch c Remove the Registration Clutch Figure 1 Feed and Registration Clutches Paper Feed PWB Replacement Replacement is the reverse of the removal procedure REP 4 4 Transfer Roll Parts List on PL 4 1 Removal 1 Open the Front Cover Door N...

Страница 69: ...t is the reverse of the removal procedure REP 4 5 LSU and Cables Parts List on PL 4 1 Removal 1 Switch off the machine then disconnect the power cord 2 Remove the Top Cover REP 3 2 3 Disconnect two connectors on the LSU then release the harness from the LSU harness guide Figure 1 Figure 1 LSU Cable Connectors and Wire Harness Top View NOTE The Flat Cable may be adhered to the LSU Detach it from th...

Страница 70: ...ne then disconnect the power cord 2 Remove the Paper Cassette 3 Remove the Left and Right Side Covers REP 2 2 4 Remove the Rear Cover REP 2 3 NOTE The Rear Cover holds the Duplex Assembly Pivot in the frame cutout With the Rear Cover removed the assembly will come out of the pivot when the front latches are released 5 Press the two green tabs in the front of the printer to release the Duplex Assem...

Страница 71: ...igure 2 Duplex Assembly Pivots Rear View REP 4 7 Output Tray Full Sensor Parts List on PL 4 3 Removal 1 Switch off the machine then disconnect the power cord 2 Remove the Top Cover REP 3 2 NOTE Do not disconnect the connectors to the Main PWB The PWB only needs to be moved away from the frame to access the Output Tray Full Sensor NOTE Mark the location of the Ground Screw with larger head so it ca...

Страница 72: ... installing the Main PWB make sure the ground screw with large head is installed in the correct location REP 4 8 Exit Roll and Bushings Parts List on PL 4 3 Removal 1 Switch Off the Printer and unplug the Power Cord 2 Remove the Top Cover REP 3 2 3 Remove the Exit Roll and Bushings Figure 1 a Remove the Drive Gear b Release the latch rotate the bushing then remove the bushings c Remove the Exit Ro...

Страница 73: ...move the Feed and Registration Clutch Drive Gears Figure 1 Figure 1 Feed and Registration Clutch Drive Gears 8 Remove the feed and registration drive gears and bushings Figure 2 NOTE Make note of the order the feed and registration drive gears are removed for re installation a Remove the snap ring then remove the feed and registration drive gears b Remove two snap rings then remove then feed and r...

Страница 74: ...Feed and Reg Sensors PWB Cover Bottom View 10 Release the latch noting the location of the spring in the frame then release the Feed Sensor Actuator Figure 4 Figure 4 Feed Sensor Actuator Bottom View 11 On the bottom of the printer disconnect the drive motor connector then remove the ground screw Figure 5 Figure 5 Drive Motor Connector Screw Bottom View Screw Latch Feed Sensor Actuator Spring Latc...

Страница 75: ... contact guide b Disconnect four connectors remove six screws then remove the LVPS PWB Remove the insulation black pad behind the LVPS PWB c Disconnect seven connectors three FFCs remove five screws then remove the Main PWB Figure 6 PWB Removal 13 Remove two screws on the left frame Figure 7 two screws on the right frame Figure 8 then remove the LSU Assembly Figure 7 LSU Left Side Screws Figure 8 ...

Страница 76: ...e two screws on the wire harness guide the screw securing the high voltage con tact guide then remove the guides Figure 9 Figure 9 Wire Guides and HV Contact Guide 15 Remove two screws from the right frame securing the Exit Sensor Plate Figure 10 Figure 10 Exit Sensor Plate Screws Screws Screws ...

Страница 77: ...s securing the Pickup Frame Base then three screws securing the Middle Frame on the right side Figure 11 Figure 11 Right Frame Screws Removal 17 Remove three screws securing the Middle Frame and Pickup Frame Base on the left side Figure 12 Figure 12 Left Frame Screw Removal Frame Screws Exit Screws Screws ...

Страница 78: ...e Pivot Plate Collar the Registration Roll Pivot Gear Figure 13 then the Reg istration Roll Drive Gear Figure 14 Figure 13 Registration Roll Drive Pivot Gears 20 Remove the screw then remove the Registration Holder Figure 14 Figure 14 Registration Roll Drive Gear and Bushing Pivot Plate Collar Registration Roll Pivot Gear and Registration Drive Gear Screw Registration Drive Gear and Registration H...

Страница 79: ...the cor rect order 1 Align the left and right frames together with the paper path modules install but do not tighten the three Middle Frame screws on each side of the printer Refer to Figure 14 and Figure 15 in the removal procedure 2 Loosely install the three Middle Frame screws on each side of the printer Refer to Figure 14 and Figure 15 in the removal procedure 3 On the bottom of the printer in...

Страница 80: ...pport Arm Placement REP 4 10 Feed and Registration Sensors PWB and Actuators Parts List on PL 4 4 Removal 1 Switch off the machine then disconnect the power cord 2 Remove the Duplex Assembly REP 4 6 3 Set the printer on the Rear Cover Front of printer facing up 4 Remove two screws then remove the Bottom Bar Figure 1 Figure 1 Bottom Bar Bottom View Support Arm Screws ...

Страница 81: ...ation Sensor PWB Figure 3 Figure 3 Feed and Registration Sensors PWB Bottom View 7 Release the actuator from the latch then remove the Feed and Registration Sensor Actu ators Figure 4 Figure 4 Feed and Registration Sensors Actuators Bottom View Note the location of the Spring in the frame cutout for reinstallation Figure 5 Figure 5 Actuator Spring Cutouts Bottom View Screw Latch Latch Sensors PWB ...

Страница 82: ...re used to hold the cover to the frame Make sure that the plastic screws go into plastic components and machine screws go into the metal frame REP 4 11 Manual Paper Tray Parts List on PL 4 4 Removal 1 Switch Off the Printer and unplug the Power Cord 2 Remove the Top Cover REP 3 2 3 Remove two screws securing the bottom of the Manual Paper Tray Figure 1 Figure 1 Manual Paper Tray Bottom Screws Bott...

Страница 83: ...cement Replacement is the reverse of the removal procedure REP 4 12 Exit Sensor Parts List on PL 4 1 Removal 1 Switch off the machine then disconnect the power cord 2 Remove the Left and Right Side Covers REP 2 2 3 Remove the Rear Cover REP 2 3 4 Remove the Fuser REP 5 1 5 Release the latch on the underside of the frame to release the Exit Sensor Mounting Plate from the frame Figure 1 Figure 1 Exi...

Страница 84: ...placement Replacement is the reverse of the removal procedure REP 4 13 Paper Drive Roll Parts List on PL 4 5 Removal 1 Switch Off the Printer and unplug the Power Cord 2 Remove the Top Cover REP 3 2 3 Remove the Main Drive Unit REP 4 17 4 Remove the Feed and Registration Clutches REP 4 3 5 Remove the Feed and Registration Clutch Drive Gears Figure 1 Figure 1 Feed and Registration Clutch Drive Gear...

Страница 85: ...s 7 Remove two screws from the bottom of the Feed Assembly Figure 3 Figure 3 Feeder Assembly Bottom Screws Bottom View CAUTION The Brackets holding the Registration Pinch Rolls and Guide are Spring Loaded Maintain light pressure on the Brackets when removing them to avoid damaging or losing parts or personal injury 8 Remove two screws then remove the Registration Pinch Rolls and Paper Guide Brack ...

Страница 86: ...Figure 7 Drive Roll Replacement Replacement is the reverse of the removal procedure NOTE Tapered plastic screws and round machine screws are used to hold the cover to the frame Make sure that the plastic screws go into plastic components and machine screws go into the metal frame 1 Install the Drive Roll in the Feed Assembly lower half ensure the flat on the bushing aligns with the flat on the ass...

Страница 87: ...overs REP 2 2 4 Set the printer on the back front of the printer facing up 5 Remove two screws then remove the Bottom Bar Figure 1 Figure 1 Removing the Bottom Bar Bottom View 6 Remove two screws pull the right side of the Paper Feed Roll Assembly out then slide the Paper Feed Roll Assembly right and remove Figure 2 Figure 2 Paper Feed Roll Assembly removal Bottom View 7 Remove the Retard Rolls fr...

Страница 88: ...cing the Paper Feed Roll Assembly ensure the flat of the bushing is lined up with the flat on the assembly Figure 4 Figure 4 Bushing Flat Bottom View REP 4 15 Drive Motor Parts List on PL 4 6 Removal 1 Switch off the machine then disconnect the power cord 2 Remove the Top Cover REP 3 2 3 Remove the Bottom Bar and Duplex Assembly REP 4 6 4 Remove the Main Drive Unit REP 4 17 5 Remove the Feed and R...

Страница 89: ...ve two snap rings then remove two Feed and Registration Clutch Bushings c Remove two screws release the latch the remove the Exit Drive Gears Figure 2 Drive Gears and Bushings 8 Remove the following from the left frame Figure 3 a Release two latches then remove two Shaft Bushings b Remove two screws securing the LSU support c Remove five screws securing the Middle Frame and Pickup Frame Base Figur...

Страница 90: ...the PWB to the frame Make sure that the Plastic Screws go into plastic components and Machine Screws go into the metal frame 1 Install the new Drive Motor NOTE The Frame is flexible and can be bowed out if the screws are not tightened in the correct order Reinstall the Frame as follows so it seats flush against the printer internal modules 2 Align the Frame on to the internal modules and shafts NO...

Страница 91: ...ure 6 a Tighten three Front Paper Path Module screws installed in Step 3b b Tighten two ROS Support screws c Tighten three Rear Middle Frame screws d Tighten two Fuser Module Screws installed in Step 3a 6 Install the Drive Gears then the snap ring Figure 7 Figure 7 Feed and Registration Drive Gears 7 Install the remaining components in the reverse of removal NOTE When installing the Front Cover Su...

Страница 92: ... cord 2 Remove the Left Side Cover REP 2 2 3 Remove the Feed Clutch and Drive Gear Figure 1 a Remove the E ring and Washer from the Feeder Clutch b Remove the Feeder Clutch and Drive Gear Figure 1 Feed Clutch Removal 4 Remove the snap ring then remove the Idler Gear Figure 2 Figure 2 Feed Idler Gear Replacement Replacement is the reverse of the removal procedure Feed Clutch Feed Idler Gear ...

Страница 93: ...ve Unit move the Fuser Drive Locking Lever to the unlock position right then remove the Main Drive Unit Figure 1 Figure 1 Main Drive Unit Removal Replacement 1 Place the Front Cover Support Arm on the Stop Bracket Figure 2 Figure 2 Front Cover Support Arm Placement 2 Install the Main Drive Unit Figure 1 NOTE Make sure the two tabs on the locking lever are inside the frame cutouts before moving the...

Страница 94: ...e 3 Locking Lever Tab and Frame Cutout 4 Install the remaining components in the reverse of the removal procedure REP 4 18 Pick Up Assembly Parts List on PL 4 5 Removal 1 Remove two screws remove the one way pickup frame from the upper pickup guide then remove the bushing from the one way pickup frame Figure 1 Figure 1 One way pickup frame and bushing removal 2 Remove the pickup guide from the upp...

Страница 95: ...kup shaft removal 4 Remove the washer from the feed roller and the bushing from the pickup shaft Figure 4 Figure 4 Washer and bushing removal 5 Remove the width actuator and paper actuator from the upper pickup guide Figure 5 Figure 5 Actuator removal 6 Remove the actuator holder and TS spring from the width and paper actuators Figure 6 Figure 6 Actuator holder and TS spring removal ...

Страница 96: ...n daher zu ernsthaften Verletzungen oder Stromschlägen führen AVISO No realice reparaciones con la máquina encendida o conectada a la corriente Algunos componentes de la máquina contienen voltajes eléctricos peligrosos que pueden producir una descarga eléctrica y causar daños graves WARNING Do not handle the fuser components until they have cooled Some fuser components operate at hot temperatures ...

Страница 97: ...he Screw with the larger head for Fuser replacement 4 Remove four screws then remove the Fuser Module routing the harness through the frame Figure 2 Figure 2 Fuser Screws Rear View Replacement Replacement is the reverse of the removal procedure NOTE Tapered plastic screws and round machine screws are used to hold the fuser to the frame Make sure that the plastic screws go into plastic components a...

Страница 98: ...he two latches to open the Retard Roll Cover Figure 1 Figure 1 Retard Roll Cover Latches 3 Rotate the Retard Roll Holder up and remove it from the Paper Tray Figure 2 Figure 2 Retard Roll Holder Removal 4 Slide the left side of the Retard Roll out of the holder to remove it Figure 3 Figure 3 Retard Roll Removal Replacement Replacement is the reverse of the removal procedure Latches Retard Roll Hol...

Страница 99: ... Xerox B210 Service Manual REP 6 1 Initial Release Repairs Adjustments NOTE Make sure the two springs on the Retard Roll Holder are correctly positioned on the holes Figure 4 Figure 4 Springs Located in Holes Springs ...

Страница 100: ... PL 4 2 Duplex Assembly PL 4 2 Duplex Assembly 5 7 PL 4 3 Exit Frame PL 4 3 Exit Frame 5 8 PL 4 4 Paper Path PL 4 4 Paper Path 5 9 PL 4 5 Base Pick Up PL 4 5 Base Pick Up 5 10 PL 4 6 Left Main Frame PL 4 6 Left Main Frame 5 11 PL 4 7 Right Main Frame PL 4 7 Right Main Frame 5 12 PL 5 1 Fuser PL 5 1 Fuser 5 13 PL 5 2 Lower Fuser PL 5 2 Lower Fuser 5 14 PL 6 1 Paper Tray PL 6 1 Paper Tray 5 15 Part ...

Страница 101: ...July 2019 5 2 Xerox B210 Service Manual Initial Release Parts List ...

Страница 102: ...al PL 1 1 Parts List Initial Release PL 1 1 Main Overview Item Part Description 1 Fuser PL 5 1 2 Paper Tray PL 6 1 3 Top Cover PL 3 1 4 Rear Cover PL 2 1 5 Coupling B Lever 6 Frame 7 140N63856 Main PWB REP 1 1 8 140N63862 Wifi PWB REP 1 2 ...

Страница 103: ...eft Cover REP 2 2 2 Right Cover REP 2 2 3 002N03172 Rear Cover Assembly REP 3 2 4 002N03350 Front Cover Assembly REP 2 1 5 Rear Cover 6 Exit Paper Guide 7 Duplex Gate 8 Spring 9 Front Cover Latch Sensor 10 CRUM PWB 11 CRUM Contacts 12 Front Cover 13 Manual Feed Cover REP 2 4 14 Front Harness Cover 15 CRUM Harness ...

Страница 104: ...ial Release PL 3 1 Top Cover Item Part Description 1 Output Support 2 Top Cover 3 Antistatic Brush 4 Paper Stacker 5 Bin Full Sensor Actuator 6 Spring 7 Exit Cover 8 140N63723 Control Panel PWB REP 3 1 9 Key Holder 10 Holder 11 002N03351 Top Cover Assembly REP 3 2 ...

Страница 105: ...ch REP 4 3 6 Transfer Roll Holder 7 Bottom Bar 8 Feed Frame 9 Ground Clip 10 022N02309 Transfer Roll REP 4 4 11 Exit Gear 12 Feed Gear 13 Exit Idle Gear 14 Exit Gear 15 011N00581 Paper Feed PWB REP 4 3 16 Main Exit Frame 17 Paper Path Frame 18 Exit Sensor Frame 19 LSU Bracket Frame 20 Left Main Frame 21 Right Main Frame 22 062N00292 LSU REP 4 5 23 Duplex REP 4 6 24 130N01574 Exit Sensor 25 Registr...

Страница 106: ...ler 2 Washer 3 Idle Roll Shaft 4 Spring 5 Duplex Upper Guide 6 Duplex Paper Guide 7 Duplex Align Bracket 8 Ground Terminal 9 Roller Bushing 10 Rubber Feed Roller 11 Feed Shaft 12 Pulley 13 Exit Gear 14 Flat Rubber Belt 15 Feed Roller 16 Duplex Base Frame 17 Duplex Latch 18 Align Lever 19 022N02815 Duplex Assembly A4 Letter REP 4 6 ...

Страница 107: ...Exit Frame Item Part Description 1 130N01574 Output Tray Full Sensor REP 4 7 2 Harness 3 Bushing 4 Exit Frame 5 001N00546 Exit Roll REP 4 8 6 Decurler Roller 7 Exit Shaft 8 Rubber Exit Dup 9 Inner Exit Roller 10 Outer Exit Roller 11 Exit Roll Holder 12 Spring 13 Exit Frame Assembly ...

Страница 108: ...l REP 4 9 14 Pickup Frame Base 15 Middle Frame 16 Registration Holder 17 P SAW Plate 18 120N00545 Feed Sensor Actuator REP 4 10 19 120N00548 Registration Sensor Actuator REP 4 10 20 130N01759 Feed Sensor PWB REP 4 10 21 Spring 22 Registration Base Assembly 23 050N00681 Manual Paper Tray REP 4 11 24 Paper Guide Cover 25 Registration Idle Shaft 26 Registration Idle Roller 27 Manual Left Adjust 28 Ma...

Страница 109: ...ng 5 Sensor Actuator 6 Duplex Guide Lever 7 Pick Up Shaft 8 Pick Up Guide 9 022N02802 Paper Drive Roll REP 4 13 10 Bushing 11 130N01760 Paper Feed Roll Assembly REP 4 14 12 Feed Roll Holder 13 Idle Pick Up Gear 14 One Way Clutch 15 Retard Roller 16 Actuator Empty Holder REP 4 18 17 Spring TS REP 4 18 18 Actuator Width REP 4 18 19 Actuator Paper REP 4 18 20 Feed Sensor PWB REP 4 18 21 Washer ...

Страница 110: ...rive Motor REP 4 15 3 Fuser Drive Out Gear 4 Knock Up Left Guide 5 Left Developer Guide Plate 6 Left Frame 7 Shaft Bushing 8 007N01802 Paper Feed Idler Gear REP 4 16 9 Idler Gear 10 Band 11 Idler Gear 12 Fuser Locking Lever 13 Hub Clutch Gear 14 Feed Gear 15 Feed Gear 2 16 Cam Coupler 17 Coupling Lever 18 007N01842 Main Drive Unit REP 4 17 19 Harness Cover ...

Страница 111: ...al PL 4 7 Initial Release Parts List PL 4 7 Right Main Frame Item Part Description 1 Right Developer Guide Plate 2 CST Rear Guide 3 Lower Guide 4 Foot 5 Right Frame 6 Cable Clamp 7 LVPS Cover 8 Developer Right Guide 9 Spring 10 Ground Clip ...

Страница 112: ...t Drive 6 Left Lamp Cap 7 Fuser Gear Stopper 8 Fuser Rear 9 Fuser Joint Harness 10 Thermostat 11 Thermistor 12 Fuser Cover 13 Exit Roller 14 Spring 15 Guide 16 Spring 17 Exit Roller 18 Exit Shaft 19 Exit Gear 20 Bushing 21 Rear Guide 22 Exit Idle Roller 23 Spring 24 Actuator Holder 25 Exit Sensor Actuator 26 126N00430 Fuser Module 110V REP 5 1 126N00431 Fuser Module 220V REP 5 1 ...

Страница 113: ... Release Parts List PL 5 2 Lower Fuser Item Part Description 1 Fuser Frame 2 Heat Roller 3 Left Bushing 4 Right Bushing 5 Gear 6 Roller 7 Spring 8 Bushing 9 Left Jam Lever Link 10 Antistatic Brush 11 Jam Lever 12 Right Jam Lever Link 13 Lower Fuser Assembly ...

Страница 114: ...ft Plate 2 Pad 3 Spring 4 Pinion Gear 5 Retard Roll Cover 6 050N00683 Retard Roll Assembly REP 6 1 7 Left Paper Guide 8 Left Plate 9 Spring 10 Paper Tray Latch 11 Spring 12 Right Paper Guide 13 Paper Tray Handle 14 Paper Tray Rear Guide 15 Paper Tray Frame 16 Paper Tray Handle 17 Paper Indicator 18 050N00700 Paper Tray ...

Страница 115: ...PL 4 1 022N02309 PL 4 1 022N02797 PL 4 4 022N02802 PL 4 5 022N02815 PL 4 2 050N00681 PL 4 4 050N00683 PL 6 1 050N00700 PL 6 1 062N00292 PL 4 1 105N02301 PL 4 1 105N02350 PL 4 1 105N02351 PL 4 1 117N01969 PL 4 1 120N00545 PL 4 4 120N00548 PL 4 4 121N01248 PL 4 1 121N01269 PL 4 1 126N00430 PL 5 1 126N00431 PL 5 1 127N07919 PL 4 6 130N01574 PL 4 5 130N01574 PL 4 1 130N01574 PL 4 3 130N01759 PL 4 4 13...

Страница 116: ...July 2019 5 17 Xerox B210 Service Manual Part Number Index Parts List Initial Release ...

Страница 117: ...July 2019 5 18 Xerox B210 Service Manual Part Number Index Parts List Initial Release ...

Страница 118: ...July 2019 5 19 Xerox B210 Service Manual Part Number Index Initial Release Parts List ...

Страница 119: ...July 2019 5 20 Xerox B210 Service Manual Part Number Index Initial Release Parts List ...

Страница 120: ...ecifications 6 7 General Procedures GP 1 Diagnostics Entry and Exit 6 9 GP 2 Machine Reports 6 9 GP 3 Machine Firmware Version 6 10 GP 4 Machine Settings 6 10 GP 5 Altitude Adjustment 6 11 GP 6 Firmware Upgrade 6 12 GP 7 Usage of the Electrostatic Discharge ESD Field Service Kit 6 12 GP 8 Memory Clear 6 13 GP 9 USB Serial Number Writing Tool 6 13 Change Tags Tags MODs 6 15 ...

Страница 121: ...July 2019 6 2 Xerox B210 Service Manual Initial Release General Procedures Information ...

Страница 122: ...utput resolution of up to 1200 x 1200 dpi System Overview This section provides illustrations of the following systems Paper Path Paper Path System Layout System Layout Print Process Print Process Laser Scanner Unit LSU Laser Scanner Unit LSU Drives Drives Toner System Toner System Some features and options may not be available depending on machine configuration Refer Refer to the Xerox B210 User ...

Страница 123: ... Release General Procedures Information Paper Path The following diagrams display the path that the paper follows during the printing process Figure 1 Paper Path System Layout The figures below illustrates the mechanical parts of the printer Figure 2 System Layout ...

Страница 124: ...Figure 3 presents a general layout of the fusing and printing components used in the print pro cess Figure 3 Print Process Laser Scanner Unit LSU The Scanner Unit receives image data from the HVPS PWB and scans the surface of the pho toreceptor drum OPC with a laser to create a latent image Figure 4 Laser Scanner Unit ...

Страница 125: ...sists of the Main BLDC Motor Registration and Pick up Clutches along with various gears for the Drum Cartridge OPC Fuser Pick up Registration Feed and Exit Rollers Figure 5 Drive Gears and Clutches Toner System The printer uses a separated toner system comprised of a Toner Cartridge and Imaging Unit Figure 6 Separated Toner System ...

Страница 126: ...2 R2 2016 2019 Linux Red Hat Enterprise Linux 5 6 7 Fedora 15 16 17 18 19 20 21 22 23 24 25 26 openSUSE 11 2 11 4 12 1 12 2 12 3 13 1 13 2 14 1 15 2 Ubuntu 11 10 12 04 12 10 13 04 13 10 14 04 14 10 15 04 15 10 16 04 16 10 17 04 17 10 18 04 18 10 SUSE Linux Enterprise Desktop 10 11 12 Linux Mint 15 16 17 1 Debian 6 7 8 9 Mac OS Mac OS 10 9 thru 1014 Fonts PCL 95 Scalable Fonts Include OCR A OCR B 1...

Страница 127: ...r Cartridge DMO 106R04348 CRU 2 Pk 106R04349 CRU 3k images 3k images ea 6k images total Drum Cartridge Imaging Unit 101R00664 CRU 10k images Table 6 Reliability and Service Item Specification Printing Volume SET AMPV 250 400 pages Maximum Monthly Duty 12 000 pages MPBF 30 000 pages MTTR 30 minutes SET Life Cycle 100 000 pages or 5 years whichever comes first Table 4 Paper Handling Specifications I...

Страница 128: ...t a Supplies Usage and Billing Counters Report From the Control Panel press and hold the red Cancel button for 4 8 seconds until Status LED fast blink stops then release the button From CentreWare Internet Services CWIS 1 Connect to the printer to the Ethernet or WiFi connection for network access 2 Open Easy Print Manager and select Advanced Settings Device Settings Link to Program OR type the ma...

Страница 129: ...talled GP 4 Machine Settings Purpose This procedure is used to provide information on how to configure machine settings Procedure To change settings using the CentreWare Internet Services CWIS 1 Connect to the Xerox B210 to an Ethernet or WiFi connection 2 Open Easy Print Manager and select Advanced Settings Device Settings Link to Program OR Type the machine IP address in a browser address line t...

Страница 130: ...Upgrade Upgrade Management GP 5 Altitude Adjustment Purpose Print quality is affected by atmospheric pressure which is determined by the height of the machine above sea level Requirements USB cable connection Procedure 1 Determine altitude of machine placement Figure 1 Altitude values 2 Connect the printer using the USB cable 3 Open Easy Printer Manager Select Device Settings System Altitude Adjus...

Страница 131: ...e sure that the Firmware upgrade was successful 10 The CWIS under General Setup Configuration Printer Setup The line System Software Version should reflect the latest software just installed GP 7 Usage of the Electrostatic Discharge ESD Field Service Kit Purpose The purpose of the Electrostatic Discharge ESD Field Service Kit is to preserve the inherent reliability and quality of sensitive electro...

Страница 132: ...et so that they may change if desired NOTE A Memory Clear is the only way to reset the SA Password GP 9 USB Serial Number Writing Tool Purpose Use this procedure access and download the USB Serial Number Writing Tool Procedure 1 To access the USB Serial Number Writing Tool file go to GSN Library 7387 https www xrxgsn com secure main pl catid 13991 Click the Service Software Tools link to download ...

Страница 133: ...July 2019 6 14 Xerox B210 Service Manual GP 8 GP 9 Initial Release General Procedures Information ...

Страница 134: ...actory built machines with the modification installed Name indicates the name of the retrofit Purpose provides a brief description of the modification Kit Number identifies the part number of the kit or part required to install the modification Parts List On identifies the Part List location of the modification part Reference Indicates all other Tag MOD numbers that are related to this product con...

Страница 135: ...July 2019 6 16 Xerox B210 Service Manual Tags Initial Release General Procedures Information ...

Страница 136: ...July 2019 7 1 Xerox B210 Service Manual BSD Initial Release 7 BSD BSD Block Schematic Diagrams 7 3 BSD 1 7 4 BSD 2 7 5 ...

Страница 137: ...July 2019 7 2 Xerox B210 Service Manual Initial Release BSD ...

Страница 138: ... for the Xerox WorkCentre B210 Printers These block schematic diagrams are supplemental to the diagnostic and troubleshooting infor mation found in the Xerox WorkCentre B210 Service Manual Every effort has been made to achieve accuracy on these schematics However if a difference is noted between these schematics and the Xerox service documentation the service docu mentation takes precedence ...

Страница 139: ...July 2019 7 4 Xerox B210 Service Manual Initial Release BSD BSD 1 1 1 Main Power Electrical Drive Fuser Networking LSU CRUM Figure 1 BSD 1 1 Main ADF Power Electrical Drive Fuser Networking LSU CRUM ...

Страница 140: ...July 2019 7 5 Xerox B210 Service Manual BSD Initial Release BSD 2 2 1 Printer OPE Figure 1 BSD 2 1 Printer OPE ...

Страница 141: ...July 2019 7 6 Xerox B210 Service Manual Initial Release BSD ...

Страница 142: ... 2014 Xerox Corporation All rights reserved Xerox and the sphere of connectivity design are trademarks of Xerox Corporation in the US and or other countries ...

Отзывы: