background image


81


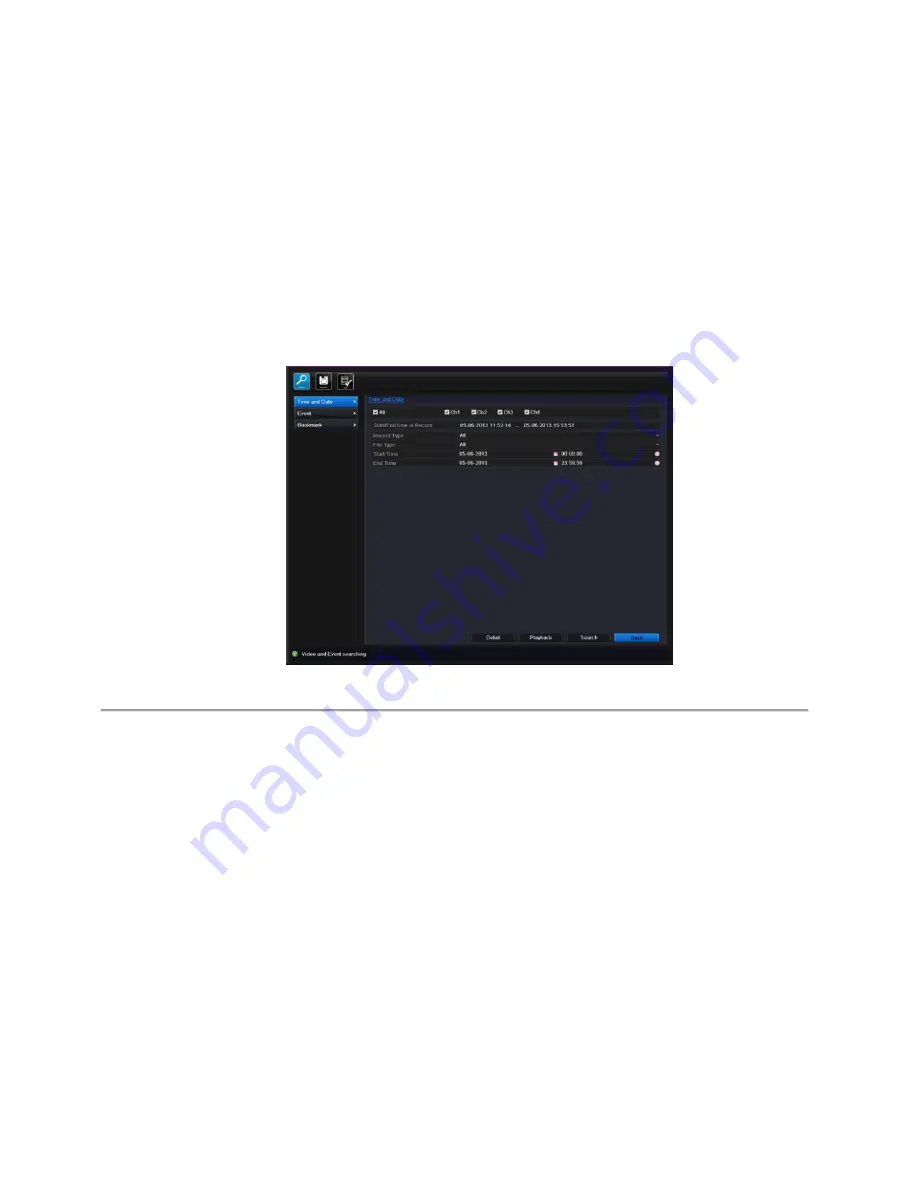
7.1.2 Playing Back by Time


Purpose: 

Play back video files recorded in specified time duration. Multi-channel simultaneous playback and channel switch are 
supported. 

Steps: 

1. 

Enter playback interface. 
Search>Search>Time and Date 

2. 

Set search conditions and click the 

Playback

 button to enter Playback interface. 


Figure 7.6 Video Search by Time and Date 


In the Playback interface: 

The toolbar in the bottom part of Playback interface can be used to control playing process. 

Содержание XDR5K4

Страница 1: ...Xeno XDR5K4 real time DVRs SET UP AND USER MANUAL...

Страница 2: ...Xeno XDR5 DVR manual V1 0...

Страница 3: ...oduct refer to this document and any other documentation provided If you still have questions please contact Norbain Technical Support and Sales Norbain Ltd 210 Wharfedale Road IQ Winnersh Wokingham B...

Страница 4: ...manufacturer declares that the product supplied with this document is compliant the provisions of the EMC CE RoHS2 2011 65 EU This symbol indicates electrical warnings and cautions This symbol indicat...

Страница 5: ...label If you are not sure of the type of power supplied at the installation location contact your dealer For equipment designed to operate from battery power refer to the operating instructions 8 GROU...

Страница 6: ...ibits a distinct change in performance 14 REPLACEMENT PARTS When replacement parts are required be sure the service technician uses replacement parts specified by the manufacturer or that have the sam...

Страница 7: ...7 CE COMPLIANCE STATEMENT WARNING This is a Class A product In a domestic environment this product may cause radio interference in which case the user may be required to take adequate measures...

Страница 8: ...ck set menu is provided for live view Camera viewing access is controlled via users rights Motion detection tamper proof video exception alert and video loss alert functions Privacy mask Multiple PTZ...

Страница 9: ...ull etc Alarm triggers full screen monitoring audio alarm notifying client host sending email and relay output Automatic restore when system is abnormal Other Local Functions Operation via front panel...

Страница 10: ...nd exception information can be sent to the remote host Remotely enable disable recording Remote PTZ control Two way audio Embedded WEB server Development Scalability SDK for Windows and Linux system...

Страница 11: ...nt Panel 24 2 2 USB Mouse Operation 25 2 3 Input Method Description 26 2 4 Rear Panel 27 C H A P T E R 3 30 Getting Started 30 3 1 Using the Wizard for Basic Configuration 31 C H A P T E R 4 35 Live V...

Страница 12: ...Parameters 57 6 2 Configuring Record Schedule 60 6 3 Configuring Holiday Record 63 6 4 Configuring Motion Detection Record 65 6 5 Configuring Redundant Record 70 6 6 Configuring HDD Group for Recordi...

Страница 13: ...on 117 9 2 Detecting Video Loss 120 9 3 Detecting Camera Tampering 122 9 4 Handling Exceptions 124 9 5 Setting Alarm Response Actions 125 C H A P T E R 10 126 Network Settings 126 10 1 Configuring Gen...

Страница 14: ...ral Settings 150 11 1 2 Configuring Advanced Settings 151 11 1 3 Importing Exporting Configuration Files 151 11 1 4 Restoring Default Settings 153 11 1 5 Logging out Shutting down Rebooting Device 154...

Страница 15: ...Viewing System Information 176 11 5 1 Viewing Device Information 176 11 5 2 Viewing Camera Information 176 11 5 3 Viewing Record Information 177 11 5 4 Viewing Network Information 177 11 5 5 Viewing...

Страница 16: ...16 C H A P T E R 1 Installation...

Страница 17: ...ifications 4 Install a manufacturer recommended HDD DVR Installation During the installation of the DVR 1 Use brackets for rack mounting 2 Ensure there is ample room for audio and video cables 3 When...

Страница 18: ...DD should be used for this installation Tools Required Screwdriver Steps 1 Remove the cover from the DVR by unfastening the screws on the back and side 2 Install the HDD in the HDD rack using the prov...

Страница 19: ...19 4 Connect the power cable to the HDD 5 Re install the cover of the DVR and fasten screws...

Страница 20: ...tight Note Make sure the pan tilt receiver unit is connected to the D and D of the RS 485 terminal of DVR 1 4 HDD Storage Calculation Chart The following chart shows an estimation of storage space use...

Страница 21: ...536K 675M 1792K 787M 2048K 900M Note Please note that supplied values for storage space used is just for reference Storage space used is estimated by formulas and may have some deviation from actual v...

Страница 22: ...22 1 5 Menu Structure The menu structure of the DVR is shown as below Main Menu Search Menu...

Страница 23: ...23 C H A P T E R 2 Introduction...

Страница 24: ...Name Function Description 1 POWER POWER indicator turns green when DVR is powered up 2 STATUS STATUS indicator lights in red when HDD is reading writing 3 Tx Rx Tx Rx indictor blinks green when netwo...

Страница 25: ...n of the mouse Table 2 1 Description of the Mouse Control Name Action Description Left Click Single Click Live view Select channel and show the quick set menu Menu Select and enter Double Click Live v...

Страница 26: ...2 2 Soft Keyboard Description of the buttons on the soft keyboard Table 2 2 Description of the Soft Keyboard Icons Icons Description Icons Description English Capital English Numbers Symbols Lowercas...

Страница 27: ...HDMI video output 5 VGA DB15 connector for VGA output Display local video output and menu 6 AUDIO IN RCA connector for audio input 7 AUDIO OUT RCA connector for audio output 8 LAN Interface Connector...

Страница 28: ...ll day recording Starting up the DVR Steps 1 Check the power supply is plugged into an electrical outlet It is HIGHLY recommended that an Uninterruptible Power Supply UPS be used in conjunction with t...

Страница 29: ...29 In the Shutdown menu you can also reboot the DVR Steps 1 Enter the Shutdown menu by clicking Menu System Basic Shutdown 2 Click the Reboot button to reboot the DVR...

Страница 30: ...30 C H A P T E R 3 Getting Started...

Страница 31: ...If you don t want to use the Setup Wizard at that moment click the Cancel button You can also choose to use the Setup Wizard next time by leaving the Start wizard when DVR starts checkbox checked 2 Cl...

Страница 32: ...n Figure 3 3 Figure 3 3 Date and Time Settings 6 After the time settings click Next button which takes you back to the Network Setup Wizard window as shown in Figure 3 4 Figure 3 4 Network Configurati...

Страница 33: ...o initialise the HDD click the Init button Initialisation removes all the data saved in the HDD 9 Click Next button to enter the Record Settings window Figure 3 6 Record Settings 10 Click Copy to copy...

Страница 34: ...34 Figure 3 7 Copy Record Settings 11 Click OK to complete the startup Setup Wizard...

Страница 35: ...35 C H A P T E R 4 Live View...

Страница 36: ...to the Live View mode Live View Icons In the live view mode there are icons at the right top of the screen for each channel showing the status of the record and alarm in the channel so that you can kn...

Страница 37: ...day Log Off log out current user whom already logged in Alarm Cancel Panic Cancel the latest active alarm start panic recording if there isn t any alarm active Note It is recommended that either the H...

Страница 38: ...lected from a dropdown list Multi screen Switch between different display layout options Layout options can be selected from a dropdown list Previous When displaying less than the maximum number of ca...

Страница 39: ...period of a day for configuring independent image parameters so as to satisfy different light conditions e g daylight and night time Two periods can be configured When you have configured Period 1 the...

Страница 40: ...el and 0 5 for the denoising level 4 Copy image parameters 1 If you want to copy the image parameters of the current camera to other camera s click the Copy button to enter the Copy to interface Figur...

Страница 41: ...ons e g daylight and night time Two periods can be configured When you have configured Period 1 the Period 2 is remained as the Other Time 4 Select the mode from the dropdown list of Mode Four modes a...

Страница 42: ...configured and the size of each area can be adjusted 5 The configured privacy mask zones on the window can be cleared by clicking the corresponding Clear Zone1 4 icons on the right side of the window...

Страница 43: ...mera Name in the text field 4 Configure the Display Name Display Date and Display Week by clicking the checkbox 5 Select the Date Format Time Format and Display Mode Figure 4 9 OSD Configuration Inter...

Страница 44: ...the camera s to be configured with the same OSD settings You can also click the checkbox of Analog to select all cameras 3 Click the OK to finish the Copy settings and back to the OSD Configuration i...

Страница 45: ...menu include Main Video Monitor Designates the output to configure the settings for Two output interfaces are selectable VGA HDMI and Main CVBS Display on Power Up Designates the display mode to be us...

Страница 46: ...To set the Screen Views 1 Select Screen Views 2 Click the up and down button at each screen to select the channel you would like to display Setting an X means the channel will not be displayed 3 Click...

Страница 47: ...Steps 1 Enter the PTZ Settings interface Menu System Communications Figure 5 1 Communications General 2 Choose the camera for PTZ setting in the Camera dropdown list 3 Enter the parameters of the PTZ...

Страница 48: ...s place Steps 1 Enter the PTZ Control interface Menu System Communications PTZ More Figure 5 2 Communications More Settings 2 Use the directional button to wheel the camera to the location where you w...

Страница 49: ...eps 1 Enter the PTZ Control interface Menu System Communications PTZ More 2 Check the round icon before Call Preset Figure 5 4 Communications Call Preset 3 Choose the preset number Call preset in live...

Страница 50: ...nder Tour option box to add key points for the tour Figure 5 6 PTZ Toolbar 4 Configure key point parameters such as the key point No duration of staying for one key point and speed of tour The key poi...

Страница 51: ...to move according the predefined tour path Calling patrol in the PTZ setting interface Steps 1 In the PTZ setting interface Menu System Communications PTZ More 2 Select the tour number and then click...

Страница 52: ...rol bar 3 Click the Tour you want to call Figure 5 10 PTZ Toolbar Tour 5 2 5 Customizing Learns Purpose Learns can be set by recording the movement of the PTZ You can call the learn to make the PTZ mo...

Страница 53: ...ccording to the predefined learns Calling learns in the PTZ setting interface Steps 1 Enter the PTZ Control interface 2 Click then the PTZ moves according to the learn Click to stop it Figure 5 11 PTZ...

Страница 54: ...54 Figure 5 12 PTZ Toolbar Learn...

Страница 55: ...ure 5 13 PTZ Toolbar Table 5 1 Description of the PTZ toolbar icons Icon Description Icon Description Icon Description Direction button and the auto cycle button Zoom Focus Iris Zoom Focus Iris The sp...

Страница 56: ...56 C H A P T E R 6 Record Settings...

Страница 57: ...d initialize it Menu System Disk Advanced Figure 6 1 Disk Advanced 2 Check the storage mode of the HDD 1 Click General to check the storage mode of the Disk 2 If the Disk mode is Quota please set the...

Страница 58: ...r the main stream settings interface 2 Select the camera for configuration 3 Configure the following parameters for the Main Stream_Normal TL and the Main Stream_Event Stream Type Set the stream type...

Страница 59: ...then the file will not be deleted The actual keeping time for the file should be determined by the capacity of the HDD Redundant Record Enabling redundant record means you save the record files in the...

Страница 60: ...rameters 4 If you want to copy the current sub stream settings to other camera s click Copy to enter the Copy Camera interface Select the camera s and click OK to finish the copy settings 6 2 Configur...

Страница 61: ...the day to which you want to set schedule 3 To schedule an all day recording check the checkbox after the All Day item Figure 6 7 Edit Schedule 4 To arrange other schedule leave the All Day checkbox u...

Страница 62: ...ording types are available for different models 2 Use the mouse to drag and draw time periods Note Up to 8 periods can be configured for each day 3 You can repeat the above steps to set schedule for o...

Страница 63: ...on holiday for that year You may want to have different plans for recording on holiday Steps 1 Enter the Record setting interface Menu Recording Schedule Holiday Figure 6 10 Holiday Settings 2 Enable...

Страница 64: ...wn list Figure 6 12 Edit Schedule Holiday 4 Select Motion or Normal TL from the Type dropdown list 5 If you need all day recording check the All Day checkbox Otherwise leave it blank 6 Set start end t...

Страница 65: ...ng or trigger full screen monitoring audio warning notify the surveillance center and so on Steps 1 Enter the Motion Detection interface Menu Event Motion Settings Figure 6 13 Motion Detection 2 Confi...

Страница 66: ...p up Figure 6 15 Motion Detection Handling 5 Select the channels which you want the motion detection event to trigger recording 6 Click Apply to save the settings 7 Click OK to back to the upper level...

Страница 67: ...nable Schedule item 2 Click Edit Figure 6 17 Edit Schedule Motion Detection 3 In the message box you can choose the day to which you want to set schedule 4 Set the Type as Motion 5 To schedule an all...

Страница 68: ...each other Repeat the above steps3 6 to schedule motion detection triggered recording capture for all the week If the schedule can also be set to other days click Copy Figure 6 19 Copy Schedule to Oth...

Страница 69: ...69 Figure 6 20 Copy Schedule to Other Channels...

Страница 70: ...Note You must set the Storage mode in the HDD general settings to Group before you set the HDD property to Redundant For detailed information please refer to Chapter 11 2 3 Managing HDD Group There s...

Страница 71: ...evel menu 3 Enter the Record setting interface Menu Recording Video 1 Select Video Figure 6 23 Video Encoding Parameters 2 Select Camera you want to configure 3 Check the checkbox of the Redundant Rec...

Страница 72: ...g interface 4 Configuring HDD group 1 Choose a group number for the HDD group 2 Click Apply and then in the pop up message box click Yes to save your settings 3 Click OK to back to the upper level men...

Страница 73: ...files from being overwritten Protect file by locking the record files Steps 1 Enter search interface Search Time and Date Figure 6 25 Search Time and Date 2 Select the channels you want to investigat...

Страница 74: ...ord files which the recording is not completed can t be locked 2 Click to change it to to unlock the file and the file is not protected Figure 6 27 Unlocking Attention Protect file by setting HDD prop...

Страница 75: ...te You can t save any files in a Read only HDD If you want to save files in the HDD change the property to R W Note If there is only one HDD and is set to Read only the DVR can t record any files Only...

Страница 76: ...76 C H A P T E R 7 Playback...

Страница 77: ...Steps Choose a channel in live view mode using the mouse and click the button in the quick setting toolbar Note Only record files recorded during the last few minutes on this channel will be played b...

Страница 78: ...control playing progress as shown in Figure 7 3 Figure 7 3 All day Playback Interface The channel and time selection menu displays by moving the mouse to the right of the playback interface Click the...

Страница 79: ...ated Figure 7 5 Toolbar of All day Playback Table 7 1 Detailed Explanation of All day playback Toolbar Button Operation Button Operation Button Operation Button Operation Audio on Mute Start Stop clip...

Страница 80: ...progress bar use the mouse to click any point of the progress bar or drag the progress bar to locate special frames 2 About video type bar represents normal recording manual or schedule represents eve...

Страница 81: ...nd channel switch are supported Steps 1 Enter playback interface Search Search Time and Date 2 Set search conditions and click the Playback button to enter Playback interface Figure 7 6 Video Search b...

Страница 82: ...ookmark Add customized bookmark Bookmark management Speed down Pause reverse play Reverse play Single frame reverse play Pause play Play Single frame play Stop Speed up Video search Exit Hide Progress...

Страница 83: ...Normal TL Motion Steps 1 Enter Record File Search interface Search Search Time and Date Set search condition and press Search button to enter the Search Result interface Figure 7 9 Normal Video Searc...

Страница 84: ...hosen to search record files in step 1 And the channel with the recorded file selected in step 2 is the main channel during multi channel playback and it is displayed at the upper left corner Figure 7...

Страница 85: ...right of the playback interface Figure 7 13 4 ch Synchronous Playback Interface with Video List Figure 7 14 Toolbar of Normal Playback Table 7 3 Detailed Explanation of Normal Playback Toolbar Button...

Страница 86: ...special frames 2 About video type bar represents normal recording manual or schedule represents event recording represents smart search recording 7 1 4 Playing Back by Event Search Purpose Play back...

Страница 87: ...ck Details button to view detailed information of the record file e g start time end time file size etc Figure 7 17 Event Details Interface 6 Playback interface The toolbar in the bottom part of Playb...

Страница 88: ...played by moving the mouse to the right of the playback interface Figure 7 19 Playback Interface with Motion List Figure 7 20 Toolbar of Playback by Event Table 7 4 Detailed Explanation of Playback by...

Страница 89: ...click any point of the progress bar or drag the progress bar to locate special frames 2 About video type bar represents normal recording manual or schedule represents event recording represents smart...

Страница 90: ...Bookmark management Press button to check edit and delete bookmark s Figure 7 22 Bookmark Management Interface Steps 1 Enter Playback interface Search Search Bookmark Choose channels bookmark type and...

Страница 91: ...ile you want to play back it can be edited or deleted Pre play and post play time can be set according to actual needs Note Pre play time and post play time is added to the time point of the bookmark...

Страница 92: ...Playback by Bookmark The hidden list of tags will be displayed by moving the mouse to the right of the playback interface Figure 7 26 Interface of Playback by Bookmark with Video List Figure 7 27 Tool...

Страница 93: ...d up Previous tag Next tag Tag search Exit Hide Progress bar Video type bar Note 1 Playback progress bar use the mouse to click any point of the progress bar or drag the progress bar to locate special...

Страница 94: ...to enter Playback interface Note If there is no record file at the time point of the log the message box no related record file will pop up Figure 7 29 Result of System Log Search 3 Playback interface...

Страница 95: ...95 Figure 7 30 Interface of Playback by Log...

Страница 96: ...one frame It is also feasible to use button in toolbar 7 2 2 Smart Search Purpose In order to locate motion detection event easily and accurately when playing back you are allowed to analyze a certain...

Страница 97: ...button to execute smart search in this area Note Multi area and full screen searching modes are supported Figure 7 33 Draw Area of Smart Search Results of intelligent analysis Video type bar Normal re...

Страница 98: ...tag Tag management Slow down Pause reverse play Reverse play Single frame reverse play Pause play Play Single frame play Stop Speed up Previous smart search result Next smart search result Video searc...

Страница 99: ...he image within it will be enlarged for up to 16 times Figure 7 36 Draw Area for Digital Zoom Figure 7 37 Right click Menu when Playback The Right click menu Note This menu differs slightly from one p...

Страница 100: ...100 Smart search for motion against a specified area Show hide control interface Return to Playback interface...

Страница 101: ...101 C H A P T E R 8 Archive...

Страница 102: ...x 24 hours are allowed for quick export will pop up 2 The recommended number of channels for synchronous export less than or equal than 4 Otherwise the message box Note If you archive more than 4 came...

Страница 103: ...2 Archiving by Normal Video Search Purpose The record files can be backup to various devices such as USB devices USB flash drives USB HDDs USB writer Archive using USB flash drives and USB HDDs Steps...

Страница 104: ...before the record files you want to archive Note The size of the currently selected files is displayed in the lower left corner of the window Figure 8 5 Result of Normal Video Search for Backup 4 Exp...

Страница 105: ...Drive Stay in the Exporting interface until all record files are exported with pop up message box Export finished Figure 8 7 Export Finished Archive using USB writer and SATA writer Steps 1 Enter Expo...

Страница 106: ...the record files you want to archive Note The size of the currently selected files is displayed in the lower left corner of the window Figure 8 9 Result of Normal Video Search for Backup 4 Export Clic...

Страница 107: ...ort Finished 8 1 3 Archiving by Event Search Purpose Archive event related record files using USB devices USB flash drives USB HDDs USB writer Quick Export and Normal Archive are supported Steps 1 Ent...

Страница 108: ...ort interface 2 Pressing Quick Export button will export record files of all channels triggered by motion detection Figure 8 13 Result of Event Search 3 Click the Details button to view detailed infor...

Страница 109: ...vice is not recognized Click the Refresh button Reconnect device Check for compatibility from vendor You can also format USB flash drive or USB HDDs via the device Figure 8 15 Export by Event Using US...

Страница 110: ...se refer to Chapter 7 2 During playback use buttons and in the playback toolbar to start or stop clipping record file s 3 Quit Playback interface after finishing clipping and you will then be prompted...

Страница 111: ...Reconnect device Check for compatibility from vendor You can also format USB flash drive or USB HDDs via the device Figure 8 19 Export Video Clips Using USB Flash Drive Stay in the Exporting interface...

Страница 112: ...t one channel shall be selected Figure 8 21 Normal Video Search for Backup 2 Select record files you want to back up Click Export button to enter Export interface Note At least one record file shall b...

Страница 113: ...ice Note If the inserted USB device is not recognized Click the Refresh button Reconnect device Check for compatibility from vendor Figure 8 23 USB Flash Drive Management Management of USB writers and...

Страница 114: ...ted Figure 8 25 Result of Normal Video Search for Backup 3 Backup device management Click Erase button if you want to erase the files from a re writable CD DVD Note There must be a re writable CD DVD...

Страница 115: ...115 Check for compatibility from vendor Figure 8 26 USB Writer Management...

Страница 116: ...116 C H A P T E R 9 Event Settings...

Страница 117: ...vent Motion Settings Figure 9 1 Motion Detection Setup Interface 2 Set up detection area and sensitivity Tick Enable Motion Detection use the mouse to draw detection area s and drag the sensitivity ba...

Страница 118: ...g schedule Choose one day of a week and up to eight time periods can be set within each day Click Apply to save the arming settings of the selected day Repeat the above steps to set up arming schedule...

Страница 119: ...to complete the motion detection settings of the channel 7 If you want to set up motion detection for another channel repeat the above steps or just copy the above settings to it Note You are not allo...

Страница 120: ...ter Video Loss and select a channel you want to detect Menu Event Video Loss Figure 9 7 Video Loss Setup Interface 2 Set up handling method of video loss Check the checkbox of Enable Video Loss Alarm...

Страница 121: ...a week You can also use Copy button to copy an arming schedule to other days Note Time periods shall not be repeated or overlapped Figure 9 9 Set Arming Schedule of Video Loss 4 Click Handling tab to...

Страница 122: ...etect video tampering Menu Event Camera Tamper Figure 9 11 Tamper proof Setup Interface 2 Set up the camera tampering handling method of the channel Check the checkbox of Enable Tamper Drag the sensit...

Страница 123: ...up arming schedule of other days of a week You can also use Copy button to copy an arming schedule to other days Note Time periods shall not be repeated or overlapped Figure 9 13 Set Arming Schedule o...

Страница 124: ...ble IP Conflicted Duplicated IP address Illegal Login Incorrect user ID or password Input Output Video Standard Mismatch I O video standards do not match Abnormal Recording of Video No space for savin...

Страница 125: ...View Event Sequence Dwell Time Auto switch will terminate once the alarm stops and you will be taken back to the Live View interface Note You must select during Trigger Channel settings the channel s...

Страница 126: ...126 C H A P T E R 10 Network Settings...

Страница 127: ...ce 2 Select the IP Settings tab 3 In the IP Settings interface you can configure the following settings NIC Type IPv4 Address IPv4 Gateway MTU and DNS Server If the DHCP server is available you can cl...

Страница 128: ...se DDNS Steps 1 Enter the Network Settings interface Menu Network Network Settings 2 Select the DDNS tab to enter the DDNS Settings interface as shown in Figure 10 2 Figure 10 2 DDNS Settings Interfac...

Страница 129: ...embers dyndns org 2 In the Device Domain Name text field enter the domain obtained from the DynDNS website 3 Enter the User Name and Password registered in the DynDNS website Figure 10 4 DynDNS Settin...

Страница 130: ...obtained from the NO IP website www no ip com 3 Enter the User Name and Password registered in the NO IP website Figure 10 6 NO IP Settings Interface vistaDDNS You need to enter the Server Address and...

Страница 131: ...it will replace the old one registered on the server Figure 10 7 vistaDDNS Settings Interface 5 Click the Apply button to save and exit the interface 10 2 2 Configuring NTP Server Purpose A Network Ti...

Страница 132: ...ional Time Center IP Address 210 72 145 44 If the DVR is setup in a customized network NTP software can be used to establish a NTP server used for time synchronization 10 2 3 Configuring Email Purpose...

Страница 133: ...wing Email settings Enable Server Authentication optional Check the checkbox to enable the server authentication feature User Name The user account of sender s Email for SMTP server authentication Pas...

Страница 134: ...if you want to send email with attached alarm images Interval The interval refers to the time between two actions of sending attached pictures 6 Click the Apply button to save the Email settings 7 You...

Страница 135: ...Settings 5 Click the Apply button to save and exit the interface Note Before setting the SNMP please download the SNMP software and manage to receive the device information via SNMP port By setting th...

Страница 136: ...etwork Settings 2 Select the PPPoE tab to enter the PPPoE Settings interface as shown in Figure 10 14 Figure 10 14 PPPoE Settings Interface 3 Check the PPPoE checkbox to enable this feature 4 Enter Us...

Страница 137: ...ice Before you start If you want to enable the UPnP function of the device you must enable the UPnP function of the router to which your device is connected When the network working mode of the device...

Страница 138: ...alarm is triggered The remote alarm host must have the Network Video Surveillance software installed Steps 1 Enter the Network Settings interface Menu Network Network Settings 2 Select the More Setti...

Страница 139: ...ss spans the Class D IP range of 224 0 0 0 to 239 255 255 255 It is recommended to use the IP address ranging from 239 252 0 0 to 239 255 255 255 Steps 1 Enter the Network Settings interface Menu Netw...

Страница 140: ...eal Time Streaming Protocol is a network control protocol designed for use in entertainment and communications systems to control streaming media servers Steps 1 Enter the Network Settings menu by cli...

Страница 141: ...twork Settings interface Menu Network Network Settings 2 Select the More Settings tab to enter the More Settings interface as shown in Figure 10 22 3 Enter new Server Port and HTTP Port Figure 10 22 H...

Страница 142: ...such as linking status MTU sending receiving rate etc Steps 1 Enter the Network Traffic interface Menu Network Network Data Select LAN Usage tab page Figure 10 23 Network Traffic Interface 2 You can...

Страница 143: ...Detection menu Figure 10 24 Network Detection Interface 3 Enter the destination address in the text field of Destination Address 4 Click the Test button to start testing network delay and packet loss...

Страница 144: ...device please check whether it is compatible with the device You can format the backup device if the format is incorrect Figure 10 26 Export Network Packet 4 Click the Export button to start exporting...

Страница 145: ...rk is normal the following message box pops out Figure 10 29 Network Status Checking Result If the message box pops out with other information instead of this one you can click Network button to show...

Страница 146: ...network status to obtain the real time information of the device Steps 1 Enter the Network Statistics interface Menu Network Network Data Network Statistics Figure 10 31 Network Statistics Interface...

Страница 147: ...147 3 Click Refresh button to get the latest bandwidth statistics...

Страница 148: ...m Encoding can send a split screen image of all the cameras on the DVR in a single D1 resolution stream Steps 1 Enter the Network Settings interface Menu Network Single Stream Encode Figure 10 32 Sing...

Страница 149: ...149 C H A P T E R 11 System Configuration...

Страница 150: ...t the CVBS output standard to NTSC or PAL which must be the same with the video input standard HDMI VGA Resolution Select the HDMI VGA output resolution which must be the same with the resolution of t...

Страница 151: ...rrent operation menu to live view screen after 5 minutes of menu inactivity Menu Output Mode Select the menu monitor to Auto HDMI VGA or Main CVBS Notes 1 When you select Auto the DVR can automaticall...

Страница 152: ...e selected local backup device 3 To import a configuration file select the file from the selected backup device and click the Import button After the import process is completed you must reboot the de...

Страница 153: ...m Basic Initialisation Figure 11 4 Restore to Default Settings 2 Click the OK button to restore the default settings Note Except the network parameters including IP address subnet mask gateway MTU and...

Страница 154: ...n Figure 11 5 Shutdown Menu 2 Click the Logout button to lock the device or Click the Shutdown button to shut down the device or Click the Reboot button to reboot the device Note After you have logged...

Страница 155: ...before it can be used with your DVR Steps 1 Enter the HDD Information interface Menu System Disk Select Advanced tab to view the mounted HDDs Figure 11 6 Disk Advanced Information 2 Select HDD to be i...

Страница 156: ...rom Uninitialized to Normal Figure 11 9 HDD Status Changes to Normal Note Initializing the HDD will erase all data on it 11 2 2 Managing Network HDDs Purpose You can add the allocated NAS or disk of I...

Страница 157: ...11 11 HDD Information Interface 3 Add the allocated NetHDD 4 Select the type to NAS or IP SAN 5 Configure the NAS or IP SAN settings Add NAS disk 1 Enter the NetHDD IP address in the text field 2 Ent...

Страница 158: ...k the OK button to add the selected IP SAN disk Note Up to 1 IP SAN disk can be added Figure 11 13 Add IP SAN Disk 6 After having successfully added the NAS or IP SAN disk return to the HDD Informatio...

Страница 159: ...Mode to Group as shown in Figure 11 14 Figure 11 14 Storage Mode Interface 3 Click the Apply button and the following Attention box will pop up Figure 11 15 Attention for Reboot 4 Click the Yes butto...

Страница 160: ...HDD property please set the storage mode to Group refer to step1 4 of Chapter 11 2 3 Managing HDD Groups Setting HDD Groups A HDD can be set to read only to prevent important recorded files from being...

Страница 161: ...At least 2 hard disks must be installed on your DVR when you want to set a HDD to Redundancy and there is one HDD with R W property 11 2 4 Configuring Quota Mode Purpose Each camera can be configured...

Страница 162: ...ota 4 Enter the storage capacity in the text fields of Max Record Capacity GB as shown in Figure 11 20 Figure 11 20 Configure Record Quota 5 You can copy the quota settings of the current camera to ot...

Страница 163: ...to apply the settings Note If the quota capacity is set to 0 then all cameras will use the total capacity of HDD for recording 11 2 5 Checking HDD Status Purpose You may check the status of the insta...

Страница 164: ...tialize the HDD before use And if the HDD initialization is failed please replace it with a new one Checking HDD Status in HDD Information Interface Steps 1 Enter the System Information interface Menu...

Страница 165: ...ist as shown in Figure 11 24 Figure 11 24 S M A R T Settings Interface 11 2 7 Configuring HDD Error Alarms Purpose You can configure the HDD error alarms when the HDD status is Uninitialized or Abnorm...

Страница 166: ...he system to slow down when reading or writing data You can detect the bad sectors of the HDD and thus to take immediate measures to repair it Steps 1 Enter the Bad Sector Detection interface Menu Sys...

Страница 167: ...11 27 Bad Sector Detecting 3 You can click Pause to pause the detection and click Resume to resume the detection 4 If there is any error information about the HDD you can click Error info to view the...

Страница 168: ...min and the password is 12345 The Administrator has the permission to add and delete user and configure user parameters 11 3 1 Adding a User Steps 1 Enter the User Management interface Menu System Acc...

Страница 169: ...only has the local remote playback in the Camera Configuration User s MAC Address The MAC address of the remote PC which logs onto the DVR If it is configured and enabled it only allows the remote us...

Страница 170: ...eters and importing exporting configuration files Remote Serial Port Control Configuring settings for RS 485 ports Remote Video Output Control Sending remote control panel signal Two Way Audio Realizi...

Страница 171: ...ctory default parameters 11 3 2 Deleting a User Steps 1 Enter the User Management interface Menu System Account 2 Select the user to be deleted from the list as shown in Figure 11 32 Figure 11 32 Dele...

Страница 172: ...rface 4 Edit the user information including user name password level and MAC address 5 Click the OK button to save the settings and exit the menu 11 3 4 Changing Admin Password Purpose The password of...

Страница 173: ...ser and click to change the password as shown in Figure 11 35 Figure 11 35 Change Password 3 Enter the old password check checkbox enter new password and confirm password on the menu 4 Click the OK bu...

Страница 174: ...n in Figure 11 36 Figure 11 36 Local Upgrade Interface 4 Select the update file from the backup device 5 Click the Upgrade button to start upgrading 6 After the upgrading is complete reboot the DVR to...

Страница 175: ...gure 11 37 FTP Upgrade Interface 3 Enter the FTP Server Address in the text field 4 Click the Upgrade button to start upgrading 5 After the upgrading is complete reboot the DVR to activate the new fir...

Страница 176: ...l No firmware version and encode version as shown in Figure 11 38 The information on the figure is for reference only the information for actual product may be different Figure 11 38 Device Informatio...

Страница 177: ...the System Information interface Menu System System Info 2 Click the Record Info tab to enter the Record Information menu to view the recording status encoding parameters of each camera as shown in Fi...

Страница 178: ...k information as shown in Figure 10 41 Figure 11 41 Network Information Interface 11 5 5 Viewing HDD Information Steps 1 Enter the System Information interface Menu System System Info 2 Click the HDD...

Страница 179: ...179...

Страница 180: ...180 C H A P T E R 12 Others...

Страница 181: ...ps 1 Enter the Log Search interface Search Log Log Search Figure 12 1 Log Search Interface 2 Set the log search conditions to refine your search including the Start Time End Time Major Type and Minor...

Страница 182: ...as shown in Figure 12 3 And you can also click the button to view the related video files if available Figure 12 3 Log Details 6 If you want to export the log files click the Export button to enter t...

Страница 183: ...e Name 8 Click the Export to export the log files to the selected backup device You can click the New Folder button to create new folder in the backup device or click the Format button to format the b...

Страница 184: ...184 C H A P T E R 13 Appendix...

Страница 185: ...tro Ethernet networks DDNS Dynamic DNS is a method protocol or network service that provides the capability for a networked device such as a router or computer system using the Internet Protocol Suite...

Страница 186: ...se nearby Why does the PTZ seem unresponsive If the PTZ seem unresponsive please check a The RS 485 cable is properly connected b The dome decoder type is correct c The dome decoder speed configuratio...

Страница 187: ...187 Norbain SD Ltd 210 Wharfedale Road IQ Winnersh Wokingham RG41 5TP 44 0 118 912 5000...

Отзывы: