background image

XAL Inc.   150 Hawley Rd.   Oxford, CT 06478   T: +1 203.292.9990   www.xalusa.com

6

Mino 2.5 Circle 

pendant

MOUNTING INSTRUCTIONS

MI-V02

10/2018

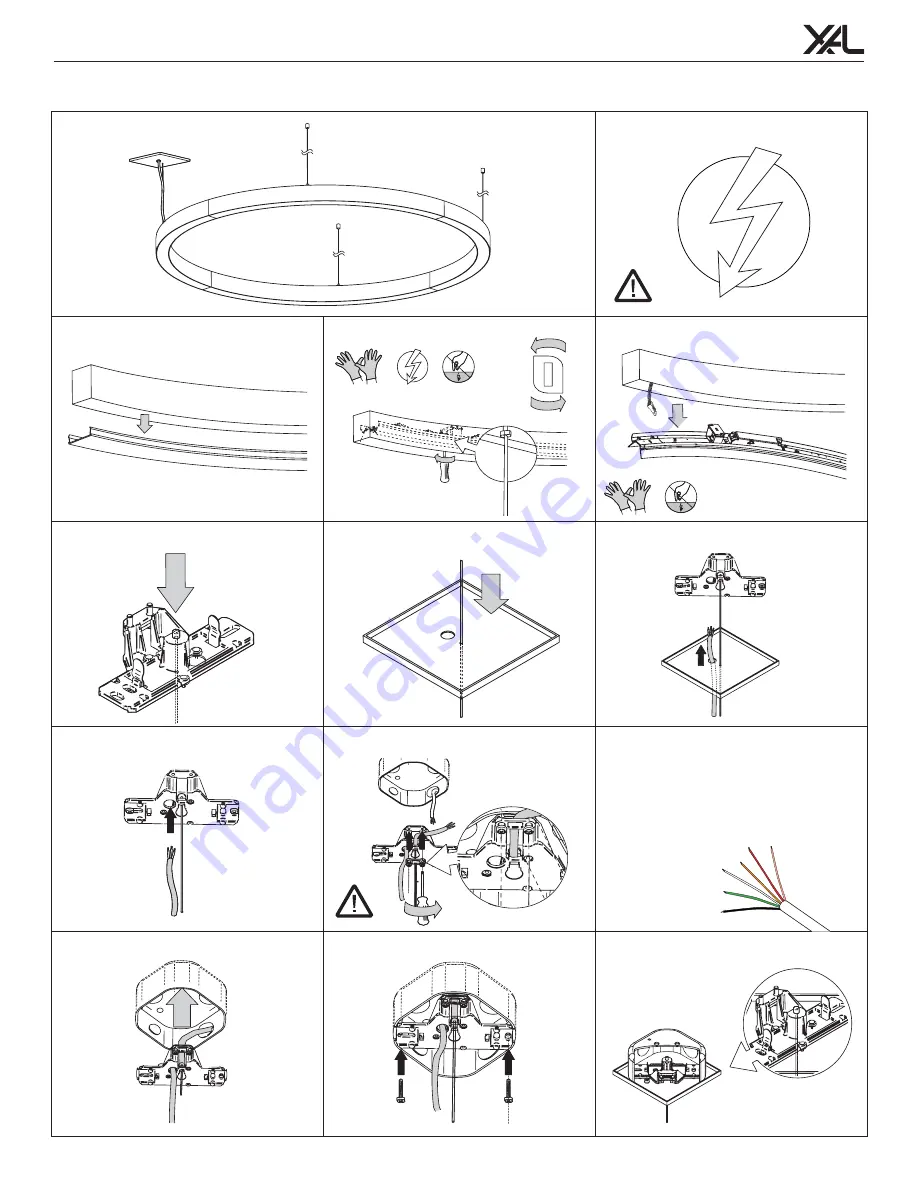
1. Remove covers

2. Open inset locks

3. Remove insets from channels

118" 

/

 236" INSTALLATION

12. Click cover plate into bracket via springs

Phase (black)

Ground (green

Neutral (

white)

DIM

 E2 -

 (ora

nge

)

DIM

 E1 

+ (r

ed)


*U

nsw

itc

he

d e

m

erg

en

cy

  lin

e (r

ed

 / w

hite

)

5. Thread cable through cover plate

9. Connect wiring to power source

8. Screw on strain relief

10. Insert mounting bracket

11. Screw bracket into junction box

4. Thread cable through top of bracket

6. Thread power feed through cover plate

7. Thread power feed through bracket

TURN OFF POWER SOURCE BEFORE 
INSTALLATION

Keep covers with channels

Содержание Mino 2.5 Circle

Страница 1: ...30 10 61 10 10 5 15 5 POWER OFF POWER ON DON T TOUCH THE LED Pencil Drill Screwdriver ATTENTION USE ESD GLOVES ESD GLOVES SIGN LEGEND TOOLS REQUIRED not included Level DO NOT DISCARD XAL Inc 150 Hawley Rd Oxford CT 06478 T 1 203 292 9990 www xalusa com 1 Mino 2 5 Circle pendant MOUNTING INSTRUCTIONS MI V02 10 2018 ...

Страница 2: ... POSITIONS 60 MOUNTING POSITIONS 750mm 29 500mm 19 11 16 500mm 19 11 16 750mm 29 XAL Inc 150 Hawley Rd Oxford CT 06478 T 1 203 292 9990 www xalusa com 2 Mino 2 5 Circle pendant MOUNTING INSTRUCTIONS MI V02 10 2018 ...

Страница 3: ...ep covers with channels 12 Click cover plate into bracket via springs Phase black Ground green Neutral white DIM E2 orange DIM E1 red U n s w i t c h e d e m e r g e n c y l i n e r e d w h i t e 5 Thread cable through cover plate 9 Connect wiring to power source 8 Screw on strain relief 10 Insert mounting bracket 11 Screw bracket into junction box 4 Thread cable through top of bracket 6 Thread po...

Страница 4: ... xalusa com 22 Insert covers 23 Installation complete 13 Use laser pointer or pencil to mark dimensions for mounting 15 Attach clip to top of channel and trim cable 14 Assemble barrel mount and rope fixation Click Max 0 5 Ohm resistance 16 Clip grounding bracket into channel 17 Connect power and dimming inputs 18 Once connected place insets into channels 21 Test the channel grounding 19 Secure ins...

Страница 5: ...776mm 30 9 16 1500mm 59 1 16 2121mm 83 2598mm 102 5 16 2898mm 114 1 16 3000mm 118 750mm 29 1299mm 51 1500mm 59 1 16 XAL Inc 150 Hawley Rd Oxford CT 06478 T 1 203 292 9990 www xalusa com 5 Mino 2 5 Circle pendant MOUNTING INSTRUCTIONS MI V02 10 2018 ...

Страница 6: ...s Phase black Ground green Neutral white DIM E2 orange DIM E1 red U n s w i t c h e d e m e r g e n c y l i n e r e d w h i t e 5 Thread cable through cover plate 9 Connect wiring to power source 8 Screw on strain relief 10 Insert mounting bracket 11 Screw bracket into junction box 4 Thread cable through top of bracket 6 Thread power feed through cover plate 7 Thread power feed through bracket TUR...

Страница 7: ...ver tighten 16 Connect curve channels 18 Locate adhesive tape 19 Apply adhesive tape on the inside of channel seam 20 Hold and let sit for one minute 21 Mark dimensions for mounting with laser pointer or pencil 23 Attach clip to top of channel and trim cable 22 Assemble barrel mount and rope fixation Click 24 Clip grounding bracket into channel 25 Connect power and dimming inputs 26 Once connected...

Страница 8: ...RUCTIONS MI V02 10 2018 29 Test the channel grounding After Sales Service Hotline The XAL After Sales Hotline is available by phone from Monday to Friday 8 AM 6 PM EST 1 203 262 9990 Or 24 7 via email Hotline service xalusa com 31 Installation complete 28 Connect insets Max 0 5 Ohm resistance 30 Insert covers ...

Страница 9: ...habilité 29 Il faut que le circuit de LED soit fermé avant de connecter le convertisseur XAL ne assume pas la garantie si cette norme ne se respecte pas ES La instalación la puesta en marcha y el mantenimiento sólo deben realizarse por personal especializado considerando esta guía de instalación y todas las normas y reglamentaciones vigentes Asegurarse de la aptitud eléctrica mecá en esta p ej Lim...

Страница 10: ... homepage Ø 40 Circle Ø 59 Circle 16 16 16 16 MINO 2 5 CIRCLE suspended direct MINO 2 5 CIRCLE surface direct MINO 2 5 CIRCLE suspended direct indirect MINO 2 5 CIRCLE surface direct indirect please download the corresponding files from the homepage please download the corresponding files from the homepage please download the corresponding files from the homepage please download the corresponding ...

Страница 11: ...esponding files from the homepage Ø 236 Circle 16 16 16 16 MINO 2 5 CIRCLE suspended direct MINO 2 5 CIRCLE surface direct MINO 2 5 CIRCLE suspended direct indirect MINO 2 5 CIRCLE surface direct indirect please download the corresponding files from the homepage please download the corresponding files from the homepage please download the corresponding files from the homepage please download the c...

Отзывы: