OWNER’S MANUAL
(Please keep for future reference)
M
ODEL
VK84A
I
NCLUDES
S
ENTINEL
P
RO
AN
/T
ILT
/Z
OOM
C
AMERA
(XC35A)
AND
D
OME
WITH
R
EMOTE
ONTROL
(CR15A)
™
O
UTDOOR
ROFESSIONAL
YSTEM
Страница 1: ...NER S MANUAL Please keep for future reference MODEL VK84A INCLUDES SENTINELPRO PAN TILT ZOOM CAMERA XC35A AND DOME WITH REMOTE CONTROL CR15A SENTINELPRO OUTDOOR PROFESSIONAL PAN TILT ZOOM CAMERA SYSTE...
Страница 2: ...Pro Pan Tilt Zoom Camera has superior image quality a high powered zoom and pan and tilt motion You can operate the camera through walls using the supplied remote control It comes with a weather resis...
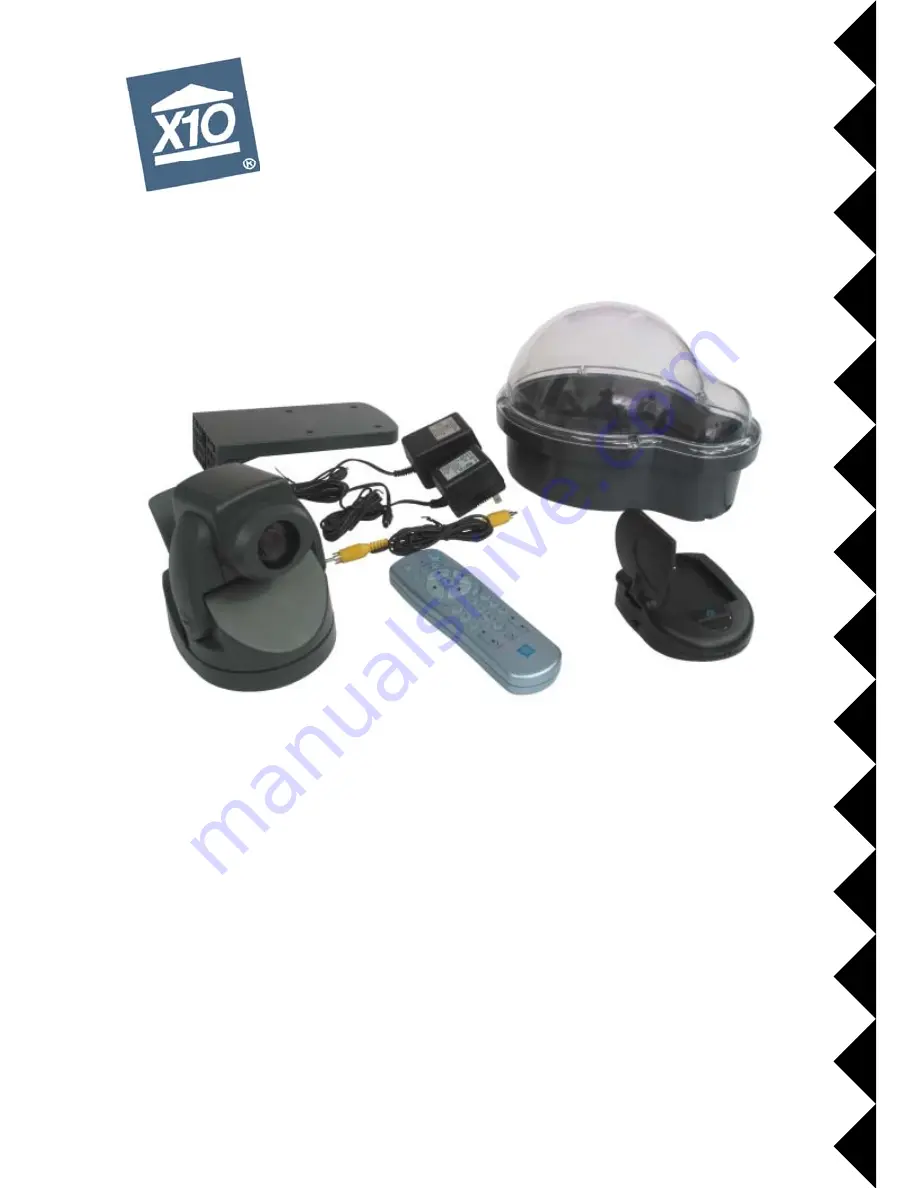
Страница 3: ...s power supply the camera remote the camera mounting bracket a weather resistant dome and the screws to install the bracket A wireless video receiver and it s video cable and power supply shown above...
Страница 4: ...Plug its power supply into a standard wall outlet and the other end into the video receiver Basic Camera Setup Insert batteries into the remote Remove the battery cover and put four 4 AAA batteries in...
Страница 5: ...re the power switch on the video receiver is set to ON Basic Camera Setup Connect the video receiver to your TV Connect the video cable into the video out jack on the video receiver and into the video...
Страница 6: ...e picture on your TV Basic Camera Setup Fine tune the antennas Turn on your TV Turn on your TV and select its video input Use the Video or Select buttons on your TV remote control or try channel 0 and...
Страница 7: ...Plug the other end into the camera Remove the protective cover from the camera s lens Select Transmit Disable BASIC CAMERA OPERATION Once you have the camera set up you re ready to start using it It s...
Страница 8: ...positions in the camera press the desired number button on the remote to move to that position If you press Sweep the camera will automatically switch through all the positions you ve stored Press an...
Страница 9: ...t amount of light for your subject If you want to brighten the picture press the Iris Up button to open the iris wider and let more light in To limit the amount of light in the picture press Iris Down...
Страница 10: ...the outside of the base 4 Attach the camera to the base of the dome using the brass screw on the outside of the dome s base 5 Plug the power and video cables into the camera Mounting the Camera cont M...
Страница 11: ...brass screw on the outside of the dome s base 5 Plug the power and video cables into the camera 7 Pass the cables through the hole in the mounting bracket and attach the bracket to a wall Mounting the...
Страница 12: ...irror image Up and Down arrows flip the image from top to bottom Picture Orientation Vertical Orientation If you choose not to mount the camera upside down Here s how to flip the picture vertically in...
Страница 13: ...Units 5 8 press C3 for Units 9 12 or press C4 for Units 13 16 Once you have changed the group Unit Codes on the remote control you have to reprogram the cameras Follow the Multiple Camera Setup instr...
Страница 14: ...t the SentinelPro Camera as the video source The onscreen menu is displayed over the picture from the camera 1 Use the Up and Down arrow buttons to select items from the main menu 2 Use the Right arro...
Страница 15: ...in lighting conditions Your options are PEAK This setting controls the reaction of the automatic iris adjustment in relation to the average light level in the picture A higher level of peak sets the...
Страница 16: ...AGC affect the brightness and picture levels of the video produced by the camera AGC amplifies existing video to help the camera reproduce a video signal at low light levels Sensitivity controls adjus...
Страница 17: ...low the camera to focus on objects any distance away or a short focal length NEAR if you are using the camera only to view objects relatively close In Manual mode the camera will set focus automatical...
Страница 18: ...uces Or you can do both H REV Reverses the picture horizontally or from left to right Set this to ON if you want to use the camera like a mirror for viewing objects behind you V REV When set to ON thi...
Страница 19: ...the Up and Down arrows to select the desired position on the screen up top or down bottom Then use the Up and Down arrows to select characters from the screen above selecting each character with the...
Страница 20: ...and turned on Press C1 on the remote to turn it on 4 Check that the mode switch on the bottom of the camera is set to Transmit Enable Bottom of camera 5 Follow the setup instructions again pages 4 th...
Страница 21: ...devices can distort the Camera s picture If you are experiencing interference between X10 Cameras and some other equipment that uses 900 MHz check the other device s owner s manual for the frequencie...
Страница 22: ...X10 Why enter a dark room when there is a simple and affordable solution that can keep you safe and secure From a simple remote control that can turn on a lamp to a full blown automation system X10 p...
Страница 23: ...o correct the interference by one or more of the following measures Reorient the antenna of the radio TV experiencing the interference Relocate the equipment with respect to the radio TV Move the equi...