Woxcon SCU82TS Скачать руководство пользователя страница 1


SCU82TS 

8x2 HDMI 2.0 Seamless Matrix Switcher 


All Rights Reserved 

Version: SCU82TS_2019V1.4


User Manual


Содержание SCU82TS

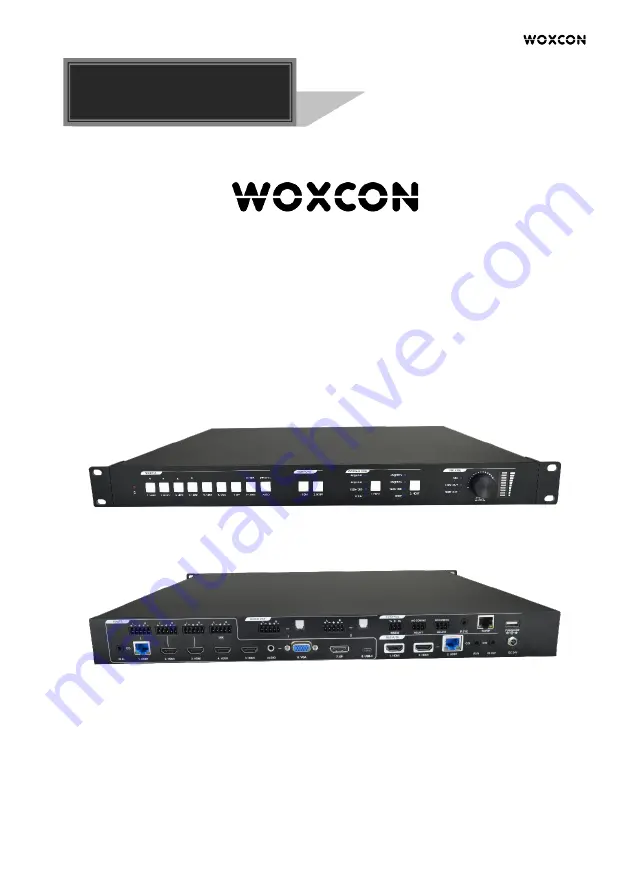
Страница 1: ...SCU82TS 8x2 HDMI 2 0 Seamless Matrix Switcher All Rights Reserved Version SCU82TS_2019V1 4 User Manual...

Страница 2: ...FCC Statement This equipment generates uses and can radiate radio frequency energy and if not installed and used in accordance with the instructions may cause harmful interference to radio communicat...

Страница 3: ...sture or install this product near water l Do not put any heavy items on the extension cable in case of extrusion l Do not remove the housing of the device as opening or removing housing may expose yo...

Страница 4: ...Transmitter Front and Rear Panel 8 3 4 Receiver Front and Rear Panel 9 4 System Connection 10 4 1 Usage Precaution 10 4 2 System Diagram 10 5 Button Control 11 5 1 Manual Switching 11 5 2 Auto Switch...

Страница 5: ...ommand 32 8 2 1 Device Control 32 8 2 2 Source Switching 33 8 2 3 Preset Setting 34 8 2 4 Output Resolution Setting 35 8 2 5 Audio Control 36 8 2 6 EDID Management 38 8 2 7 Relay Control 39 8 2 8 VGA...

Страница 6: ...d tablets The matrix switcher supports auto switching on HDMI HDBaseT and HDMI loop outputs based on TMDS activity signals sensing It also allows users to control system functionality via Web GUI RS23...

Страница 7: ...age List Matrix Switcher l 1x SCU82TS 8x2 HDMI 2 0 Seamless Matrix Switcher l 2x Mounting Ears with 6 Screws l 4x Plastic Cushions l 1x IR Remote l 1x IR Receiver l 3x 3 pin Terminal Blocks l 7x 5 pin...

Страница 8: ...ersion 2 2 Audio Input Audio Input 1 External balanced audio L R for 1 HDBT input port 1 External balanced audio L R for 2 HDMI input port 1 External balanced audio L R for 3 HDMI input port 1 Stereo...

Страница 9: ...ad Capability 1K and higher Supports 10x paralleled 10K loads Stereo Channel Separation 70dB 1KHz Noise Level 80dB Control Part Control Port 1 RS232 2 RELAY 1 2 1 IR EYE 2 IR IN 1 IR OUT 1 TCP IP 1 FI...

Страница 10: ...female HDMI Control 1 IR IN 1 IR OUT 1 RS232 Control Connector 2 3 5mm jacks 1 3 pin terminal block Video Resolution Up to 4Kx2K 60Hz 4 4 4 8bit General Transmission Mode HDBaseT Transmission Distance...

Страница 11: ...to enter or exit auto switching mode Press and hold it at least 2 seconds to enable OSD menu OUTPUTS Two buttons with blue backlight l 1 HDMI output selector l 2 HDBT output selector RESOLUTION Two o...

Страница 12: ...ource One stereo auxiliary audio input 3 5mm jack can be embedded in the VGA video l 7 DP Type A female DP port to connect the DP source l 8 USB C Type C USB port to connect the device with SlimPort o...

Страница 13: ...receiver to control the switcher by the IR remote l TCP IP RJ45 port to connect the control device e g PC to control the switcher by GUI l FIRMWARE Type A USB port for firmware upgrade DC 24V DC barre...

Страница 14: ...UPDATE A position to update the Valens IC program Finally put the switch in the UPDATE B position to update the compression IC program POWER LED The LED illuminates red when power is applied HDMI OUT...

Страница 15: ...DC 24V OUTPUTS 2 HDBT IR IN 1 HDMI TCP IP CONTROL IR EYE FIRMWARE 1 L R L R IR OUT 2 HDMI 5 HDMI 4 HDMI 2 HDMI 3 HDMI 1 HDBT IR IN L R L R L R MIX L R INPUTS 2 RS232 Tx Rx RELAY1 NO COM NC RELAY2 NO C...

Страница 16: ...tton and the corresponding button LED turns blue 3 Press AUTO button again to confirm the setting otherwise it will automatically confirm after three seconds 4 Repeat the above three steps can exit au...

Страница 17: ...cate which resolution is selected 5 4 Sound Volume Control Press volume knob to choose MIX HDMI OUT or HDBT OUT audio needs to be adjusted the corresponding LED will turn blue and keep on l Adjusting...

Страница 18: ...select output channel Press BLACK and then select output channel to make it output black screen Enable Disable OSD menu Confirm and Navigation buttons OK UP DOWN LEFT and RIGHT for OSD menu Return to...

Страница 19: ...CP IP The default IP settings are IP Address 192 168 0 178 Subnet Mask 255 255 255 0 Type 192 168 0 178 in the internet browser it will enter the below log in webpage Username admin Password admin Typ...

Страница 20: ...UTPUT Switch the selected input source to HDMI output Click AUTO to enable disable auto switching mode l HDBT OUTPUT Switch the selected input source to HDBT output Click AUTO to enable disable auto s...

Страница 21: ...automatically select the best output resolution for satisfying the connected display l HDBT OUTPUT Select the HDBT output video resolution Press AUTO to automatically select the best output resolutio...

Страница 22: ...in 2 HDMI video input l 3 HDMI Embedded Select the external balanced audio 5 pin to embed in 3 HDMI video input l MIX MIX input audio volume control l HDMI Output Select MIX input audio to mix with HD...

Страница 23: ...8x2 HDMI 2 0 Seamless Matrix Switcher 18 7 4 Configuration 7 4 1 PoC Setting l Turn on or off PoC for HDBT output port l Turn on or off PoC for HDBT input port...

Страница 24: ...EDID for the selected input source l Upload user define EDID by the below steps Step 1 Prepare the EDID file bin on the control PC Step 2 Select the user defined Step 3 Click the black box and then se...

Страница 25: ...l Click Latching the projector screen starts to be rolled up or dropped down and then click Latching again to stop process RELAY 1 and RELAY 2 Ports Definition l When clicking Momentary the NO connect...

Страница 26: ...7 5 CEC Control If the input sources and display support CEC they can be controlled by the below control buttons to replace IR remote 1 Source Control l Select the input source which needs to be contr...

Страница 27: ...8x2 HDMI 2 0 Seamless Matrix Switcher 22 2 Display Control l Select the output display which needs to be control and then press function button as need...

Страница 28: ...ions the CEC command can be edited and saved in the Trigger textbox l Select the input source and then type CEC command in the Trigger 1 or Trigger 2 box to control the selected source l Select the ou...

Страница 29: ...8x2 HDMI 2 0 Seamless Matrix Switcher 24 7 6 Tags Setting l INPUTS Modify the label of input sources l Preset Modify the label of presets...

Страница 30: ...o control the third party device which is connected to the HDBaseT receiver l HDBT Receiver Pass Through Establish RS232 pass through communication between the switcher and the HDBaseT transmitter e g...

Страница 31: ...nsmitter HDBT Out Send RS232 commands to control the far end third party e g projector which is connected to the RS232 port of HDBaseT receiver l Select HEX or ASCII format l Baud Rate Supports 2400 4...

Страница 32: ...8x2 HDMI 2 0 Seamless Matrix Switcher 27 7 8 Network Setting l Static IP or Dynamic Host Configuration Protocol DHCP l Modify the static IP Address Subnet Mask and Gateway...

Страница 33: ...8x2 HDMI 2 0 Seamless Matrix Switcher 28 7 9 Password Setting l Modify the login password l Lock or unlock the front panel buttons...

Страница 34: ...the username and password the same as the GUI log in setting modified password will be available only after rebooting to login the configuration interface After that click Administration in the sourc...

Страница 35: ...l Installation Copy the control software file to the control PC l Uninstallation Delete all the control software files in corresponding file path Basic Settings Connect the switcher with all input dev...

Страница 36: ...Please set the parameters of COM number bound rate data bit stop bit and the parity bit correctly and then you are able to send command in command sending area Parameter configuration area Monitoring...

Страница 37: ...e PWON Power on system PWON PWOFF Power off system Turn off HDBaseT power supply PWOFF STANDBY System standby Press any button to awake STANDBY Type Report system model SCU82TS Version Report firmware...

Страница 38: ...el 1 1 2 2 All Through All Turn off all output All Closed x Switch input x to output x x 1 2 1 Through x Turn off output x x 1 2 1 Closed x Turn on output x x 1 2 01 Open All Turn on all outputs All O...

Страница 39: ...omation ON HDBT Automation ON AutomationOFF X Disable the auto switching mode for the output X X Output Port 1 HDMI 2 HDBT HDMI Automation OFF HDBT Automation OFF 8 2 3 Preset Setting Command Descript...

Страница 40: ...Example VRES X Y Set the output resolution of port X to Y 1 X 9 10 X Output Port 9 HDMI 10 HDBT 2 Y 1 10 Y Resolution 1 4K 60Hz 2 4K 30Hz 3 1920X1200 60Hz 4 1080P 60Hz 5 1080P 50Hz 6 1600x1200 60Hz 7...

Страница 41: ...8x2 HDMI 2 0 Seamless Matrix Switcher 36 8 2 5 Audio Control...

Страница 42: ...audio HDMI Mute HDMIUnmute Unmute the HDMI output audio HDMI Unmute SetHDBTVol xx Set the HDBT output audio volume to xx xx 0 60 Volume of HDBT 30 HDBTVolume Increase the HDBT output audio volume Volu...

Страница 43: ...DIDUpgrade x Upgrade the EDID data of the input port x x 1 5 7 When the command applied system prompts to upload the EDID file bin Operation will be cancelled in 10 seconds Please disconnect HDBT conn...

Страница 44: ...8 2 7 Relay Control Command Description Feedback Example RelayON X Turn on relay X X 1 2 RelayOFF X Turn off relay X X 1 2 RelayAutomationCtl X Y Set the auto stop time of relay X to Y seconds X 1 2 Y...

Страница 45: ...emp X Auto adjust the color temperature to X X 0 3 Normal Cool Warm SetVGAAspetRatio X Set the aspect ratio to X X 0 2 16 9 4 3 auto SetVGAPicMode X Set the image mode to X X 0 3 dynamic standard mild...

Страница 46: ...ol Command Description Feedback Example CECON Enable CEC CEC Turn ON CECOFF Disable CEC CEC Turn OFF Step 2 According to the below command format to send specific command to control input source or di...

Страница 47: ...0141 CEC Source VOL CECI port 42 Volume down CECI0142 CEC Source VOL CECI port 44 Play CECI0144 CEC blue ray play CECI port 45 Stop CECI0145 CEC blue ray stop CECI port 46 Pause CECI0146 CEC blue ray...

Страница 48: ...t 36 Power off CECO0636 CEC TV Power off CECO port 04 Power on CECO0604 CEC TV Power on 8 2 11 Third party Device Control The switcher supports RS232 pass through control the third party device can be...

Страница 49: ...TPUH610AR The RS232 port of the switcher can be used to transfer commands to control the third party device which is connected to the HDBaseT receiver Y X l xxx ASCII characters l Y Represents the RS2...

Страница 50: ...8x2 HDMI 2 0 Seamless Matrix Switcher 45...

Страница 51: ...Press and hold the MENU 2s button at least two seconds on the front panel 2 Press the MENU button on the IR remote Operation l Press direction buttons on IR Remote to switch between menu options and m...

Страница 52: ...8x2 HDMI 2 0 Seamless Matrix Switcher 47 SOUND MENU OPTION MENU...

Страница 53: ...8x2 HDMI 2 0 Seamless Matrix Switcher 48 SYSTEM MENU INFO MENU...

Страница 54: ...I 2 HDMI 3 HDMI 1 HDBT IR IN L R L R L R MIX L R INPUTS 2 RS232 Tx Rx RELAY1 NO COM NC RELAY2 NO COM NC AUDIO OUT 8 USB C 1 HDBT 7 DP 5 HDMI 6 VGA 4 HDMI 3 HDMI 2 HDMI SOURCE SELECT MUTE 3s MIX HDBT O...

Страница 55: ...8x2 HDMI 2 0 Seamless Matrix Switcher 50 TPUH610AR HDBaseT Receiver DC 12V Tx Rx HDMI OUT HDBT IN IR OUT IR IN CTRL UPDATE B UPDATE A 115 0 mm 16 0 mm 84 0 mm...

Страница 56: ...Fail or loose connection Make sure the connection is good The switcher is broken Send it to authorized dealer for repairing POWER indicator doesn t work or no respond to any operation Fail connection...

Страница 57: ...ar and tear Use of supplies or parts not meeting our specifications No certificate or invoice as the proof of warranty The product model showed on the warranty card does not match with the model of th...

Отзывы: