


Sawmill Setup
Tensioning The Blade
Sawmill Setup
60HD-R04doc112210
3-31
3
3.4
Tensioning The Blade
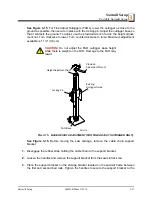
See Figure 3-28.
Before tensioning the blade, check the air pressure gauge to see that
the air tension system is properly charged. With the blade tension completely released
and the air bag plate against the stop bolt, the gauge should read 58 psi for 1 1/4” blades
or 78 psi for 1 1/2” and wider blades. To add air pressure, remove the air valve stem cover
and attach an air pump to the air valve. Add air until the gauge indicates the proper air
pressure. To release air, push in the valve stem. Replace the air valve stem cover when
finished adjusting the air pressure.
Rev. A9.00+:
Adjust the valve handle to the closed (down) position. Install the tensioner
handle to the tensioner and pump the lever until the air bag plate is approximately 1/8"
from the stop plate. Remove the tensioner handle and place in the storage position on the
tensioner assembly.
To release blade tension, adjust the valve handle to the open (up) position. Place the ten-
sioner handle between the end of the piston housing and bracket and pry the assembly
forward until the blade can be removed.
Rev. A5.03 - A8.01:
To tension the blade, push the blade tension handle up. Make sure
the handle lock flips to the locked (down) position after the blade tension is engaged.
WARNING!
Use both hands to operate the blade tensioner
handle. Be sure the handle lock engages (flips down) after
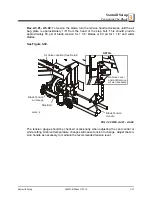
FIG. 3-28 (REV. A9.00+)
Valve Handle
Tensioner
Handle
Tensioner Handle
in Storage Position
600239-4B
Open Valve to
Release Blade
Tension
Stop Plate
Use tensioner handle
to pry piston housing
forward until blade
can be removed