background image


157

 ~


The pre-rinsing of dishes leads to increased water and energy consumption and 
is not recommended. 


Cleaning dishes in a household dishwasher generally consumes less energy and 
water during the utilisation phase than cleaning them manually (if the household 
dishwasher is used according to the instructions). 


8. Cleaning and maintenance 


 WARNING!


Disconnect the appliance from the mains before you clean 

or maintain it. RISK OF ELECTRIC SHOCK!  


 WARNING!

 When a rinse cycle has been completed, wait at least 20 

minutes  before  cleaning  the  interior  of  the  appliance  so  the  heating 
elements can cool down. RISK OF BURNS! 


 WARNING!


Never use a cleaner spray as you may damage the lock 

and the electrical components.  RISK OF ELECTRIC SHOCK! RISK OF 
DAMAGE! 


NOTICE! 

Never operate the appliance without the filter inserted properly. 

RISK OF DAMAGE! 


1.


Always keep the appliance clean so that unpleasant odours do not occur. 

2.


Take  off  all  rings  and  bracelets  before  cleaning  or  maintaining  the  appliance; 
otherwise, you will damage the surface of the appliance. 


8.1 Cleaning of the filter system 


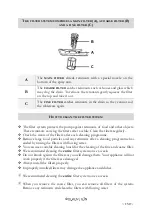
The filter system protects the pump against remnants of food and other objects. 
These remnants can clog the filters after a while. The filter system comprises a 
coarse filter, a flat filter and a micro filter. 


Содержание WGSP15-8FI

Страница 1: ...16 07 2021 Bedienungsanleitung Instruction Manual GESCHIRRSP LER VOLLINTEGRIERT DISHWASHER FULLY INTEGRATED WGSP15 8FI Deutsch Seite 2 English Page 90...

Страница 2: ...rts 12 2 2 Kondenswasser Schutzstreifen 12 2 3 Raumbedarf 13 2 4 Installation des Wasserzufuhrschlauchs Kaltwasser 14 2 5 Installation des Abwasserschlauchs 16 2 6 Hocheinbau 19 2 7 Elektrischer Ansch...

Страница 3: ...ellen der Besteckschublade 57 5 5 Ungeeignetes Geschirr Besteck 59 5 6 Sch den an Glaswaren Geschirr 59 6 Die Sp lprogramme 60 6 1 Die zus tzlichen Programmfunktionen 62 6 2 Starten eines Sp lprogramm...

Страница 4: ...ise des Ger tes haben Entsorgen Sie das Verpackungsmaterial entsprechend den rtlichen Vorschriften Ihres Wohnorts Das von Ihnen gekaufte Ger t wurde m glicherweise inzwischen verbessert und weist somi...

Страница 5: ...in durchgef hrt werden Das Ger t ist ausschlie lich zur privaten Nutzung bestimmt sowie zur Nutzung 1 in Personalk chen von Gesch ften B ros und hnlichen Arbeitsumgebungen 2 durch G ste von Beherberg...

Страница 6: ...heit des Ger tebetreibers und oder kann das Ger t besch digen 2 Alle zum Anschluss an die Stromversorgung notwendigen elektrischen Arbeiten m ssen von einer qualifizierten Fachkraft Elektrotechniker i...

Страница 7: ...SCHLAGGEFAHR WARNUNG Zur Verringerung der Verbrennungsgefahr Stromschlaggefahr Feuergefahr oder von Personensch den 1 In einem Warmwassersystem das ber einen Zeitraum von 2 Wochen oder l nger nicht be...

Страница 8: ...ein 10 Nehmen Sie keine Ver nderungen an dem Ger t vor 11 Schalten Sie vor dem Aufbau und Anschluss des Ger tes unbedingt den Strom ab GEFAHR EINES T DLICHEN STROMSCHLAGS 12 Es ist gef hrlich die T r...

Страница 9: ...VERLETZUNGS GEFAHR 2 Stellen oder legen Sie keine schweren Gegenst nde auf die ge ffnete T r da das Ger t ansonsten nach vorne kippen kann 3 Wenn Sie das Ger t bef llen a Platzieren Sie scharfkantige...

Страница 10: ...iert abh ngig von Ihrem Wohnort Wenn in einem Geschirrsp ler hartes Wasser verwendet wird ergeben sich Ablagerungen auf dem Geschirr und im Ger t Der Wasserenth rter entfernt Mineralien und Salze aus...

Страница 11: ...er t regelm ig s Kapitel REINIGUNG UND PFLEGE 22 Das Typenschild darf niemals unleserlich gemacht oder gar entfernt werden Falls das Typenschild unleserlich gemacht oder entfernt wurde entf llt jeglic...

Страница 12: ...ie das Ger t auf einem geraden trockenen und festen Fu boden auf Kontrollieren Sie mit einer Wasserwaage den ordnungsgem en Aufbau Ihres Ger tes 6 Die R ckseite des Ger tes muss an der hinteren Wand u...

Страница 13: ...beitsplatte KONDENSWASSER SCHUTZSTREIFEN HINWEIS Ein nichtordnungsgem es Anbringen des Kondenswasser Schutzstreifens kann zu einer Besch digung der Arbeitsplatte f hren 2 3 Raumbedarf RAUMBEDARF DES G...

Страница 14: ...ation des Wasserzufuhrschlauchs Kaltwasser Der Wasseranschluss sowie der Abwasseranschluss m ssen von einer qualifizierten Fachkraft durchgef hrt werden Der Geschirrsp ler beinhaltet einen Wasserzuflu...

Страница 15: ...en Zeitraum nicht in Benutzung waren lassen Sie das Wasser laufen um sicherzugehen dass es klar und frei von Verunreinigungen ist HINWEIS Anderenfalls kann der Wassereinlass blockiert und dadurch das...

Страница 16: ...s m ssen von einer qualifizierten Fachkraft durchgef hrt werden Der Geschirrsp ler beinhaltet einen Wasserzufluss sowie einen Wasserablaufschlauch welche rechts oder links installiert werden k nnen7 u...

Страница 17: ...INSTALLATION B ABWASSERROHR MIND 40 mm 1 GESCHIRRSP LER R CKSEITE 2 WASSEREINLASS 3 WASSERAUSLASS 4 NETZKABEL 5 ABWASSERSCHLAUCH 6 ABWASSERROHR 7 SP LBECKEN 8 ARBEITSPLATTE 4 Befestigen Sie den Abwass...

Страница 18: ...erwerben Die L nge des Ablaufschlauchs darf einschlie lich einer m glichen Verl ngerung nicht mehr als 4 Meter betragen da ansonsten die Reinigungswirkung des Ger tes reduziert wird Sollte die L nge...

Страница 19: ...orrichtung zur Befestigung der Manschette Der Abwasserschlauch muss am h chsten Punkt der Manschette eine H he von mindestens 400 mm aufweisen Folgen Sie f r die Anschlussm glichkeiten A B oder C der...

Страница 20: ...ckdosenleisten Mehrfachsteckdosen oder Verl ngerungskabel BRANDGEFAHR WARNUNG Das Ger t muss an eine ordnungsgem geerdete Sicherheits Netzsteckdose angeschlossen werden Der Anschluss muss in bereinsti...

Страница 21: ...Wand ausgerichtet sein und ber einen Wasserzufuhr und einen Abwasserschlauch verf gen die f r gew hnlich rechts oder links angebracht werden k nnen9 Das Ger t muss in der N he eines bestehenden Wasse...

Страница 22: ...mentsprechend Der feste Kontakt der Standf e mit dem Boden stellt au erdem sicher dass das Ger t nicht vibrieren oder sich unbeabsichtigt bewegen kann Der Geschirrsp ler muss au erdem waagerecht ausge...

Страница 23: ...einen flachen Schraubendreher Justieren Sie die vorderen Standf e bis das Ger t waagerecht und stabil ausgerichtet ist Achten Sie beim Justieren der Standf e auf die auf dem Ger t angegebenen Pfeilric...

Страница 24: ...E waagerechten Stand in der Breite pr fen C 1 Stellschraube zur Justierung des HINTEREN STANDFU ES C 2 VORDERE STANDF E 2 10 Befestigung der Zierverkleidung 1 Entfernen Sie die vier kurzen Schrauben A...

Страница 25: ...n11 in die entsprechenden ffnungen auf der Au enseite der Ger tet r ein B s Abb unten B FFNUNGEN ZUM EINH NGEN DER ZIERVERKLEIDUNG 3 Richten Sie die Zierverkleidung ordnungsgem an der Au enseite der G...

Страница 26: ...aube im oder entgegen dem Uhrzeigersinn zur ordnungsgem en Einstellung oder lassen Sie die Balance einstellen EINSTELLEN DER T RFEDERSPANNUNG 1 Drehen Sie die Einstellschraube mit Hilfe eines Kreuzsch...

Страница 27: ...ionsort fixiert werden Dabei muss das Material der Arbeitsplatte in Betracht gezogen werden 1 NORMALE ARBEITSPLATTE Befestigen Sie das Ger t mit den entsprechenden Schrauben an der Arbeitsplatte s unt...

Страница 28: ...28 3 Ger teansicht und Bedienfeld 3 1 Ger teansicht Abb hnlich Modifikationen sind m glich...

Страница 29: ...ER SPR HARM 6 WASSERENTH RTER BEH LTER 3 FILTERSYSTEM 7 ECK SPR HARM 4 BEDIENFELD ZUBEH R BESTECKSCHUBLADE OBERER GESCHIRRKORB UNTERER GESCHIRRKORB 3 2 Bedienfeld Bedientasten und Anzeigen Das Bedienf...

Страница 30: ...e von einem Sp lprogramm zum n chsten Siehe auch Kapitel 6 Die SP LPROGRAMME D AUTO FFNEN TASTE Wenn diese Programmfunktion aktiviert ist ffnet sich die Ger tet r nach Ende eines Sp lprogramms automat...

Страница 31: ...Siehe auch Kapitel 6 2 1 ZUS TZLICHE PROGRAMM FUNKTIONEN W HLEN ANZEIGEN 1 DISPLAY Anzeige von DETAILLIERTEN INFORMATIONEN bez glich des gew hlten Programms und anderer Funktionen restliche Programml...

Страница 32: ...Siehe auch Kapitel 6 2 1 ZUS TZLICHE PROGRAMM FUNKTIONEN W HLEN 4 PROGRAMMANZEIGE AUTOMATISCH Leuchtet wenn das Sp lprogramm AUTOMATISCH eingestellt ist Sensor Das Ger t erkennt die Beladung und pass...

Страница 33: ...r leicht verschmutztes Geschirr Teller Gl ser Sch sseln etc Siehe auch Kapitel 6 DIE SP LPROGRAMME 9 PROGRAMMANZEIGE 90 MIN Leuchtet wenn das Sp lprogramm 90 MIN eingestellt ist Geeignet zum allt gli...

Страница 34: ...PROGRAMM FUNKTIONEN W HLEN 4 Vor der ersten Benutzung BERPR FEN SIE VOR DEM STARTEN DES GER TES OB 1 das Ger t gerade und fest steht 2 die Wasserzufuhr ge ffnet ist 3 die Verbindungen der Zu und Ablei...

Страница 35: ...R Durch Korrosion verursachte Sch den werden nicht durch die Garantie abgedeckt HINWEIS Wasserenth rter Sp lmaschinensalz verursacht Korrosion wenn nicht direkt nach dem Einf llen ein komplettes Sp lp...

Страница 36: ...en Deckel des Wasserenth rter Beh lters ab s unten Abb A 2 Wenn Sie den Beh lter zum ersten Mal bef llen f llen Sie den Beh lter zu 2 3 mit Wasser ca 500 ml s unten Abb B 3 Stecken Sie den mitgeliefer...

Страница 37: ...Korrosion auf Grund unsachgem er Nutzung entstanden sind KORROSIONS GEFAHR 4 1 2 Wasserh rtegrade Wasserenth rterverbrauch Die Wasserh rten in der untenstehenden Tabelle sind in Grad deutscher H rte...

Страница 38: ...bei jedem zehnten Programmlauf 9 H 3 bei jedem f nften Programmlauf 12 H 4 bei jedem dritten Programmlauf 20 H 5 bei jedem zweiten Programmlauf 30 H 6 bei jedem Programmlauf 60 Jeder Programmlauf mit...

Страница 39: ...Wasserenth rterverbrauchs an z B Wasserenth rterstufe H 3 SCHRITT 2 AUSWAHL DES WASSERENTH RTERVERBRAUCHS 1 Zur Auswahl der geeigneten Wasserenth rter Verbrauchseinstellung entsprechend den Anforderu...

Страница 40: ...sp ler Beh lter nicht da es ansonsten zu starker Schaumbildung kommen kann Wischen Sie versch tteten Klarsp ler mit einem weichen Tuch auf Vergessen Sie nicht nach dem Bef llen die Klappe des Klarsp l...

Страница 41: ...es Klarsp ler Beh lters A zu ffnen s Abb unten Pfeil A KLARSP LER BEH LTER B VERSCHLUSSHEBEL C KLAPPE DES KLARSP LER BEH LTERS 2 F llen Sie den Klarsp ler in den daf r vorgesehenen Beh lter s Abb unte...

Страница 42: ...t werden F nf Verbrauchseinstellungen sind w hlbar D 1 D 5 Je h her die Verbrauchs stufe desto h her der Klarsp lerverbrauch a D 1 niedrigster Klarsp lerverbrauch b D 2 niedriger Klarsp lerverbrauch c...

Страница 43: ...Nutzungsgewohnheiten zu w hlen 2 Jedes Dr cken der PROGRAMM TASTE ver ndert die Verbrauchseinstellung um eine Stufe Die Einstellungen sind fortlaufend D 1 D 2 D 3 D 4 D 5 D 1 SCHRITT 3 VERLASSEN DER...

Страница 44: ...mit einer h heren Temperatur SP LMASCHINEN TABS Sp lmaschinen Tabs verschiedener Hersteller l sen Verunreinigungen in unterschiedlichen Zeitperioden Aus diesem Grund k nnen einige Tabs bei Kurzsp lpro...

Страница 45: ...en tigen Sie nur einen Essl ffel Sp lmittel f r einen normalen Sp lprogramm St rker verschmutztes Geschirr erfordert eine h here Menge an Sp lmittel Benutzen Sie nur f r Sp lmaschinen geeignete Sp lmi...

Страница 46: ...Abb unten Pfeil A ABDECKUNG DES SP LMITTELBEH LTERS 3 Geben Sie das Sp lmittel immer vor dem Beginn eines jeden Sp lprogramms hinzu D s Abb unten Benutzen Sie nur f r Sp lmaschinen geeignete Sp lmitte...

Страница 47: ...an Sp lmittel auf die Innenseite der Geschirrsp lert r s Abb unten E INNENSEITE DER GESCHIRRSP LERT R 4 4 Zusammenfassung der Grundfunktionen WARNUNG Die folgende Zusammenfassung stellt lediglich ein...

Страница 48: ...EDIENTASTEN UND ANZEIGEN SP LMITTEL BEH LTER F LLEN KAMMER A Bei jedem Sp lvorgang B Innenseite der Geschirrsp lert r Nur bei Programmen mit Vorsp lgang KLARSP LERSTATUS PR FEN MECHANISCHE ANZEIGE C16...

Страница 49: ...TASTE wiederholt bis die Programmanzeige des gew nschten Sp l programms auf dem Display aufleuchtet PROGRAMM STARTEN ffnen Sie zuerst den Wasserhahn und schlie en Sie dann die T r Der Sp lvorgang begi...

Страница 50: ...s Beladen der Geschirrk rbe Entfernen Sie gr ere Mengen briggebliebener Nahrungsmittel vom Geschirr Sie brauchen das Geschirr vorher nicht unter flie endem Wasser absp len Weichen Sie vor dem Beladen...

Страница 51: ...me blockieren Geben Sie sehr kleine Gegenst nde nicht in das Ger t da diese leicht aus den K rben fallen k nnen 5 2 Oberer Geschirrkorb Der obere Geschirrkorb ist f r empfindliches und leichteres Gesc...

Страница 52: ...rb mehr Platz f r gr ere Gegenst nde Platzieren Sie lange Gegenst nde auf dem Regal sodass die Spr harme nicht in ihrer Rotation behindert werden Das Regal kann bei Bedarf zur ckgeklappt oder entfernt...

Страница 53: ...er Verriegelung des Korbes wird freigegeben 3 Setzen Sie den Geschirrkorb in die niedrige Position A OBERER GESCHIRRKORB B VERSTELLHEBEL 5 2 2 Einklappen der Tassenablagen Die Tassenablagen des oberen...

Страница 54: ...er und Deckel an den Seiten des Geschirrkorbs und blockieren Sie nicht die rotierenden Spr harme T pfe und Sch sseln m ssen sich mit der Oberseite nach unten im Geschirrkorb befinden TYP GESCHIRRART T...

Страница 55: ...t nden Platz zu bieten s Abb unten 5 4 Besteckschublade Legen Sie besonders lange Gegenst nde nur waagerecht und sicher in das Ger t damit Sie die rotierenden Spr harme nicht blockieren 19 Ausstattung...

Страница 56: ...fen Seite nach unten in die Besteckschublade Geben Sie Ihr Besteck au er scharfe Messer mit dem Griff nach unten in den Besteckkorb Legen Sie besonders lange Gegenst nde nur waagerecht und sicher in d...

Страница 57: ...nd rechts stehen schr g 2 Heben Sie die linke Schub ladenh lfte auf deren linker Seite an und setzen Sie sie dann auf die untere Position Die linke Schubladenh lfte steht waagerecht und die rechte ste...

Страница 58: ...enh lften berlappen sich auf der linken Seite Stellen Sie sicher dass das Besteck nicht herausfallen kann 5 Sie k nnen die rechte Schubladenh lfte aus dem Schubladenrahmen ent nehmen Es verbleibt nur...

Страница 59: ...2 Gegenst nde aus Silber oder Aluminium neigen dazu sich beim Sp len zu verf rben 3 Glasierte Muster k nnen bei h ufigem Sp len verblassen 5 6 Sch den an Glaswaren Geschirr M GLICHE URSACHEN MA NAHMEN...

Страница 60: ...r sehr stark verschmutztes Geschirr mit Eintrocknungen Vorsp len 50 C Hauptsp len 65 Sp len Sp len Sp len 60 C Trocknen 4 19 g oder 1 2 Tabs 205 Min 1 50 kWh 16 6 L Universal F r normal verschmutztes...

Страница 61: ...chnell Kurzes Sp len f r leicht verschmutztes Geschirr ohne Trocknung Hauptsp len 45 Sp len 45 C 12 g oder 1 Tab 30 Min 0 82 kWh 11 2 L Vorsp len Zum Absp len von Geschirr das sp ter gereinigt wird Vo...

Страница 62: ...AUFZEIT AUTO FFNEN HALBE BELADUNG STARTZEITVORWAHL UNIVERSAL SP LEN K RZERE PROGRAMMLAUFZEIT AUTO FFNEN HALBE BELADUNG STARTZEITVORWAHL ECO SP LEN K RZERE PROGRAMMLAUFZEIT AUTO FFNEN HALBE BELADUNG ST...

Страница 63: ...EL ff 5 ffnen Sie die Wasserzufuhr Das Ger t muss w hrend des Betriebs bei vollem Druck mit Wasser versorgt werden 6 Schalten Sie das Ger t mit der EIN AUS TASTE an s Kapitel 3 2 BEDIENFELD BEDIENTAST...

Страница 64: ...Kombination22 durch Aufleuchten der entsprechenden Anzeige n angezeigt wird Wenn das eingestellte Programm nicht mit der den eingestellten Funktion en kombiniert werden kann sind diese Programmfunkti...

Страница 65: ...isch gel scht und die Anzeigen schalten sich aus PROGRAMMFUNKTION K RZERE PROGRAMMLAUFZEIT Bei einigen Sp lprogrammen kann die Programmfunktion K RZERE PROGRAMMLAUFZEIT eingestellt werden Wenn diese P...

Страница 66: ...nicht blockiert ist wenn die Programmfunktion AUTO FFNEN aktiviert ist Dadurch kann die Funktion der T rverriegelung gest rt werden BESCH DIGUNGS GEFAHR Die Programmfunktion AUTO FFNEN ist eventuell...

Страница 67: ...eren Start des Sp lprogramms einstellen Aktivieren Sie die Programmfunktion STARTZEITVORWAHL durch Dr cken der entsprechenden Taste nachdem Sie das Sp lprogramm und m gliche zus tzliche Programmfunkti...

Страница 68: ...G TASTE ausw hlen ob das Sp lprogramm nur f r den oberen oder nur f r den unteren Geschirrkorb aktiviert wird Die Laufzeit des jeweiligen Sp lprogramms kann durch die Programmfunktion HALBE BELADUNG v...

Страница 69: ...s eingestellte Sp lprogramm die Funktion HALBE BELADUNG UNTERER GESCHIRRKORB zu aktivieren dr cken Sie die HALBE BELADUNG TASTE wiederholt bis die Betriebsanzeige dieser Funktion auf dem Display aufle...

Страница 70: ...en Betrieb Wenn Sie die T r wieder schlie en nimmt das Ger t nach ca 10 Sekunden automatisch wieder den Betrieb auf 6 4 Nachtr gliches Eingeben von Geschirr WARNUNG Es ist gef hrlich die T r bei laufe...

Страница 71: ...ZUS TZLICHE PROGRAMMFUNKTIONEN W HLEN 2 Nach Beendigung eines Sp lprogramms ert nt dreimal ein akustisches Signal und die T r des Ger tes ffnet sich automatisch s Abb unten 3 Die Betriebsanzeige des...

Страница 72: ...AUS TASTE aus 5 Drehen Sie die Wasserversorgung des Ger tes ab Wasserhahn schlie en 6 Warten Sie danach mit dem Entladen ca 15 Minuten da das Geschirr noch hei ist und so leichter zerbricht Au erdem...

Страница 73: ...wird 8 Reinigung und Pflege WARNUNG Trennen Sie das Ger t vor allen Wartungs und Reinigungsarbeiten von der Stromversorgung STROMSCHLAG GEFAHR WARNUNG Warten Sie nach dem Ende eines Sp lprogramms mind...

Страница 74: ...die R ckst nde herauszunehmen dr cken Sie leicht an den oberen Zapfen und heben Sie den Filter dann heraus C Der FEINFILTER h lt R ckst nde im Wasserablaufbereich zur ck damit diese nicht wieder auf...

Страница 75: ...r t entnehmen Entfernen Sie m gliche R ckst nde und reinigen Sie die Filter unter flie endem Wasser ENTNAHME UND EINSETZEN DES FILTERSYSTEMS 1 Drehen Sie den Grobfilter B gegen den Uhrzeigersinn um da...

Страница 76: ...Feinfilter sind nun voneinander getrennt s Abb unten A HAUPTFILTER B GROBFILTER C FEINFILTER 5 Reinigen Sie die einzelnen Filter gr ndlich wie oben unter REINIGUNG DES FILTERSYSTEMS beschrieben 6 F r...

Страница 77: ...hrter Reihenfolge vor 8 Setzen Sie das gesamte Filtersystem ordnungsgem im Boden des Ger tes ein 9 Drehen Sie den Grobfilter B im Uhrzeigersinn um das gesamte Filtersystem zu fixieren s Abb unten Pfei...

Страница 78: ...oder andere raue oder aggressive Reinigungsmittel um eine beliebige Stelle des Ger tes zu reinigen 8 3 Reinigung der Spr harme Reinigen Sie die Spr harme regelm ig da Chemikalien und Mineralien die D...

Страница 79: ...den unteren Spr harm D zu entnehmen ziehen Sie ihn nach oben heraus s Abb unten Pfeil D UNTERER SPR HARM 3 Um den Eck Spr harm E zu entnehmen ziehen Sie ihn ebenfalls nach oben heraus s Abb unten Pfei...

Страница 80: ...diese das Schloss und die Elektrik nachhaltig besch digen k nnen STROMSCHLAGGEFAHR BESCH DIGUNGSGEFAHR HINWEIS Benutzen Sie niemals scharfkantige Gegenst nde Scheuer Pads Scheuermittel L sungsmittel...

Страница 81: ...rablauf HINWEIS Falls Ihr Ger t auf Grund von Vereisung nicht arbeiten kann wenden Sie sich bitte an den Kundendienst 26 8 6 Au erbetriebnahme 1 Wenn Sie das Ger t eine Zeit lang nicht benutzen z B w...

Страница 82: ...NICHT 1 Abwasserschlauch ist geknickt 1 Abwasserschlauch berpr fen 2 Filter sind verstopft 2 Grobfilter berpr fen 3 Sp lbecken ist verstopft 3 Sp lbecken auf Verstopfungen berpr fen SP LMITTEL VERBLEI...

Страница 83: ...Vor Ort Montage oder den Querschnitt der Leitungen bedingt sein 5 Dieses hat keinen Einfluss auf die Funktion des Ger tes Falls Sie sich unsicher sind kontaktieren Sie einen geeignete n und qualifizie...

Страница 84: ...Klarsp ler im Ger t befindet F llen Sie bei Bedarf Klarsp ler auf 3 Geschirr wurde zu fr h aus dem Ger t entnommen 3 Warten Sie mind 15 Minuten bis Sie das Geschirr aus dem Ger t entnehmen 4 Benutzun...

Страница 85: ...geben von Wasserenth rter Sp lmaschinen salz immer ein Schnellwasch programm ohne Geschirr FLECKEN UND BEL GE AUF GL SERN UND BESTECKEN 1 Sehr hartes Wasser 1 berpr fen Sie die Wasserh rte 2 Sehr nied...

Страница 86: ...k E 3 Erforderliche Temperatur wird nicht erreicht Fehlfunktion des Heizelements bitte kontaktieren Sie den Kundendienst E 4 ber Auslaufen berf llung Zu gro e Wasserzufuhr Eine Komponente des Ger tes...

Страница 87: ...istung 2100 W Leistungsaufnahme ausgeschaltet 0 45 W Leistungsaufnahme nicht ausgeschaltet 0 49 W Programmdauer Standardprogramm ECO 4 ECO 230 Minuten Innenraum Edelstahl Heizelement verdeckt Programm...

Страница 88: ...Kindern gelangen ERSTICKUNGSGEFAHR 2 Nicht mehr benutzte und alte Ger te m ssen der zust ndigen Wiederverwertungsstelle zugef hrt werden Keinesfalls offenen Flammen aussetzen 3 Bevor Sie ein beliebig...

Страница 89: ...chswert des Produkts keinen Einfluss haben 3 Sch den infolge Betriebs und Bedienungsfehler 4 Sch den durch aggressive Umgebungseinfl sse Chemikalien Reinigungsmittel 5 Sch den am Produkt die durch nic...

Страница 90: ...0 2 4 Installation of the water supply hose cold water 101 2 5 Installation of the water drain hose 103 2 6 Raised level installation 105 2 7 Electrical connection 106 2 8 Installation of the applianc...

Страница 91: ...3 5 6 Damage to glasses and dishes 144 6 The cleaning programmes 144 6 1 The additional programme functions 146 6 2 Starting of a cleaning programme 147 6 2 1 Selection of an additional programme func...

Страница 92: ...e appliance shall remain reserved by the manufacturer Please dispose of the packing with respect to your current local and municipal regulations The appliance you have purchased may be an enhanced ver...

Страница 93: ...ed by a qualified professional The appliance is intended for private use only as well as to be used 1 in staff kitchen areas of shops offices and other working environments 2 by clients in hotels mote...

Страница 94: ...gulations RISK OF ELECTRIC SHOCK 3 Do not connect the appliance to the mains if the appliance itself or the power cord or the plug are visibly damaged RISK OF ELECTRIC SHOCK 4 The technical data of yo...

Страница 95: ...upply unless all packaging and transit protectors have been removed 4 Operate the appliance with 220 240 V 50 Hz AC only All connections and energy leading components must be replaced by an authorised...

Страница 96: ...rol panel flicker the appliance malfunctions Disconnect the appliance from the mains and the water supply immediately in such a case 21 Do not operate the appliance without the filters installed 22 Ch...

Страница 97: ...nerals and salts on your dishes and in the appliance The water softener removes minerals and salts from the water 7 Use a rinse aid which is suitable for a dishwasher only Never use other chemical sub...

Страница 98: ...Use brand new hoses and connector kids only We recommend securing the water supply with a back pressure valve NOTICE After the installation of the water supply and wastewater disposal as well as befor...

Страница 99: ...trip INSTALLATION OF THE CONDENSATION STRIP DEPENDING ON MODEL 1 Before installation you must install the condensation strip28 on the bottom side of the worktop to protect it from the water vapor rele...

Страница 100: ...LIANCE A B C Door closed C 1 Door open 815 mm 598 mm 550 mm 1150 mm LATERAL SPACE REQUIREMENT OF THE OPEN DOOR To open the door of the appliance freely the lateral minimum distance of the open door to...

Страница 101: ...by a qualified professional The appliance is equipped with a water supply and a water drain hose which can be installed on the right or left29 to ensure proper installation Use brand new hoses and co...

Страница 102: ...supply hose with the inches thread on the tap 3 Open the water supply completely before you operate the appliance NOTICE A hose that attaches to a sink spray can burst if it is installed on the same w...

Страница 103: ...CT THE WATER DRAIN HOSE 1 Insert the water drain hose 5 into a drainpipe 6 with a diameter of at least 40 mm or into a sink s below installation A or installation B 2 Do not bend or squeeze the water...

Страница 104: ...n a suitable container which is held outside and lower than the sink If the length of the water drain hose is not sufficient apply to your authorised service for an extension made from the same materi...

Страница 105: ...ially and fully integrated appliances can be installed at a raised level when connected properly 33 A collar enables the bending of the drain hose There is a holding device on the collar to fix the co...

Страница 106: ...ted information on the rating plate Connect the appliance to a properly grounded safety socket only The connection must be carried out in accordance with the current local and legal regulations RISK O...

Страница 107: ...and near a safety socket HOW TO INSTALL THE APPLIANCE IN THE INSTALLATION OPENING 1 Prepare an installation opening according to the figure below Depending on where your safety socket is located you...

Страница 108: ...appliance with its supporting feet horizontally Check with a spirit level HOW TO LEVEL THE APPLIANCE PROPERLY 1 The appliance must stand in a stable and level position to ensure proper operation 2 Pla...

Страница 109: ...109...

Страница 110: ...EAR SUPPORTING FOOT C 2 FRONT SUPPORTING FEET 2 10 Fixing of the front decoration panel 1 Remove the four short screws A from the appliance door s fig below A SCREW HOLES SHORT SCREWS 4 pcs 2 Install...

Страница 111: ...E DECORATION PANEL 3 Align the decoration panel with the outside of the appliance door properly and fix it using the four long screws C s fig below C SCREW HOLES LONG SCREWS 4 pcs D DECORATION PANEL E...

Страница 112: ...ckwise direction for proper adjustment or let the balance adjust by an experienced person HOW TO ADJUST THE DOOR SPRING TENSION 1 Turn the setscrew to tighten or loosen the steel cable using a Phillip...

Страница 113: ...2 13 Fixing of the appliance The appliance must be fixed properly The material of the worktop must be considered 1 NORMAL WORKTOP fix the appliance on the worktop using the appropriate screws see belo...

Страница 114: ...114 3 Appliance view and control panel 3 1 Appliance view Fig similar modifications are possible...

Страница 115: ...SPRAY ARM 6 WATER SOFTENER CONTAINER 3 FILTER SYSTEM 7 CORNER SPRAY ARM 4 CONTROL PANEL ACCESSORIES CUTLERY DRAWER UPPER DISH RACK LOWER DISH RACK 3 2 Control panel operating buttons and indicators Th...

Страница 116: ...rough the different cleaning programmes See also chapter 6 THE CLEANING PROGRAMMES D AUTO OPENING BUTTON When this programme function is activated the appliance door opens automatically after a cleani...

Страница 117: ...L PROGRAMME FUNCTION INDICATORS 1 DISPLAY Indication of DETAILED INFORMATION indicates the set cleaning programme and other functions remaining cleaning time delay time error codes etc 2 WARNING INDIC...

Страница 118: ...OF AN ADDITIONAL PROGRAMME FUNCTION 4 PROGRAMME INDICATOR AUTO This indicator will go on when the cleaning programme AUTO is activated Internal sensor the appliance detects the load and adjusts the c...

Страница 119: ...NDICATOR GLASS This indicator will go on when the cleaning programme GLASS is activated This cleaning programme is suitable for the cleaning of slightly soiled dishes plates glasses bowls etc See also...

Страница 120: ...er 6 2 1 SELECTION OF AN ADDITIONAL PROGRAMME FUNCTION 13 OPERATIONAL STATUS INDICATOR HALF LOAD LOWER DISH RACK This indicator will go on when the programme function HALF LOAD LOWER DISH RACK is acti...

Страница 121: ...cause corrosion When refilling water softener you always must initiate a complete cleaning programme immediately after RISK OF CORROSION Any damage caused by corrosion is not covered by the guarantee...

Страница 122: ...5 kg water softener dishwasher salt in the container s below fig C It is normal that a small amount of water runs out of the container 4 Close the lid carefully s below fig D 5 The water softener ind...

Страница 123: ...e requirements in your place of residence You need to get the information on the local water hardness range You can receive all relevant information from your local water supplier The appliance is equ...

Страница 124: ...creases by 0 02 kWh and the respective programme duration is extended by 4 minutes 4 1 3 Setting of the water softener consumption It is required to set the proper amount of the water softener based o...

Страница 125: ...s the consumption setting by one level The settings are consecutive H 1 H 2 H 3 H 4 H 5 H 6 H 1 Water softener dishwasher salt is added to a running programme by the appliance automatically When and h...

Страница 126: ...lled to capacity The smaller the spot the emptier the container s fig below The container should be filled not less than 25 FULL 75 50 25 REFILL EMPTY X RINSE AID INDICATOR37 4 2 1 Filling of the rins...

Страница 127: ...CONTAINER 2 Pour the rinse aid in the container s fig below Do not overfill C FLAP OF THE RINSE AID CONTAINER D FILLING HOLE E RINSE AID X RINSE AID INDICATOR 3 Close the flap C of the rinse aid cont...

Страница 128: ...ng increase the amount of rinse aid If whitish stripes are on glasses or bluish film is on the cutlery after cleaning decrease the amount of rinse aid STEP 1 ENTER RINSE AID SETTING MODE 1 Open the do...

Страница 129: ...nents low alkaline concentrated detergents with natural enzymes Normal programmes combined with concentrated detergents prevent pollution and are also good for your dishes Such programmes support the...

Страница 130: ...ger useful It may be helpful to set the water hardness to the smallest possible value 4 3 1 The detergent container You must fill the container matching the information of the programme schedule s cha...

Страница 131: ...B RELEASE BUTTON C LOCKING SLIDER 2 Slide the cover of the detergent container A forward s fig below arrow A COVER OF THE DETERGENT CONTAINER 3 Fill the container just before starting a cleaning progr...

Страница 132: ...ver backwards see fig below arrow and press it down carefully until the latch snaps into place A COVER OF THE DETERGENT CONTAINER 5 If your dishes are heavily soiled put a small additional amount of d...

Страница 133: ...tential operational risks as well as the additional functions of the appliance HOW TO SWITCH ON THE APPLIANCE Open the door Press the ON OFF BUTTON to switch on the appliance s chapter 3 2 CONTROL PAN...

Страница 134: ...ess the PROGRAMME BUTTON repeatedly until the programme indicator of the desired cleaning programme goes on STARTING OF A PROGRAMME Open the tap first and then close the door The cleaning programme wi...

Страница 135: ...mance of your appliance The features and design of the racks depend on model 5 1 General loading instructions Remove any remnants of food from the dishes You do not need to rinse the dishes under flow...

Страница 136: ...very small objects in the appliance as they may easily drop out of the racks 5 2 Upper dish rack The upper dish rack is intended for delicate and light dishes such as glasses cups saucers small platte...

Страница 137: ...an fold back the shelf if need be 1 You can adjust the position of the upper dish rack A Lift the upper dish rack to the higher position using both hands until it locks into place s fig below 2 It is...

Страница 138: ...low arrow Fig similar modifications are possible 5 3 Lower dish rack The lower dish rack is intended for objects which are hard to clean such as pots pans lids platters and bowls Place platters and li...

Страница 139: ...11 OVAL SERVING PLATE 8 DESSERT PLATES 12 DESSERT PLATES 9 DINNER PLATES 13 BOWLS 14 SMALL POT You can fold the folding shelves of the lower dish rack to provide free space for bigger items s fig bel...

Страница 140: ...140 5 4 Cutlery drawer Place long objects vertically and safely in the appliance so they do not block the spray arms HOW TO LOAD THE CUTLERY DRAWER...

Страница 141: ...lace the cutlery except sharp knives with the handles at the bottom Place long objects vertically and safely in the appliance so they do not block the spray arms CAUTION 1 Do not let any items extend...

Страница 142: ...ft side and then set it to the lower position The left half of the cutlery drawer is horizontal and the right half is slanted 3 Lift the right half of the cutlery drawer on its left side Both the left...

Страница 143: ...er frame Only the left half of the cutlery drawer remains in the appliance Ensure that the cutlery cannot drop out 5 5 Unsuitable dishes cutlery THE FOLLOWING OBJECTS ARE NOT SUITABLE TO BE WASHED IN...

Страница 144: ...of the glasses dishes or their production method Use dishwasher proof glasses and dishes only The chemical composition of your detergent Use a mild dishwasher detergent The manufacturer of the deterge...

Страница 145: ...soiled dishes Standard programme for daily use Main wash 50 Rinse Rinse 45 C Drying 19 g or 1 2 tabs 230 min 0 76 kWh 10 0 l Glass For slightly soiled dishes plates glasses bowls slightly soiled pans...

Страница 146: ...e in terms of its combined energy and water consumption for that kind of dishes PW pre wash MW main wash 6 1 The additional programme functions PROGRAMME AVAILABLE ADDITIONAL PROGRAMME FUNCTIONS AUTO...

Страница 147: ...water softener dishwasher salt in the relevant containers s chapter 4 1 WATER SOFTENER DISHWASHER SALT et seq chapter 4 2 RINSE AID et seq and chapter 4 3 DISHWASHER DETERGENT et seq 5 Open the tap Du...

Страница 148: ...e function 2 Press the corresponding button s once or repeatedly until the indicator of the desired programme function or combination42 is displayed If the selected cleaning programme cannot be combin...

Страница 149: ...ns cannot be selected or will be cancelled and the indicators switches off automatically PROGRAMME FUNCTION TURBO SPEED The programme function TURBO SPEED can be set for some cleaning programmes When...

Страница 150: ...ENING is activated This may interfere with the door locking function RISK OF DAMAGE The programme function AUTO OPENING may not be available for all cleaning programmes see also chapter 6 1 THE ADDITI...

Страница 151: ...ROGRAMME FUNCTION DELAYED PROGRAMME START You can set a delayed programme start Set the cleaning programme and the desired additional programme function s first and then activate this function using t...

Страница 152: ...ng programme can be reduced by this programme function NOTICE Do not use this programme function when the dishwasher is fully loaded otherwise the cleaning effect of the appliance will be reduced The...

Страница 153: ...s not operate If the selected cleaning programme cannot be combined with the desired programme function s these functions cannot be selected or will be cancelled and the indicators switches off automa...

Страница 154: ...F BURNS You can put dishes later in the appliance unless the detergent container has opened 1 Open the door slightly to stop operation 2 You can open the door completely after the rotating spray arms...

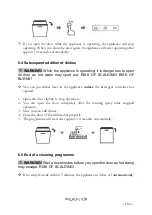
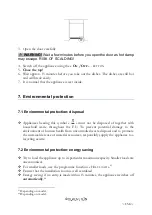
Страница 155: ...ce using the ON OFF BUTTON 5 Close the tap 6 Wait approx 15 minutes before you take out the dishes The dishes are still hot and will break easily 7 It is normal that the appliance is wet inside 1 The...

Страница 156: ...sed of together with household waste throughout the EU To prevent potential damage to the environment or human health from uncontrolled waste disposal and to promote the sustainable reuse of material...

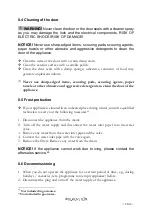
Страница 157: ...or of the appliance so the heating elements can cool down RISK OF BURNS WARNING Never use a cleaner spray as you may damage the lock and the electrical components RISK OF ELECTRIC SHOCK RISK OF DAMAGE...

Страница 158: ...ile Clean the filters regularly Check the status of the filters after each cleaning programme Remove large food particles and any remnants after a cleaning programme has ended by rinsing the filters w...

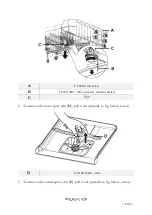
Страница 159: ...COARSE FILTER 2 Separate the fine filter C from the filter system by pulling it downwards s fig below 3 Separate the coarse filter B from the filter system press the upper pins gently and pull the co...

Страница 160: ...AN THE FILTER SYSTEM 6 You can use a suitable cleaning brush D for the cleaning of the fine C and coarse filter B s fig below B COARSE FILTER C FINE FILTER D SUITABLE CLEANING BRUSH 7 To reconnect the...

Страница 161: ...exterior of the appliance with a suitable polish Never use sharp edged items scouring pads scouring agents paper towels or other abrasive and aggressive detergents to clean any component of the applia...

Страница 162: ...SH RACK B UPPER SPRY ARM unscrew anticlockwise C NUT 2 To remove the lower spray arm D pull it out upwards s fig below arrow D LOWER SPRAY ARM 3 To remove the corner spray arm E pull it out upwards s...

Страница 163: ...arm soapy water and the nozzles with a soft brush F s fig below 5 Rinse the spray arms thoroughly using flowing water s fig below F SOFT BRUSH 6 Proceed in reverse order to install the spray arms prop...

Страница 164: ...s to clean the door of the appliance 8 5 Frost protection If your appliance is situated in an unheated place during winter consult a qualified technician to carry out the following measures45 1 Discon...

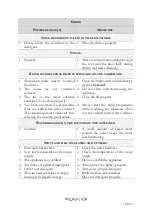
Страница 165: ...door is not closed properly 4 Ensure that the door of the dishwasher is closed properly NOISE 1 Some noise is normal 1 The detergent container has opened 2 Dishes are placed improperly Small objects d...

Страница 166: ...k the spray arms CLOUDINESS ON GLASSWARE 1 Soft water in combination with too much detergent 1 If you have soft water use less detergent Select a short programme for glassware WHITE FILM ON INNER SURF...

Страница 167: ...after you added the water softener The remaining water softener is now affecting the running programme 4 Always start the rapid programme without adding any tableware when you have added some water so...

Страница 168: ...ce 9 1 Error codes ERROR CODE MEANING POSSIBLE CAUSES E 1 Long water inlet time Tap is closed Water intake is restricted Water pressure is too low E 3 Required temperature is not reached Malfunction o...

Страница 169: ...rgy consumption off mode 0 45 W Energy consumption left on mode standby 0 49 W Standard cleaning programme duration4 ECO 230 minutes Interior Stainless steel Heating elements Hidden Programmes Auto In...

Страница 170: ...ne bags polystyrene pieces etc should be kept away from children CHOKING HAZARD 2 Old and unused appliances must be sent for disposal to the responsible recycling centre Never expose to open flames 3...

Страница 171: ...not influence the utility value of the product 3 damage caused by handling errors or false operation 4 damage caused by aggressive environmental conditions chemicals detergents 5 damage caused by non...

Страница 172: ...Kundendienst auf der Einlage in dieser Bedienungsanleitung Aftersales service information on the leaflet inside this instruction manual nderungen vorbehalten Subject to alterations STAND UPDATED 16 0...

Отзывы: