background image


9


Note:

  The  “Remove”  buttons  in  last  column  allow  you  to  remove  the  corresponding  configurations  for  IP 

Control/RS232. 


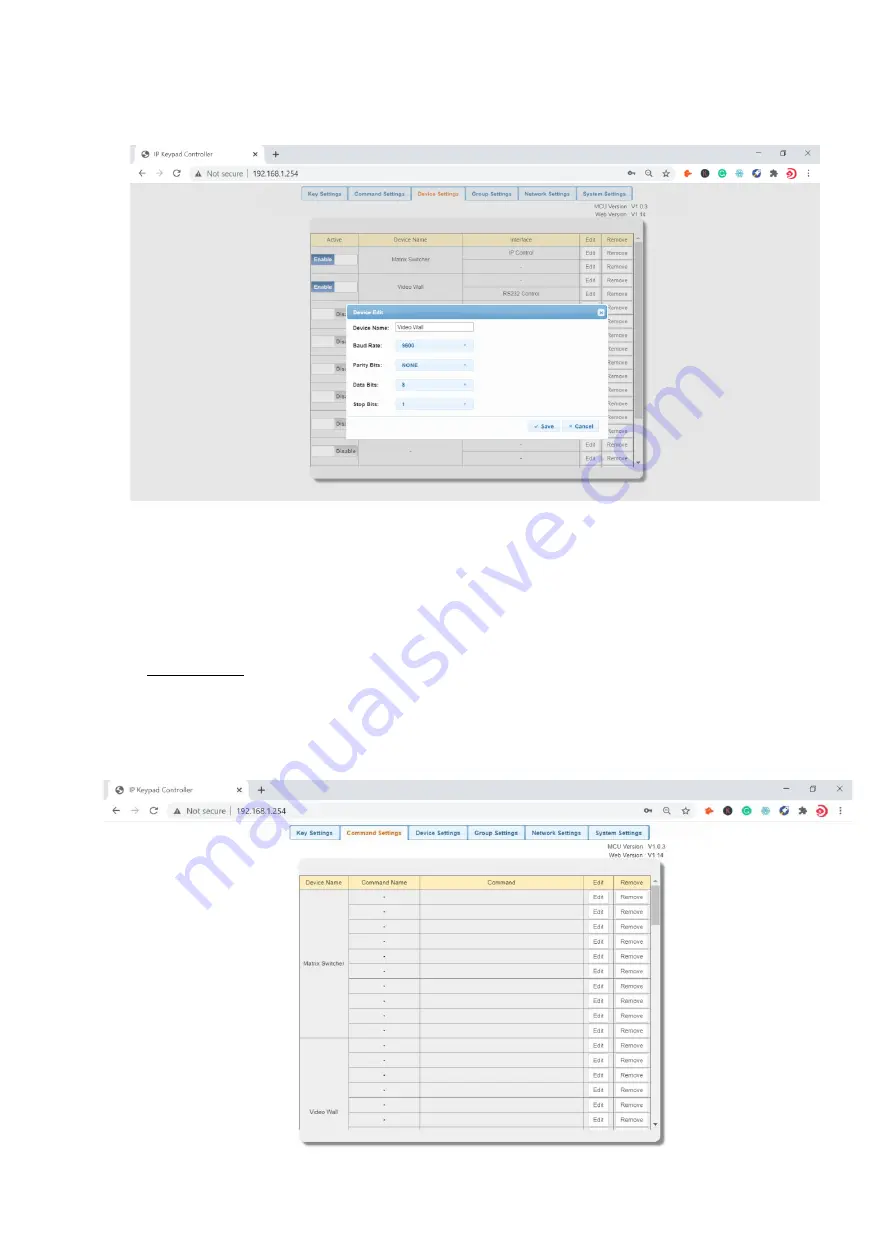
Command Settings


After 

Device Settings

 is configured successfully, click “Command Settings” to set control commands for the stored 

devices in “Device Settings” section.


Note:

 The control commands are provided by third

-

party devices manufacturers and can be found in instructional 

documentations.


Содержание WolfPad

Страница 1: ...1 WolfPad Programmable 10 button Keypad with PoE Function WolfPad User Manual ...

Страница 2: ...o not install or place this product near any heat sources such as radiators heat registers stoves or other apparatus including amplifiers that produce heat 8 Protect the power cord from being walked on or pinched particularly at plugs convenience receptacles and the point where they exit from the product 9 Only use attachments accessories specified by BC to avoid fire shock or other hazards 10 To ...

Страница 3: ...3 Contents Important Safety Information 2 1 Introduction 1 2 Features 1 3 Package Contents 1 4 Panel Description 1 5 Specification 2 6 Installation 3 7 Configuration settings 3 Application 18 ...

Страница 4: ...LAN PoE port or RS232 port It supports button configuration and control also system firmware update on web UI 2 Features WEB GUI programming Ten buttons Supports TCP IP and RS232 Supports PoE function US or UK single panel for selection 3 Package Contents 1 x BYOD 1000 1 x 1 Gang US Plastic Decora Plates White 1 x Phoenix Male Connector 3 5mm 2 Pins 1 x Phoenix Male Connector 3 5mm 3 Pins 2 x 6 32...

Страница 5: ... in the package Factory default setting The factory default IP address is 192 168 1 254 Press the two buttons shown in the above picture at the same for at least until all the backlights of the buttons blink 3 times the keypad will be reset to factory defaults 5 Specification Technical Front panel 10 x Buttons silicone soft buttons Back panel 1 x LAN RJ45 PoE 1 x RS232 1 x DC 12V Power In Operatin...

Страница 6: ...ower the keypad should start work press the any button it will flash 7 Configuration settings The keypad supports WEB GUI to setup devices and configure commands for the Keypad buttons it also supports to set network and system information The Web UI can be accessible through a browser with latest version e g Chrome Firefox Safari Opera IE10 etc Step 1 Connect LAN PoE port of the keypad to an Ethe...

Страница 7: ...evices See the following diagram Input the IP address the factory default IP address is 192 168 1 254 to the browser and press Enter The following Login window will display Input the default Username admin and Password admin Click Login to enter the following page ...

Страница 8: ...e and store functions for buttons Network Settings is used to configure DHCP Static IP information System Settings is used to configure general system settings Configure Functions for Buttons Device Settings Command Settings and Key Settings submenus allows you to set up mostly used devices and commands for quick button function definition The configuration sequence should be as follows ...

Страница 9: ...mmonly used devices See operation in detail as below The controlled devices can be connected to LAN via network port or RS232 port of the keypad Users can configure IP control parameters and RS232 control parameters for these most commonly used devices by clicking the Edit to start ...

Страница 10: ...acters and can include letters numbers and underscores IP Address Input the IP address of the controlled device Connect Port Input the port number of the controlled device Username Input the telnet control username of the controlled device Password Input the telnet control password of the controlled device Note The Connect Port Username and Password are provided by third party devices manufacturer...

Страница 11: ...documentations Device Name The Device Name configured in the first Edit tab Baud Rate Select the baud rate from the drop down menu Parity Bits Select the parity bits from the drop down menu Data Bits Select the data bits from the drop down menu Stop Bits Select the stop bits from the drop down menu 3 Click Save or Cancel to save or cancel the configurations above If you click Save the page will re...

Страница 12: ... Control RS232 Command Settings After Device Settings is configured successfully click Command Settings to set control commands for the stored devices in Device Settings section Note The control commands are provided by third party devices manufacturers and can be found in instructional documentations ...

Страница 13: ... command type accordingly to the controlled devices Command When the command is string it will have the end flag for selections but when use HEX it will be no end flag 3 Click Save or Cancel to save or cancel the configurations above If you click Save the page will return to the Command Settings tab automatically Note The Remove button in last column allow you to remove the corresponding command o...

Страница 14: ... the button red box of Fig 1 take KEY1 as an example to enter the following page Fig 2 Fig 1 Fig 2 2 Configure the items in the picture above Key alias edit Configure a name for the button then click Save to take effect Note The length of each button s name shall not exceed 24 characters and can include letters numbers and underscores Command Click Edit in the web table to choose devices that are ...

Страница 15: ... the picture above Delay ms Set the delay time for the command to be sent to the controlled device when press the button It can be left blank Interface Select the control interface from pull down list Telnet or RS232 Note Select the interface according to the actual connection requirements Command Select one command from the drop down menu c Click Save to save the configurations ...

Страница 16: ...nu to enter the configuration page DHCP When keypad DHCP mode is enabled the keypad should connect to network with DHCP server The IP address Netmask and gateway parameters will be automatically assigned by DHCP server Static When keypad is set to Static IP mode the IP address netmask and gateway parameters can be assigned manually Save Save the configuration changes Note The keypad default networ...

Страница 17: ...umbers or underscores it must be within 4 to 16 characters in length 2 Web Login Timeout Minutes Configure web login timeout to automatically exit web in certain time Click to configure the timeout from the drop down menu 5 60 minutes optional The default timeout is 10 min 3 Download Current Configuration Click Download to save current configurations Save Click Save to save the configuration file ...

Страница 18: ...e from local PC Note After selecting the wanted bin file it may show fakepath message on the page This is designed to hide the bin file path for protection Restore Click Restore to begin to restore the configuration from the selected bin file Note Users can customize the config file by adding the name after config but not able to delete the config 5 Reset to Default Click Reset to reset the keypad...

Страница 19: ...reboot the unit A notice window will pop up as follows After rebooting the keypad successfully the buttons on front panel blink 3 times and the web page returns to the login page 7 Web Upgrade Select a file Select a Web UI upgrade bin file from the local PC Upgrade Click Upgrade to start Web UI upgrade A notice window will pop up as follows ...

Страница 20: ...d the web page will be refreshed automatically 8 MCU Upgrade Select a file Select an MCU upgrade bin file from the local PC Upgrade Click Upgrade to start MCU upgrade The WolfPad keypad will reboot and the web page will be refreshed automatically when MCU upgrading is completed ...

Страница 21: ...figurations on Web UI section 1 Connect the controlled third party device to LAN PoE port or RS232 port of the keypad 2 Connect the DC 12V power adapter to the keypad Note If the controlled device connected to LAN PoE port supports PoE function the keypad can receive power from it and no additional power adapter is needed 3 Power on all devices 4 Press the buttons on front panel of the keypad to c...

Отзывы: