#NAME?
W 0 0 0 1 S K 2 7 U - F IT $ 0 1 1 3 1 0 2 5 0 0 0 0
Fitting
Instructions
TOWBAR
For SKODA OCTAVIA SALOON/
ESTATE
AUDI A3, SPORTBACK
SEAT LEON 2013-
SK27U
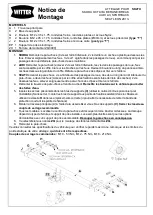
MATERIALS
A 1 Cross Bar.
C 2 Sidearm.
G 2 M12 x 35 x 1.75 bolts with lock washers, flat washers and Nyloc nuts.
H 2 M12 x 45 x 1.75 bolts, lock washers, flat washers (40o.d.), Witter square nuts (
“T” type)
and retainers.
J 2 M12 x 35 x 1.75 bolts with lock washers, square nuts
(NOT
“T” type)
EP 1 Electric plate.
ZX 1 Detachable kit (ZQ3000)
FITTING
1.
SKODA
Remove bumper (4 screws on lower edge, 2 screws beneath light cluster under plastic capping in boot channel
(carefully remove light clusters), 3 screws and 1 push in clip around wheel arch.) starting at wheel arches prise bumper
from clips and push down clips under light clusters, which will enable the bumper to Slide backwards off side panel sliders.
2.
AUDI
Remove Bumper ( remove 2 screws on lower edge, remove screws within wheel arches, remove light clusters
access gained from inside boot, pull up plastic pins at light clusters unscrew 4 bolts hidden across the back panel under
plastic panel and boot linings. Carefully prise plastic clips and slide bumper rearwards.
3.
SEAT
Remove bumper, screws inside wheel arches, screws along bottom edge of bumper, remove the light clusters
(small removable access panels inside boot edge) 2 screws under light clusters, carefully prise plastic clips and slide
bumper rearwards
4.
Remove crash beam and hand to end user for re-fitment when bar is removed.
Refit bolts to rear panel to prevent
ingress of water.
5.
Insert Caged Nuts into the Side Arms C. (Use Cage Nut installation guide to assist with fitment). Loosely attach Side Arms
to existing side mountings inside the chassis (may have to remove tape covering holes) using fixtures H in correct
locations.
6.
Attach Cross Bar (A) using fixtures G & J to the Side Arms.
Fully Tighten Bolts to recommended settings.
7.
All vehicles
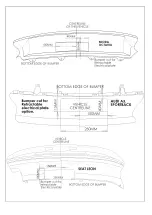
Locate centre of bumper and cut as shown below. Cut is dependant on the neck option required and
therefore the electrical plate used. Examples shown are for detachable option with retractable electrical plate. Please
Cut
bumper accordingly.
8.
Please refer to ZQ fitting instruction for fitting of ZQ detachable unit.
9.
Refit Bumper,
10. Please refer to the vehicle specification for the trailer weight and nose limits, which
must be observed
.
Recommended torque settings:
M10 - 53 Nm, M12 - 75 Nm, M16 - 214 Nm


