background image

DVR-0015C-WISEUP

User Guide

I. Product Overview

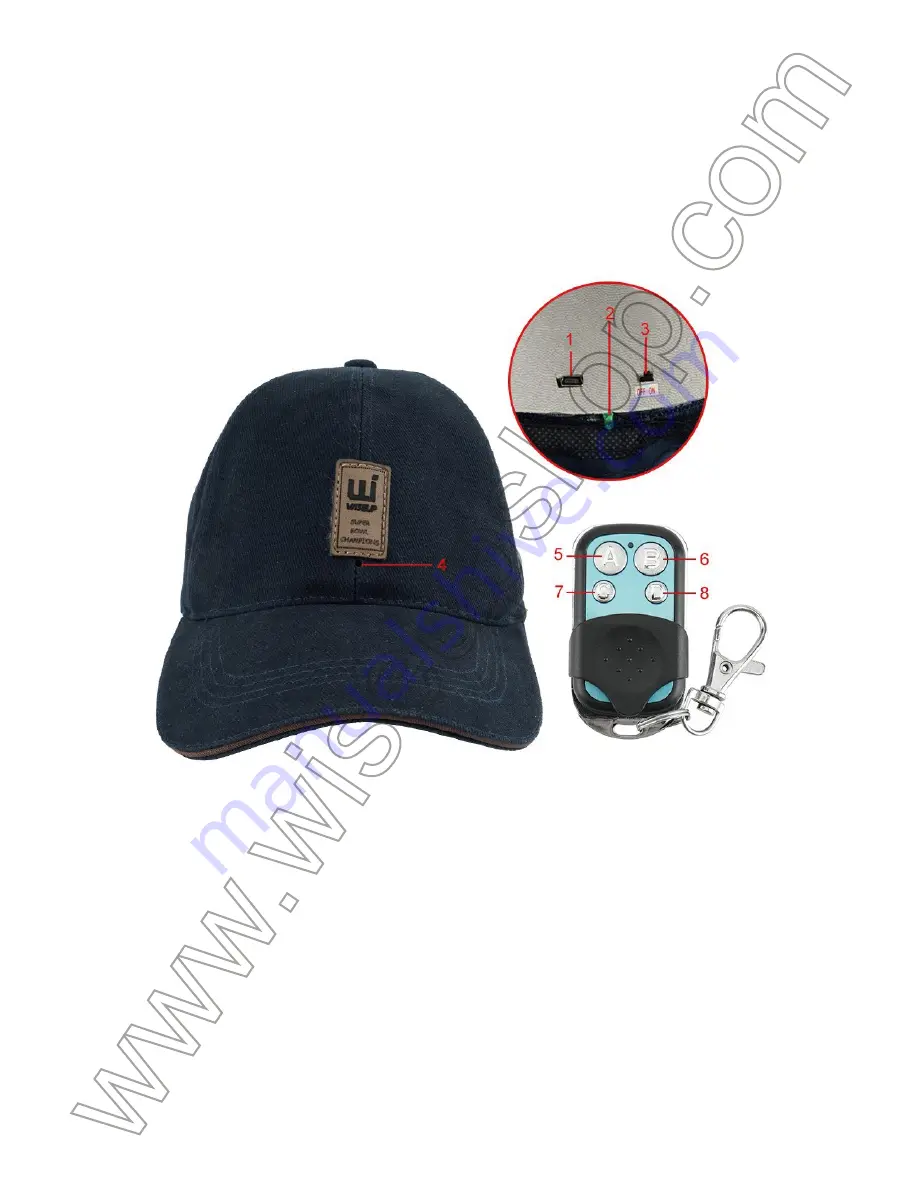
1. USB Port
2. Yellow Indicator Light
3. Power Switch
4. Camera Lens
5. Power Button
6. Video Recording Button
7. Camera Button
8. Motion Detection Recording Button
 

II. What’s in the Box

 -1× Baseball Cap Camera
-1× USB Cable
-1× 2.4GHz Remote Controller
-1× AC110-230V to DC 5V Charging Adapter

III. Operation

>> Before using, make sure that the cap camera is fully recharged and format the 
camera on your PC computer by using the USB cable provided.

3.1. POWER ON/OFF

3.1.1. Slide the Power Switch to the ON position, pressing the Power Button for 1 
second to power on the camera. The camera will vibrate once, the yellow indicator 
light will stay illuminated, indicating the camera has entered into standby mode 
automatically.
3.1.2. Press the Power Button once, slide the Power Switch to the OFF position to 
power off the camera. The camera will vibrate once, the yellow indicator light will 
flash 3 times and then turn off.

[Note]:


The camera will shut down automatically if it is in standby mode without any 

operation more than 1 minute.

3.2. VIDEO RECORDING

3.2.1. Slide the Power Switch to the ON position, pressing the Power Button for 1 
second to power on the camera. The camera will vibrate once, the yellow indicator 
light will stay illuminated, indicating the camera has entered into standby mode 
automatically.
3.2.2. Press the Video Recording Button for 2 seconds to record video. The camera 
will vibrate once, the yellow indicator light will flash twice and then turn off.
3.2.3. Press the Video Recording Button once to stop video recording. The camera 
will vibrate twice, the yellow indicator light will stay illuminated, indicating the 
camera is back to standby mode.
[

Note]:

1). A video clip will be generated and saved every 5 minutes automatically.
2). 40 minutes video will take up 8GB memory.
3). Video Resolution: 1920×1080P                              Video Format: AVI

3.3. CAMERA/STILL  PHOTOGRAPHY

3.3.1. Slide the Power Switch to the ON position, pressing the Power Button for 1 
second to power on the camera. The camera will vibrate once, the yellow indicator 
light will stay illuminated, indicating the camera has entered into standby mode 
automatically.
3.3.2. Press the Camera Button once to take a photo. The camera will vibrate once, 
the yellow indicator light will flash once and then stay illuminated, indicating the 
camera is back to standby mode.

3.4. MOTION DETECTION RECORDING

3.4.1. Slide the Power Switch to the ON position, pressing the Power Button for 1 
second to power on the camera. The camera will vibrate once, the yellow indicator 
light will stay illuminated, indicating the camera has entered into standby mode 
automatically.
3.4.2. Press the Motion Detection Recording Button once to get the camera enter 
into motion detection video recording mode. The camera will vibrate once, the 
yellow indicator light will flash twice and then turn off. The camera will capture a 
video automatically when a movement is detected.
3.4.3. Press the Motion Detection Recording Button once again to exit motion 
detection video recording mode. The camera will vibrate twice, the yellow indicator 
light will stay illuminated, indicating the camera is back to standby mode.

IV. Video/Image File Uploads

4.1. Power off the camera and connect it directly to a proper PC computer USB port 
by using the USB cable provided.
4.2. Removable disk drive folder appears.
4.3. All the files can be accessed in the drive.

V. Setting Time/Date Stamp

5.1. Power off the camera and connect it directly to a proper PC computer USB port 
by using the USB cable provided.
5.2. Removable disk drive folder appears.
5.3. Click on the drive in the root directory and inside the root directory, create the 
file named “TIME.TXT”.
5.4. Write the current date and time in the “TIME.TXT” file with the correct format:
YYYY.MM.DD HH:MM:SS Y (For example: 2016.12.06 14:24:32 Y). If you don’t 
need the time stamp on the video footage, change Y into N in the “TIME.TXT” file. 
(For example: 2016.12.06 14:24:32 N). Save this file.
5.5. Restart the camera and the system will upgrade the program automatically.

VI. Charging

6.1. Slide the Power Switch to the ON position, connect the camera directly to an 
outlet AC power supply by using the USB cable and charging adapter provided.
6.2. It will take 2 hours to obtain a full charge.
6.3. The yellow indicator light will stay illuminated during the charging process.
6.4. When the camera is fully charged, the yellow indicator light will turn off.
6.5. The camera can record for 160 minutes continuously on a full charge. 

Содержание DVR-0015C-WISEUP

Страница 1: ...R 0015C WISEUP User Guide I Product Overview 1 USB Port 2 Yellow Indicator Light 3 Power Switch 4 Camera Lens 5 Power Button 6 Video Recording Button 7 Camera Button 8 Motion Detection Recording Butto...

Страница 2: ...era The camera will vibrate once the yellow indicator light will flash 3 times and then turn off Note The camera will shut down automatically if it is in standby mode without any operation more than 1...

Страница 3: ...r Button for 1 second to power on the camera The camera will vibrate once the yellow indicator light will stay illuminated indicating the camera has entered into standby mode automatically 3 4 2 Press...

Страница 4: ...time stamp on the video footage change Y into N in the TIME TXT file For example 2016 12 06 14 24 32 N Save this file 5 5 Restart the camera and the system will upgrade the program automatically VI C...

Страница 5: ...015C WISEUP Benutzerhandbuch I Produkt bersicht 1 USB Anschluss 2 Gelbe Anzeigelampe 3 Netzschalter 4 Kameraobjektiv 5 Netzschalter 6 Video Aufnahmetaste 7 Kamerataste 8 Bewegungs Abfragungs Aufnahmet...

Страница 6: ...tion OFF um die Kamera auszuschalten Die Kamera wird einmal vibrieren die gelbe Kontrollleuchte blinkt dreimal und schaltet sich dann aus Hinweis Die Kamera schaltet sich automatisch ab wenn sie sich...

Страница 7: ...ie den Netzschalter in die EIN Position und dr cken Sie den Ein Ausschalter f r 1 Sekunde um die Kamera einzuschalten Die Kamera wird einmal vibrieren die gelbe Kontrollleuchte leuchtet auf und zeigt...

Страница 8: ...Format YYYY MM DD HH MM SS Y Beispiel 2016 12 06 14 24 32 Y Wenn Sie den Zeitstempel auf dem Videomaterial nicht ben tigen ndern Sie Y in N in der Datei TIME TXT Beispiel 2016 12 06 14 24 32 N Speich...

Страница 9: ...er u du produit 1 Port USB 2 Voyant lumineux jaune 3 Interrupteur d alimentation 4 Objectif de la cam ra 5 Bouton d alimentation 6 Bouton d enregistrement vid o 7 Bouton de la cam ra 8 Bouton d enregi...

Страница 10: ...ition OFF pour mettre l appareil hors tension la cam ra vibre une fois le voyant jaune clignote 3 fois puis s teint Remarque la cam ra s arr te automatiquement s il est en mode veille sans aucune op r...

Страница 11: ...imentation sur la position ON en appuyant sur le Bouton d Alimentation pendant 1 seconde pour allumer la cam ra la cam ra vibre une fois le t moin lumineux jaune reste allum indiquant que la cam ra es...

Страница 12: ...MM SS Y Par exemple 2016 12 06 14 24 32 Y Si vous n avez pas besoin de l horodatage sur la vid o changez Y en N dans le fichier TIME TXT Par exemple 2016 12 06 14 24 32 N Enregistrer ce fichier 5 5 R...

Страница 13: ...rizione del prodotto 1 Porta USB 2 spia gialla 3 Interruttore di alimentazione 4 Lente di camera 5 Pulsante di alimentazione 6 Pulsante di Registrazione video 7 Pulsante di Camera 8 Pulsante di Regist...

Страница 14: ...tore di alimentazione in posizione OFF per spegnere la camera La camera vibra una volta la spia gialla lampeggia 3 volte e poi si spegne Nota La camera si spegne automaticamente se in modalit di attes...

Страница 15: ...premendo il pul sante di alimentazione per 1 secondo per accendere la camera La camera vibra una volta la spia gialla rimarr illuminato indicando la camera entrato in modal it di attesa automaticamen...

Страница 16: ...4 24 32 Y Se non neces sario il timestamp sul video riprese cambiare Y in N nel file time txt Per esempio 2016 12 06 14 24 32 N Salvare il file 5 5 Riavviare la telecamera e il sistema aggiorner autom...

Страница 17: ...rio I Descripci n del producto 1 Puerto USB 2 Luz Indicadora Amarilla 3 Interruptor de Potencia 4 Lente de C mara 5 Bot n de Potencia 6 Bot n de Grabaci n de V deo 7 Bot n de C mara 8 Bot n de Grabaci...

Страница 18: ...ar la c mara La c mara vibrar una vez la luz indicadora amarilla parpadear 3 veces y luego se apagar Nota La c mara se apagar autom ticamente si est en modo de espera sin ninguna operaci n durante m s...

Страница 19: ...a la posici n ON presionando el Bot n de Potencia durante 1 segundo para encender la c mara La c mara vibrar una vez la luz indicadora amarilla permanecer iluminada indicando que la c mara ha entrado...

Страница 20: ...jemplo 2016 12 06 14 24 32 Y Si no necesita la marca de tiempo en el v deo cambie Y en N en el archivo TIME TXT Por ejemplo 2016 12 06 14 24 32 N Guarde este archivo 5 5 Reinicie la c mara y el sistem...

Страница 21: ...DVR 0015C WISEUP I 1 USB 2 3 4 5 6 7 8...

Страница 22: ...II 1 1 USB 1 2 4GHz 1 AC110 230V DC 5V III USB 3 1 ON OFF 3 1 1 ON 1 3 1 2 1 OFF 3 1 3 2 3 2 1 ON 1 3 2 2 2 2 3 2 3 1 2 1 5 2 40 8GB 3 1920 1080P AVI...

Страница 23: ...3 3 3 3 1 ON 1 3 3 2 1 3 4 3 4 1 ON 1 3 4 2 1 2 3 4 3 2 IV 4 1 USB USB 4 2 4 3 V 5 1 USB USB 5 2 5 3 TIME TXT 5 4 TIME TXT...

Страница 24: ...YYYY MM DD HH MM SS Y 2016 12 06 14 24 32 Y TIME TXT Y N 2016 12 06 14 24 32 N 5 5 VI 6 1 ON USB AC 6 2 2 6 3 6 4 6 5 160...

Отзывы: