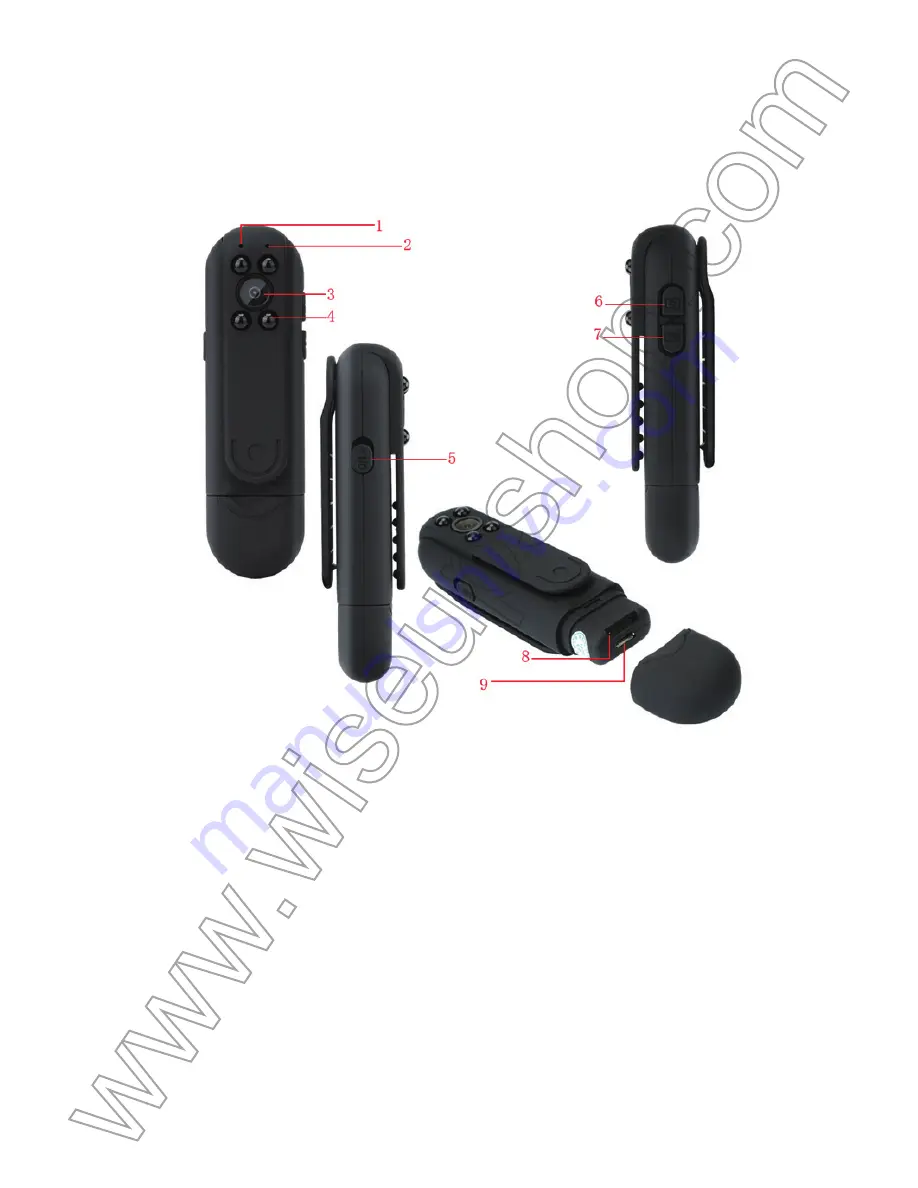
I. Product Overview
1. Indicator Light
2. Microphone
3. Camera Lens
4. IR LEDs
5. Power Switch
II. What’s In the Box
-1× Meeting Recorder Camera
-1× USB Cable
-1×DC 5V Charging Adapter
III. Operation
>> Before using, make sure that the camera is fully recharged.
DV-07
User Guide
>> Please make sure the Micro SD card (4GB-32GB, format it for the first usage) is
securely fitted into the camera’s SD card slot, or the camera will not work. A SDHC
Class 10 Micro SD card is recommended.
[Note]:
If no Micro SD card is fitted into the camera, the indicator light will flash blue for one minute
and the camera will shut down automatically.
3.1. POWER ON/OFF
3.1.1. Power on the camera by sliding the power switch to the
ON
position. The indica-
tor light will be solid blue, indicating the camera has entered into standby mode auto-
matically.
3.1.2. Power off the camera by sliding the power switch to the
OFF
position. The indi-
cator light will turn off.
[Note]:
The camera will shut down automatically if it is in standby mode without any operation more
than one minute.
3.2. VIDEO RECORDING
3.2.1. Power on the camera by sliding the power switch to the
ON
position. The indica-
tor light will be solid blue, indicating the camera has entered into standby mode auto-
matically.
3.2.2. Press Video Recording Button once to record video. The indicator light will flash
blue three times and then turn off.
3.2.3. Press Video Recording Button once again to stop recording video. The indicator
light will be solid blue, indicating the camera is back to standby mode.
[Notes]:
1). A video file will be generated and saved every 3 minutes automatically.
2). The camera can record video for 3.5 hours continuously on a full charge.
3). Video Resolution: 1920×1080P Video Format: AVI
3.3. CAMERA/STILL PHOTOGRAPHY
3.3.1. Power on the camera by sliding the power switch to the
ON
position. The indica-
tor light will be solid blue, indicating the camera has entered into standby mode auto-
matically.
3.3.2. Press Camera Button once to take a photo. The indicator light will flash blue
once and then be solid blue, indicating the camera is back to standby mode.
3.4. MOTION DETECTION RECORDING
3.4.1. Power on the camera by sliding the power switch to the
ON
position. The indicator
light will be solid blue, indicating the camera has entered into standby mode automatically.
3.4.2. Press Video Recording Button for three seconds to enter into motion detection
recording mode. The indicator light will flash five times and turn off.
3.4.3. The camera will record video automatically when a movement is detected.
3.4.4. Press Video Recording Button once to exit motion detection recording mode.
The indicator light will be solid blue, indicating the camera is back to standby mode.
3.5. AUDIO RECORDING
3.5.1. Power on the camera by sliding the power switch to the
ON
position. The indica-
tor light will be solid blue, indicating the camera has entered into standby mode auto-
matically.
3.5.2. Press Video Recording Button for six seconds to record audio. The indicator light
will flash blue nine times and then turn off.
3.5.3. Press Video Recording Button once to stop recording audio. The indicator light
will be solid blue, indicating the camera is back to standby mode.
[Notes]:
1). An audio file will be generated and saved every 30 minutes automatically.
2). Audio Format: WAV
3.6. IR NIGHT VISION
3.6.1. While the camera is working, press Camera Button for three seconds to enter
into night vision mode. The infrared LEDs will be turned on and the indicator light will
flash blue twice.
3.6.2. Press Camera Button for three seconds again to exit night vision mode. The
infrared LEDs will be turned off and the indicator light will flash blue twice.
[Note]:
IR Distance: 2m
IV. Video/Image File Uploads
4.1. When the camera is powered off, remove the Micro SD card and insert it into a
card reader.
4.2. Insert the card reader into a PC computer.
4.3. The Micro SD card will be recognized as a removable disk drive.
4.4. All the files can be accessed in the “
DCIM
” folder.
V. Setting Time/Date Stamp
5.1. When the camera is powered off, remove the Micro SD card and insert it into a
card reader.
5.2. Insert the card reader into a PC computer.
5.3. Removable disk drive folder appears.
5.4. Click on the drive in the root directory and inside the root directory, create a file
named “time.txt”.
5.5. Write the current date and time in the “timer.txt” file with the correct format:
Year.Month.Day Hour:Minute:Second. (For example: 2016.04.12 14:24:32). Save this
file.
5.6. Restart the camera and the system will upgrade the program automatically.
VI. Charging
6.1. Remove the Micro SD card from the camera.
6.2. Connect the camera directly to an outlet AC power socket by using the USB cable
and DC 5V charging adapter provided.
6.3. It will take 4 hours to obtain a full charge.
6.4. The indicator light will glow solid red and flash blue during the charging process.
6.5. When the camera is fully charged, the indicator light will be solid red.
[Note]:
The camera can be charged whether it is on or off.
6. Camera Button
7. Video Recording Button
8. Micro SD Card Slot
9. USB Port


