BC183
User Guide
I. Product Overview
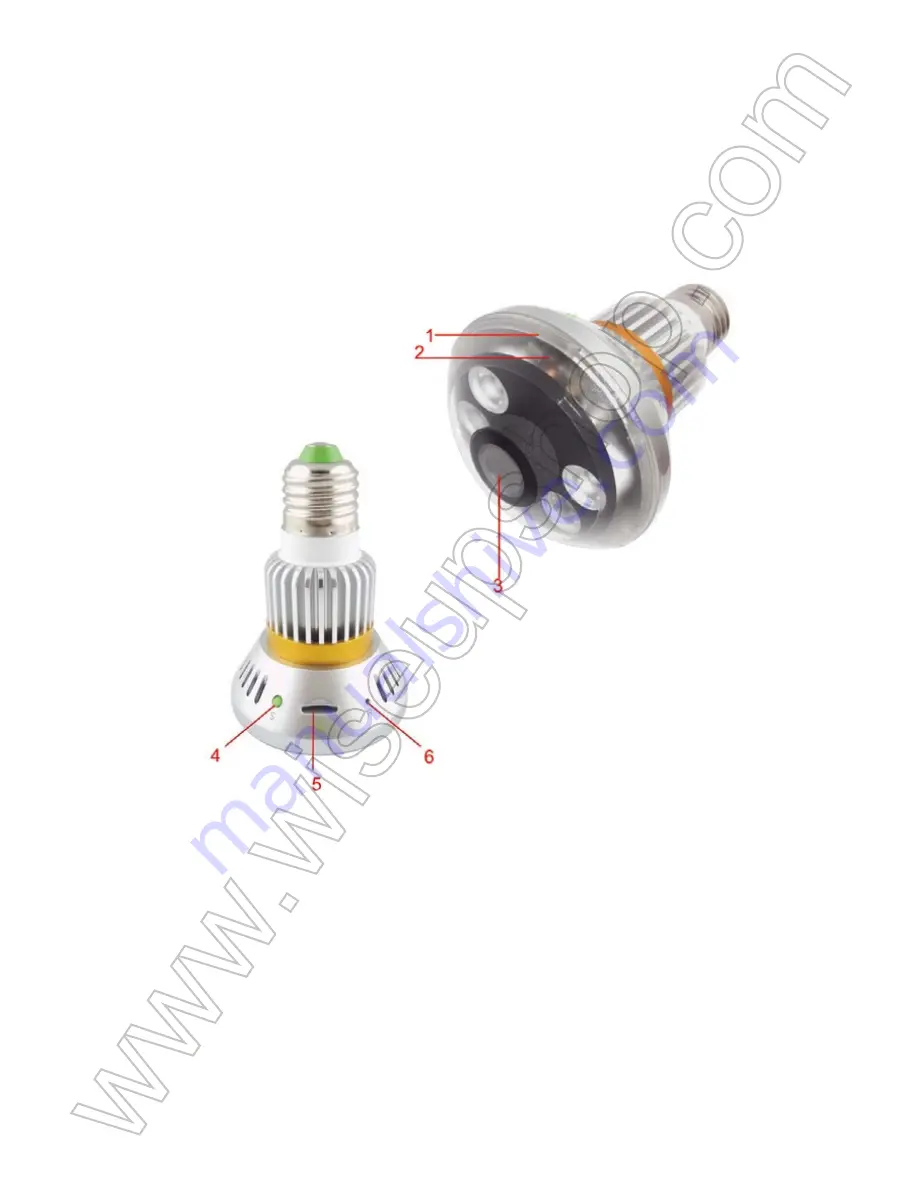
1. Red Indicator Light
2. Blue Indicator Light
3. Camera Lens
4. Recording Button
5. Micro SD Card Slot
6. Reset Button
II. What’s in the Box
-1× Bulb Camera
-1× Card Reader
-1× 8GB Micro SD Card (fitted into the Micro SD card slot already)
-1× 20cm E27 Bulb Extension Adapter
III. Before You Start
3.1.1. Go to
http://www.wiseupshop.com/var/downloadfile/BC183%20USERSET%20TOOL.rar
to download the user tool. Copy the zip file to a valid Micro SD card.
3.1.2. Decompress the zip file you downloaded, then open it and locate .
3.1.3. Open the program, then choose your desired recording mode and resolution. You
can turn on circular storage if you need to.
3.1.4. Click “
Customize time
” and the time and date will be sync with your computer.
3.1.5. Click “
Save to exit
”.
3.2. HOW TO INSTALL BULB CAMERA
3.2.1. Insert this Micro SD card into the bulb camera.
3.2.2. First, make sure the power is turned off. Then insert the bulb lightly but firmly into
the socket. Turn it clockwise until it locks it into place, or keep gently twisting clockwise
until it won’t go away further.
3.2.3. Once the bulb is in, turn the power back on again and switch on the light.
3.3. CONTINUOUS VIDEO RECORDING
3.3.1. Make sure you have chosen “
Real Time
” recording mode in 3.1.3. Once the bulb
camera is switched on, the blue indicator light will come on and remain solid. Wait 2
seconds, the red indicator light will come on, then flash once and turn off. 5 seconds later,
the blue indicator light will start flashing slowly. The camera will start video recording
automatically.
3.3.2. Press the Recording Button once to stop video recording. Both red and blue
indicator lights will stay illuminated, indicating the camera is back to standby mode. If the
camera is in standby mode without any operation more than 15 seconds, it will start video
recording again.
[Note]:
1). A video clip will be generated and saved every 30 minutes automatically.
2). Video Resolution: 640×480 Video Format: 3GP
3). Loop recording is supported.
4). When the illumination is below 150 lux, the IR LEDs will turn on automatically. IR distance is 6
meters.
5). Each video clip will take up to 225-250MB storage space of the Micro SD card.
3.4. MOTION DETECTION VIDEO RECORDING
3.4.1. Make sure you have chosen “
Motion Detection
” recording mode in 3.1.3. Once the
bulb camera is switched on, the blue indicator light will come on and remain solid. Wait 2
seconds, the red indicator light will come on, then flash once and turn off. 10 seconds later,
the blue indicator light will start flashing slowly. The camera will enter into motion detection
recording mode automatically.
3.4.2. The camera will record a 2-minute video automatically when motion is detected.
The blue indicator light will flash once then turn off.
3.4.3. Press the Recording Button once to exit motion detection recording mode. Both red
and blue indicator lights will stay illuminated, indicating the camera is back to standby
mode.
3.4.4. If the camera is in standby mode without any operation more than 30 seconds, it
will go back to motion detection recording mode automatically.
IV. Video File Uploads
4.1. Power off the camera, remove the Micro SD card, then insert it into a card reader.
4.2. Insert the card reader into a proper PC computer USB port.
4.3. The Micro SD card will be recognized as a removable disk drive.
4.4. All the files can be accessed in the drive.
V. Resetting
If, for any reason, the camera stops responding or isn’t working properly, a quick reset will
restore it back to normal operation.
Operation:
When the camera is powered on, use a pin to press the Reset Button once;
the camera will shut down automatically. Restart the camera with the factory default
settings.


