


DVR-0017
User Guide
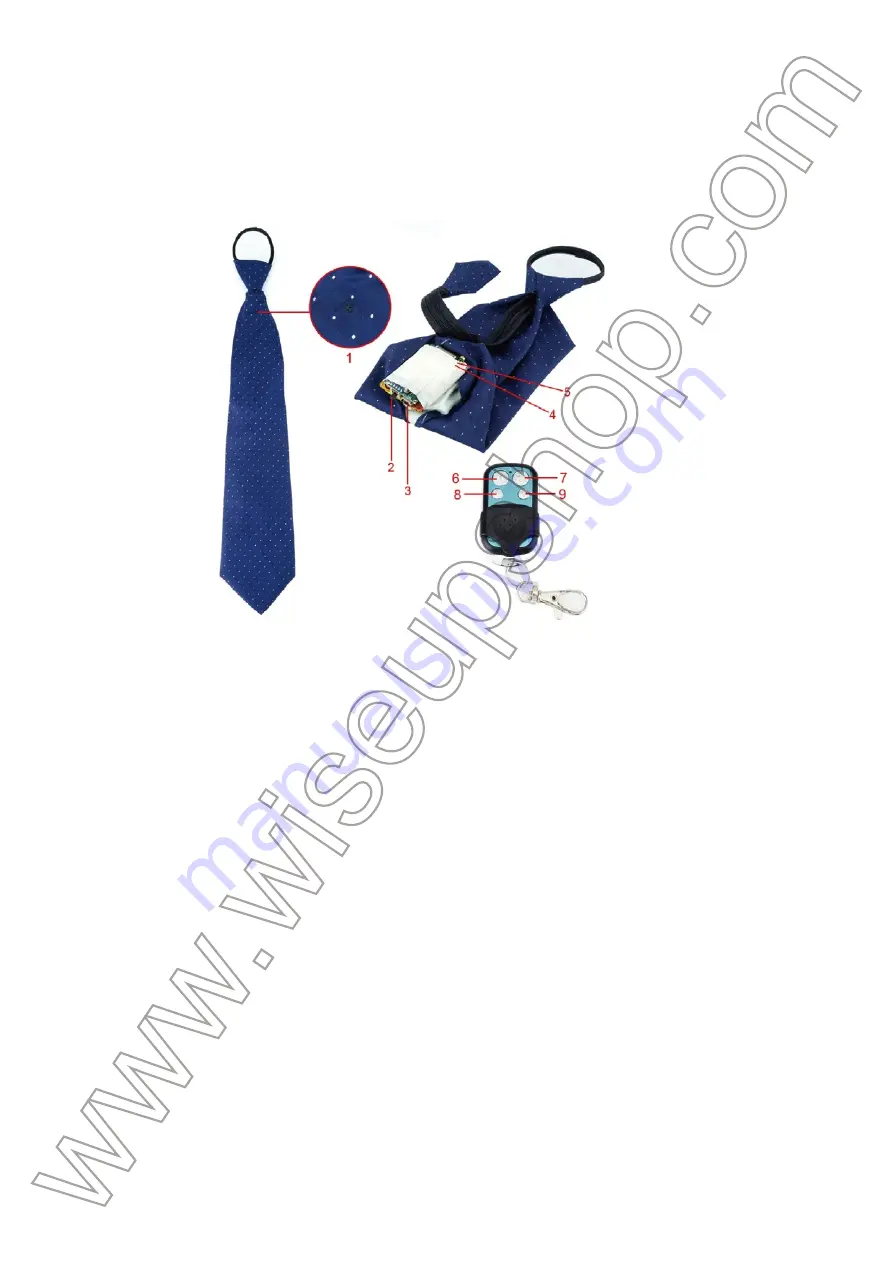
I. Product Overview
1. Camera Lens
2. Power Switch
3. Mini USB Port
4. Red Indicator Light
5. Blue Indicator Light
6. Button A
7. Button B
8. Button C
9. Button D
II. What’s In the Box
-1×Tie Camera
-1×Remote Controller
-1×USB Cable
-1×DC 5V Charging Adapter
III. Operation
>> Before using, make sure that the camera battery is fully recharged.
>> Before using, make sure that the power switch stands next to mini USB port.
>> Aim the remote controller at the camera every time you press a button.
[Note]: The camera will shut down automatically if it is in standby mode without any
operation more than 2 minutes.
3.1. POWER ON/OFF
3.1.1. Power on the camera by pressing Button A for 3 seconds. The camera will
vibrate once. The red and blue indicator lights will illuminate for 3 seconds, then the
red indicator light will stay illuminated, indicating the camera has entered into stand-
by mode.
3.1.2. Power off the camera by pressing Button A for 3 seconds. The red and blue
indicator lights will flash 3 times and turn off.
3.2. VIDEO RECORDING
3.2.1. Power on the camera by pressing Button A for 3 seconds. The camera will
vibrate once. The red and blue indicator lights will illuminate for 3 seconds, then the
red indicator light will stay illuminated, indicating the camera has entered into stand-
by mode.
3.2.2. Hold down Button B for 3 seconds to record video. The camera will vibrate
once. The red indicator light will flash 3 times and turn off.
3.2.3. Press Button B once to stop recording video. The camera will vibrate twice.
The red indicator light will stay illuminated, indicating the camera is back to standby
mode.
[Note]:
1). A video file will be generated and saved every 5 minutes automatically.
2). The camera can record video continuously for 2 hours on a full charge.
3). Video Resolution: 1920×1080P Video Format: AVI
4). Loop recording is supported.
5). The camera memory could save 50 minutes video in max.
3.3. CAMERA/STILL PHOTOGRAPHY
3.3.1. Power on the camera by pressing Button A for 3 seconds. The camera will
vibrate once. The red and blue indicator lights will illuminate for 3 seconds, then the
red indicator light will stay illuminated, indicating the camera has entered into stand-
by mode.
3.3.2. Press Button C once to take a photo. The camera will vibrate once. The red
and blue indicator lights will flash once every time you take a photo.
3.3.3. Then the red indicator light will stay illuminated, indicating the camera is back
to standby mode.
3.4. MOTION DETECTION RECORDING
3.4.1. Power on the camera by pressing Button A for 3 seconds. The camera will
vibrate once. The red and blue indicator lights will illuminate for 3 seconds, then the
red indicator light will stay illuminated, indicating the camera has entered into stand-
by mode.
3.4.2. Press Button D once to enable motion detection function. The camera will
vibrate twice. The blue and red indicator lights will flash once and then turn off.
3.4.3. The camera will record video automatically when a movement is detected.
3.4.4. Press Button D again to disable motion detection function. The camera will
vibrate three times. The red indicator light will stay illuminated, indicating the camera
is back to standby mode.
3.5. VIDEO/AUDIO/IMAGE FILES UPLOADS
3.5.1. Connect the camera to a PC computer by using the USB cable provided.
3.5.2. The camera will be recognized as a removable disk drive.
3.5.3. All the files can be accessed in the DCIM folder.
3.6. SETTING THE DATE/TIME STAMP
3.6.1. Connect the camera to a PC computer by using the USB cable provided.
3.6.2. The camera will be recognized as a removable disk drive.
3.6.3. Click on the drive in the root directory and inside the root directory, create a
file “time.txt”.
3.6.4. Write the current date and time in the “time.txt” file with the correct format:
Year.Month.Day Hour:Minute:Second (For example: 2016.03.08 14:24:32). Save
this file.
3.6.5. Restart the camera and the system will upgrade the program automatically.
IV. Charging
4.1. Make sure that the power switch stands next to mini USB port.
4.2. Connect the camera directly to an outlet AC power socket by using the DC 5V
charging adapter and USB cable provided.
4.3. The red indicator light will keep flashing slowly and the blue one will stay illumi-
nated during the charging process.
4.4. The red indicator light will stay illuminated when the camera battery is fully
recharged.
4.5. It will take 4 hours to obtain a full charge.


