


24
PCS Machine Bolts (1-1/4")
2
PCS
Metal Grommet
14
PCS
(3/4") Flat Head Wood Screws
7 PCS Wood Dowels ( 8x25mm)
10 PCS ( 1-1/4") Flat Head Wood Screws
2 PCS Keys For File Drawer Lock
Thank you for purchasing Winners Only Inc. product.
This product has been designed for easy assembly
and constructed for durability. Please take the
time to read and follow the assembly instructions.
If a part or hardware is missing or you have any
difficulties in assembling this product, please contact us.
Those are the non included tools needed to successfully
assemble your new desk:
Phillips screw driver or Power Drill (recommended).
Mallet.
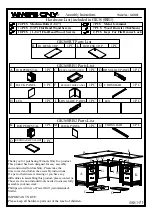
RHS GLIDE PANEL
REGULAR DRAWER
BACK PANEL
R1 DESK TOP
B
A
1 PC
1 PC
C
1 PC
R1B PEDESTAL
E
D
1 PC
F
1 PC
RSF&LSF SIDE PANEL
CROSS BAR
LEG
H
G
1 PC
1 PC
1 PC
LHS GLIDE PANEL
LEG
J
I
1 PC
1 PC
R2B PEDESTAL
L
1 PC
K
1 PC
N
1 PC
R2 DESK TOP
IMPORTANT NOTE :
Please keep all hardware parts out of the reach of children
.
A
K
B
L
C
O
D
E
F
G
H
I
J
N
M
O
1 PC
M
1 PC
BACK PANEL
CROSS BAR
KEYBOARD PULLOUT
GK368RT Parts List
GK368RB2 Parts List
Hardware List (included in GK368RB1)
GK368RB1 Parts List


