background image

Winmate E430RM2 Series PDA 
User Guide  

11 


Chapter 3: Using Android 4.1 Operating System 


Wake Up the Phone  

If you do not use the phone for a while, the screen dims and then darkens to conserve the 
battery. To wake up the phone: 

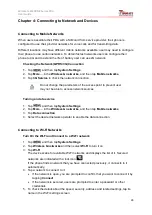
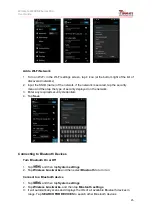
1.  Press the 

Power

 button on the side of the PDA. 

2.  Drag the lock icon to the right 


Using the Touch Screen  

To gain full access of the Android interface is by using your finger to manipulate icons, on 
screen keyboard, menu items, and other items on the touch screen.   


Tap


– Simply touch the icon, symbol, or onscreen button using your finger 


Tap and hold


– Touching an item using your finger and not lifting it until an action 

occurs 


Drag


– Touch and hold an item for some amount of time and then, without lifting your 

finger, move your finger along the screen until you reach target position 


Swipe or slide


– Quickly move your finger across the surface of the screen, without 

pausing it when you first touch it. (e.g. scroll a page or a list up or down) 


Double tap


– Tap quickly twice on a webpage, map, or other screen to zoom. Double 

tapping after pinching the zoom in some application to fit the width of the screen 


Pinch


– Place two fingers on the screen at once and pinching them together (to zoom 

out) and spreading them apart (to zoom in). 


Rotate the screen


– Orientation of the screens rotates with the phone as user turn it 

from upright to its side and back again. 
 

Using the Home Screen  

Home screen is the starting point to access all the features on your PDA Device. It displays 
application icons, widgets, shortcuts, and other features. User can personalize the home 
screen. See “Personalizing home screen”  

Содержание E430RM2 Series

Страница 1: ...Winmate E430RM2 Series PDA User Guide Version 1 00 Revision B 2015...

Страница 2: ...ng 8 Turning On and Off the Device 9 Turning the E430RM2 On 9 Turning the E430RM2 Off 9 Resetting to Factory Defaults 10 Chapter 3 Using Android 4 1 Operating System Wake Up the Phone 11 Using the Tou...

Страница 3: ...work GPRS 3G connection 24 Turning on data service 24 Connecting to Wi Fi Networks 24 Turn On the Wi Fi and Connect to a Wi Fi Network 24 Add a Wi Fi Networks 25 Connecting to Bluetooth Devices 25 Tur...

Страница 4: ...the devices RF Exposure Information This PDA meets the government s requirement for exposure to radio waves This PDA is designed and manufactured not to exceed the emission limits for exposure to rad...

Страница 5: ...board dryer or other heat source Do not attempt to insert foreign object into the battery or allow conductive objects to contact the battery In the event of battery leak Do not have any contact with t...

Страница 6: ...ech includes dual cameras a micro SD card slot 802 11 a b g n Wi Fi Built in GPS and 3G mobile broadband Features This section provides the features of the E430RM2 series and describes how to set this...

Страница 7: ...evice Normal mode Return to the user setting mode 8 Function Key Use to trigger the barcode reader for E430RM2series with barcode reader differs by product type 9 Volume Up Down Increases or decreases...

Страница 8: ...Insert the SIM card with the gold parts facing down and cut off corner facing out in the direction of the arrow as shown in the figure 5 Locate the SD card holder 6 Push the SD card holder in the dir...

Страница 9: ...king with appropriate power supply For more information about the E430RM2accessories see chapter 6 To charge the battery using USB Charge cable 1 Connect the power supply output connector to the input...

Страница 10: ...he slot to begin charging 2 The E430RM2 LED indicator indicates the status of the battery charging This docking provides Input 12V 50W DC in Two slot charging dock Power level LED indicators Support u...

Страница 11: ...e see features table Resetting to Factory Defaults To reset the device to factory defaults 1 Tap MENU than tap System settings 2 Locate Backup reset and then tap it 3 Tap Factory data reset user can s...

Страница 12: ...d then without lifting your finger move your finger along the screen until you reach target position Swipe or slide Quickly move your finger across the surface of the screen without pausing it when yo...

Страница 13: ...enu that opens tap the type of item you want to add To move an item on the Home screen 1 Tap and hold the item you want to move until it can be moved 2 Drag it to a new location on the screen 3 Place...

Страница 14: ...ill change into a Remove icon 2 Drag the item you want to remove to the Remove icon 3 When the icon turns red release your finger View other parts of the Home Screen 1 Slide your finger left or right...

Страница 15: ...een On the left are notification icons and on the right are status icons along with the current time Status Icon The following icons indicate the status of your PDA for example if users are connected...

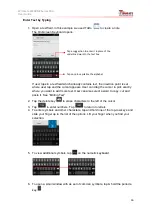
Страница 16: ...ate that you have received notification Using the On Screen Keyboard User will be able to enter text using the On Screen Keyboard Some applications will launch the keyboard automatically In others use...

Страница 17: ...o copy cut and paste it See Editing Text 2 Tap the delete key to erase characters to the left of the cursor 3 Tap to enter numbers Tap to return to letters 4 To enter symbols and other characters tap...

Страница 18: ...the text to cut or copy see to select text 2 Tap or in the Edit text menu 3 If you select the selected text is removed from the text field it is stored in temporary area so that you can paste it into...

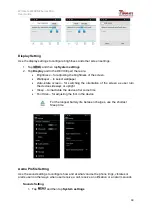
Страница 19: ...reen for switching the orientation of the screen as user turn the device sideways or upright Sleep to inactivate the device after some time Font Size for adjusting the font in the device For the longe...

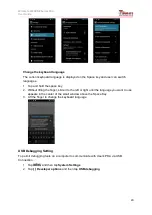
Страница 20: ...to open the language screen where user can select the language to use for the text on the device Default to apply the onscreen keyboard that is included with user s device The correction and capitali...

Страница 21: ...ut lifting the finger slide it to the left or right until the language you want to use appears in the center of the small window above the Space Key 3 Lift the finger to change the keyboard language U...

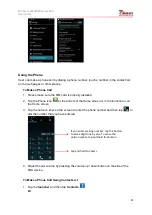
Страница 22: ...e Home screen or in the launcher or on the Home screen 3 Tap the numeric keys on the screen to enter the phone number and then tap to dial the number that you have entered 4 Adjust the call volume by...

Страница 23: ...incoming call screen opens with the caller ID and any additional information about the caller that you have entered in contacts Messaging Send a Text Message 1 Tap the launcher and then tap 2 Tap Com...

Страница 24: ...ge 1 Tap hold a message in a message window 2 Tap Forward message in the menu that opens 3 Enter a recipient for message and edit the content if necessary 4 Tap Send About Phone About Phone includes i...

Страница 25: ...not be able to access network sources Turning on data service 1 Tap and then tap System Settings 2 Tap More in the Wireless networks and then tap Mobile networks 3 Tap Data connection 4 Select the des...

Страница 26: ...on the network 3 Enter any required security credentials 4 Tap Save Connecting to Bluetooth Devices Turn Bluetooth On or Off 1 Tap and then tap System settings 2 Tap Wireless networks and then select...

Страница 27: ...and disconnecting USB device to avoid damaging or corrupting files To connect your PDA to a computer via USB 1 Use the USB cable that came with your PDA to connect the phone to a USB port on your com...

Страница 28: ...Winmate E430RM2 Series PDA User Guide 27 To disconnect your PDA from the computer 1 Open the Notifications panel and tap USB connected 2 Tap Turn off USB storage in the screen that opens...

Страница 29: ...djust the exposure flash and other necessary settings Or leave it automatic 2 Frame your subject object on screen User can set whether user want to use the front or rare camera by taping Slide to zoom...

Страница 30: ...ew other photo or video in the galleries 3 Swipe right or left to view more photos Shoot a video 1 Tap to switch from camera to video mode 2 Point the lens to record the scene where you want to start...

Страница 31: ...l indicators supports up to 2 set of dock interconnected Battery Charger 98K004A0000G Two slot charging dock power level LED indicator buzzer to indicate battery is inserted properly 12V 50W DC in Bat...

Отзывы: