Montage- und Bedienungsanleitung
DE
Installation and operating instructions
EN
12 V Netzbetrieb / 12 V external supply
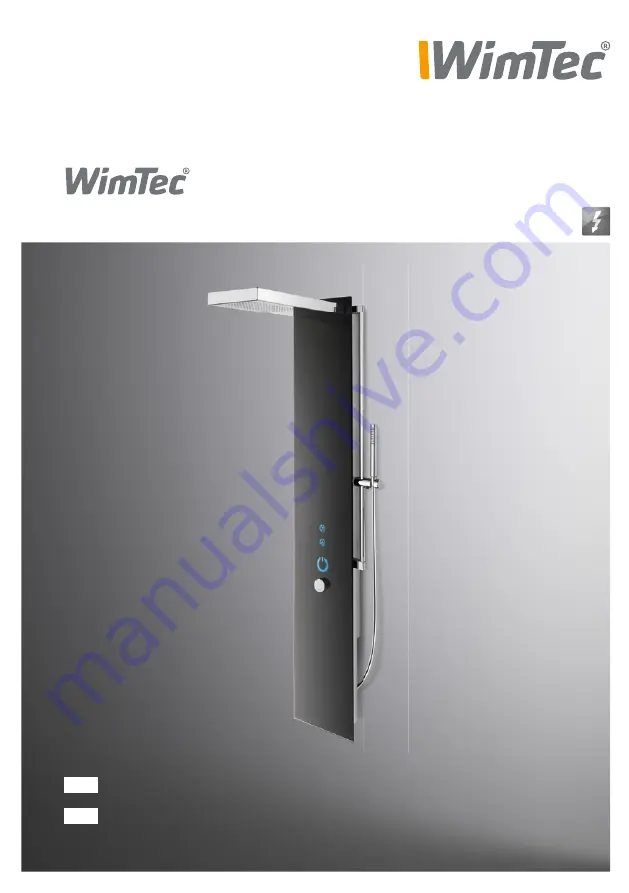
OCEAN P7
Страница 1: ...Montage und Bedienungsanleitung DE Installation and operating instructions EN 12 V Netzbetrieb 12 V external supply OCEAN P7 ...
Страница 2: ...uch Tronic Funktion kommen Um dies vorbeugend zu vermeiden empfehlen wir ein regelmäßiges Reinigen der Glasoberfläche mit einem Kraftreiniger Diese Anleitung ist gültig für folgende Produkte WimTec OCEAN P7 12 V Glas weiß Art Nr 114 676 Glas schwarz Art Nr 114 713 Lieferumfang Grundkörper mit Magnetventilen Sicherheitsglas Frontplatte mit integrierter Elektronik WimTec UP Netzteil Thermostat mit H...
Страница 3: ...dienelemente 6 Einstellelemente 6 Funktionseinstellung 7 Einstellregler 7 DIP Schalter 7 Montage 8 Bedienung 12 Einschalten 12 Ausschalten 12 Reinigungsstopp 13 Funktionbeschreibung 14 Abschalt Automatik 14 Warmlauf 15 Intelligente Freispül Automatik 16 Spülstoppzeit 17 Nachlaufzeit 17 Ersatzteile 18 ...
Страница 4: ...rbar Freispül Automatik aktivierbar deaktivierbar Spülintervall nach 3 h bis 48 h Nichtbenutzung Spüldauer 10 s oder 20 s Reinigungsstopp aktivierbar deaktivierbar für 5 min Fließdruck 0 05 bis 0 5 MPa 0 5 bis 5 bar Statischer Druck max 0 8 MPa 8 bar Thermostat mit Heißwassersperre 38 C Wassertemperatur max 70 C max 80 C für max 10 min Durchflussmenge max 22 l min bei 0 3 MPa 3 bar Durchflussmenge...
Страница 5: ...rgung 2 x 0 5 1 5 mm2 max 100 m Gesamt Kabellänge Achtung Netzteil nicht im Paneel oder eventuellen Schutzbereichen anbringen Auf bestehende Zweipunktanschlüsse Standardmaß 150 mm ist eine Montage ebenfalls möglich WW R 1 2 IG KW R 1 2 IG Freifläche für Wasser und Elektroanschluss 1145 30 30 35 1590 95 8 485 260 200 430 250 910 1530 80 155 181 525 2000 2100 Unterkante Regendusche 12 V B L ...
Страница 6: ...m Ausschalten der Regen und Handbrause F Thermostatgriff zur Temperatur regelung mit Taste zum Öffnen der 38 C Sicherheitssperre G Infrarot Sensor für die Benutzer erkennung Ansprechbereich H Dip Schalter zum Einstellen der Programme und Funktionen I Intervall Regler J Zeit Regler K Reichweiten Regler 1 2 3 4 5 6 ON OFF Halbautomatik Vollautomatik Manuell ON OFF 1 2 3 4 ON OFF 1 2 3 4 ON OFF 1 2 3...
Страница 7: ...ar K Reichweiten Regler für den Ansprechbereich 70 cm voreingestellt 30 cm bis 70 cm einstellbar Einstellregler DIP Schalter Funktion Beschreibung 1 2 Abschalt Automatik Seite 14 3 Warmlauf 1 Seite 15 4 Intelligente Freispül Automatik Seite 16 5 Freispül Dauer ON 20 s OFF 1 10 s Seite 17 6 Nachlaufzeit ON 5 s OFF 1 2 s Seite 17 H Dip Schalter 1 Funktion bereits werksseitig voreingestellt 3 12 h 48...
Страница 8: ...hrschablone auf der Rückwand aufkleben Unterkante Duschkopf auf Bohrschablone beachten für gewünschte Montagehöhe Standard 200 210 cm 4 Vier Befestigungsbohrungen ø 8 mm herstellen und danach Bohrschablone wieder ablösen 5 Wandanschlusswinkel und Vorabsperrungen senkrecht nach oben stehend montieren 6 Vorspülung durchführen ACHTUNG Folgende Schritte unbe dingt in beschriebener Reihenfolge ausführe...
Страница 9: ...Sechskantschraube M8 x 25 mm am Glaspaneel montieren Achtung Schraubenkopf muss auf der Innenseite des Paneels montiert werden 10 Den im Grundkörper vormontierten Anschlussschlauch am Duschkopf befestigen 11 Duschkopf Abdeckung mit 2 Schrauben Linsenschraube 2 2 x 9 5 mm von oben befestigen 12 Gewünschte Programmeinstellungen am Elektronikmodul vornehmen siehe Seite 7 ACHTUNG Folgende Schritte unb...
Страница 10: ...shaken einhängen 14 Kalt und Warmwasser Anschlussschläuche anschließen 15 Handbrause anschließen beiliegende Dichtung verwenden 16 Brausestange an den vormontierten Montagebügel befestigen 17 Netzversorgung herstellen und Vorabsperrungen öffnen ACHTUNG Folgende Schritte unbe dingt in beschriebener Reihenfolge ausführen 16 17 12 13 ...
Страница 11: ...manent ca 10 bis 15 cm vor dem Infrarot Raumüberwachungs sensor unmittelbar unterhalb der Temperatureinstellung zu halten Andernfalls kann es dazu führen dass sich die Dusche nicht aktivieren lässt oder sofort wieder abschaltet 19 Glaspaneel anheben und in Endposition am vorderen Einhängehaken einhängen ACHTUNG Keine Kabel oder Schläuche quetschen oder knicken 20 Sicherungsdeckel montieren 19 i Hi...
Страница 12: ...pen der ge wünschten Wasserabgabe stelle wird diese aktiviert Regendusche Handbrause 30 70 cm Ausschalten AquaCap Sensortaste Durch Antippen der ON OFF Taste oder erneutes Antippen der aktivierten Wasserabga bestelle schaltet diese ab ON OFF Regendusche Handbrause Sicherheitsspülstopp Nach Ablauf der eingestellten Spülstoppzeit siehe Seite 17 schaltet die Dusche ab Abschalt Automatik DIP 2 ON sieh...
Страница 13: ... an den Infrarotsensor heranführen ca 4 cm und verweilen 2 Sobald der senkrechte Strich des ON OFF Icons zu blinken beginnt mit der zweiten Hand in das ON OFF Icon tippen Nach einer Sicherheitszeit von 3 s ist der Reinigungsstopp deaktiviert 5 min 1 Heranführen der Hand an den Infrarotsensor ca 4 cm und Verweilen 2 Sobald der senkrechte Strich des ON OFF Icons zu blinken beginnt mit der zweiten Ha...
Страница 14: ...te Nachlaufzeit von 5 s zu aktivieren DIP 6 ON Dient zum automatischen Stoppen des Wasserflusses sobald der Benutzer den Ansprechbereich des Duschpaneels verlässt Stellung ON Abschalt Automatik aktiviert Stellung OFF Abschalt Automatik deaktiviert voreingestellt ON OFF 2 1 3 4 5 6 Abschalt Automatik Sobald der Benutzer den Ansprechbereich verlässt und nach Ablauf der Nachlaufzeit siehe Seite 17 wi...
Страница 15: ... vor der Dusche im Ansprechbereich verweilen muss nur bei aktivier ter Abschalt Automatik DIP 2 ON siehe Seite 14 Stellung ON Warmlauf Funktion aktiviert voreingestellt Stellung OFF Warmlauf Funktion deaktiviert Warmlauf aktivieren Warmlauf DIP Schalter 3 ON OFF 2 3 4 5 6 1 1 Der Benutzer tritt in den Ansprechbereich und wird von der Armatur erkannt 2 Durch Einschalten der Dusche bei aktivierter W...
Страница 16: ...ung und automatischer Freispülung an Einstellbar von 3 bis 48 h über den Intervall Regler siehe Seite 7 Intelligente Freispül Automatik Wird die Armatur für die eingestellte Zeit nicht benützt wird eine automatische Spülung für die eingestellte Dauer siehe Dip 5 Seite 17 ausgelöst Intelligente Freispül Automatik DIP Schalter 4 ON OFF 2 3 4 5 6 1 i Hinweis Befindet sich ein Benutzer im Ansprechbere...
Страница 17: ...t Automatik DIP 2 ON siehe Seite 14 Stellung ON Nachlaufzeit beträgt 5 s Stellung OFF Nachlaufzeit beträgt 2 s voreingestellt Legt die Laufzeit der automatischen Freispülung fest Stellung ON Freispül Dauer beträgt 20 s Stellung OFF Freispül Dauer beträgt 10 s voreingestellt Freispül Dauer DIP Schalter 5 Nachlaufzeit DIP Schalter 6 ON OFF 2 3 4 5 6 1 ON OFF 2 3 4 5 6 1 ...
Страница 18: ...ünffach 113 792 19 Versorgungskabel 4 m 114 232 Bezeichnung Art Nr 1 Abdeckung Kopfbrause 115 697 2 Kartusche Kopfbrause 114 140 3 Grundkörper Kopfbrause 115 703 4 Frontplatte Glas weiß 114 423 Frontplatte Glas schwarz 114 430 5 LED Einsatz 114 362 6 Kunststoff Adapter 115 420 7 Thermostatgriff 115 550 8 Sicherungsdeckel 115 710 9 Grundkörper 118 179 10 Handbrause 115 680 11 Brausestange Set 115 7...
Страница 19: ......
Страница 20: ...vent this outcome we recommend regular cleaning of the glass panel using a power cleaner This manual is valid for the following products WimTec OCEAN P7 12 V White glass Art no 114 676 Black glass Art no 114 713 Delivery scope Base body with magnetic valves safety glass front plate with integrated electronics module WimTec flush mount power supply thermostat with hot water blocking mechanism rain ...
Страница 21: ... 24 Module controls 24 Function configuration 25 Regulator controls 25 DIP switches 25 Assembly 26 Operation 30 Switch on 30 Switch off 30 Cleaning stop 31 Description of the functions 32 Automatic stop 32 Warm water rinse 33 Intelligent stagnation flush 34 Stagnation flush duration 35 Shut off delay 35 Spare parts 36 ...
Страница 22: ...s to 20 min Automatic stop can be enabled Stagnation flush can be enabled flushing interval after 3 h to 48 h of non usage flushing duration 10 or 20 s Cleaning stop can be enabled for 5 min Flow pressure 0 05 to 0 5 MPa 0 5 to 5 bar Static pressure max 0 8 MPa 8 bar Thermostat with hot water blocking mechanism 38 C Water temperature max 70 C max 80 C for max 10 min Flow rate max 22 l min at 0 3 M...
Страница 23: ... x 0 5 1 5 mm2 total cable length max 100 m Attention Do not install the power supply in the panel or protected zones if applicable Can be attached to existing two point connections 153 mm standard measure PWH R 1 2 IT PWC R 1 2 IT Mounting area for water and electric connection 1145 30 30 35 1590 95 8 485 260 200 430 250 910 1530 80 155 181 525 2000 2100 lower edge of rain shower 12 V B L ...
Страница 24: ...ower and switch off the rain shower and hand shower F Thermostat handle to adjust the temperature including a button for bypassing the 38 C safety lock G Infrared sensor for user detection detection range H DIP switches for configuring the programs and functions I Interval control J Time control K Range control 1 2 3 4 5 6 ON OFF Halbautomatik Vollautomatik Manuell ON OFF 1 2 3 4 ON OFF 1 2 3 4 ON...
Страница 25: ...ation ON 20 s OFF 1 10 s page 35 6 Shut off delay ON 5 s OFF 1 2 s page 35 H DIP switches 1 Functions preset at factory 3 12 h 48 24 6 10 300 s 1200 600 60 30 50 cm 70 60 40 I Interval control for the stagnation flush function preset to 24 h adjustable from 3 to 48 h J Time control set to flushing stop preset to 1 min adjustable from 10 s to 20 min K Range control for the detection range preset to...
Страница 26: ...l template on the back wall Ensure the lower edge of the shower head on the drill template is at the desired installation height 200 210 cm as standard 4 Prepare four mounting holes ø 8 mm and then remove the template 5 Attach the wall mount brackets and integrated stop valves so they are standing vertically upwards 6 Carry out the pre flush ATTENTION Perform the following steps in the order indic...
Страница 27: ...screws 5 5 x 50 mm 9 ount the shower head using the mounting material provid ed hexagonal screw M8 x 25 mm on the glass panel Attention Screw head must be mounted on the inside of the panel 10 Fasten the connection hose pre assembled in the base body to the shower head 11 Fasten the shower head cover from above with two screws over head screws 2 2 x 9 5 mm 12 Configure the electronics module with ...
Страница 28: ...to the hooks on the back 14 Connect the PWC and PWH connection hoses 15 Connect the hand shower use gasket provided 16 Fasten the shower rod set to the pre assembled mounting bracket 17 Establish the mains supply and open the integrated stop valves 16 12 13 17 ATTENTION Perform the following steps in the order indicated ...
Страница 29: ... an object or body part such as your hand 10 15 cm from the infrared shower monitoring sensor located right below the temperature setting for the entire duration of the system test If not it may not be possible to turn the shower on or immediately off again 19 Lift the glass panel hook into the final position on the front fixing hook ATTENTION Be careful not to bend or crimp any cables or tubes 20...
Страница 30: ...ery points Tap the desired water delivery points to activate this Rain shower Hand shower AquaCap sensor button Tapping the ON OFF button or tapping the activated water delivery points again switches this off ON OFF Rain shower Hand shower Safety flow arrest The shower will shut off after the configured flushing stop time has elapsed see p 25 Automatic stop DIP 2 ON see p 32 The shower switches of...
Страница 31: ...or with your hand again approx 4 cm and hold it there 2 Once the vertical line of the ON OFF icon starts to flash tap with the second hand on the ON OFF icon The cleaning stop is deactivated with a safety delay of 3 s 5 min 1 Approach the infrared sensor with your hand approx 4 cm and hold it there 2 Once the vertical line of the ON OFF icon starts to flash tap with the second hand on the ON OFF i...
Страница 32: ...it is recommended that you activate the extended shut off delay of 5 s DIP 6 ON This function automatically stops the water flow as soon as the user leaves the detection range of the shower panel ON position automatic stop activated OFF position automatic stop deactivated preset Automatic stop The water flow is automatically stopped once the user leaves the detection range and the shut off delay t...
Страница 33: ...he PWH pipe without the need for you to remain within the detection range of the shower only if the automatic stop function is activated DIP 2 ON see p 32 ON position Warm water rinse function enabled preset OFF position Warm water rinse function disabled Activate warm water rinse 1 When you step in the detection range the system will detect you 2 By switching on the shower with the warm water rin...
Страница 34: ...t ON OFF 2 1 3 4 5 6 3 48 h 10 or 20 s Time interval Specifies the time between the last use and automatic flush Adjustable from 3 to 48 h at the interval control see p 25 Intelligent stagnation flush If the fitting has not been used for the set period stagnation flushing is triggered for the duration configured see Dip 5 Page 35 i Note If you are in the detection range or if the cleaning stop fun...
Страница 35: ...N is activated see Page 32 ON position Shut off delay is 5 s OFF position Shut off delay is 2 s preset Determines the flow time of the stagnation flushing ON position Stagnation flush duration is set to 20 s OFF position Stagnation flush duration is set to 10 s preset Stagnation flush duration DIP switch 5 Shut off delay DIP switch 6 ON OFF 2 3 4 5 6 1 ON OFF 2 3 4 5 6 1 ...
Страница 36: ...ct 117 899 5 connect 113 792 19 Power cable 4 m 114 232 Description Art no 1 Cover head shower 115 697 2 Cartridge head shower 114 140 3 Base body head shower 115 703 4 Front plate white glass 114 423 Front plate black glass 114 430 5 LED insert 114 362 6 Plastic adapter 115 420 7 Thermostat handle 115 550 8 Securing cap 115 710 9 Base body 118 179 10 Hand shower 115 680 11 Shower rod set 115 727 ...
Страница 37: ......
Страница 38: ......
Страница 39: ......
Страница 40: ...WimTec Sanitärprodukte GmbH p A 3325 Ferschnitz Freidegg 50 AUSTRIA t 43 0 7473 5000 f 43 0 7473 5000 500 m verkauf wimtec com i www wimtec com www wimtec com Auflage 2017 07 31 Art Nr 1001354 ...