background image

1141AFGSPc; 1141AFCAFc Pacific Blanket Dresser 

Assembly Instructions


1141AFGSPc_1141AFCAFc 

— Page 4 — 04/13 

Tool Required: Phillips Screwdriver 

 
1. 

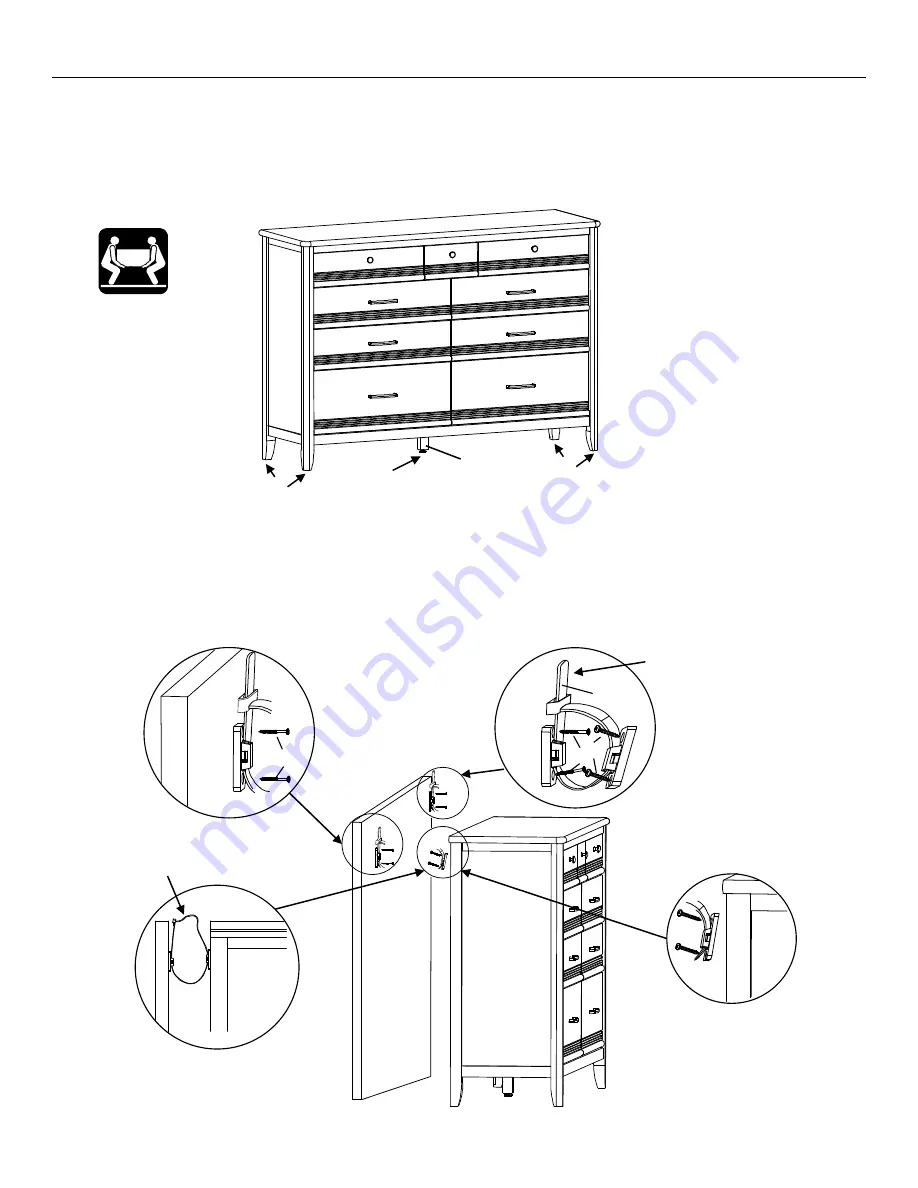
Place the unit at its final destination. Rotate the Small Adjustable Glides (W) found at the 
corners of the unit and the Adjustable Glide with Hex Nut (ZS) at the bottom of the Assembled 
Foot (ZT) until the unit is level. See Figure 1. 


2. 

Tipping restraint: 

Locate two studs in the wall behind the unit. Attach a Clip (T1) to one wall 

stud with two #8 x 2" Black Screws (T3). See Figure 2a. Attach a second clip to the unit with two 
#8 x 1" Pan Head Screws (T4). See Figure 2b. Connect the two clips with the Nylon Restraint 
Strap (T2). Pull the Nylon Restraint Strap (T2) tight so there is no slack. See Figures 2c and 2d. 
Repeat this procedure to attach the second tipping restraint. If you cannot locate two studs, 
purchase the proper wall attachment hardware for your type of wall and secure the unit. 


Fig. 2a 

T1 

T3 

Pull tight 

Fig. 2d 

T1 

T2 

T3 T4 

Fig. 2c 

Pull the Nylon Restraint 

Strap (T2) tight  

so there is no slack. 

T4 

T1 

Fig. 2b 

Fig. 1 

ZT 

ZS 

Содержание 1141AFGSPc

Страница 1: ...Place heaviest items in the bottom drawers Unless specifically designed to accommodate do not set TVs or other heavy objects on top of this product Never allow children to climb or hang on drawers doors or shelves Never open more than one drawer at a time Use of tip over restraints may only reduce but not eliminate the risk of tip over DESIGN SUBJECT TO CHANGE WITHOUT NOTICE CALL US FIRST Do not r...

Страница 2: ... Drawer inserted 2 G Center Drawer with secret storage inserted 1 H Small Left Drawer inserted 1 I Small Right Drawer inserted 1 J Large Drawer Face installed 2 K Medium Drawer Face installed 4 L Small Drawer Face installed 2 M Center Drawer Face installed 1 N Knob attached 3 O Handle attached 6 Q Drawer Slides pre installed sets 9 R 6 x 1 2 Philtruss Screw inserted 54 S 6 x 3 4 Philtruss Screw in...

Страница 3: ...w inserted 2 ZM M4 x 10mm Insert Nut inserted 4 ZN 8 x 1 Lo Profile Screw inserted 48 ZO 8 x 1 1 8 Lo Profile Screw inserted 10 ZP 1 4 x 20mm Insert Nut inserted 4 ZQ 8 x 1 5 8 Machine Screw installed 15 ZR 8 x 1 3 8 Lo Profile Screw inserted 9 ZS Adjustable Glide with Hex Nut installed 1 ZT Assembled Foot attached 1 ZU 5 16 x 3 4 Insert Nut inserted 1 TR Furniture Tipping Restraint 2 sets ...

Страница 4: ...the unit Attach a Clip T1 to one wall stud with two 8 x 2 Black Screws T3 See Figure 2a Attach a second clip to the unit with two 8 x 1 Pan Head Screws T4 See Figure 2b Connect the two clips with the Nylon Restraint Strap T2 Pull the Nylon Restraint Strap T2 tight so there is no slack See Figures 2c and 2d Repeat this procedure to attach the second tipping restraint If you cannot locate two studs ...

Страница 5: ...ccess this storage open the top right medium drawer F Reach in until you find the Hinged Drawer Stop Vb that is attached to the bottom right side of the Center Drawer G Pull the Hinged Drawer Stop forward and then pull the center drawer G out far enough so you can access the concealed storage space To close the drawer just push it shut See Figure 3 Fig 3 G Vb G F ...

Отзывы: