Whirlpool WRR56X18FW02 Скачать руководство пользователя страница 7

7

Ensuring Proper Air Circulation

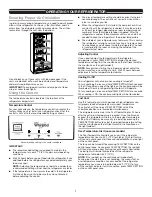
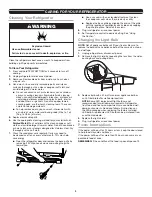
In order to ensure proper temperature, you need to permit proper 

airflow in the refrigerator. As shown in the illustration, cool air 

enters from the refrigerator wall and moves down. The air then 

recirculates through the vent near the bottom.

Do not block any of these vents with food packages. If the 

vents are blocked, airflow will be restricted and temperature 

and moisture problems may occur.

IMPORTANT:

 To avoid odor transfer and drying out of food, 

wrap, or cover foods tightly.

Using the Control

The temperature control is located at the top front of the 

refrigerator compartment.
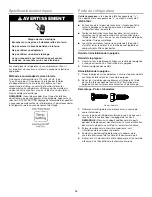
Temperature Control

For your convenience, the temperature control is preset at the 

factory. When you first install your refrigerator, check that the 

control is still set to the recommended setting as shown.

IMPORTANT:


The recommended setting is designed to maintain the 

temperature at or near 37°F (3°C) under normal operating 

conditions.


Wait 24 hours before you put food into the refrigerator. If you 

add food before the refrigerator has cooled completely, your 

food may spoil.

NOTE:

 Adjusting the temperature set point to a colder-than 

recommended setting will not cool the refrigerator any faster.


If the temperature is too warm or too cold in the refrigerator, 

first check the air vents to be sure they are not blocked 

before adjusting the control.


The preset temperature setting should be correct for normal 

household usage. The control is set correctly when milk or 

juice is as cold as you like.


When the refrigerator is first started, the compressor will run 

constantly until the refrigerator is cooled. It may take up to 6 

or 8 hours (or longer), depending on room temperature and 

number of times the refrigerator door is opened. After the 

refrigerator is cooled, the compressor will turn on and off as 

needed to keep the refrigerator at the proper temperature.


The outside of your refrigerator may feel warm. This is normal. 

The refrigerator’s design and main function is to remove heat 

from packages and air space inside the refrigerator. The heat 

is transferred to the room air, making the outside of the 

refrigerator feel warm.
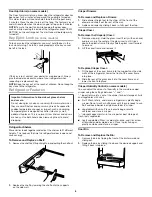
Adjusting Control

If you need to adjust the temperature in the refrigerator 

compartment, press TEMP SETTING to display the desired 

temperature setting from the snowflake on the left (least cold) to 

the snowflake on the right (coldest).

NOTE:

 Except when starting the refrigerator, do not adjust the 

control more than one setting at a time. Wait 24 hours between 

adjustments for the temperature to stabilize.

Cooling On/Off

Your refrigerator will not cool when cooling is turned off.
To turn cooling off, press and hold TEMP SETTING for 3 seconds. 

In the Off condition, none of the lights on the control panel will be 

illuminated. The main refrigerator light bulb will still operate.
To turn cooling on, press and hold TEMP SETTING for 3 seconds. 

When cooling is ON, the control panel lights will be illuminated.

Fast Cool

Use this feature to assist with periods of high refrigerator use, 

full grocery loads or temporarily warm room temperature.
To activate Fast Cool, press TEMP SETTING until all the 

snowflake positions are illuminated simultaneously.
The refrigerator will remain in the Fast Cool setting for 24 hours 

after the extra-low temperature is reached. Once the time has 

expired, the refrigerator will return to the previous temperature 

setting. Fast Cool may be manually turned off by pressing the 

TEMP SETTING button to select the desired temperature setting 

from the snowflake on the left (least cold) to the snowflake on 

the right (coldest).

Over-Temperature Alert (on some models)

The Over Temperature Alert lets you know if the refrigerator 

temperature has risen to 54°F (12°C) or higher. This alert feature 

will sound a continuous alert tone and repeatedly flash a red light 

on the control panel.
The tone can be turned off by pressing TEMP SETTING on the 

control panel once. As you press TEMP SETTING, the red light 

will then also change from flashing to continuously illuminated. 

The red light will remain illuminated until the refrigerator 

temperature falls below 54°F (12°C).

NOTE:

 If the red light on the control panel is repeatedly 

flashing, but the alert tone is not sounding, this means that an 

over temperature condition has occurred but the refrigerator 

temperature has since returned to below 54°F (12°C). To turn 

off the red light indicator for this condition, press TEMP SETTING 

on the control panel once.

Recommended setting is the center snowflake.

OPERATING YOUR REFRIGERATOR

Содержание WRR56X18FW02

Страница 1: ...d serial numbers These numbers can be found inside your refrigerator Model Number____________________________________________ Serial Number_____________________________________________ User Guide Refrigerator TABLE OF CONTENTS You can be killed or seriously injured if you don t immediately You can be killed or seriously injured if you don t follow All safety messages will tell you what the potenti...

Страница 2: ...people to move and install refrigerator Disconnect power before installing ice maker on ice maker kit ready models only Use a sturdy glass when dispensing ice on some models Do not hit the refrigerator glass doors on some models This appliance is not intended for use by persons including children with reduced physical sensory or mental capabilities or lack of experience and knowledge unless they h...

Страница 3: ...our refrigerator in a location where the temperature will not fall below this recommended temperature Upon Moving to Final Location NOTE This refrigerator may be installed side by side with another freezer or refrigerator Allow for a 1 2 54 cm space behind the refrigerator and a 1 4 6 4 mm clearance between the appliances WARNING Excessive Weight Hazard Use two or more people to move and install r...

Страница 4: ...rol off and remove food and adjustable door or utility bins from door Remove and Replace the Handle To Remove the Handle 1 Loosen the setscrews located on the side of handle at each end See Handle graphic 2 Remove the handle from the grommets To Replace the Handle 1 Place the handle onto the grommets making sure the grommets are fitted into the handle holes 2 Tighten the upper and lower setscrews ...

Страница 5: ...hic Do not tighten the screws completely Final Steps 1 Plug into a grounded 3 prong outlet 2 Reset the control See Using the Control 3 Return all removable door parts to door and food to refrigerator Electrical Shock Hazard Plug into a grounded 3 prong outlet Do not remove ground prong Do not use an adapter Do not use an extension cord Failure to follow these instructions can result in death fire ...

Страница 6: ...gerator seems unsteady or rolls forward when the door is pulled open adjust the brake feet To Steady the Refrigerator Open the refrigerator door Using a 1 4 hex driver turn both brake feet clockwise the same amount until the brake feet are snug against the floor Check again If not satisfied continue to adjust the brake feet by half turns of the screw until the refrigerator does not roll forward wh...

Страница 7: ... If you need to adjust the temperature in the refrigerator compartment press TEMP SETTING to display the desired temperature setting from the snowflake on the left least cold to the snowflake on the right coldest NOTE Except when starting the refrigerator do not adjust the control more than one setting at a time Wait 24 hours between adjustments for the temperature to stabilize Cooling On Off Your...

Страница 8: ...isper s Hold the glass insert firmly with one hand and press up in the center of the glass insert until it rises above the plastic frame Slowly slide the glass insert forward to remove 2 Lift the cover frame and remove it To Replace Crisper Cover 1 Fit the back of the cover frame into the supports on the side walls of the refrigerator Lower the front of the cover frame into place 2 Slide the rear ...

Страница 9: ...y removing 2 Phillips head screws and pulling the grille toward you Use a vacuum with an extended attachment to clean the condenser coils when they are dusty or dirty Replace the base grille by aligning the ends of the grille with the leveling assemblies on each side and snapping the grille into place Reinstall the screws 8 Plug in refrigerator or reconnect power 9 Set temperature control to desir...

Страница 10: ... circuit breaker NOTE If problems continue contact an electrician Lights Do Not Work Check that it is plugged into a grounded 3 prong outlet Check that the light bulb is tight in the socket and is not burned out Water in Defrost Drain Pan It is normal for water to drip into the defrost drain pan when refrigerator is defrosting When humidity is high it is normal for water in the defrost pan to take...

Страница 11: ...nized and close door as soon as possible Adding a large amount of food warms the refrigerator causing the refrigerator to run longer to cool back down Check that the temperature control is set correctly for surrounding conditions The Door Will Not Close Completely or Is Difficult to Open Check that there are no food packages blocking the door On some models check that the crisper covers pans shelv...

Страница 12: ...utions etc 5 Defects or damage caused by the use of non genuine Whirlpool parts or accessories 6 Conversion of products from natural gas or L P gas 7 Damage from accident misuse abuse fire floods acts of God or use with products not approved by Whirlpool 8 Repairs to parts or systems to correct product damage or defects caused by unauthorized service alteration or modification of the appliance 9 C...

Страница 13: ...duit Vous trouverez les numéros de modèle et de série à l intérieur du réfrigérateur Numéro de modèle___________________________________________ Numéro de série______________________________________________ Guide d utilisation Réfrigérateur TABLE DES MATIÈRES SÉCURITÉ Risque possible de décès ou de blessure grave si vous ne suivez pas immédiatement les instructions Risque possible de décès ou de b...

Страница 14: ...nnes pour déplacer et installer le réfrigérateur Débrancher le réfrigérateur avant l installation de la machine à glaçons seulement pour modèles prêts à recevoir une machine à glaçons Utiliser un verre robuste pour prendre des glaçons sur certains modèles Ne pas heurter les portes en verre du réfrigérateur sur certains modèles Cet appareil ne convient pas à une utilisation par des personnes y comp...

Страница 15: ...de déplacement à son emplacement final REMARQUE Ce réfrigérateur peut être installé côte à côte avec un autre réfrigérateur ou congélateur Laisser un dégagement de 1 2 54 cm à l arrière du réfrigérateur et un dégagement de 1 4 6 4 mm entre les appareils AVERTISSEMENT Risque du poids excessif Utiliser deux ou plus de personnes pour déplacer et installer le réfrigérateur Le non respect de cette inst...

Страница 16: ... tout balconnet réglable ou compartiment utilitaire des portes Retrait et réinstallation de la poignée Retrait de la poignée 1 Desserrer les vis de blocage situées sur le côté de la poignée à chaque extrémité Voir l illustration de la poignée 2 Retirer la poignée des oeillets Réinstallation de la poignée 1 Placer la poignée sur les oeillets en s assurant que les oeillets sont bien installés dans l...

Страница 17: ...0882914A W10854518A SP 2016 Whirlpool Used under license in Canada All rights reserved Usada en Canadá bajo licencia Todos los derechos reservados Utilisé sous licence au Canada Tous droits réservés 6 16 ...

Отзывы: