background image

MICROWAVE OVEN

UNDER-THE-CABINET INSTALLATION INSTRUCTIONS

INSTRUCTIONS D’INSTALLATION FOUR À MICRO-ONDES 

SOUS PLACARD MURAL


MICROWAVE OVEN SAFETY

This product is not intended for use above any heat source, such as a range or cooktop. See “Installation Requirements” section for 
further notes.
These installation instructions cover different models. The appearance of your particular model may differ slightly from the illustration in 
these installation instructions.

Ce produit n’est pas conçu pour l’utilisation au-dessus de tous de source de chaleur, comme une cuisinière ou table de cuisson. Voir la 
section “Exigences d’installation” pour d’autres remarques.
Ces instructions d’installation sont valables pour plusieurs modèles. Il se peut que l’apparence de votre propre modèle soit légèrement 
différente de celle montrée sur les illustrations dans ce document.

Table of Contents / Table des matières

MICROWAVE OVEN SAFETY .................................................. 1

INSTALLATION REQUIREMENTS........................................... 2

Tools and Parts ...................................................................... 2
Location Requirements .......................................................... 2
Product Dimensions............................................................... 2
Electrical Requirements ......................................................... 3

INSTALLATION INSTRUCTIONS............................................. 3

Place Cabinet Template......................................................... 3
Mark and Drill Holes ............................................................... 4
Install the Microwave Oven.................................................... 4
Complete Installation ............................................................. 5

SÉCURITÉ DU FOUR À MICRO-ONDES .......................................... 7

EXIGENCES D'INSTALLATION.......................................................... 7

Outils et pièces................................................................................. 7
Exigences d’emplacement............................................................... 7
Dimensions du produit ..................................................................... 7
Spécifications électriques ................................................................ 8

INSTRUCTIONS D’INSTALLATION ................................................... 9

Placement du gabarit du placard..................................................... 9
Marquage de l’emplacement/perçage des trous ............................ 9
Installation du four à micro-ondes ................................................. 10
Achever l'installation........................................................................11

W10482078A/JS1M0609-18261-005

You can be killed or seriously injured if you don't immediately 
 

You


can be killed or seriously injured if you don't follow 

All safety messages will tell you what the potential hazard is, tell you how to reduce the chance of injury, and tell you what can
happen if the instructions are not followed.

Your safety and the safety of others are very important.

We have provided many important safety messages in this manual and on your appliance. Always read and obey all safety 
messages.

This is the safety alert symbol.

This symbol alerts you to potential hazards that can kill or hurt you and others.

All safety messages will follow the safety alert symbol and either the word “DANGER” or “WARNING.”

These words mean:

follow instructions.

instructions.

DANGER

WARNING

Содержание WMC10007AB

Страница 1: ...TALLATION INSTRUCTIONS 3 Place Cabinet Template 3 Mark and Drill Holes 4 Install the Microwave Oven 4 Complete Installation 5 SÉCURITÉ DU FOUR À MICRO ONDES 7 EXIGENCES D INSTALLATION 7 Outils et pièces 7 Exigences d emplacement 7 Dimensions du produit 7 Spécifications électriques 8 INSTRUCTIONS D INSTALLATION 9 Placement du gabarit du placard 9 Marquage de l emplacement perçage des trous 9 Instal...

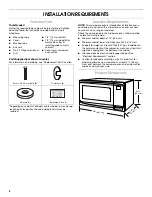
Страница 2: ... provide Minimum cabinet depth of 12 30 5 cm Minimum cabinet lower shelf thickness of 3 16 5 mm Support for weight of at least 50 lbs 22 7 kg in addition to the normal contents of the cabinet as well as any items that might be hanging from the bottom of the cabinet Grounded electrical outlet inside upper cabinet See Electrical Requirements section To allow for adequate ventilation which is importa...

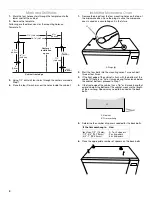
Страница 3: ...s shown 4 Align the Hole Centerlines of Template A with those of Template B as shown 5 Tape the template pieces into place Electrical Shock Hazard Plug into a grounded 3 prong outlet Do not remove ground prong Do not use an adapter Do not use an extension cord Failure to follow these instructions can result in death fire or electrical shock WARNING GROUNDING INSTRUCTIONS SAVETHESE INSTRUCTIONS For...

Страница 4: ...ree or four times 3 If the front edge of the cabinet is flush with the bottom of the cabinet if there is no lip or trim overhang that extends below the cabinet bottom proceed to Step 7 4 If the front edge of the cabinet has a lip or trim overhang that extends below the bottom of the cabinet measure the length of the overhang Spacers may need to be used on the back bolts 5 Determine the number of s...

Страница 5: ...Check the operation of microwave oven by placing 1 cup 250 mL of water on the turntable and programming a cook time of 1 minute at 100 power 3 If the microwave oven does not operate Check that a household fuse has not blown or that a circuit breaker has not tripped Replace the fuse or reset the circuit breaker If the problem continues call an electrician Check that the power supply cord is plugged...

Страница 6: ...6 Notes ...

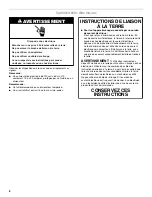
Страница 7: ...le au bon fonctionnement du produit un dégagement d au moins 2 6 4 cm doit exister entre le four micro ondes et une éventuelle paroi latérale ou la paroi d un meuble de chaque côté Dimensions du produit Risque possible de décès ou de blessure grave si vous ne suivez pas immédiatement les instructions Risque possible de décès ou de blessure grave si vous ne suivez pas les instructions Tous les mess...

Страница 8: ...micro ondes soit relié à la terre En cas de court circuit électrique la liaison à la terre réduit le risque de choc électrique car le courant électrique dispose d un itinéraire direct d acheminement à la terre Le four à micro ondes est doté d un cordon de courant électrique qui comporte un fil de liaison à la terre avec broche de liaison à la terre On doit brancher la fiche sur une prise de couran...

Страница 9: ...eux parties à poser de chaque côté de la cloison 3 Aligner chaque partie du gabarit A pour qu il affleure l arête avant du placard comme illustré 4 Aligner les axes des trous du gabarit A avec ceux du gabarit B comme illustré 5 Fixer les parties du gabarit avec du ruban adhésif Marquage de l emplacement perçage des trous 1 Repérer le centre des quatre trous à travers le gabarit sur l étagère infér...

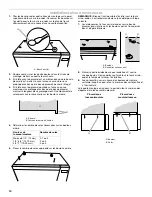
Страница 10: ...r les boulons arrière 6 Placer le nombre de cales approprié sur les boulons arrière REMARQUE Bien qu il soit possible d installer seul le four à micro ondes il est recommandé de se faire aider pour l étape suivante 7 Lever doucement le four à micro ondes vers le bas du placard jusqu à faire sortir les boulons par les trous percés dans l étagère inférieure 8 Glisser la partie évidée de chaque ronde...

Страница 11: ...roblème persiste appeler un électricien Vérifier que le cordon d alimentation est correctement branché sur une prise de courant à 3 alvéoles reliée à la terre Pour l information relative au dépannage consulter le Guide d utilisation et d entretien L installation est maintenant terminée Conserver les Instructions d installation pour une éventuelle réutilisation future AVERTISSEMENT Risque de choc é...

Страница 12: ...W10482078A 2012 All rights reserved Tous droits réservés JS1M0609 18261 005 4 12 Printed in China Imprimé en Chine ...

Отзывы: