background image

MODEL  MH8150XJ

4619-652-60191/8169687

Microwave Hood

Combination

A Note to You.............................................2
Microwave Oven Safety ...........................3
Installation Instructions............................6
Getting to Know Your 
Microwave Oven........................................7

How your microwave oven works ...........7
Radio interference .................................7
Testing your microwave oven ...............7
Testing your dinnerware 
or cookware............................................8
Operating tips.........................................8
Electrical connection .............................8
Microwave oven features......................9
Control panel features.........................10
Using the cooking rack .......................13
Using the exhaust fan .........................13
Using the cooktop/
countertop light....................................14
Setting the clock..................................14
Using the minute timer........................15
Using JET START

TM

feature.................16

Changing preset cooking times .........16

Using Your Microwave Oven ...................17

Cooking at high cook power ..............17
Cooking at different cook powers......17
Cooking in stages................................19
Progress Bar ........................................20
Using EZ-TOUCH

TM

COOK control.....21

Using EZ-TOUCH

TM

REHEAT control ..22

Using EZ-TOUCH

TM 

JET DEFROST

TM  

feature ......................24

JET DEFROST

TM

feature chart ............25

Defrosting tips......................................27
Using POPCORN .................................28
Using BEVERAGE ................................29
Using BAKED POTATO........................30
Using VEGETABLE...............................31
Using FROZEN ENTREE .....................32
Using WARM HOLD ............................33

Cooking Guide.........................................34
Caring for Your Microwave Oven ...........35

Caring for the filters.............................36
Replacing the cooktop 
and oven lights.....................................37

Questions and Answers .........................38
Troubleshooting.......................................39
Requesting Assistance 
or Service .................................................41
Warranty ...................................................44

1-800-253-1301

Call our Customer Interaction Center 

with questions or comments.

Содержание MH8150XJ

Страница 1: ...eature 16 Changing preset cooking times 16 Using Your Microwave Oven 17 Cooking at high cook power 17 Cooking at different cook powers 17 Cooking in stages 19 Progress Bar 20 Using EZ TOUCHTM COOK control 21 Using EZ TOUCHTM REHEAT control 22 Using EZ TOUCHTM JET DEFROSTTM feature 24 JET DEFROSTTM feature chart 25 Defrosting tips 27 Using POPCORN 28 Using BEVERAGE 29 Using BAKED POTATO 30 Using VE...

Страница 2: ...label plate see the diagram in the Getting to Know Your Microwave Oven section Please also record the purchase date of your appliance and your dealer s name address and telephone number Keep this book and the sales slip together in a safe place for future reference It is important for you to save your sales receipt showing the date of purchase Proof of purchase will assure you of in warranty servi...

Страница 3: ...ealed containers for example closed glass jars may explode and should not be heated in the microwave oven Use the microwave oven only for its intended use as described in this manual Do not use corrosive chemicals or vapors in the microwave oven This type of oven is specifically designed to heat cook or dry food It is not designed for industrial or laboratory use As with any appliance close superv...

Страница 4: ...ot cover or block any openings on the microwave oven Do not store this microwave oven outdoors Do not use the microwave oven near water for example near a kitchen sink in a wet basement or near a swimming pool and the like Do not immerse cord or plug in water Keep cord away from heated surfaces Do not let cord hang over edge of table or counter Do not mount over a sink Do not cover racks or any ot...

Страница 5: ...ounding plug can result in a risk of electric shock Consult a qualified electrician or serviceman if the grounding instructions are not completely under stood or if doubt exists as to whether the microwave oven is properly grounded Do not use an extension cord If the power supply cord is too short have a qualified electrician or serviceman install an outlet near the microwave oven For a permanentl...

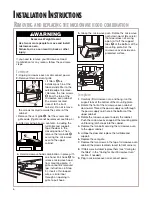
Страница 6: ...moving all oven contents including the turntable and support tape the door in the closed position Then remove the two bolts D securing the microwave oven to the upper cabinet B C A D F E 5 Grasp the microwave oven Rotate the microwave oven downward Be careful that door does not swing open Lift off the support tabs F at the bottom of the mounting plate Set the microwave oven aside on a protected su...

Страница 7: ...king If needed touch JET START feature while the oven is operating or after the cooking cycle is over see the Using JET START feature section To help make sure the food is evenly cooked stir turn over or rearrange the food about halfway through the cooking time If you do not have a cover for a dish use wax paper or microwave approved paper towels or plastic wrap Remember to turn back a corner of t...

Страница 8: ...o avoid possibly breaking it If your turntable cracks or breaks contact your dealer for a replacement When you use a browning dish the browning dish bottom must be at least 3 16 in 5 mm above the turntable Follow the directions supplied with the browning dish ELECTRICAL CONNECTION Never cook or reheat a whole egg inside the shell Steam buildup in whole eggs may cause them to burst and possibly dam...

Страница 9: ...and POPCORN 9 Exhaust Fan and Cooktop Light Switches 10 Control Panel Touch the pads on this panel to perform all functions 11 Vent Grille 12 Oven Cavity Light 13 Microwave Inlet Cover 14 Model and Serial Number Plate MICROWAVE OVEN FEATURES CLOCK CANCEL OFF ENTER START JET START VENT FAN HIGH LOW OFF LIGHT ON NIGHT OFF 3 2 1 4 5 8 7 6 9 0 TIMER SET TIMER OFF TURNTABLE ON OFF SENSOR ONE TOUCH BAKE...

Страница 10: ... microwave oven WARM HOLD can be used by itself or it can automatically follow a cooking cycle 11 COOK TIME Touch this pad followed by num ber pads to set a cooking time 12 COOK POWER Touch this pad after the cook ing time has been set followed by a Number pad in order to set the amount of microwave energy released to cook the food Also touch this pad to lengthen or shorten a preset cooking time 1...

Страница 11: ...owave oven comes with audible signals that can guide you when setting and using your oven A programming tone will sound each time you touch a pad One long tone signals the end of a Kitchen Timer countdown Four tones signal the end of a cooking cycle Two quick short tones sound once every minute for the first 15 minutes after an end of cooking signal as a reminder if the food has not been removed f...

Страница 12: ...is over or when you touch OFF CANCEL NOTE You cannot turn off the turntable when using an auto function Usingthechildlock The Child Lock locks the control panel so children cannot use the microwave oven when you do not want them to This will only work when oven is in standby mode To lock the control panel TOUCH and hold for 5 seconds Two tones will sound and will appear on the display When the con...

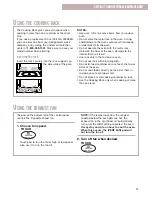
Страница 13: ... to the interior finish will result Use rack only in the microwave oven Do not use rack with browning dish Do not let food container on rack touch the top or sides of the oven Do not cook foods directly on rack Put them in microwave safe containers first Do not place a metal cooking container on rack Use the Cooking Rack only when cooking at more than one level USING THE EXHAUST FAN The pad on the...

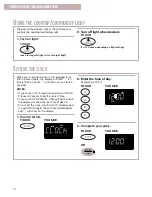
Страница 14: ...a power failure the display will flash If a time of day is not set will flash until you touch any pad NOTES If you touch in an invalid time and touch CLOCK 3 tones will sound Enter the correct time If you touch OFF CANCEL while setting the clock the display will show the last time of day set To turn off the clock touch CLOCK Number pad 0 and CLOCK again the set time will disappear and will show on...

Страница 15: ...the first 4 digits will disappear and the following digit s will appear on the right side as you enter them 3 Start the countdown NOTE If you do not do this step within 5 seconds of doing Step 2 START will appear You then have 1 minute to touch TIMER SET or START ENTER before the display returns to the time of day At the end of the countdown TocanceltheMinuteTimer During the countdown TIMER ENTER ...

Страница 16: ...k power after you touch the JET START feature pad by touching COOK POWER Number pads for the new cook power and START ENTER You can use the JET START feature only for the cook time function 1 Make sure the food is in the oven 2 Touch the JET START feature pad Example for cooking for 30 seconds TOUCH YOU SEE JET START PWR TIME COOK CHANGING PRESET COOKING TIMES If a preset cooking time is too long ...

Страница 17: ...a different percentage of cook power Many microwave cookbook recipes tell you by number percent or name which cook power to use The following chart gives the percentage of cook power each Number pad stands for and the cook power name usually used It also tells you when to use each cook power Follow recipe or food pack age instructions if available NOTE Refer to a reliable cookbook for cooking time...

Страница 18: ...ese and ice cream Keeping food warm Taking chill out of fruit COOKING AT DIFFERENT COOK POWERS CONT NOTE Once cook time has been entered you can also use the COOK POWER pad as a second Minute Timer by entering 0 for the cook power The oven will count down the cooking time you set without cooking 1 Put your food in the oven and close the door 2 Touch COOK TIME 3 Enter the cooking time Example for 7...

Страница 19: ...tain length of time and another cook power for another length of time Your oven can be set to change from one to another automatically for up to 3 stages You can set your chosen cook functions in any order However if you use the JET DEFROSTTM feature it must be the first stage 1 Put your food in the oven and close the door 2 Touch COOK TIME 3 Enter the cooking time for the first stage Example for ...

Страница 20: ...OOK YOU SEE TIME COOK ENTER START four tones will sound PROGRESS BAR The display contains a Progress Bar which indi cates how far the Cook functions have gone and how much more the functions have to go The full length of the bar represents the estimated running time of the cooking cycle The Progress Bar advances line by line during a cycle The 12 segments on the Progress Bar give an estimate of pr...

Страница 21: ... a quantity and to touch START ENTER If you do not do so EZ TOUCH COOK control will be canceled If you touch COOK 7 times the display returns to the Rice setting If you need more or less time do not touch COOK again Touch COOK POWER before you touch START ENTER See Changing preset cooking times in the Getting to Know Your Microwave Oven section When cooking bacon keep in mind that differences in t...

Страница 22: ...nt French Toast frozen USING YOUR MICROWAVE OVEN USING EZ TOUCHTM COOKCONTROL CONT USING EZ TOUCHTM REHEATCONTROL You can reheat microwavable foods just by choosing a category and quantity EZ TOUCH REHEAT control has preset times and cook powers for 5 categories see following chart To use EZ TOUCH REHEAT control follow the steps below 1 Touch You see 2 Touch REHEAT 1 to 5 times to choose the type ...

Страница 23: ...ONTROL CONT TIME REHEAT AUTO ENTER START countdown time may vary NOTES If you do not enter a quantity within 2 seconds EZ TOUCH REHEAT control will prompt you to choose a quantity You then have 1 minute to enter a quantity and to touch START ENTER If you do not do so EZ TOUCH REHEAT control will be canceled If you touch REHEAT 6 times the display returns to the Pizza Slice setting If you need more...

Страница 24: ...t within 2 seconds the EZ TOUCH JET DEFROST feature will prompt you to enter a weight You then have 1 minute to enter a weight and to touch START ENTER If you do not do so the EZ TOUCH JET DEFROST feature will be canceled If you enter a weight higher than the highest weight allowed for your food setting 3 tones will sound and RETRY will appear on the display when you touch START ENTER Then the min...

Страница 25: ...you can set for each type You must touch the JET DEFROST feature pad once before choosing the food type TOUCH NUMBER PAD 1 2 3 OR SPECIAL INSTRUCTIONS Meat of irregular shape and large fatty cuts of meat should have the narrow or fatty areas shielded with foil at the beginning of a defrost cycle Do not defrost less than 1 4 lb 113 g Do not defrost less than two 4 oz 113 g patties Place on a microw...

Страница 26: ...k Finish defrosting by immersing in cold water Place on a microwavable roasting rack Finish defrosting by immersing in cold water Fishsetting SPECIAL INSTRUCTIONS Place in a microwavable baking dish Carefully separate fillets under cold water Place in a microwavable baking dish Run cold water over to finish defrosting Place in a microwavable baking dish Cover head and tail with foil do not let foi...

Страница 27: ...ger than expected For more information on standing time see the Microwave cooking tips in the Cooking Guide section Weightconversionchart You are probably used to food weights as being in pounds and ounces that are fractions of a pound for example 4 ounces equals 1 4 lb 113 g However in order to enter food weight in the JET DEFROST feature you must specify pounds and tenths of a pound If the weigh...

Страница 28: ...imes to choose the bag size You see NOTES If you touch POPCORN 4 times the display returns to the 3 5 ounce 100 g setting You do not need to touch START ENTER to start the oven The oven will start in 5 seconds Popcorn brands make a difference How well your popcorn cooks will depend on the brand of popcorn and how much fat it has in it Try several brands to decide which pops the best For best resul...

Страница 29: ...ss time do not touch BEVERAGE again Touch POWER before the oven starts cooking See Changing preset cooking times in the Getting to Know Your Microwave Oven section 1 Place your cup s of beverage in the oven and close the door 2 Touch BEVERAGE If you want to heat 1 cup just wait 5 seconds and the oven will start heating automatically for 1 cup 3 Change to 2 cups if desired After 5 seconds the oven ...

Страница 30: ... oven will cook NOTES If you touch BAKED POTATO 5 times the display returns to the 1 potato setting You do not need to touch START ENTER to start the oven The oven will start cooking by itself in 5 seconds If you need more or less time do not touch BAKED POTATO again Touch POWER before the oven starts cooking See Changing preset cook ing times in the Getting to Know Your Microwave Oven section For...

Страница 31: ...ups if desired Example for 2 cups After 5 seconds the oven will start cooking Example for 2 cups At end of cooking time You do not need to touch START ENTER to start the oven The oven will start cooking by itself in 5 seconds If you need more or less cooking time do not touch VEGETABLE again Touch COOK POWER before the oven starts cooking See Changing preset cooking times in the Getting to Know Yo...

Страница 32: ...g time NOTES If you touch FROZEN ENTREE 3 times the display returns to the 10 ounce 284 g setting You do not need to touch START ENTER to start the oven The oven will start cooking by itself in 5 seconds If you need more or less cooking time do not touch FROZEN ENTREE again Touch COOK POWER before the oven starts cooking See Changing preset cooking times in the Getting to Know Your Microwave Oven ...

Страница 33: ...vered during WARM HOLD Do not use more than one complete WARM HOLD cycle The quality of some foods will suffer with extended time 1 Put hot cooked food in the oven and close the door 2 Touch WARM HOLD 3 Start the oven TomakeWARMHOLDautomatically followanothercycle While entering cooking instructions touch WARM HOLD before touching START ENTER or during cooking When the last cooking cycle is over y...

Страница 34: ...ng times Keep food moist You can use any covering that lets microwaves pass through See Getting to Know Your Microwave Oven for materials that microwaves will pass through Releasingpressureinfoods Several foods for example baked potatoes sausages egg yolks and some fruits are tightly covered by a skin or membrane Steam can build up under the membrane during cooking causing the food to burst To rel...

Страница 35: ...ingyoushouldnotdoinyourmicrowaveoven Do not do canning of foods in the oven Closed glass jars may explode resulting in damage to the oven Do not use the microwave oven to sterilize objects baby bottles etc It is difficult to keep the oven at the high temperature needed for sterilization CARING FOR YOUR MICROWAVE OVEN To make sure your microwave oven looks good and works well for a long time you sh...

Страница 36: ...rom you This will slide the front of the filter off the lower lip Swing the front of the filter down and slide the filter out 4 This model comes with Dishwasher Safe Grease Filters Place the grease filters in an empty dish washer and wash NOTE Washing these filters with dirty dishes may cause the filters to trap the parti cles from the dishes so we recommend washing separately in an empty dishwash...

Страница 37: ...opening Push filter upward and push to the other side to lock into place 7 Slide the bottom of the vent grille into place Push the top until it snaps into place Replace the mounting screws 8 Plug in microwave oven or reconnect power NOTE Do not operate the hood without the grease filters in place REPLACING THE COOKTOP AND OVEN LIGHTS Thecooktoplight 1 Unplug microwave oven or disconnect power 2 Re...

Страница 38: ...or additional time to allow it to finish cooking This frees the oven for other cooking Steam is normally produced during cooking The microwave oven has been designed to vent this steam out the vents Yes Pop packaged microwave popcorn following manufacturer s guidelines or use the preset POPCORN pad Do not use regular paper bags Use the listening test by stopping the oven as soon as the popping slo...

Страница 39: ...things you can find and fix without tools of any kind Check the lists below and on the next page before calling for assistance or service If you still need help see the Sears toll free numbers on the back cover MICROWAVE OVEN DOES NOT WORK COOKING TIMES Problem Food is not cooked enough The display shows a time counting down but the oven is not cooking Cause The electric supply to your home or wal...

Страница 40: ...does not move call an authorized service technician for repair Cooking without the turntable can give you poor results TURNTABLES TONES Problem You do not hear the programming or end of cycle tone Cause You have not entered the correct command You have turned off the tone See the Audible signals section on Page 12 If none of these items are causing your problem see the Sears Toll Free Numbers sect...

Страница 41: ...hirlpool designated service technicians are trained to fulfill the product warranty and provide after warranty service anywhere in the United States To locate the Whirlpool designated service company in your area you can also look in your telephone directory Yellow Pages REQUESTING ASSISTANCE OR SERVICE To avoid unnecessary service calls please check the Troubleshooting section It may save you the...

Страница 42: ...ed built in kit See the Built In kits section for a list of approved built in kits D Damage to your microwave oven caused by accident alteration misuse abuse fire flood acts of God or use of products not approved by Whirlpool Corporation E Any labor costs during limited warranty F Repairs to parts or systems resulting from unauthorized modifications made to the appliance G Replacement parts or rep...

Отзывы: