background image


CARBON QUICK START GUIDE, VERSION 1.1 


24 (35)


4.4.4


Configuration 

 
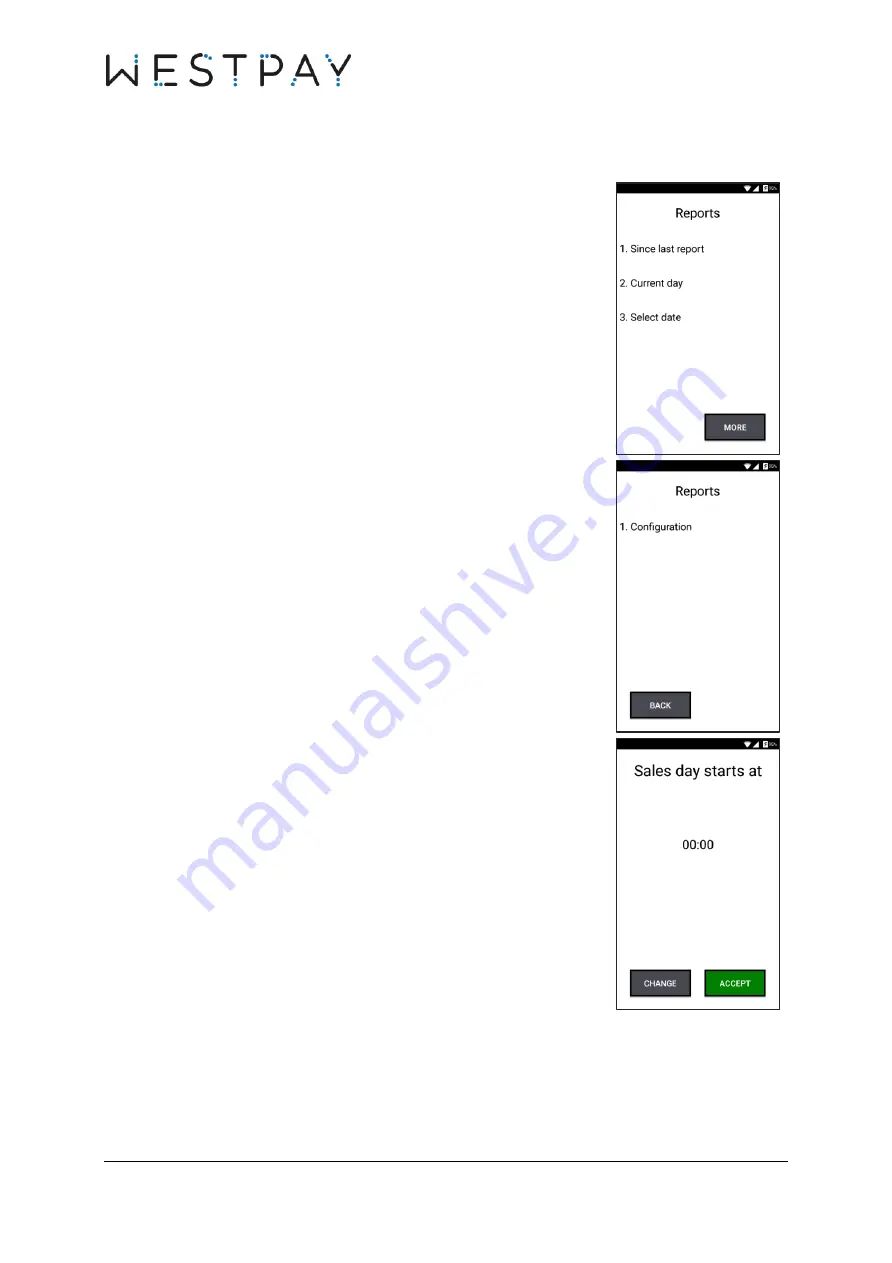
In the Reports menu, press 

MORE


From the Reports menu, select option 

Configuration


by pressing 

corresponding number at the terminal keypad. 


Press 

CHANGE

 to set time when the sales day starts. 


Содержание Carbon 100

Страница 1: ...Carbon Quick Start Guide Standalone terminals ...

Страница 2: ...d 16 4 3 Perform a reversal 18 4 4 Reports 20 4 4 1 Since last report 21 4 4 2 Current day 22 4 4 3 Select date 23 4 4 4 Configuration 24 5 Other settings 26 5 1 Wireless network WiFi 26 5 2 Mobile network GSM 3G 4G 28 5 2 1 General requirements 28 5 2 2 Operator settings 28 6 Preferred battery settings 31 6 1 Set screen brightness 32 6 2 Set sleep timer 34 6 3 Set suspend timer 35 Version history...

Страница 3: ...urrent battery level network connection WiFi and 3G 4G 3 4 TFT Color Display multi touch screen contactless card reader 4 Magnetic Card Reader 5 Keypad 6 Chip card reader 7 Power button 8 Abort button 9 Edit or back button 10 Approval or select button 11 USB C power supply 12 Camera 13 Battery cover 12 11 13 ...

Страница 4: ... DSS It is therefore important that you get to know its content and how to use the payment terminal in a PCI safe way To get hold of the information please download the implementation guide from the following homepage http www westpay se pci If you have any questions related to above information contact your reseller ...

Страница 5: ...tallation If the terminal for some reason is replaced in the future these steps must be applied again Start the terminal by holding down the red terminal button for approximately five seconds You have successfully started the terminal when a blue screen is shown The payment application starts and asks for the Terminal ID Press CHANGE on the screen and then enter the ID by using the terminal keypad...

Страница 6: ... two digits should also be filled with zeroes 0 Dots will be added automatically Example IP address 192 168 0 1 Is entered like 192 168 000 001 Next setting is for the PPL Server Port Press CHANGE on the screen and then enter the number by using the terminal keypad Press the yellow terminal button to delete an entered value Once done save the settings by pressing OK and then ACCEPT to continue Nex...

Страница 7: ...ress If not using a second SPDH server leave this field empty Press CHANGE on the screen and then enter the number by using the terminal keypad Press the yellow terminal button to delete an entered value Once done save the settings by pressing OK and then ACCEPT to continue Next setting is for the second SPDH server port If not using a second SPDH server leave this field empty Press CHANGE on the ...

Страница 8: ...ormation that this should be used To skip this step leave field empty Press CHANGE on the screen and then enter the number by using the terminal keypad Press the yellow terminal button to delete an entered value Once done save the settings by pressing OK and then ACCEPT to finish the configuration The terminal now automatically returns to the main menu ...

Страница 9: ... main menu press MORE Select Terminal setup menu by pressing corresponding number on the terminal keypad In the Terminal setup menu select Language by pressing corresponding number on the terminal keypad In the Select language menu set default language by pressing corresponding number on the terminal keypad Available languages may vary depending on the terminal configuration ...

Страница 10: ...change the settings to static IP addresses In the Terminal main menu press MORE Select Terminal setup menu by pressing corresponding number on the terminal keypad In the Terminal setup menu press MORE Select System functions by pressing corresponding number on the terminal keypad In the System functions menu select Status by pressing corresponding number on the terminal keypad ...

Страница 11: ...ection If there is only one interface on the terminal it will automatically continue to the next screen The first configuration option displayed is if the terminal should use DHCP or not To enable DHCP press YES this option is activated as standard If NO is selected a new screen is displayed with options to set static IP addresses for your network Follow the steps below for configuration Set IP Ad...

Страница 12: ...ere numbers with one or two digits should be filled with zeroes 0 Dots will be added automatically Example IP address 192 168 0 1 Is entered like 192 168 000 001 Complete the registration by pressing the green terminal button Once the configuration is done press the red terminal button to return to the System functions menu If changes have been made then the terminal will require a restart Press Y...

Страница 13: ...to select debit or credit Enter the amount of the purchase Press the yellow terminal button to delete an entered value Accept the entry with OK or the green terminal button CANCEL or the red terminal button aborts the transaction If the tipping function has been activated then the following screen will be displayed where it is possible to enter tip The amount is entered as a total sum for example ...

Страница 14: ... PIN code four digits Enter PIN using the terminal keypad and accept with the green terminal button Press the yellow terminal button to delete an entered value If not remember PIN code press onscreen icon No PIN to select signature Purchase less than 200 SEK does usually not require PIN When the purchase is approved two receipts will be printed if this function is activated The first receipt is th...

Страница 15: ...ARBON QUICK START GUIDE VERSION 1 1 15 35 When the purchase is approved remove the card The terminal automatically returns to the main menu The example shows printed receipts for merchant and cardholder ...

Страница 16: ...ord was handed along with the terminal ID Depending on the card used there might be a supplementary question for example to select debit or credit Enter the amount of the refund Press the yellow terminal button to delete an entered value Accept the entry with OK or the green terminal button CANCEL or the red terminal button aborts the transaction Insert or swipe the card or use contactless If chip...

Страница 17: ... printed if this function is activated The first receipt is the merchant copy Press OK to print second receipt the cardholder copy When the refund is approved remove the card The terminal will return to the main menu automatically The example shows printed receipts for merchant and cardholder ...

Страница 18: ... terminal keypad For security reasons the reversal function is password protected Enter the password with the terminal keypad and confirm with OK The password was handed along with the terminal ID Terminal asks if to reverse last transaction Confirm by pressing YES or press NO to cancel It is only possible to reverse the previous made transaction ...

Страница 19: ...ts will be printed if this function is activated The first receipt is the merchant copy Press OK to print second receipt the cardholder copy The terminal automatically returns to the main menu when the reversal is approved The example shows printed receipts for merchant and cardholder ...

Страница 20: ... START GUIDE VERSION 1 1 20 35 4 4 Reports In the terminal main menu press MORE until option Reports is displayed Select Reports by pressing corresponding number on the terminal keypad The Reports menu is displayed ...

Страница 21: ...mplete report was printed The report information is cleared after printing a full report The function will set printing time as new start time The example shows the two types of reports that can be printed Sales from 19 01 16 00 00 Purchase 21 977 00 Refund 0 0 00 Transactions 21 Transaction report WESTPAY TEST TESTGATAN 22 11122 STOCKHOLM Termid 8181003214563309 From 19 01 16 00 00 To 19 01 17 00...

Страница 22: ...print the information displayed on the summary screen Press PRINT REPORT to print a full report The example shows the two types of reports that can be printed Sales from 19 01 16 00 00 Purchase 21 977 00 Refund 0 0 00 Transactions 21 Transaction report WESTPAY TEST TESTGATAN 22 11122 STOCKHOLM Termid 8181003214563309 From 19 01 16 00 00 To 19 01 17 00 00 Debet MasterCard Purchase 4 100 00 Refund 0...

Страница 23: ...responding number at the terminal keypad Select date that should be included in the report This can be done in two ways 1 Use the right and left arrows on the screen to step one day per press 2 Enter the date manually with the terminal keypad press yellow terminal button first to delete current date Press OK to continue to the next screen The report has two options Print summary and Print report P...

Страница 24: ... VERSION 1 1 24 35 4 4 4 Configuration In the Reports menu press MORE From the Reports menu select option Configuration by pressing corresponding number at the terminal keypad Press CHANGE to set time when the sales day starts ...

Страница 25: ...RBON QUICK START GUIDE VERSION 1 1 25 35 Press the yellow terminal button to delete the current value Use the terminal keypad to enter the new value Press OK when finished Press ACCEPT to confirm settings ...

Страница 26: ...E Select Terminal setup menu by pressing corresponding number on the terminal keypad In the Terminal setup menu press MORE Select System functions by pressing corresponding number on the terminal keypad In the System functions menu press the right button Select WiFi by pressing corresponding number on the terminal keypad ...

Страница 27: ...or 5GHz should now be displayed Select the preferred one by pressing corresponding number on the terminal keypad Enter password for the chosen network by using the terminal keypad or the onscreen keyboard Press the green check button on the screen keyboard and then OK to confirm When the wireless network has been connected the WiFi icon on the screen header should be visible showing the actual sig...

Страница 28: ...is prepaid make sure that it has a balance available 3 The SIM card should not have PIN code activated 4 The SIM card must be of Mini SIM type see illustration below Westpay cannot guarantee that all the operators will work For support related to GSM settings please contact your operator 5 2 2 Operator settings In the terminal main menu press MORE Select Terminal setup menu by pressing correspondi...

Страница 29: ...ng corresponding number on the terminal keypad In the System functions menu press the right button Select 3G GSM by pressing corresponding number on the terminal keypad Select the preferred Access Point Name APN by pressing corresponding number on the terminal keypad Press Manual settings to configure APN manually ...

Страница 30: ...ter the new name Press OK when finished Second step is to enter MCC and MNC values The Mobile Country Code MCC and Mobile Network Code MNC fields together specify which carrier you are using Each carrier in the world has their own unique MCC and MNC value pair Press the yellow terminal button to delete the current value Use the terminal keypad to enter new values Note that you must add a comma bet...

Страница 31: ...el is below 10 Charge the terminal before this level is reached To save terminal battery it is strongly recommended to adjust the screen settings to this configuration 1 Screen brightness 40 2 Sleep timer 30 seconds 3 Suspend timer 30 seconds Follow the steps below to make these adjustments before using the terminal ...

Страница 32: ...Select Terminal setup menu by pressing corresponding number on the terminal keypad In the Terminal setup menu press MORE Select System functions by pressing corresponding number on the terminal keypad In the System functions menu select Screen settings by pressing corresponding number on the terminal keypad ...

Страница 33: ... by pressing corresponding number on the terminal keypad Press CHANGE to set percent of the full screen brightness Press the yellow terminal button to delete the current value Use the terminal keypad to enter value 40 Press OK when finished Screen brightness is now set to 40 Press CANCEL to return to the Screen settings menu ...

Страница 34: ...menu option Set sleep timer by pressing corresponding number on the terminal keypad Press CHANGE to configure Select option 30 s by pressing corresponding number on the terminal keypad Sleep timer is now set to 30 seconds Press CANCEL to return to the Screen settings menu ...

Страница 35: ...number on the terminal keypad Press CHANGE to configure Select option 30 s by pressing corresponding number on the terminal keypad Suspend timer is now set to 30 seconds Press CANCEL to return to the Screen settings menu Press the red terminal button two times to return to the terminal main menu The terminal is now ready to use ...

Отзывы: