# QL051
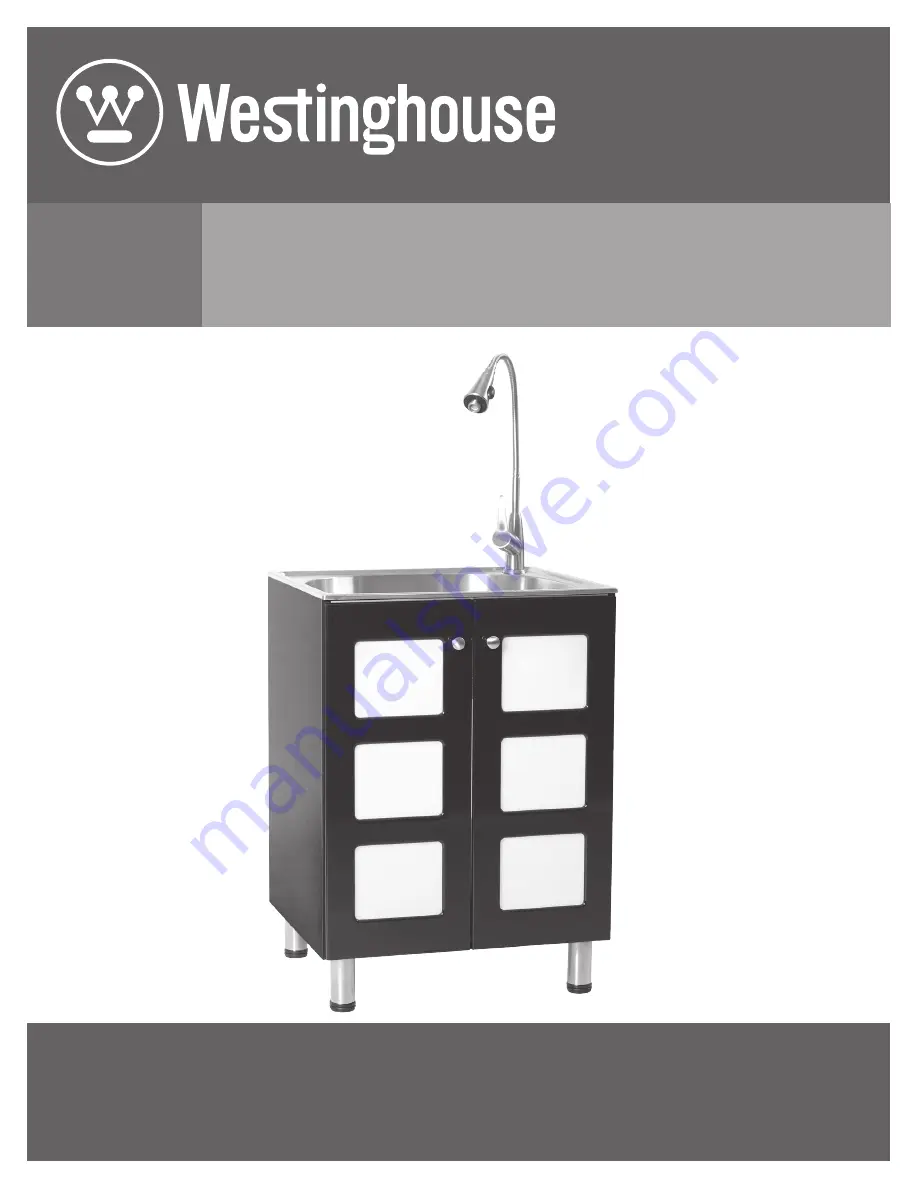
UTILITY SINK, STORAGE CABINET & FAUCET
ÉVIER UTILITAIRE, ARMOIRE DE RANGEMENT ET ROBINET
ALL-IN-ONE
TOUT-EN-UN
OWNER’S MANUAL
MANUEL DE L’UTILISATEUR
Страница 1: ... QL051 UTILITY SINK STORAGE CABINET FAUCET ÉVIER UTILITAIRE ARMOIRE DE RANGEMENT ET ROBINET ALL IN ONE TOUT EN UN OWNER S MANUAL MANUEL DE L UTILISATEUR ...
Страница 2: ...afety Information READ AND SAVE THESE INSTRUCTIONS 1 Inspect your unit before proceeding Once you unpack your unit check for chips scratches cracks dents or scuff marks If any damage is noticed do not install 2 Use this unit only in the manner intended by the manufacturer If you have any questions contact the manufacturer 3 Installation work and plumbing must be done by qualified person s in accor...
Страница 3: ...ss of use of this product costs incurred for labour or materials removal and installation of replacement units or any other incidental or consequential damages Costs relating to obtaining access for repair or replacement are the responsibility of the user Our obligation shall be limited to the repair or replacement of a unit at our discretion that may prove by our sole examination to be defective ...
Страница 4: ...TERIALS REQUIRED NOT SUPPLIED Adjustable wrench Needle nose pliers Phillips screwdriver Utility knife Pipe wrench Sealant Hacksaw Carpenter s level Hex key Safety gloves Safety goggles PARTS REQUIRED NOT SUPPLIED Tail Pipe P Trap Supply lines ...
Страница 5: ...r further assistance ENGLISH Pre Installation continued PACKAGE CONTENTS A B C E F G H I D Part Description Quantity A Cabinet 1 B Utility Sink 1 C Faucet 1 D Strainer Assembly 1 E Door Knobs 2 F Leveling Legs 4 G Door Knob Screws 2 H Leveling Leg Screws 16 J Hex Key 1 ...
Страница 6: ...ly to the manufacturer Do not dispose of packaging before you are satisfied with your new utility sink Remove the utility sink B and place it on a soft protective surface Turn the cabinet A upside down onto a protective surface Gently put each leveling leg F onto its proper location Using four leveling leg screws H on each Attach the leveling legs F to the bottom of the cabinet Gently right the ca...
Страница 7: ... door Attach the door knob E and tighten the door knob screw G Repeat on other door ADJUSTING THE DOOR POSITION If the doors need to be repositioned the hinges can be adjusted to ensure a precise fit with a cabinet 1 The lateral adjustment screw adjusts the door left or right 2 The horizontal adjustment screw adjusts the door forward or backward 3 The vertical adjustment screw adjusts the door up ...
Страница 8: ...the retaining ring by hand until it is snug Using a wrench or pliers tighten the assembly 5 Gently tighten the two screws on the retaining ring Do not over tighten 6 Screw the sprayer head onto the gooseneck 7 Connect the water supply lines not supplied to the faucet INSTALLING THE STRAINER 1 Apply a ring of plumber s putty to the underside of the strainer flange 2 Insert the strainer body into th...
Страница 9: ...ued MOUNTING THE UTILITY SINK 1 Carefully place a bead of sealant all around the top of the cabinet A B A Sealant 2 Ease the utility sink B into the cabinet A Ensure that it is placed evenly and is centered on the cabinet Wipe off any excess sealant Use masking tape to hold the basin in place until the sealant dries ...
Страница 10: ...faucet C 2 Take off the plastic water temperature sign by hand then use the Hex key to take out the screw and pull out the handle body The top lever of the cartridge will be exposed 3 Unscrew the cap and rings making sure not to damage the threads 4 Pull the cartridge out of the faucet body and replace it with a new 35 mm ceramic cartridge 5 Replace the rings then the cap 6 Place the handle body o...
Страница 11: ...use chlorine based cleaners in your new sink they could lead to rust spots and discolouration If you must use them rinse sink thoroughly with fresh water immediately after use If any chemicals or glue make contact with the sink during installation wipe clean and rinse thoroughly with fresh water Do not allow your cabinet surface to come into contact with products such as acetone nail polish remove...
Страница 12: ...available in English and French Monday Friday from 8 30am 5pm EST Identify the required part s and have the part number s ready E F G H C A B D Part Description Code Quantity A Sprayer Head QHL186 1 B Ceramic Cartridge QHS121 1 C Leveling Legs QHL114 4 D Strainer Assembly QHS150 1 E Door Knobs QHL103 2 F Hinges QHL102 4 G Door Knob Screws QHL104 2 H Leveling Leg Screws QHL106 16 ...
Страница 13: ...IVES 1 Vérifier soigneusement l unité avant l installation pour vous assurer qu elle ne comporte aucun dommage Une fois que vous déballez votre unité vérifiez pour les rayures les fissures les bosses ou les éraflures Si des dommages sont notés ne pas installer 2 Cet appareil ne peut être utilisé autrement que pour l usage prévu par le fabricant Consulter le fabricant pour toutes questions concerna...
Страница 14: ...u d aucun autre dommage causé par un incident ou accessoire Les coûts encourus pour obtenir l accès pour la réparation ou le remplacement sont la responsabilité de l utilisateur Nos obligations se limitent à la réparation ou au remplacement de l unité selon notre discrétion qui peut s avérer selon notre examen unique être défectueuse sous l utilisation et le service normaux pendant la période de g...
Страница 15: ...taire FRANÇAIS Préinstallation OUTILS MATÉRIAUX REQUIS NON INCLUS Clé Pinces Tournevis Phillips Couteau à lame retractable Clé à molette Mastic Scie à métaux Niveau à bulle Clé hexagonale Gants de sécurité Lunettes de sécurité PIÈCES REQUISES NON INCLUSES Tuyaux de vidange Siphon P Tuyaux d alimentation ...
Страница 16: ...AGE A B C E F G H I D Pièce Description Quantité A Armoire 1 B Évier utilitaire 1 C Robinet 1 D Assemblage de la crépine 1 E Poignées de l armoire 2 F Pattes de nivellement 4 G Vis de poignées de l armoire 2 H Vis des pattes de nivellement 16 J Clé hexagonale 1 ...
Страница 17: ...éballer l unité et placer l évier B sur une couverture ou un morceau de carton pour protéger la surface Tourner l armoire A à l envers sur la surface protectrice Glisser les pattes de nivellement F dans chaque base d emplacement spécifiquement destiné pour celles ci Fixer chacune des pattes de nivellement F à la base de l armoire A en utilisant quatre vis des pattes de nivellement H par pattes Ins...
Страница 18: ...e G Répéter pour l autre porte AJUSTEMENT DE LA POSITION DES PORTES Si les portes doivent être repositionnées les charnières peuvent être réglées de façon à s adapter précisement avec l armoire 1 La vis de réglage latérale ajuste la porte vers la gauche ou vers la droite 2 La vis de réglage horizontale ajuste la porte vers l avant ou l arrière 3 La vis de réglage verticale ajuste la porte vers le ...
Страница 19: ... de retenue à la main jusqu à ce qu elle soit bien serrée En utilisant une clé ou une pince serrer l assemblage 5 Serrer légèrement les deux vis sur la bague de retenue Ne pas trop serrer 6 Visser la tête du pulvérisateur sur le tuyau en col de cygne 7 Raccorder les conduites d alimentation en eau non fournies au robinet INSTALLATION DE LA CRÉPINE 1 Appliquer une bague d étanchéité en mastic de pl...
Страница 20: ... sur le pourtour de la partie supérieure du meuble A B A Mastic 2 Introduire l evier B sur l armoire A en vous assurant que celui ci soit de niveau et centré sur le meuble Essuyer l excès de mastic Utiliser du ruban cache pour maintenir la cuve en place jusqu à ce que le mastic soit solidifié ...
Страница 21: ...RTOUCHE Si à l avenir la cartouche en céramique devait être remplacée 1 Couper l alimentation en eau du robinet 2 Retirer la poignée à la main Libérer la vis avec la clé hexagonale fournie et retirer le corps de la poignée Le haut du levier de la cartouche sera exposé 3 Dévisser le capuchon et les anneaux en faisant attention à ne pas endommager le filetage 4 Tirer sur la cartouche pour la sortir ...
Страница 22: ...urrait causer l apparition de taches de rouille ainsi que sa décoloration Si vous devez utiliser de tels produits nettoyants rincer vigoureusement avec de l eau froide immédiatement après leur utilisation Si d autres produits chimiques ou de la colle entrent en contact avec la surface de l évier essuyer et rincer vigoureusement avec de l eau froide Éviter que la surface de votre armoire entre en c...
Страница 23: ...98 service disponible en anglais et français de lundi au vendredi 8h30 à 17h H N E Veuillez identifier les pièces nécessaires et ayez les codes à portée de main E F G H C A B D Pièce Description Code Quantité A Douchette QHL186 1 B Cartouche en céramique QHS121 1 C Pattes de nivellement QHL114 4 D Assemblage de la crépine QHS150 1 E Poignées de l armoire QHL103 2 F Charnières QHL102 4 G Vis de poi...
Страница 24: ...t Laurent Québec H4S 2C3 1 877 333 0098 cs conglomkb com service available in English and French Monday Friday from 8 30am 5pm EST service disponible en anglais et français du lundi au vendredi 8h30 à 17h H N E www conglomkb com Made in China Fabriqué en Chine ...