Westin Automotive Products, Inc.
320 W. Covina Blvd
San Dimas, Ca. 91773
Thank you for choosing Westin products
for additional installation assistance please call
Customer Service (800) 793-7846
DATE: 1/4/17
5
P.N.: 75-XXXX-
RevX
ECO #: W16-
XXXX
PROCEDURE
1. Remove contents from box, verify if all parts listed are present and free from damage.
Carefully read and understand all instructions before attempting installation.
Failure to identify damage before installation could lead to a rejection of any claim.
INSTALLATION
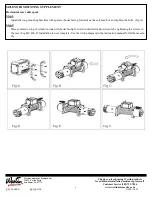
MOUNTING YOUR WINCH
1.
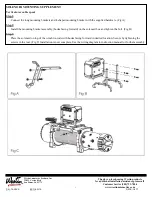
A) The winch is to be mounted into a suitable steel mounting frame using the 4 point foot mounting system in either a hori-
zontal or vertical plane.
B)
It is very important that the winch is mounted on a flat surface so that the three sections (motor, cable drum and gear
housing) are properly aligned.
C)
Before commencing installation, ensure the mounting facility being used is capable of withstanding the rated capacity
of the winch.
2.
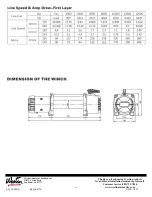
Should you wish to manufacture your own mounting plate the dimensions below will assist. A steel mount plate of at least
1/4” thickness is recommended. Fasteners should be steel class 8.8 or better. A poorly designed mount may void warranty.
3.
When installing the winch tighten the M10 hardware to 35-40 ft-lbs.
4.
The roller fairlead is to be mounted so as to guide the rope onto the drum evenly.
LUBRICATION
All moving parts in the winch are permanently lubricated with high temperature lithium grease at the time of assembly. Under
normal conditions factory lubrication will suffice. Lubricate the cable periodically using light penetrating oil. Inspect for bro-
ken strands and replace if necessary. If the cable becomes worn or damaged, it must be replaced.


