background image

Westin Automotive Products, Inc. 
320 W. Covina Blvd 
San Dimas, Ca. 91773 

Thank you for choosing Westin products 

for additional installation assistance please call 

Customer Service (800) 793-7846 

www.westinautomotive.com 

DATE: 1/4/17 

P.N.: 75-XXXX-
RevX 

ECO #: W16-
XXXX 


To keep your winch in working order please: 

Once a month cycle the winch by: 

1.


Power out steel cable/synthetic rope 15ft. Then free spool out another 50+ ft of steel cable/synthetic rope. Always 
make sure you have at least 6 wraps of steel cable or 10 wraps of synthetic rope around winch drum. 

2.


Put winch into gear and re-spool the winch line. Inspect winch line as you re-spool winch line. It is recommended that you 
have at least 1000 lbs of tension when re-spooling cable. This prevents the rope from pinching itself during recovery. 
*Keep instructions in glove box for reference. 
Winching is dangerous and potentially fatal. 

Use caution when winching: 

-


Be sure that the cable is in good condition and is attached properly. 

-


Do not use the winch if the cable is frayed. 

11.


Since the greatest pulling power is achieved on the innermost layer of your winch, it is desirable to pull off as much line as 
you can for heavy pulls (you must leave 6 wraps of steel cable or 10 wraps of synthetic rope minimum on the drum-red 
cable). If this is not practical use a snatch block and double line arrangement. 

12.


Draping a heavy blanket or similar object over the extended winch cable is recommended as it will dampen any back lash 
should failure occur. 

13.


Neat, tight spooling avoids cable binding, which is caused when load is applied and the cable is pinched between the oth- 
ers. If this happens, alternatively power the winch in and out. Do not attempt to work a bound cable under load, free it by 
hand. 

14.


Apply blocks to wheels when vehicles are on an incline. 

15.


Battery: 
-


Be sure that the battery is in good condition. Avoid contact with battery acid or other containments. 

-


Always wear eye protection when working around a battery. 

-


Have the engine running when using the winch, to avoid draining the battery. 

16.


Winch Cable: 

-


NEVER operate winch with less than 10 wraps of synthetic rope or 6 wraps of steel cable around the drum. The terminal 

end is to prevent the rope from unraveling, it is NOT a load bearing attachment point. Improper installation and/or spool- 
ing out to last layer will put a load on the terminal end and the rope will release from the terminal. 
-


Always re-spool winch rope under a minimum 1000 lb load before each use. 

17.


Do not attempt to exceed the load rating of the winch. 

18.


Do not drive your vehicle to assist the winch in any way. Vehicle movement in combination with winch operation may 
overload the cable, the winch itself or cause damaging shock loads. 

19.


Shock loads when winching are dangerous! A shock load occurs when an increased force is suddenly applied to the cable. 
A vehicle rolling back on a slack cable may induce a damaging shock load. 

20.


The winches shown in this manual are solely for vehicle and boat use. Do not use 

21.


Do not use the winch in hoisting applications due to required hoist safety factors and features. 

22.


Do not use the winch to lift, support or otherwise transport personnel. 

23.


Never operate your electric winch near flammable liquids. 

24.


Power out only enough to relive slack, excessive powering out can cause damage to internal parts. 

25.


Do not use to drop loads (example-unloading vehicles). 

26.


Only DC power can be applied to the winch. 


Содержание 47-2100

Страница 1: ...footwear is recommended Wear protective hair covering to contain long hair 2 Keep a Safe Distance Be sure to stand well clear of the winch cable during winch operation 1 5 times the cable length is re...

Страница 2: ...t attach tow hooks to the winch mounting apparatus They must be attached to vehicle frame 7 The use of a snatch block will aid recovery operations by providing a doubling of the winch capacity and a h...

Страница 3: ...th ers If this happens alternatively power the winch in and out Do not attempt to work a bound cable under load free it by hand 14 Apply blocks to wheels when vehicles are on an incline 15 Battery Be...

Страница 4: ...intained Use a Hawse style fairlead only Do not use over rough surfaces without chafe protection Do not bend around unprotected sharp corners Do not move the vehicle when pulling a load Do not replace...

Страница 5: ...e so that the three sections motor cable drum and gear housing are properly aligned C Before commencing installation ensure the mounting facility being used is capable of withstanding the rated capaci...

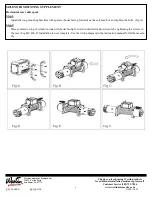
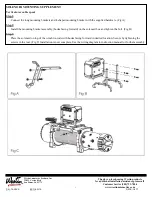
Страница 6: ...CO W16 XXXX SOLENOID MOUNTING SUPPLEMENT Horizontal over cable spool Step 1 Install the long mounting brackets with spacers hooks facing forward on the solenoid box and tighten the bolts Fig A Step 2...

Страница 7: ...rtical over cable spool Step 1 Connect the long mounting brackets and L shaped mounting bracket with the supplied hardware Fig A Step 2 Install the mounting bracket assembly hooks facing forward on th...

Страница 8: ...ners on the side of the solenoid box and place the small mounting bracket at the side of the solenoid box Fig A Slide the bracket over the screw heads and tighten them Step 2 Loosen the winch tie rod...

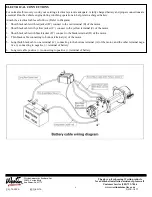
Страница 9: ...operations to help retain a charged battery Attach the electrical cables as follows Refer to Diagram 1 Short black cable with red jacket B connect to the red terminal B of the motor 2 Short black cab...

Страница 10: ...ld not rub or chafe across any surfaces this could possibly damage them 3 Corrosion on electrical connections will reduce performance or may cause excessive heat 4 Clean all connections especially the...

Страница 11: ...e needs to be kept clean and free from any chemicals or dirt NEVER operate the winch with less than 10 wraps of synthetic rope or 6 wraps of steel cable around the drum The terminal end is to prevent...

Страница 12: ...heck the winch to ensure cable is winding onto the drum evenly Note 1 Never winch with your vehicle in gear or in park this can damage your vehicle s transmission 2 Never wrap the cable around the obj...

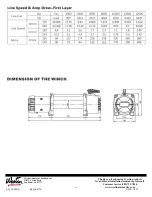
Страница 13: ...es Wound Control Remote Switch 12 lead Gear Train 3 State Planetary Gear Ratio 161 28 Clutch Sliding Ring Gear Brake Automatic In The Drum Drum Size Diameter 2 5 Length 8 75 Wire Synthetic Rope 94 Lon...

Страница 14: ...eries Wound Control Remote Switch 12 lead Gear Train 3 State Planetary Gear Ratio 193 2 Clutch Sliding Ring Gear Brake Automatic In The Drum Drum Size Diameter 2 5 Length 8 75 Wire Synthetic Rope 85 L...

Страница 15: ...nc 320 W Covina Blvd San Dimas Ca 91773 Thank you for choosing Westin products for additional installation assistance please call CustomerService 800 793 7846 www westinautomotive com DATE 1 4 17 15 P...

Страница 16: ...nc 320 W Covina Blvd San Dimas Ca 91773 Thank you for choosing Westin products for additional installation assistance please call CustomerService 800 793 7846 www westinautomotive com DATE 1 4 17 16 P...

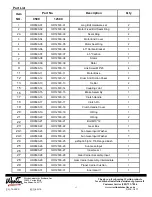
Страница 17: ...25 4 11 OR9500 11 OR12500 11 Motor Base 1 12 OR9500 12 OR12500 12 Drum Anti Friction Sheet 2 13 OR9500 13 OR12500 13 Tie Bar 2 15 OR9500 14 OR12500 14 Coupling Joint 1 16 OR9500 15 OR12500 15 Brake A...

Страница 18: ...500 33 Spline Cushion 1 32 OR9500 34 OR12500 34 Gear Box Seals Ring 1 34 OR9500 35 OR12500 35 Gear Box Base 1 35 OR9500 36 OR12500 36 Spring Washer 4 10 36 OR9500 37 OR12500 37 Bolt M4 16 10 37 OR9500...

Страница 19: ...receive the connection with the retaining bolts Step 4 Re install the long bolts To maintain the IP67 waterproof rating it is best to have this done professionally and to replace the sealing componen...

Страница 20: ...00S Rated Line Pull 10000lbs single line Motor 6 6hp 12v Series Wound Control Wireless Multi control Gear Train 3 State Planetary Gear Ratio 218 1 Clutch Sliding Ring Gear Brake Automatic In The Drum...

Страница 21: ...d Line Pull 12000lbs single line Motor 6 6hp 12v Series Wound Control Wireless Multi control Gear Train 3 State Planetary Gear Ratio 265 1 Clutch Sliding Ring Gear Brake Automatic In The Drum Drum Siz...

Страница 22: ...nc 320 W Covina Blvd San Dimas Ca 91773 Thank you for choosing Westin products for additional installation assistance please call CustomerService 800 793 7846 www westinautomotive com DATE 1 4 17 22 P...

Страница 23: ...2000 11 Gear Box Tube 1 12 ORI 10000S 12 ORI 12000 12 Clutch Pin 1 13 ORI 10000S 13 ORI 12000 13 Clutch Handle 1 14 ORI 10000S 14 ORI 12000 14 Gear Box Base 1 15 ORI 10000S 15 ORI 12000 15 Nylon Beari...

Страница 24: ...Integrated Solenoid Module ISM 1 37 ORI 10000S 37 ORI 12000 37 Radio Receptor 1 38 ORI 10000S 38 ORI 12000 38 Bolt M8 x 25 5 39 ORI 10000S 39 ORI 12000 39 Bolt M8 x 45 1 40 ORI 10000S 40 ORI 12000 40...

Страница 25: ...nd installed in accordance with the installation in structions and apply torque to the specifications as defined DOUBLE CHECK ALL FASTENERS BEFORE PRODUCT USE TO ENSURE PROPER FUNCTION AND SAFETY DRIL...

Страница 26: ...nc 320 W Covina Blvd San Dimas Ca 91773 Thank you for choosing Westin products for additional installation assistance please call CustomerService 800 793 7846 www westinautomotive com DATE 1 4 17 26 P...

Отзывы: