Page 1
Quick Install Guide
SATA to USB2.0 / eSATA , OTB HDD Docking
1. Getting Started
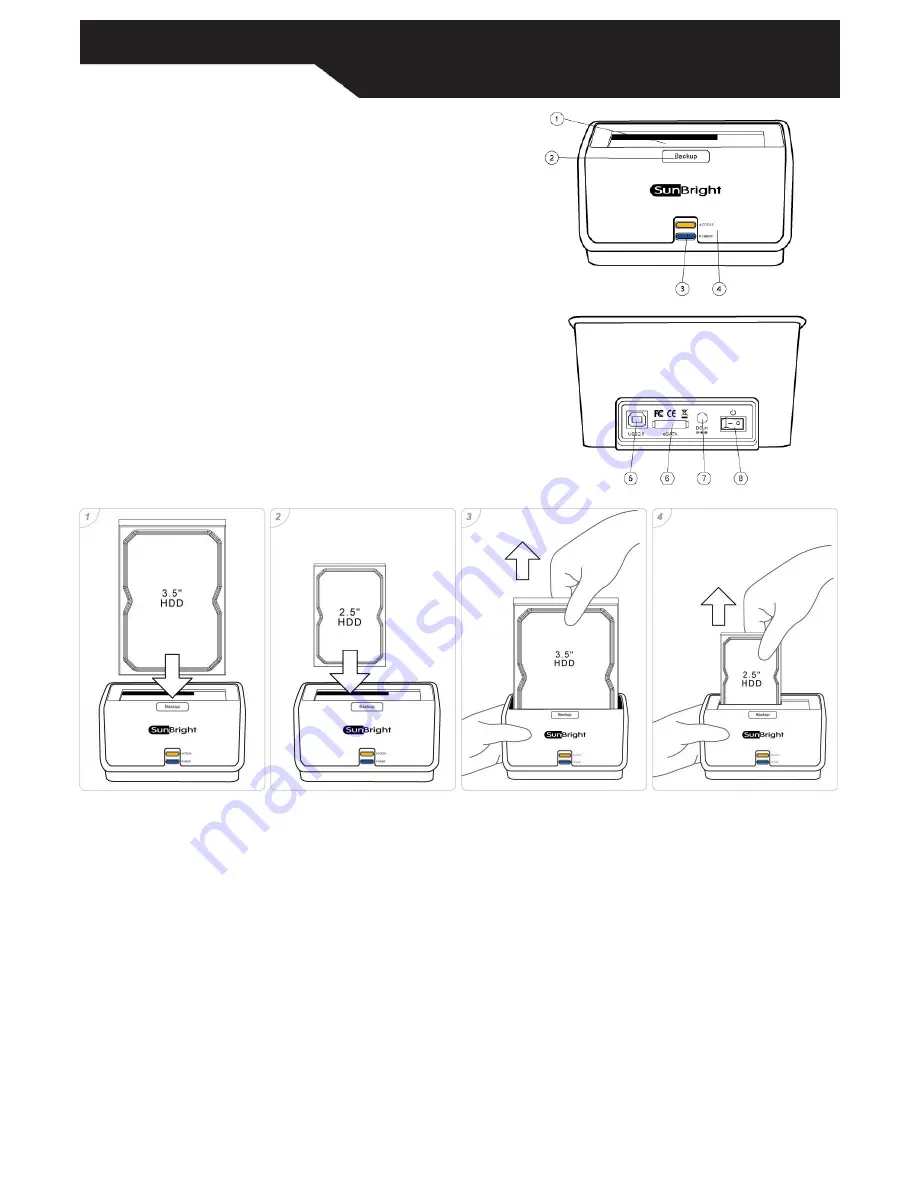
Product Overview
1. Cover
2. OTB Button
3. Power LED
4. Access LED
5. USB2.0 Port
6. eSATA Port
7. DC Jack
8. Power Switch
Kit Contents
●
SATA HDD Docking
●
USB Cable
●
eSATA cable
●
Power Adapter
●
Installation CD
●
QIG
Minimum System Requirements
●
Available OHCI-compliant USB port
●
Windows 98SE/ME/2000/XP/VISTA
●
MAC OS 9.x or above
Note : eSATA mode isn’t compliant with Windows 98SE
、
Windows ME and Mac OS.
2. Assembling the SATA HDD into the Docking
1. The docking supports 2.5” or 3.5” SATA HDD directly plug in to the SATA
connector , which is instructed by below photo 1 and 2.
2. You can easily hot-swap the HDD by directly pulling it out from the docking ,
which is instructed by below photo 3 and 4.
3. Connecting the Drive
Note : If using Windows 98SE , you must install the device driver on your system before connecting the drive.
Do not connect the USB cable and the eSATA cable at the same time.
USB connection
1. Connect one end (USB A Type) of the USB Cable to your computer.
2. Connect the other end (USB B Type) of the USB Cable to the USB port on the back of the device.
3. Connect the power adapter to the power socket of the docking and switch the power on.
4. The “Power” LED will illuminate and the presence of an external drive will be visible on your PC monitor or laptop.
eSATA connection
Note : If using PC without eSATA interface , please install the iSATA to eSATA bracket cable in your PC. (Please make sure your PC or motherboard supports
iSATA before installation) If using a laptop, please make sure there is a built-in eSATA or eSATA interface on your laptop.
1. Connect one end of the eSATA cable to your PC or Laptop.
2. Connect the other end of the eSATA cable to the docking.
3. Connect the power adapter to the power socket of the docking and switch the power on.


