background image

9

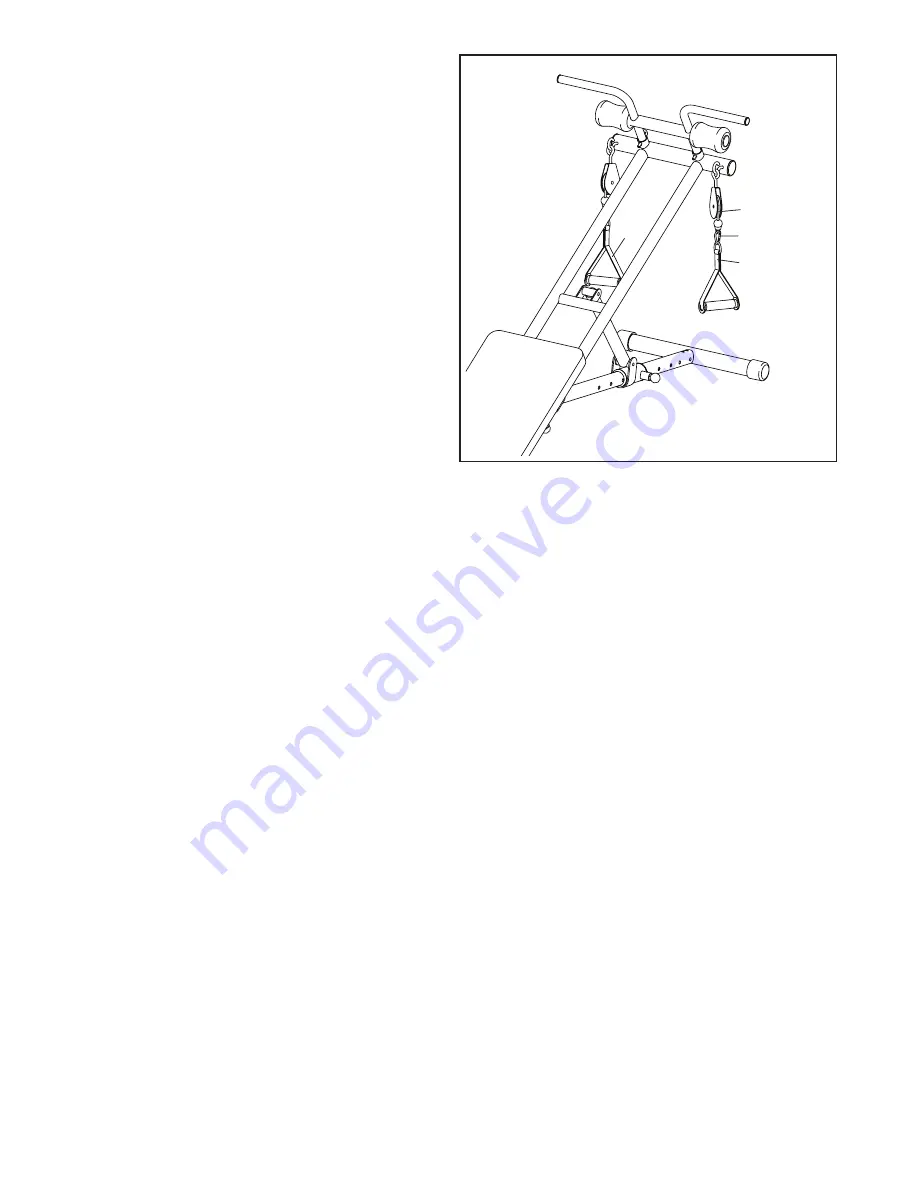
6.  Attach a Handle (34) to one end of the Cable 

(32) with a Cable Clip (33).


Attach the other Handle (34) in the same way.

6

32

34

34

33

7. 

Make sure that all parts are properly tightened before you use the weight training system.

 To adjust the 

weight training system, see ADJUSTMENT on page 10.

Содержание WEBE15911.0

Страница 1: ...5911 0 Serial No Write the serial number in the space above for reference Serial Number Decal To register your product and activate your warranty today go to www weiderservice com registration For service at any time go to www weiderservice com Or call 1 877 992 5999 Mon Fri 6 a m 6 p m MT Sat 8 a m 12 p m MT Please do not contact the store ACTIVATE YOUR WARRANTY CUSTOMER CARE ...

Страница 2: ...ement decal Apply the decal in the location shown Note The decal s may not be shown at actual size WARNING DECAL PLACEMENT 2 IMPORTANT PRECAUTIONS 3 BEFORE YOU BEGIN 5 ASSEMBLY 6 ADJUSTMENT 10 EXERCISE GUIDELINES 13 PART LIST 14 EXPLODED DRAWING 15 ORDERING REPLACEMENT PARTS Back Cover LIMITED WARRANTY Back Cover TABLE OF CONTENTS WEIDER is a registered trademark of ICON IP Inc ...

Страница 3: ...t and use the weight train ing system 6 Inspect and properly tighten all parts regu larly Replace any worn parts immediately 7 The weight training system is designed to support a maximum user weight of 250 lbs 113 kg 8 Keep children under age 12 and pets away from the weight training system at all times 9 Keep hands and feet away from moving parts 10 Always wear athletic shoes for foot protec tion...

Страница 4: ...4 all STANDARD SERVICE PLANS ...

Страница 5: ...ly before using the weight training system If you have questions after reading this manual please see the front cover of this manual To help us assist you note the product model number and serial number before contacting us The model number and the location of the serial number decal are shown on the front cover of this manual Before reading further please review the drawing below and familiarize ...

Страница 6: ...tool s assembly requires the following tool s one Phillips screwdriver one adjustable wrench Assembly may be easier if you have a set of wrenches To avoid damaging parts do not use power tools ASSEMBLY 1 Go to www weiderservice com registration on your computer and register your product activates your product manufacturer s warranty saves you time if you ever need to contact Customer Care allows u...

Страница 7: ...stment Leg 5 outward as far as possible and release the Knob into one of the adjustment holes in the Adjustment Leg Make sure that the Knob is engaged in an adjustment hole in the Adjustment Leg 44 55 1 2 5 3 Attach the Stabilizer 6 to the Adjustment Leg 5 with three M8 x 52mm Bolts 40 three M8 Washers 54 and three M8 Locknuts 46 Make sure that the Bolts are in the hexagonal holes 3 Hexagonal Hole...

Страница 8: ...8 4 8 2 17 17 4 Insert the Foot Plate 8 into the Bottom Frame 2 and secure it with two L pins 17 5 17 17 29 1 5 Insert the Handlebar 29 into the Top Frame 1 and secure it with two L pins 17 ...

Страница 9: ... Cable 32 with a Cable Clip 33 Attach the other Handle 34 in the same way 6 32 34 34 33 7 Make sure that all parts are properly tightened before you use the weight training system To adjust the weight training system see ADJUSTMENT on page 10 ...

Страница 10: ... the weight training system ADJUSTMENT ATTACHING THE HANDLES Attach the Handles 34 to the ends of the Cable 32 with the two Cable Clips 33 ATTACHING THE FOOT BRACKET OR THE HANDLEBAR See the upper drawing For some exercises the Foot Plate 8 must be attached to the weight train ing system Insert the Foot Plate into the Bottom Frame 2 and secure it with two L pins 17 See the lower drawing For some e...

Страница 11: ...ket 35 10 ADJUSTING THE INCLINE To change the resistance of the weight training sys tem you can adjust the incline To adjust the incline first lift the Top Frame 1 and pull the Long Knob 55 Slide the Adjustment Bracket 48 to the desired position and release the Long Knob 55 into one of the adjustment holes in the Adjustment Leg 5 Make sure that the Long Knob is engaged in an adjustment hole 48 5 5...

Страница 12: ... Plate 8 Then pull the Short Knob 44 slide the Bottom Frame into the Top Frame as far as possible and release the Short Knob To use the weight training system pull the Short Knob 44 extend the Bottom Frame 2 as far as possible and then release the Short Knob Make sure that the Short Knob is engaged in a hole in the Top Frame 1 8 2 1 17 17 44 17 29 ...

Страница 13: ...S Familiarize yourself with the equipment and learn the proper form for each exercise Use your own judgment to determine the appropriate length of time for each workout and the numbers of repetitions and sets to complete Progress at your own pace and be sensitive to your body s signals Follow each workout with at least one day of rest Warming Up Start with 5 to 10 minutes of stretch ing and light ...

Страница 14: ...ulley 21 1 Right 38 32mm Bushing 22 1 M10 x 45mm Bolt 23 6 Small Bushing 24 2 Small Wheel 25 2 Big Bushing 26 2 Big Wheel 27 2 Bumper 28 2 32mm Round Inner Cap 29 1 Handlebar 30 2 60mm Eyebolt 31 2 108mm Eyebolt 32 1 Cable 33 2 Cable Clip 34 2 Handle 35 4 Bungee Cord 36 2 Leg Bushing 37 2 M10 x 30mm Bolt 38 2 M8 x 90mm Bolt 39 4 M6 Washer 40 3 M8 x 52mm Bolt 41 2 M10 x 63mm Bolt 42 1 M10 x 175mm B...

Страница 15: ... 23 24 25 1 2 3 4 5 6 7 8 10 11 12 12 12 12 13 13 20 18 18 19 19 57 26 27 27 30 30 31 31 32 33 35 35 37 37 51 51 47 47 47 41 41 9 43 36 36 40 55 44 45 9 45 46 17 17 22 45 52 49 49 48 21 28 17 17 46 46 40 45 54 54 54 54 39 39 56 45 56 42 34 EXPLODED DRAWING Model No WEBE15911 0 R0913A ...

Страница 16: ...t responsible or liable for indirect special or consequential damages arising out of or in con nection with the use or performance of the product damages with respect to any economic loss loss of property loss of revenues or pro ts loss of enjoyment or use or costs of removal or installation or other consequential damages of any kind Some states do not allow the exclusion or limitation of incident...

Отзывы: