Weed Eater 178078 Скачать руководство пользователя страница 16

16

MUFFLER

Inspect and replace corroded muffler and spark arrester (if
equipped) as it could create a fire hazard and/or damage.

SPARK PLUGS

Replace spark plugs at the beginning of each mowing
season or after every 100 hours of operation, whichever
occurs first.  Spark plug type and gap setting are shown in
“PRODUCT SPECIFICATIONS” section of this manual.

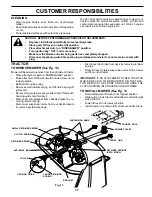
IN-LINE FUEL FILTER  (See Fig. 12)

The fuel filter should be replaced once each season.  If fuel
filter becomes clogged, obstructing fuel flow to carburetor,
replacement is required.

With engine cool, remove filter and plug fuel line sec-
tions.

Place new fuel filter in position in fuel line with arrow
pointing towards carburetor.

Be sure there are no fuel line leaks and clamps are
properly positioned.

Immediately wipe up any spilled gasoline.

CLAMP

FUEL
FILTER

CLAMP

FIG. 12

AIR FILTER

Your engine will not run properly using a dirty air filter.
Service air cleaner more often under dusty conditions. See
engine manual.

CLEAN AIR SCREEN

Air screen must be kept free of dirt and chaff to prevent
engine damage from overheating.  Clean with a wire brush or
compressed air to remove dirt and stubborn dried gum fibers.

CUSTOMER RESPONSIBILITIES

ENGINE

LUBRICATION

Only use high quality detergent oil rated with API service
classification SF-SJ.  Select the oil’s SAE viscosity grade
according to your expected operating temperature.

TEMPERATURE RANGE ANTICIPATED BEFORE NEXT OIL CHANGE

SAE VISCOSITY GRADES

-20°

30°

40°

80°

100°

-30°

-20°

20°

30°

40°

°

F

°

C

32°

-10°

10°

60°

5W-30

SAE 30

FIG. 10

NOTE:  Although multi-viscosity oils (5W30, 10W30 etc.)
improve starting in cold weather, these multi-viscosity oils
will result in increased oil consumption when used above
32°F.  Check your engine oil level more frequently to avoid
possible engine damage from running low on oil.

Change the oil after every 25 hours of operation or at least
once a year if the tractor is not used for 25 hours in one year.

Check the crankcase oil level before starting the engine and
after each eight (8) hours of operation.  Tighten oil fill cap/
dipstick securely each time you check the oil level.

FIG. 11

V-BELTS

Check V-belts for deterioration and wear after 100 hours of
operation and replace if necessary. The belts are not
adjustable. Replace belts if they begin to slip from wear.

TRANSAXLE COOLING

Keep transaxle free from build-up of dirt and chaff which can
restrict cooling.

TO CHANGE ENGINE OIL (See Figs. 10 and 11)

Determine temperature range expected before oil change.
All oil must meet API service classification SF-SJ.

Be sure tractor is on level surface.

Oil will drain more freely when warm.

Catch oil in a suitable container.

Remove oil fill cap/dipstick.  Be careful not to allow dirt
to enter the engine when changing oil.

Remove cap from bottom fitting of drain valve and install
the drain tube onto the fitting.

Unlock drain valve by pushing inward and turning coun-
terclockwise.

To open, pull out on the drain valve.

CLOSED
AND
LOCKED
POSITION

CAP

DRAIN
TUBE

OIL DRAIN VALVE

After oil has drained completely, close and lock the drain
valve by pushing inward and turning clockwise until the
pin is in the locked position as shown.

Remove the drain tube and replace the cap onto to the
bottom fitting of the drain valve.

Refill engine with oil through oil fill dipstick tube.  Pour
slowly.  Do not overfill.  For approximate capacity see
“PRODUCT SPECIFICATIONS” section of this manual.

Use gauge on oil fill cap/dipstick for checking level.  Be
sure dipstick cap is tightened securely for accurate
reading.  Keep oil at “FULL” line on dipstick.

TO CLEAN BATTERY AND TERMINALS

Corrosion and dirt on the battery and terminals can cause the
battery to “leak” power.

Open battery box door.

Disconnect BLACK battery cable first  then RED  battery
cable and remove battery from tractor.

Rinse the battery with plain water and dry.

Clean terminals and battery cable ends with wire brush
until bright.

Coat terminals with grease or petroleum jelly.

Reinstall battery (See “REPLACING BATTERY” in the
Service and Adjustments section of this manual).

Содержание 178078

Страница 1: ...ANUAL MODEL NO WE13T38D 13 0 HP 38 Inch LawnTractor For Parts and Service contact our authorized distributor call 1 800 849 1297 For Technical Assistance call 1 800 829 5886 178078 1 10 01 RD PRINTED...

Страница 2: ...nd proceed slowly straight down the slope SAFE OPERATION PRACTICES FOR RIDE ON MOWERS IMPORTANT THIS CUTTING MACHINE IS CAPABLE OF AMPUTATING HANDS AND FEET AND THROWING OBJECTS FAILURE TO OBSERVE THE...

Страница 3: ...rting or stopping on a slope If tires lose traction disengage the blades and proceed slowly straight down the slope If machine stops while going uphill disengage blades shift into reverse and back dow...

Страница 4: ...d the proper tools to service or repair this tractor Please read and retain this manual The instructions will enable you to assemble and maintain your tractor properly Always observe the SAFETY RULES...

Страница 5: ...sher 1 Locknut 5 16 18 1 Hex Bolt 5 16 18 x 1 1 4 1 Hex Bolt 3 8 16 x 1 1 Lockwasher 3 8 Steering Boot Steering Extension Shaft Steering Wheel Adapter 1 Bolt 1 Washer 17 32 x 1 3 16 x 12 Gauge Seat 2...

Страница 6: ...BEFORE REMOVING TRACTOR FROM SKID ATTACH STEERING WHEEL See Fig 1 ASSEMBLE EXTENSION SHAFT AND BOOT Slide extension shaft onto lower steering shaft Align mountingholesinextensionandlowershaftsandinsta...

Страница 7: ...OTE You may now roll or drive your tractor off the skid Follow the appropriate instruction below to remove the tractor from the skid INSTALL SEAT See Fig 3 Adjust seat before tightening adjustment bol...

Страница 8: ...anual CHECK DECK LEVELNESS For best cutting results mower housing should be properly leveled See TOLEVELMOWERHOUSING intheService and Adjustments section of this manual CHECK FOR PROPER POSITION OF AL...

Страница 9: ...RD FAST SLOW ENGINE ON ENGINE OFF OIL PRESSURE LIGHTS ON FUEL CHOKE MOWER HEIGHT PARKING BRAKE LOCKED UNLOCKED REVERSE NEUTRAL HIGH LOW ATTACHMENT CLUTCH ENGAGED MOWER LIFT DANGER KEEP HANDS AND FEET...

Страница 10: ...d off THROTTLE CHOKE CONTROL Used for starting and controllingenginespeed CLUTCH BRAKE PEDAL Used for declutching and brak ing the tractor and starting the engine PARKINGBRAKE Locksclutch brakepedalin...

Страница 11: ...roximately 1 1 2 to 4 The heights are measured from the ground to the blade tip with theenginenotrunning Theseheightsareapproximateand may vary depending upon soil conditions height of grass and types...

Страница 12: ...or a few seconds remove and read oil level If necessary add oil until FULL mark on dipstick is reached Do not overfill For cold weather operation you should change oil for easier starting See OIL VISC...

Страница 13: ...of fuel it will take extra cranking time to move fuel from the tank to the engine Sit on seat in operating position depress clutch brake pedal and set parking brake Place gear shift lever in neutral N...

Страница 14: ...ery 7 Tighten front axle pivot bolt to 35 ft lbs maximum Do not overtighten 1 12 3 2 5 5 6 7 GENERAL RECOMMENDATIONS The warranty on this tractor does not cover items that have beensubjectedtooperator...

Страница 15: ...the blade is balanced TRACTOR Always observe safety rules when performing any mainte nance BRAKE OPERATION If tractor requires more than six 6 feet stopping distance at high speed in highest gear the...

Страница 16: ...ed for 25 hours in one year Checkthecrankcaseoillevelbeforestartingtheengineand after each eight 8 hours of operation Tighten oil fill cap dipstick securely each time you check the oil level FIG 11 V...

Страница 17: ...and push housing guide out of bracket Disconnect anti swaybar from chassis bracket by re movingretainerspring Disconnect suspension arms from rear deck brackets by removing retainer springs Disconnec...

Страница 18: ...t side NOTE Threefullturnsofadjustmentnutwillchangemower height about 1 8 Recheck measurements after adjusting NUT E D D MANDREL FIG 16 NUT F FRONT LINKS FIG 17 FRONT TO BACK ADJUSTMENT See Figs 16 an...

Страница 19: ...center department FIG 21 RETAINING RING WASHERS SQUARE KEY REAR WHEEL ONLY AXLE COVER NOTE To seal tire punctures and prevent flat tires due to slow leaks tire sealant may be purchased from your local...

Страница 20: ...ot short battery termi nals by allowing a wrench or any other object to contact both terminals at the same time Before connecting battery remove metal bracelets wristwatch bands rings etc Lift seat pa...

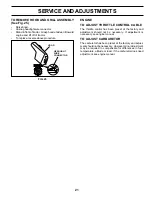
Страница 21: ...CONNECTOR HOOD ENGINE TO ADJUST THROTTLE CONTROL CABLE The throttle control has been preset at the factory and adjustment should not be necessary If adjustment is necessary see engine manual TO ADJUST...

Страница 22: ...G IN ESSENTIAL FUEL SYSTEM PARTS SUCH AS CARBURETOR FUEL FILTER FUEL HOSE OR TANK DURING STORAGE ALSO EXPERIENCE INDICATES THAT ALCOHOL BLENDED FUELS CALLED GASOHOL OR USING ETHANOL OR METHANOL CAN AT...

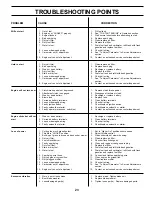
Страница 23: ...ty ignition switch 7 Check replace ignition switch 8 Faulty solenoid or starter 8 Check replace solenoid or starter 9 Faulty operator presence switch es 9 Contact an authorized service center departme...

Страница 24: ...mowing 4 Mower deck not level 4 Level mower deck 5 Low uneven tire air pressure 5 Check tires for proper air pressure 6 Worn bent or loose blade 6 Replace sharpen blade Tighten blade bolt 7 Buildup o...

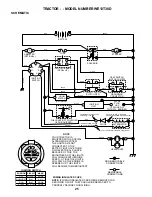
Страница 25: ...R TRACTOR IS EQUIPPED WITH A SPECIAL ALTERNATOR SYSTEM THE LIGHTS ARE NOT CONNECTED TO THE BATTERY BUT HAVE THEIR OWN ELECTRICAL SOURCE BECAUSE OF THIS THE BRIGHTNESS OF THE LIGHTS WILL CHANGE WITH EN...

Страница 26: ...26 28 29 26 24 42 43 27 27 25 41 27 27 40 33 30 8 2 1 27 48 16 16 22 21 REPAIR PARTS TRACTOR MODEL NUMBER WE13T38D ELECTRICAL 52...

Страница 27: ...Fuse 20 AMP 27 73510400 Nut Keps Hex 1 4 20 Unc 28 4207J Cable Ground 6 Ga 12 black 29 121305X Switch Plunger Nc Gray 30 175566 Switch Ign 33 140401 Key Ign 40 170217 HarnessIgn 41 71110408 Bolt Blk...

Страница 28: ...ARTS TRACTOR MODEL NUMBER WE13T38D CHASSIS 3 2 35 3 26 3 35 26 33 10 34 1 208 11 17 29 28 208 13 12 51 57 53 52 54 55 24 26 25 26 25 3 31 24 30 209 8 209 6 16 9 15 209 209 5 5 145 37 37 18 205 205 38...

Страница 29: ...er 13 32 X 13 16 X 12 Ga 26 73800600 Nut Lock Hex w Ins 3 8 16 Unc 28 140434 Grille P L 29 140273X599 Lens Grille Private Label 30 169465X550 Fender 31 136619 Bracket Fender Repl 109873x 33 105476X550...

Страница 30: ...12 14 41 42 40 38 42 39 57 51 42 51 74 75 78 76 77 25 19 24 2 53 35 34 37 36 35 62 36 64 65 59 56 212 55 63 116 70 77 61 22 27 26 6 113 18 51 5 18 6 52 30 32 32 30 52 11 21 4 3 13 10 8 12 12 7 61 61 1...

Страница 31: ...16 x 2 3 4 40 4470J Spacer Split 395 X 59 Bzp 41 165838 Keeper Belt Idler 42 19131312 Washer 13 32 X 13 16 X 12 Ga 47 127783 Pulley Idler V Groove Plastic 48 154407 Bellcrank Clutch Grnd Drv STL 49 12...

Страница 32: ...4 3 32 43 6 43 8 18 19 22 27 23 40 66 29 25 79 8 10 40 11 8 6 9 46 46 8 6 9 2 47 47 17 26 30 28 1 41 42 37 36 37 38 63 11 39 11 80 68 67 67 67 13 65 85 85 68 15 15 15 29 29 82 REPAIR PARTS TRACTOR MOD...

Страница 33: ...ire Form 19 75 Mech 36 155099 Bushing Strg 5 8 Id Dash 37 152927 Screw 38 140045X428 Cap Wheel Steer Ayp 39 19133812 Washer 13 32 x 2 3 8 x 12 Ga 40 7810H Nut Lock Center 3 8 24un 41 100711L Adaptor W...

Страница 34: ...34 2 1 OPTIONAL EQUIPMENT Spark Arrester 29 44 46 32 31 33 37 33 40 62 13 4 85 78 78 81 3 16 23 45 14 38 REPAIR PARTS TRACTOR MODEL NUMBER WE13T38D ENGINE...

Страница 35: ...Flat Scrn 31 109202X Tank Fuel Front 32 140527 Cap Asm Fuel 33 123487X ClampHose 37 137040 Line Fuel 20 38 148315 Plug Drain Oil Easy 40 124028X Bushing Snap Nyl Blk Fuel Line 44 17670412 Screw Thdrol...

Страница 36: ...6X Bracket Pnt Mounting Switch 13 121248X Bushing Snap Blk Nyl KEY PART NO NO DESCRIPTION 14 72050412 Bolt Rdhd Sht Nk 1 4 20 X 1 1 2 15 134300 Spacer Split 28 X 96 16 121250X SpringCprsn 17 123976X N...

Страница 37: ...L Gear Dr Eng 17 136832 Decal V Belt Sch 138311 Decal Handle Lft Height Adj 178078 Manual Operator sEnglish 178079 Manual Operator sFrench KEY PART NO NO DESCRIPTION 10 1 59192 Cap Tire valve 2 65139...

Страница 38: ...38 REPAIR PARTS TRACTOR MODEL NUMBER WE13T38D MOWER LIFT 15 20 16 1718 20 20 15 20 4 5 6 2 3 1 6 5 4 7 8 12 11 31 32 31 32 19 19 13 13 13 13...

Страница 39: ...icycle Matte Blk 8 124526X Button Plunger Black 11 139865 Link Lift LH Fixed Length 12 139866 Link Lift RH Fixed Length 13 4939M RetainerSpring 15 173288 Link Front 16 73350800 Nut Jam Hex 1 2 13 Unc...

Страница 40: ...MOWER DECK 19 86 3 8 4 2 2 15 14 13 11 10 9 8 1 21 2 29 27 23 26 28 25 24 21 87 88 21 146 31 40 150 45 32 33 69 55 56 36 36 89 123 113 53 30 109 89 122 40 89 108 107 68 4 3 5 6 2 21 149 16 21 2 110 5...

Страница 41: ...0 Nut Crownlock 3 8 16 Unc 45 4497H Retainer 53 130840 Brake Assembly 54 133943 Washer Hardened 55 133840 Idler Arm Assembly 56 165723 Spacer Retainer 67 106932X Knob 68 144200 V Belt 42 Mower 69 7602...

Страница 42: ...42 SERVICE NOTES...

Страница 43: ...43 SERVICE NOTES...

Страница 44: ...44 SERVICE NOTES...

Страница 45: ...limited to 90 days from the date of original purchase 5 This Warranty applies only to products which have been properly assembled adjusted operated and main tained in accordance with the instructions...

Страница 46: ...ained in an Instruction Manual for the operation of the Power Train Component and parts The cost of normal maintenance and replacement of service items which are not defective shall be paid for by the...

Страница 47: ...DE ONLY RIDE UP AND DOWN HILL NOT ACROSS HILL SUGGESTED GUIDE FOR SIGHTING SLOPES FOR SAFE OPERATION Operate your Tractor up and down the face of slopes not greater than 15 never across the face Make...

Страница 48: ......
Отзывы: