Brine Fogging System Type SOLFOG V3
Index: 02
Change date: 19/09/2023
OI No.: BA DW 042-02 Solfog V3 CB36 EN.docx
Page 53 of 65
9.3.2
Renew hose on hose bracket
WARNING!
Risk of crushing!
Injury to fingers (crushing) possible!
Only conduct the work when the device has been switched off and secured
against being reactivated!
ATTENTION!
Risk of damage due to an unsuitable hose!
The new hose must match the disassembled hose in colour and size!
The hose must not be twisted when inserted!
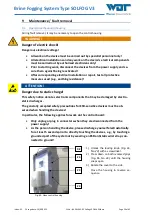
The markings on the hose ends must be visible in the front and centre (see
Fig. 67)!
Fig. 67: Hose bracket kit, marking
1)
Disassemble hose bracket kit
(see Chapter 7.5 on page 24).
2)
To replace the dosing hose (Fig. 67,
No. 43) at the hose bracket (Fig. 67,
No. 33), carefully cut the hose
clamps (Fig. 67, No. 44) with a sharp
knife or a pair of pliers!
Make sure you do not damage the
hose nipples of the hose bracket in
the process!
3)
Push the new dosing hose onto the
hose nipples so that the markings
on the hose ends are visible in the
front and centre! (Fig. 67, No. 45)
This ensures that the hose is not
twisted.
4)
Fix the hose ends with new hose
clamps and cut off the protruding
ends of the hose clamp.
5)
Install the hose bracket
kit
44
45
43
33


