background image

SCOUT LS XT ELECTRIC BIKE 2018 

MANUAL 


Welcome 

First off, welcome to the Wattwheels family! We’re so happy to have you on board! You’ve picked a 

great model 

and, in this manual, we’re

 going to break down the basics to make sure that your bike 

remains in top shape and performs to the highest standard.  
 

You’re about to experience the ride of your life. In order to get you out and having fun as quickly and 

as safely as possible please read the all the manual carefully, paying close attention to the safety 
section. 
Also, we highly recommend familiarizing yourself with local laws for e-bikes and the components of 
the model that you have before your first ride.  
Wattwheels assumes that all persons involved in: using, repairing, maintaining, cleaning, or disposing 
of this or any Wattwheels product must have fully read and understood the content and meaning of 
these operating instructions.  
Additionally, Wattwheels claims no responsibility for any injury or damage resulting in improper use of 
any electric bike.  
 

READY TO GET STARTED? LETS RIDE!


USING THIS MANUAL


This manual contains details of the product, its equipment, and information on its operation and 
maintenance. Read it carefully and familiarize yourself with the Scout before using it to ensure a safe 
use and prevent tragic accidents. Be sure to retain this manual as your convenient Scout information 
source. 
This Manual contains many Warnings and Cautions concerning the safe operation and consequences, 

Содержание SCOUT LS XT 2018

Страница 1: ...u have before your first ride Wattwheels assumes that all persons involved in using repairing maintaining cleaning or disposing of this or any Wattwheels product must have fully read and understood the content and meaning of these operating instructions Additionally Wattwheels claims no responsibility for any injury or damage resulting in improper use of any electric bike READY TO GET STARTED LETS...

Страница 2: ...and assumes no responsibility of liability if any errors or inaccuracies appear within Assembly and first adjustment of your Scout Bike requires special tools and skills and it is recommended that this should be done by a trained bicycle mechanic if possible LET S GET STARTED 1 COMPLETLEY CHARGE THE BATTERY BEFORE THE FIRST USE Red light is on when battery is charging green when fully charged Appr...

Страница 3: ...you are stopping BATTERY DISPLAY CAPCITY The LCD readout on the handlebar of your Scout Bike features a battery capacity gauge much like the fuel gauge on an automobile Once the battery is fully depleted the last remaining bar will begin to flash communicating to the user that they should cease operation immediately THROTTLE The Throttle is located on the left hand side of the handlebars in the fo...

Страница 4: ... a slightly lower PSI will provide more grip but flats can occur WARNING Caution should be exercised when inflating tires with compressor air pressure equipment e g gas stations Due to the relatively small volume of air required be sure not to overinflate the tires as this can cause them to burst Correct tire pressure should be adjusted according to the terrain within the range of 10 to 30 psi DRI...

Страница 5: ... could cause you to lose control and fall Prior to first use be sure to tighten the seat clamp properly A loose seat clamp or seat post binding bolt can cause damage to the bicycle or can cause you to lose control or fall Periodically check to make sure these the seat clamp is properly tightened RIDER COMFORT To obtain maximum comfort the rider should not overextend his or her arms reach when ridi...

Страница 6: ...in the battery should be 50 75 for long storage times Cleaning the battery and battery housing should only be done while disconnected and powered off Use a dry rag and if need be a lightly damp rag DO NOT spray with high pressured water to prevent damage or possible short circuiting Only charge the battery with the supplied charger as others may not function properly and this increases the possibi...

Страница 7: ...level of charge shows only one bar is recommended to ride as a normal bike at this time and charge as soon as you can Close the power and take down the key while parking The power switch of the LCD panel should be turned every time making the Electric Bicycle won t start suddenly and cause accidents Try and reduce please reduce braking frequently while riding in order to save the electric energy D...

Страница 8: ... the bike and ensure the battery is locked to the frame or removed and brought with you for security o In public places your Scout Bike must be parked in accordance with local rules and regulations o If you have to park outdoors in rain or wet conditions you should only leave your Scout Bike outside for a few hours and proceed to park the bike in a dry location afterwards in order to allow all the...

Страница 9: ...hain is oiled clean and runs smoothly o Extra care is required in wet or dusty conditions 5 Bearings o Ensure all bearings are lubricated run freely and display no excess movement grinding or rattling o Check headset wheel bearings pedal bearings and bottom bracket bearings 6 Cranks and Pedals o Ensure pedals are securely tightened to the cranks o Ensure the cranks are securely tightened and are n...

Страница 10: ...e without regular charges aged or damaged 1 Adjust tire pressure 2 Check connections or charge battery 3 Assist with pedals or adjust route 4 Replace the battery 5 The battery won t charge 1 Charger not well connected 2 Charger damaged 3 Battery damaged 4 Wiring damaged 1 Adjust the connections 2 Replace 3 Replace 4 Repair or replace 6 Wheel or motor makes strange noises 1 Damaged motor bearings 2...

Страница 11: ...LCD P Instructions Content About the User Manual 2 Outlook and Size 2 Material and Color 2 Button Definition 3 Function Summary 4 Function Summary 4 Full View Area 5 Normal View Area 6 ...

Страница 12: ...Current Display 6 3 Riding Mode Selection 7 4 Speed Display 7 5 KM H MPH 7 6 Backlight Indicator 7 7 6KM H Work 8 8 PAS Level Selection 8 9 Error Code Indicator 9 10 SET Operation 9 11 Distance Indicator 11 12 Trip Time Indicator 12 13 Battery Indicator 12 14 Cable Definition 13 15 Auto Sleep After 5 Minutes 13 Common Problems Solutions 14 Error Code Table 14 ...

Страница 13: ...ill inform you all the details concisely including hardware installation setting and normal operations when using our display Meanwhile the introduction will also help you solve possible confusion and malfunction Outlook and Size Material and Color LCD P products are made of black ABS material and the bracket is made of nylon material Under the temperature of 20 to 60 the shell material can ensure...

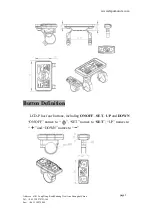
Страница 14: ... Long Dong Road Pudong New Area Shanghai China Tel 86 21 58970723 166 Fax 86 21 58979066 page 3 Button Definition LCD P has four buttons including ON OFF SET UP and DOWN ON OFF names to SET names to SET UP names to and DOWN names to ...

Страница 15: ...4 Speed display 5 KM H MPH 6 Backlight indicator 7 6KM H work 8 PAS level selection 9 Error code indicator 10 SET operation 11 Distance indicator 11 1 Total distance ODO 11 2 Trip 1 11 3 Trip 2 11 4 Remaining distance indicator without this function by default 12 Trip time indicator 13 Battery indicator 13 1 Battery residual capacity indicator 13 2 Battery voltage 13 3 Battery capacity percentage ...

Страница 16: ...ormal Operation 1 ON OFF Hold ON OFF and start the display The display will provide power for the controller Hold ON OFF again to open the backlight With display on press ON OFF for 3 seconds to turn off the power With the display off there is no battery power consumption The leakage current is no more than 2 µA The panel will go to sleep when the speed is 0 km h for 5 minutes 2 Current Display Th...

Страница 17: ...his display now and power is the option Normal mode is not available 4 Speed Display The speed display is as below and user can select KM H or MPH in SET3 5 KM H MPH Select KM H or MPH for the speed and mileage display will be the currently selected units display 6 Backlight Indicator With the power on click the ON OFF and turn on the backlight Click it again and turn off the backlight ...

Страница 18: ...e headlight at the same time of the backlight on off without this function by default 7 6KM H Work Hold the UP UP UP UP for 2 seconds to get in 6km PAS work and with your hand off the 6km PAS work is released The display is as below 8 PAS Level Selection Click UP or DOWN to change the stages and output power ratio the output power range from level 0 to level 5 the default value is level 0 ...

Страница 19: ...ror code is corresponding with different fault information please see the last page Error code table for details Display return to normal only after problem being fixed and e bike will not run before fixing the problem 10 SET Operation Hold the SET for 2 seconds and enter into the setting interface then Number 8 is lighting the display will flash at 1 HZ Click the SET to cycle from 0 to 3 setting ...

Страница 20: ...ce Click the DOWN to reset the trip 1 then the TRIP1 icon will flash at 1 HZ meanwhile the trip 1 will be cleared 10 3 SET2 Wheel diameter setting Select the accurate wheel diameter value to ensure the accuracy of display about speed and mileage 10 4 SET3 KM H MPH Select KM H or MPH for the speed and mileage display will be the currently selected units display Press UP or DOWN to select parameter ...

Страница 21: ...g mileage from using the accumulated value cannot be cleared 11 2 Trip 1 Trip 1 can be reset by hand in the SET 1 interface when the riding mileage 500km it will be reset automatically The value will be accumulated without resetting 11 3 Trip 2 Trip 2 displays the last driving distance for 30 s after turning on the display then reset it automatically and start to record the current distance 11 4 R...

Страница 22: ...automatically reset after shut down 13 Battery Indicator 13 1 Battery residual capacity indicator The battery frame have five segments each segment represent 20 battery capacity When the capacity is full the five segments are all light In low battery the battery frame will flash it indicates that the battery is severely low and needs to be recharged immediately Low battery flash ...

Страница 23: ...efault It displays the percentage of battery capacity This function needs to be customized 13 4 Battery charging and discharging times without this function by default This function needs customization The panel displays the voltage for the default 14 Cable Definition 1 RED Battery 2 BLACK Battery 3 GREY UART SEND TXD 4 WHITE UART RECEIVE RXD 5 YELLOW Lock 15 Auto Sleep After 5 Minutes When the ri...

Страница 24: ...How to deal with the error code A Fix it to the maintenance place immediately If cannot be resolved you can go to the electric vehicle repair points repair it in a timely manner Error Code Table The error code is corresponding with the fault definition Error code Definition 0 normal 2 Current error or MOS damaged 3 Motor stalling 4 Under voltage 5 Brake error Start detection 6 Hall error 7 Throttl...

Страница 25: ...www dapumotors com Address 6101 Long Dong Road Pudong New Area Shanghai China Tel 86 21 58970723 166 Fax 86 21 58979066 page 15 F communication display receiving error ...

Отзывы: