background image

ES-A-ACV-LF984GD  2115

1.  Prior to installation, flush line to remove debris.
2.  Install valve so the flow arrow matches flow through the line, and gauges to monitor valve inlet and outlet pressures. A Position Indicator 

can be installed to provide visual indication of valve position and operation without disassembly.

3.  Install isolation valves upstream and downstream of the main valve.
4.  Provide adequate clearance for valve servicing and maintenance. Refer to valve servicing dimensions on next page. Avoid installing valves 

6" and larger in the vertical position (main valve stem horizontal). Automatic Control Valves (ACVs) are designed for horizontal in-line instal-

lation, with the cover facing up (main valve stem vertical). Slow operation or premature stem and guide wear may occur if valve is not 

installed according to factory recommendations. Consult factory for detailed engineering review prior to ordering if valve is to be installed 

other than horizontally in-line.

5.  If valve is equipped with a pilot control system, extra precautions should be made during installation to protect the piping circuit from dam-

age. Only remove the pilot control system from the valve if necessary. Tubing and fittings should be kept clean and replaced exactly as 

removed. Consult appropriate hydraulic schematic to ensure proper re-assembly.

6.  Connect solenoid wiring leads to desired switching device, using safe, standard electrical practices.
7.  Wire the limit switch contacts to the proper relay connections, using safe, standard electrical practices. Adjust the limit switch collar to the 

approximate make/break contact position.

8.  After installation, vent entrapped air from valve cover and pilot system by following instructions in the 

Commissioning the Pump Control 

Valve 

section.

9.  Field install downstream orifice plate assembly pressure sense lines per schematic. 


– To accurately set flow rates, either a differential gauge or a flow meter should be installed. 


– Check orifice plate to assure that sense holes are free from obstruction.


18


Globe

Angle

Size (in)

1


1/4

1


1/2

2

21/2

3

4

6

8

10

12

14

16

20

24

A (in)

16

16

20

22

22

24

32

34

38

44

48

52

56

56

B (in)

10

10

12

14

14

16

24

26

28

30

34

40

48

48

Size (in)

1


1/4

1


1/2

2

2


1/2

3

4

6

8

10

12

14

16

C (in)

16

16

20

22

22

24

32

34

38

44

48

52

D (in)

10

10

12

14

14

16

24

26

28

30

34

40

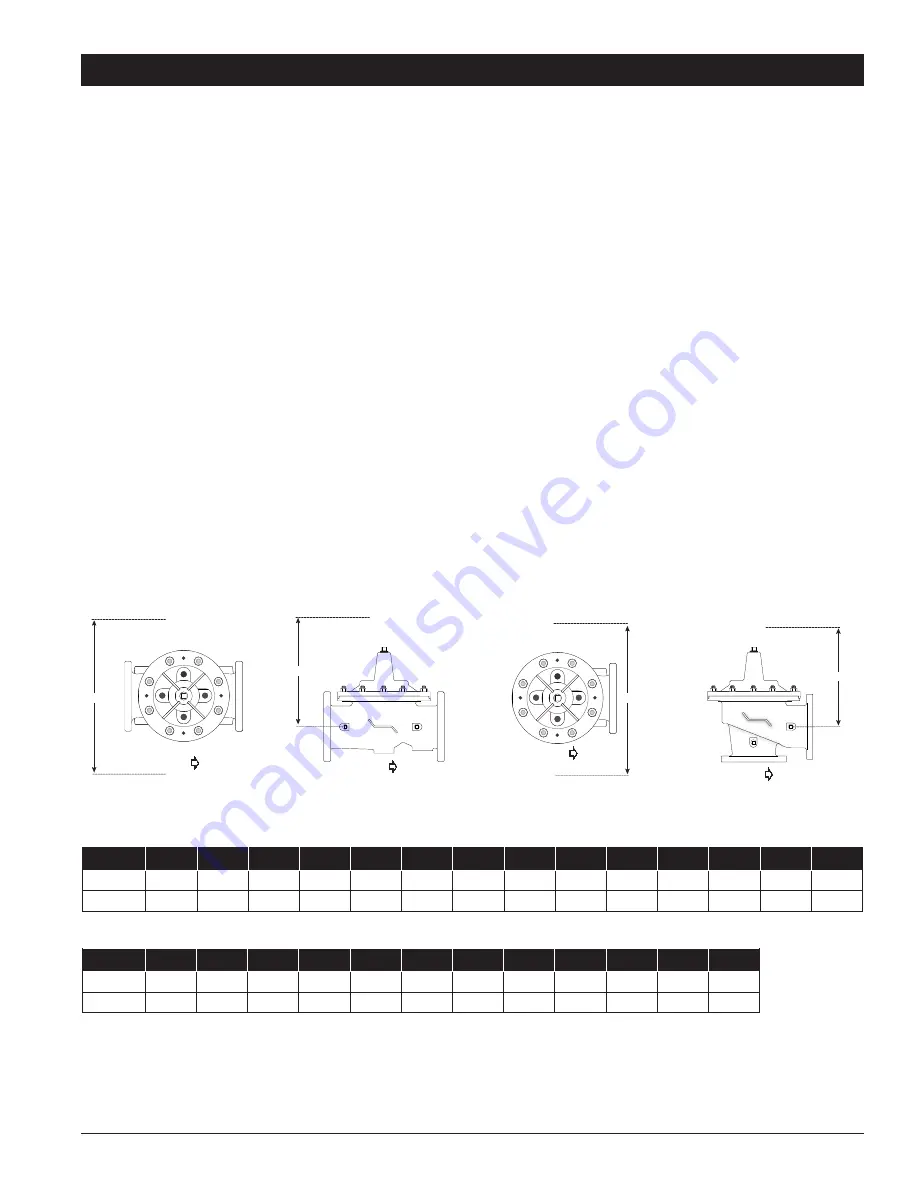
The following tables detail the recommended minimum valve servicing dimensions.


B


FLOW

FLOW

FLOW


FLOW

Valve Servicing Dimensions

Start-up of an automatic control valve requires that proper procedures be followed. Time must be allowed for the valve to react to 

adjustments and the system to stabilize. The objective is to bring the valve into service in a controlled manner to protect the system 

from damaging over-pressure.

Installation

© 2021 Watts

Installation, Operation and Maintenance - Series LF984GD 

Содержание AMES LF984GD Series

Страница 1: ...tor in accordance with local codes and ordinances WARNING Need for Periodic Inspection Maintenance This product must be tested periodically in compliance with local codes but at least once per year or...

Страница 2: ...ening speed control which restricts the speed of fluid and pressure evacuating the main valve cover chamber The valve remains open during the pumping cycle Rate of Flow Feature During the pumping cycl...

Страница 3: ...is Ames Automatic Control Valve ACV is a full port single chamber basic valve that incorporates a one piece disc and dia phragm assembly This assembly is the only moving part within the valve allowing...

Страница 4: ...530 1945 Pressure Drop psi 2 3 4 6 8 10 20 30 40 60 80 100 Flow Rate Gallons per minute Water 2 4 10 20 40 60 80 100 200 500 1000 2000 5000 10000 20000 100000 8 6 4 8 1 0 1 2 1 4 1 6 6 2 1 1 2 3 8 1 0...

Страница 5: ...l 9 Stem Washer ASTM A276 304 Stainless Steel 10 Diaphragm Washer ASTM A536 65 45 12 Epoxy Coated Ductile Iron 11 Diaphragm Buna N Nitrile 12 Disc Retainer ASTM A536 65 45 12 Epoxy Coated Ductile Iron...

Страница 6: ...e NPT Port Size NPT Shipping Weights A B C D E F G H I J K L in in mm in mm in mm in mm in mm in mm in mm in mm in mm in mm in in lbs kgs 11 4 71 4 184 51 2 140 3 8 1 4 20 9 11 2 71 4 184 81 2 216 51...

Страница 7: ...he Main Valve open and closed When the cover of the Accelerator Pilot is de pressurized the main valve cover chamber is connected to upstream pressure causing the valve to close drip tight When the co...

Страница 8: ...the valve opens or closes The adjustable collar is normally set to contact the trip arm when the main valve is closed The collar can be positioned on the stem by loosening the set screw to actuate the...

Страница 9: ...stomers Nitrile standard EPDM optional Viton optional Voltage 24VDC 24VAC or 120VAC Enclosure General Purpose NEMA 4 standard Explosion Proof NEMA 6 6P 7 9 optional Action Normally Open or Normally Cl...

Страница 10: ...lve cover This causes the main valve to close until inlet pressure is again greater than outlet Standard Material Brass Housing and Body Stainless Steel Indicating Rod Optional Material Stainless Stee...

Страница 11: ...on In the free flow direction the seat moves out of the flow path to all unrestricted flow Specifications Standard Flow Control Large Flow Control FLOW FLOW CLOSED Fluid Speed Controlled by Needle FLO...

Страница 12: ...ure signal is sensed below the diaphragm An increase in flow rate causes the differential pressure across the orifice plate to increase The Pilot modulates toward a closed position when the differenti...

Страница 13: ...3 Cap Screw 4 Power Chamber 5 O Ring 6 Body 7 Seat 8 Adjusting Screw 9 Pin 10 Adapter 11 O Ring Included in Repair Kit Item Description 12 Spring Guide 13 Nut 14 Belleville Washer 15 Diaphragm Washer...

Страница 14: ...ilot circuit speed controls and pilots The filter element can be accessed for cleaning by removing the clean out cap or may be cleaned by installing an optional blow down ball valve The wetted surface...

Страница 15: ...pilot lines to provide a positive shutoff in any override or maintenance situation for simple trouble shooting This 2 piece full port valve features bottom loaded stems PTFE seats and packing Size Dim...

Страница 16: ...r Size 1 4 3 4 NPT Model LF60 Flo Clean Strainers are used to filter the fluid pass ing through the pilot circuit and provide protection to pilot circuit speed controls and pilots It is installed in t...

Страница 17: ...vel Body Material Stainless Steel Elastomers Buna N standard EPDM optional Viton optional Enclosure NEMA 1 3 4 and 13 General Purpose standard NEMA 1 7 and 9 Explosion Proof optional Electrical Form C...

Страница 18: ...roper re assembly 6 Connect solenoid wiring leads to desired switching device using safe standard electrical practices 7 Wire the limit switch contacts to the proper relay connections using safe stand...

Страница 19: ...art to open the main valve checking that the main valve opens Air is vented through the loosened fitting Tighten the fitting when liquid begins to vent Clockwise for MANUAL Operation Figure 1 3 Way So...

Страница 20: ...g Speed Needle Valve Adjustment The closing speed needle valve regulates fluid pressure into the main valve cover chamber controlling the valve closing speed If valve closing is too slow turn the adju...

Страница 21: ...valve specification sheets for approximate cover capacity A continuous flow of water from the open port indicates a damaged diaphragm or loose disc diaphragm assembly Disassemble valve and replace di...

Страница 22: ...ation valves ensure open Diaphragm is damaged Conduct diaphragm seal test repair and replace if necessary Main valve stem assembly corroded damaged Inspect stem assembly clean replace if necessary Blo...

Страница 23: ...require a lifting eye bolt to be installed in the valve stem accessory threads located on the very top of the valve stem 5 Before removing Stem Nut examine stem threads for mineral build up Remove dep...

Страница 24: ...to ensure even distribution Test the Disc and Diaphragm Assembly for smooth travel by following the Freedom of Movement Test procedure in previous section 11 Test the integrity of the Seat Seal by fol...

Страница 25: ...s not work properly other costs resulting from labor charges delays vandalism negligence fouling caused by foreign material damage from adverse water conditions chemical or any other circumstances ove...

Отзывы: