Wasp DELTA 2040 Скачать руководство пользователя страница 1

MANUAL OF USE AND MAINTANANCE

ORIGINAL INSTRUCTIONS

Содержание DELTA 2040

Страница 1: ...MANUAL OF USE AND MAINTANANCE ORIGINAL INSTRUCTIONS...

Страница 2: ...the best results from DELTA WASP 4070 INDUSTRIAL 4 0 No part of this publication could be reproduced stored in a filing system or transmitted to third parties in any form or by any means without the M...

Страница 3: ...2 PRINT Menu 27 5 2 3 PREPARE menu 28 5 2 4 ADVANCED menu 29 5 2 5 WIFI settings 30 5 2 6 GCODE 31 5 2 7 INFO menu 32 5 3 First start 33 6 First use of the printer 35 6 1 General warnings 35 6 2 Gcode...

Страница 4: ......

Страница 5: ...e available for consultation in copy and by the recipient on the printer itself or in its immediate vicinity In the second case the manual s location must be indicated on the printer clearly It is sus...

Страница 6: ...datory to keep this manual and all attached documents in an easily accessible place near the printer and known to all users operators and maintenance personnel Operators and maintenance technicians mu...

Страница 7: ...com 1 2 Indentification label The printer is CE marked and complies with all relevant provisions Machinery Directive 2006 42 EC EMC Directive 2014 30 EU and LVD Directive 2014 35 EU EN 55022 EN 55024...

Страница 8: ...mises for the removal of defects under warranty are Manufacturer responsibility except in cases where the nature of the defect is such that it can be easily removed on site by the Customer All consuma...

Страница 9: ...CSP S r l 9 1 1 5 Declaration of conformity Below is the declaration of conformity FAC SIMILE of which the original copy is supplied together with the printer documentation...

Страница 10: ...nter can be Mechanical Electrical MECHANICAL NATURE INTERVENTIONS Any intervention of a mechanical nature must be carried out in strict compliance with the directives required by currentsafetyregulati...

Страница 11: ...e risks for the user These systems are present as a standard in all machines and shall not for any reason be manipulated nor damaged Theuserisresponsibleofreportingabnormalitiesinthefuctionsofthesesys...

Страница 12: ...risk of electrocution CAUTION It is present tension on the superior part of the printer Maintanance Cleaning Maintenance cleaning operations must be carried out by trained and authorized personnel Ope...

Страница 13: ...him who has the responsibility for the job Below there is a description of the professional profiles for the operators involved in the printer User Qualified personnel able to perform simple tasks tr...

Страница 14: ...h there is the possibility of causing damage to the environment NOTE Indicate notes warnings suggestions and other points on which you want to call the reader s attention or complete the explanation w...

Страница 15: ...a bed of work and a group of spools The material is unrolled from the spool pushed on the heated nozzle where melts and is extruded through a hole that deposes very small amounts of material on the be...

Страница 16: ...CSP S r l 16 2 Fig 2 1 Control panel 2 1 Control panel Legend 1 Ethernet cable door 2 USB door 3 Operator display 4 Display control handle Rotates left and right and it is clickable...

Страница 17: ...CSP S r l 17 2 Fig 2 2 Work area 2 2 Work area Legend 1 End filament sensor 2 Aluminum slider 3 Suspended driver 5 Support arm 6 Teflon pipe 7 Extruder...

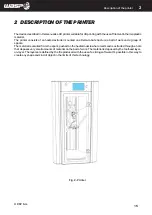
Страница 18: ...CSP S r l 18 2 Fig 2 3 External area of the printer 2 3 External area of the printer Legend 1 CE label 2 Supply...

Страница 19: ...minium Movement Rolling on anodized aluminum slide Motors Stepper Nema 17 Electrical features Input 220 240 V 50 60 Hz Absorbed power Extruder max 130W Heated bed max 500 W Heated chamber max 750 W Us...

Страница 20: ...onstructed for as described in paragraph 2 6 Failure to comply with safety regulations Printer s operation with other procedures than those described in this manual Use components not provided for in...

Страница 21: ...ust wear all the necessary Personal Protective Equipment PPE 3 1 1 Delivery of the printer Upon receipt make sure that The printer has not been damaged during transport Any packaging has not been tamp...

Страница 22: ...The printer is supplied with Operating and maintenance manual USB pendrive Power cable including a schuko socket Optional wheels Extruder cleaning kit Glue 3 4 Lifting and handling of the printer ATT...

Страница 23: ...ng space by referring to the dimensions expressed in mm given in paragraph 2 4 Technical data The room must also be Equipped with the appropriate power supply line Installed in environments with brigh...

Страница 24: ...y crushing or sources of wear according to the type of installation made ATTENTION The printer must be powered by a 10A socket protected by a magnetothermic set at 30 mA NOTE All the data concerning t...

Страница 25: ...6 General safety warnings Furthermore the specific requirements for safe interaction with the printer related to this chapter are detailed in the following paragraphs ATTENTION The operations related...

Страница 26: ...s the principal tool for the monitoring and control of the printer Legend 1 Extruder temperature clicking it can be modified 2 Wifi informations 3 Operative information position feed flow state autoca...

Страница 27: ...me puts the machine in position of zeroing of the axes 2 Unload material heats extruder and removes material inside 3 Load material heats extruder and loads material inside par 8 4 4 Autocalibration h...

Страница 28: ...used sometimes Legend Free Zeta system enters in Free Zeta System par 8 9 Set Z max allows to set a new height for the machine par 8 10 Manual extrusion enters in Manual Extrusion par 8 8 Manual level...

Страница 29: ...nd Send arbitrary command contains a keyboard to launch commands directly to the board Wifi settings to connect the machine to the wifi nerwork par 8 14 Reload UI reloads the graphic interface Camera...

Страница 30: ...etwork par 8 14 Legend 1 SSID to chose the desidered network between all the visible ones 2 PWD Allows to insert a password if present 3 AUTH makes you specify what kind of connection you re working w...

Страница 31: ...CODE you can launch gcodes and move them from the USB to the printer par 8 5 Legend 1 Chose USB Drive Printer Drive 2 Gcode list the ones on the drive present and icon beside the name 3 Arrows for the...

Страница 32: ...menu INFO contains useful video tutorials for basic and advanced operations You can access anytime you want and as you exit videos are paused Also if you access from specific pages it already directs...

Страница 33: ...er s movements during transport clamps are applied on the straps to be removed before starting the printer Filament removal from extruder ATTENTION Pay particular attention during the various stages o...

Страница 34: ...CSP S r l 34 5...

Страница 35: ...perations related to these activities must be performed by authorized and professionally qualified personnel ATTENTION Pay particular attention during the various stages of the procedures it is essent...

Страница 36: ...on of the menu Before starting the automatic calibration it is recommended to set the desired floor temperature according to the material Wait a few minutes for the temperature to be evenly distribute...

Страница 37: ...inting file from PRINT GCODE Printing will start as soon as the printing bed and the extruder reach the pre set temperatures 6 8 Function during the print During the print new functions such as pause...

Страница 38: ...rements for safe interaction with the printer related to this chapter are detailed in the following paragraphs ATTENTION The operations related to these activities must be performed by authorized and...

Страница 39: ...CSP S r l 39 Ordinary and extraordinary maintanance 6...

Страница 40: ...Par 7 2 1 Belts Tension control 160 h Arms ball joint Lubrication 160 h Par 7 2 2 Extruder fans Check if working 160 h Par 7 2 3 Elastic ropes Check if damaged 160 h Par 7 2 4 Sliders Check plays 160...

Страница 41: ...website www 3dwasp com or for additional informations contact our support at support 3dwasp com 7 2 7 Replacing Ooze shield protection The Ooze shield protection is present only in the Zen extruder th...

Страница 42: ...promised Dirt that prevents adhesion during printing Aesthetic necessity To carry out this operation it is necessary to remove the top by unscrewing the three screws indicated in figure 7 2 Once remov...

Страница 43: ...e Manufacturer Any of these operations not carried out by a manufacturer s technician can cause irreversible damage to the machine or its parts and therefore would null and void the warranty Extraordi...

Страница 44: ...orough extruder s cleaning REMOVE THE CARTRIDGE FROM THE SPITFIRE EXTRUDER With the correct extruder connected turn on the machine Bring the extruder to the minimum print temperature of the loaded mat...

Страница 45: ...fig 7 3 1 a fig 7 3 1 b fig 7 3 1 c fig 7 3 1 d CSP S r l 45 Ordinary and extraordinary maintanance...

Страница 46: ...sen the screw of the block which stops the cartridge with a 2 5 mm Allen screw without unscrewing it Using a small flat headed screwdriver pry into the slot to the right of the heating block Insert a...

Страница 47: ...fig 7 3 1 a fig 7 3 1 b fig 7 3 1 c fig 7 3 1 d CSP S r l 47 Ordinary and extraordinary maintanance...

Страница 48: ...cases of Clogged extruder Change of material s type Uncertain extrusion General maintenance The operation can be carried out in 4 ways Cartridge inserted in the extruder mounted on the machine Cartri...

Страница 49: ...fig 7 3 4 a fig 7 3 4 b fig 7 3 4 c fig 7 3 4 d CSP S r l 49 Ordinary and extraordinary maintanance...

Страница 50: ...ng the screw with a 3mm Allen wrench Loosen the front screw on the heating block with a 2 5 mm Allen key Help the opening of the block by pivoting with a flat screwdriver on the nozzle slot Remove the...

Страница 51: ...fig 7 3 4 a fig 7 3 4 b fig 7 3 4 c fig 7 3 4 d CSP S r l 51 Ordinary and extraordinary maintanance...

Страница 52: ...usion during the print The extruder temperature is or not the one needed for the material in use It is recommended to make sure the adhesion between first layer and bed 8 2 Autocalibration Autocalibra...

Страница 53: ...CSP S r l 53 Use of the printer...

Страница 54: ...sts of two overlappinggridswithslightlydifferentsizedcells whereeachlinecorrespondstoatenthofamillimeter 0 1mm The position of the second extruder T1 with respect to the first T0 will depend on the co...

Страница 55: ...3 2 1 0 1 2 3 4 5 5 4 3 2 1 0 1 2 3 4 5 5 4 3 2 1 0 1 2 3 4 5 5 4 3 2 1 0 1 2 3 4 5 CSP S r l 55 Use of the printer 8 Fig 8 3b Example of non correct calibration grid Fig 8 3c Example of correct cali...

Страница 56: ...onfirm on the screen that the operation has been performed 6 The extruder will load the filament until it is extruded To load the filament manually instead proceed as follows 1 Place the spool on its...

Страница 57: ...fig 8 4 a fig 8 4 b fig 8 4 c fig 8 4 d CSP S r l 57 Use of the printer 8 Fig 8 5 Manual filament loading...

Страница 58: ...In the machine display Select gcode into PRINT menu 4 Search for your file s name and select it for printing 5 Oncetheprintinghasstarted thefileissavedinsidethemachine smemoryandthependrivecanberemov...

Страница 59: ...CSP S r l 59 Use of the printer 8 Fig 8 5 1 Gcode loaded with USB drive notice icon beside the file name Fig 8 5 2 Gcode wifi loaded with Octoprint...

Страница 60: ...to be taken into consideration Option available only with Zen extruder The nozzles must both be well calibrated Neither nozzle must be clogged The material must be correctly loaded on both nozzles The...

Страница 61: ...CSP S r l 61 Use of the printer 8 fig 8 7 Delete gcode from machine...

Страница 62: ...print temperature of the plastic you are working with The procedure is this 1 Set the extruder temperature by selecting it on the initial screen 2 Wait until it reaches the temperature 3 Select the e...

Страница 63: ...CSP S r l 63 Use of the printer 8 fig 8 8a Manual extrusion command inside PREPARE menu Fig 8 8b Manual filament loading...

Страница 64: ...Free Zeta system correctly 1 Remove any debris on the last layers until the last clean print layer is obtained 2 Bring the machine floor into temperature 3 Select the Free Zeta system command from th...

Страница 65: ...CSP S r l 65 Use of the printer 8 fig 8 10 Modify Height command fig 8 9b Free Zeta system command Fig 8 9 8 10 Free Z System and Modify Height commands inside PREPARE menu...

Страница 66: ...each extruder The Multi core system requires an always similar tool change based on the actuator the aluminum bridge connected to the machine arms To replace an extruder with another proceed as follo...

Страница 67: ...fig 8 11 a fig 8 11 b fig 8 11 c fig 8 11 d CSP S r l 67 Use of the printer 8 Fig 8 11 Change core Multi core...

Страница 68: ...11 e fig 8 11 f CSP S r l 68 Use of the printer 8 7 Fit the new extruder with attention to alignment 8 Reconnect the cables following the colors on the cables and on the extruder 9 Start the autocalib...

Страница 69: ...fig 8 11 g fig 8 11 h fig 8 11 i fig 8 11 l CSP S r l 69 Use of the printer 8 Fig 8 11 Change core Multicore...

Страница 70: ...sidered that in the time span between turning off the machine and launching the Resurrection command the printed piece is cooled and this in some cases may cause problems in recovering the print 8 13...

Страница 71: ...CSP S r l 71 Use of the printer 8 Fig 8 13 Removing the object from the bed...

Страница 72: ...ed to the same wifi network as the printer To enter into the Octoprint control environment 1 Make sure that both the computer and the printer are connected to the same wifi network 2 Enter the IP addr...

Страница 73: ...CSP S r l 73 Use of the printer 8 Fig 8 14a Octoprint control environment on browser Fig 8 14b Octoprint control environment on browser...

Страница 74: ...erations the operator must wear all the necessary Personal Protective Equipment PPE 9 2 Decommissioning and dismantling In the event that the printer should be taken out of service for a long period w...

Страница 75: ...estination concerning the disposal of waste so it is forbidden to disperse in the environment any type of processing residue oils etc subdividing the dismantled parts by type for a correct separate co...

Страница 76: ..._________________________________________________________________________________ __________________________________________________________________________________ ___________________________________...

Страница 77: ...______________________________________________________________________________ __________________________________________________________________________________ ______________________________________...

Страница 78: ...CSP S r l 78 Additional instructions 8...

Страница 79: ...CSP S R L Viale Zaganelli 26 48024 Massa Lombarda RA Italia Tel 39 0545 82966 www wasproject it info wasproject it...

Отзывы: