background image

17 October 2014 


All Dimension are in mm………….Copyright © 


Due to continued product improvement, Warmington Ind LTD reserves the right to change product specifications without prior notification. 

Description


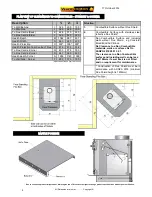
Cabinet Width 

A


400 

Cabinet Depth 

B


520 

Cabinet Height 

C


820 

Flue Diameter 

D


150 

To Flue Centre 

E


123 

Minimum Ceiling Height 

2400 

Minimum from fire to Ceiling 

1500 

Height from Floor Protector 

4600 

Emissions levels (g/kg) 


0.95g/kg 

Check List


Baffle 


Holding Down Brackets    
Check Door Seal 


Check Damper 


Bricks (If Required) 


Serial Number Check 


Loading Badge 


Packed By 


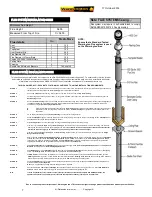
Minimum Flue Height


Flue Height 

3600 

Measured From Top of Cabinet  C + 3600 

FIREBOX DETAILS


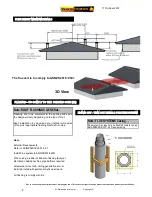
FLOOR PROTECTOR


Note: Floor Protection 

Floor

  Protectors  are  normally  designed  to  suit  each  individual 

“setting”. 
The Studio Stove requires a “Ash Hearth” Floor Protector 

The Floor Protector is to Comply with  
ASNZS 2918 : 2001 

Содержание Studio Stove

Страница 1: ...that you have the correct and current Installation details for the Warmington Fire Installation The Warmington unit is to be Installed by a Certified Warmington Installer or an Approved NZHHA Install...

Страница 2: ...S NZS 4013 BURN ONLY UNTREATED WOOD WITH A MOISTURE CONTENT LESS THAN 25 DRY BASIS AVERAGE PARTICULATE EMMISSION FACTOR BURNING SOFTWOOD 0 95g kg MAXIUM AVERAGE HEAT OUTPUT BURNING SOFTWOOD 8 9KW OVER...

Страница 3: ...um from fire to Ceiling G 1500 Height from Floor Protector H 4600 Emissions levels g kg 0 95g kg Check List Baffle Holding Down Brackets Check Door Seal Check Damper Bricks If Required Serial Number C...

Страница 4: ...Hearth depth Corner S 1255 1149 1039 To Wall Side Corner T 250 175 100 Measurement taken from front ash lip Situation 1 Combustible Surface without Flue Shield 2 Combustible Surface with stainless ste...

Страница 5: ...s without prior notification STEP 1 FITMENT REMOVAL OF BAFFLE STEP 2 STEP 3 STEP 4 STEP 5 STEP 6 Remove Ash Studio Bricks Push Baffle right to the Back of Firebox Tilt Studio Baffle on an Angle Slide...

Страница 6: ...d to an internal heat sync e g Hot water cylinder Radiator Under floor heating etc WETBACK POSITION SEISMIC RESTRAINT FIXING Seismic Restraint Fixing Instructions Remove Bottom Tray Remove bolt at bac...

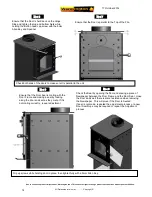
Страница 7: ...AGE 7 Place Ceiling Plate over heater flue spigot ensuring the folded edge up stands are facing ceiling STAGE 8 From the roof lower Flue Pipes through Outer Casing into position Ensure not to scratch...

Страница 8: ...pipe casing Note External Requirements Refer to AS NZS2918 2001 4 9 1 Install Flue system to AS NZS2918 2001 When using a rubber or Bitumen flashing Butynol Dectite an Additional Flue pipe Baffle is r...

Страница 9: ...the fire is in direct contact with the flame it offers a large cooking surface Ideal for entertainment at home or cooking for holiday homes and farm cottages If spillage occurs clean the surface with...

Страница 10: ...eet on Page 2 the Data Plate attached to the Fire Contact with your local TA Territorial Authority to check for local compliance 11 Flue System The Installation and Construction of the Flue System mus...

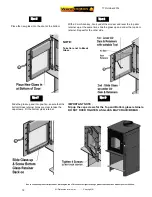
Страница 11: ...a special heat resistance glass designed for use in fires The glass can be replaced with the door still fitted to the fire Loosen the 4 Cap screws on the front of the door that retain the glass and re...

Страница 12: ...ok under the air dam and lever the top door retainer up at the same time slide the glass up and under the top door retainer Repeat for the other side No 6 No 7 No 8 Slide the glass up and into positio...

Страница 13: ...n designed to give a wide range of Adjustment Studio Door Adjustment Instructions No 1 Have all the Screws and the Nuts just loose so the door can move with a slight force No 2 Close the Door and nip...

Страница 14: ...that the Door is parallel to the Top of the Fire Check both ends of the doors to make sure it is parallel to the unit No 8 Ensure that the Door Seal is mating with the Door Frame and making a seal by...

Страница 15: ...he paint turning flat as the heat radiates out from hotter parts of the stove Summary on Setting High Temp Pain Read Stove Manufacturer instructions Babies small children pregnant women and pets shoul...

Страница 16: ...ODIFICATION OF THE APPLIANCE THAT HAS NOT BEEN APPROVED IN WRITING BY THE TESTING AUTHORITY IS CONSIDERED AS BREACHING AS NZS 4013 WARNING DO NOT USE FLAMMABLE LIQUIDS OR AEROSOLS TO START OR REKINDLE...

Отзывы: