Page | 18
Air Cleaner Service
A dirty air cleaner will restrict airflow to the carburetor and allow dirt into the engine. Service more
frequently when operating the generator in extremely dusty areas.
Never run the generator without the air cleaner. Rapid engine wear may
result.
Spark Plug Service
To ensure proper engine operation, the spark plug must be the correct part, properly gapped and
free of deposits.
1.
Open the generator service door.
2.
Remove the spark plug cap.
3.
Clean any dirt from around the spark plug base.
4.
Use the wrench to remove the spark plug.
5.
Visually inspect the spark plug. Discard it if the insulator is cracked or chipped.
Clean the spark plug with a wire brush if it is to be reused.
6.
Measure the plug gap with a feeler gauge. The gap should be 0.024-0.028in (0.6-0.7mm).
Correct as necessary by carefully bending the side electrode.
7.
Install the spark plug carefully by hand to avoid cross-threading.
8.
After a new spark plug has been seated by hand, it should be tightened 1/2 turn with a
wrench to compress the sealing washer. If a used plug is being reinstalled, it should only
require 1/8 to 1/4 turn after being seated.
9.
Reinstall the spark plug cap.
The spark plug must be securely tightened.
Use only resistor-type spark plugs. Use of non-resistor-type spark plugs will
result in no AC output.
Spark Arrester Maintenance
1.
Remove the generator rear cover to access the spark arrestor.
2.
Remove the spark arrestor from the muffler by unscrewing the clamp.
3.
Clean the spark arrestor with a stiff wire brush.
4.
Replace if the wire mesh is perforated or torn.
5.
Reinstall the spark arrester.
6.
Reinstall rear cover.
If the generator has been running, the muffler will be very hot. Allow it to cool before proceeding.
The spark arrester must be serviced every 100 hours to maintain its efficiency.
Inspect the spark arrester screen for holes or tears.
Содержание WI6000
Страница 1: ...Inverter Series Generator Operator Manual Model WI6000 May 2017 P N 220884 Rev A ...
Страница 2: ......
Страница 4: ...Page 2 ...
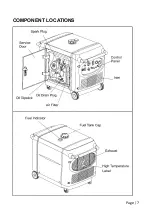
Страница 9: ...Page 7 COMPONENT LOCATIONS ...
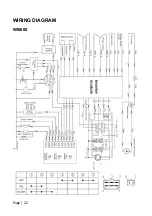
Страница 24: ...Page 22 WIRING DIAGRAM WI6000 ...
Страница 25: ......
Страница 26: ......
Страница 27: ......
Страница 28: ......


