


42
Cooking in summer
-
Grate position "UP"
-
temperature control to "3"
-
secondary air slide "OPEN"
At the warmer times of the year, the stove will mostly only be used to cook, and prepare
domestic hot water. Here the "UP" grate position is used, to ensure that the room where
the stove is and the hot water tank do not become excessively overheated.
If the hotplate is not hot enough, the ash door can be opened as an
exception.
If the heat
capacity of the domestic water boiler is exceeded then the excess energy is let off through
the heat sink (closed circuit).
This must not be allowed to be a regular operating situation; otherwise it will lead to
rapid furring up of the heat exchanger
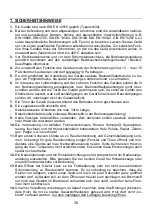
1.7 Care and cleaning
The period of time between cleaning the stove and the flue pipes depends largely on the
type of fuel used, the draught and the mode of operation. It should certainly be cleaned if:
-
heating performance drops,
-
the fuel burns poorly despite powerful air intake (open ash door),
-
smoke occasionally comes out (flue gas smell in room) or
-
the period for heating is over.
-
Unnecessary dust escape can be avoided if all openings on the stove remain closed, if
they are
not
actually being used as accesses to clean through at the time.
-
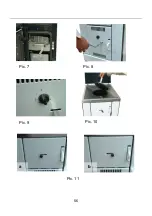
Take the hotplate out (Fig. 16) and clean out the chimney connection (Fig. 17). The
hotplate can remain in place for the upper smoke connection.
-
Clean the ducts from top to bottom using the soot scraper and brush through after-
wards (Fig. 18)
-
To clean the left and right draught ducts:
-
remove the ash pan and
-
push cleaning slides to the back of each using the fire iron (Fig. 19 & 20)
1.7.1 Ceramic glass surfaces
Clean the window and/or Ceran plate before first use with a clean damp cloth. Then rub a
few drops of a ceramic glass protection product onto the glass / Ceran plate with a paper
towel.
After wiping this and polishing it dry, the high quality surface is now covered with an invisi-
ble film. The helps to keep the glass pane /Ceran plate clean and if repeated regularly,
makes it easy to clean
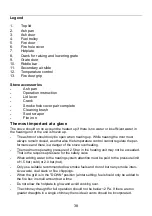
Содержание K158
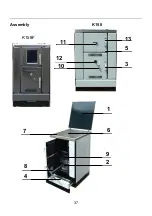
Страница 4: ...4 Geräteaufbau 1 9 2 6 4 8 7 13 5 3 10 12 11 K158F K158 ...
Страница 25: ...25 Bild 8 Bild 7 Bild 9 Bild 10 a b Bild 11 ...
Страница 26: ...26 Bild 12 Bild 13 Bild 14 Bild 15 Bild 16 Bild 17 ...
Страница 27: ...27 Bild 19 Bild 18 Bild 20 ...
Страница 29: ...29 Bild 29 Bild 30 Bild 33 Bild 31 Bild 32 Bild 35 Bild 36 Bild 34 ...
Страница 32: ...32 ...
Страница 33: ...33 ...
Страница 34: ...34 ...
Страница 37: ...37 Assembly K158 1 9 2 6 4 8 7 13 5 3 10 12 11 K158F ...
Страница 56: ...56 Pic 8 Pic 7 Pic 9 Pic 10 a b Pic 11 ...
Страница 57: ...____________________________________________________________ 57 Pic 12 Pic 13 Pic 14 Pic 15 Pic 16 Pic 17 ...
Страница 58: ...____________________________________________________________ 58 Pic 19 Pic 18 Pic 20 ...
Страница 59: ...59 Pic 23 Pic 24 Pic 25 Pic 26 Pic 27 Pic 28 ...
Страница 65: ...65 Structure de l appareil K158 K158F 1 9 2 6 4 8 7 13 5 3 10 12 11 ...
Страница 81: ...81 fig 8 fig 7 fig 9 fig 10 a b fig 11 ...
Страница 82: ...82 fig 12 fig 13 fig 14 fig 15 fig 16 fig 17 ...
Страница 83: ...83 fig 19 fig 18 fig 20 ...
Страница 84: ...84 fig 23 fig 24 fig 25 fig 26 fig 27 fig 28 ...
Страница 85: ...85 fig 30 fig 35 fig 36 fig 34 fig 29 fig 33 fig 31 fig 32 ...
Страница 90: ...90 Struttura dell apparecchio K158 K158F 1 9 2 6 4 8 7 13 5 3 10 12 11 ...
Страница 111: ...111 fig 8 fig 7 fig 9 fig 10 a b fig 11 ...
Страница 112: ...112 fig 12 fig 13 fig 14 fig 15 fig 16 fig 17 ...
Страница 113: ...113 fig 19 fig 18 fig 20 ...
Страница 114: ...114 fig 23 fig 24 fig 25 fig 26 fig 27 fig 28 ...
Страница 115: ...115 fig 33 fig 35 fig 36 fig 34 fig 29 fig 30 fig 31 fig 32 ...
Страница 118: ......
Страница 119: ...119 ...


