


41
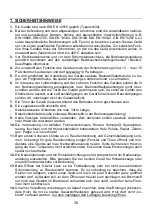
1.4 Heating and slow burning
Heating with wood
- Secondary air slide (11) "OPEN"
Lay long and thick pieces of wood in at least two charges on thick embers. Split firewood
improves the burning quality and controllability. Hardwood is more productive than soft-
wood. If the chimney draught is not sufficient (possibly high outside temperature) and the
up draught regulated by the temperature controller, the ash door can be left open for a
short time after the wood has been put on, to get the fire going.
Slow burning with wood
The burning speed is so set using the temperature control (12), that the required tempera-
ture is maintained.
Using wood, particularly softwood, it is only possible to have limited slow burning.
Heating with coal
-
Secondary air slide (11) "OPEN"
-
Only add coal after a strong basic ember glow is established and then in at least two
charges with a period of about 15 minutes between each.
1.5 Heating between seasons and during the summer
If the chimney draught is poor because of high outside temperatures, then the flue gases
cannot be drawn off completely.
Therefore:
-
put on less fuel,
-
do not turn temperature controller back too far and
-
riddle more often, to keep the draught in the stove going
1.6 Cooking
Please only use pots with solid flat bottoms and lids that fit.
Cooking in winter
-
Grate position "DOWN"
-
temperature control to "3"
-
secondary air slide "OPEN"
During the colder times of the year, the stove will mostly be used to heat and prepare do-
mestic hot water, whereby is still possible to cook immediately above the fire itself. To
cook, add wood and/or coal in small charges to create a high level ember bed, which will
heat the hotplate adequately.
After cooking, turn the temperature regulator back to the desired temperature.
Содержание K158
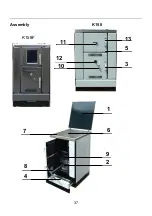
Страница 4: ...4 Geräteaufbau 1 9 2 6 4 8 7 13 5 3 10 12 11 K158F K158 ...
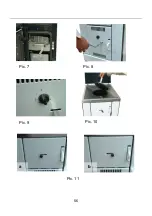
Страница 25: ...25 Bild 8 Bild 7 Bild 9 Bild 10 a b Bild 11 ...
Страница 26: ...26 Bild 12 Bild 13 Bild 14 Bild 15 Bild 16 Bild 17 ...
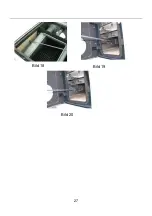
Страница 27: ...27 Bild 19 Bild 18 Bild 20 ...
Страница 29: ...29 Bild 29 Bild 30 Bild 33 Bild 31 Bild 32 Bild 35 Bild 36 Bild 34 ...
Страница 32: ...32 ...
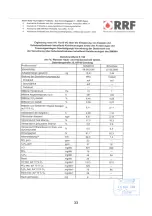
Страница 33: ...33 ...
Страница 34: ...34 ...
Страница 37: ...37 Assembly K158 1 9 2 6 4 8 7 13 5 3 10 12 11 K158F ...
Страница 56: ...56 Pic 8 Pic 7 Pic 9 Pic 10 a b Pic 11 ...
Страница 57: ...____________________________________________________________ 57 Pic 12 Pic 13 Pic 14 Pic 15 Pic 16 Pic 17 ...
Страница 58: ...____________________________________________________________ 58 Pic 19 Pic 18 Pic 20 ...
Страница 59: ...59 Pic 23 Pic 24 Pic 25 Pic 26 Pic 27 Pic 28 ...
Страница 65: ...65 Structure de l appareil K158 K158F 1 9 2 6 4 8 7 13 5 3 10 12 11 ...
Страница 81: ...81 fig 8 fig 7 fig 9 fig 10 a b fig 11 ...
Страница 82: ...82 fig 12 fig 13 fig 14 fig 15 fig 16 fig 17 ...
Страница 83: ...83 fig 19 fig 18 fig 20 ...
Страница 84: ...84 fig 23 fig 24 fig 25 fig 26 fig 27 fig 28 ...
Страница 85: ...85 fig 30 fig 35 fig 36 fig 34 fig 29 fig 33 fig 31 fig 32 ...
Страница 90: ...90 Struttura dell apparecchio K158 K158F 1 9 2 6 4 8 7 13 5 3 10 12 11 ...
Страница 111: ...111 fig 8 fig 7 fig 9 fig 10 a b fig 11 ...
Страница 112: ...112 fig 12 fig 13 fig 14 fig 15 fig 16 fig 17 ...
Страница 113: ...113 fig 19 fig 18 fig 20 ...
Страница 114: ...114 fig 23 fig 24 fig 25 fig 26 fig 27 fig 28 ...
Страница 115: ...115 fig 33 fig 35 fig 36 fig 34 fig 29 fig 30 fig 31 fig 32 ...
Страница 118: ......
Страница 119: ...119 ...


