Wallenstein WX370 Скачать руководство пользователя страница 23

WX370 

3-point Hitch Wood Splitter

Operating Instructions

23

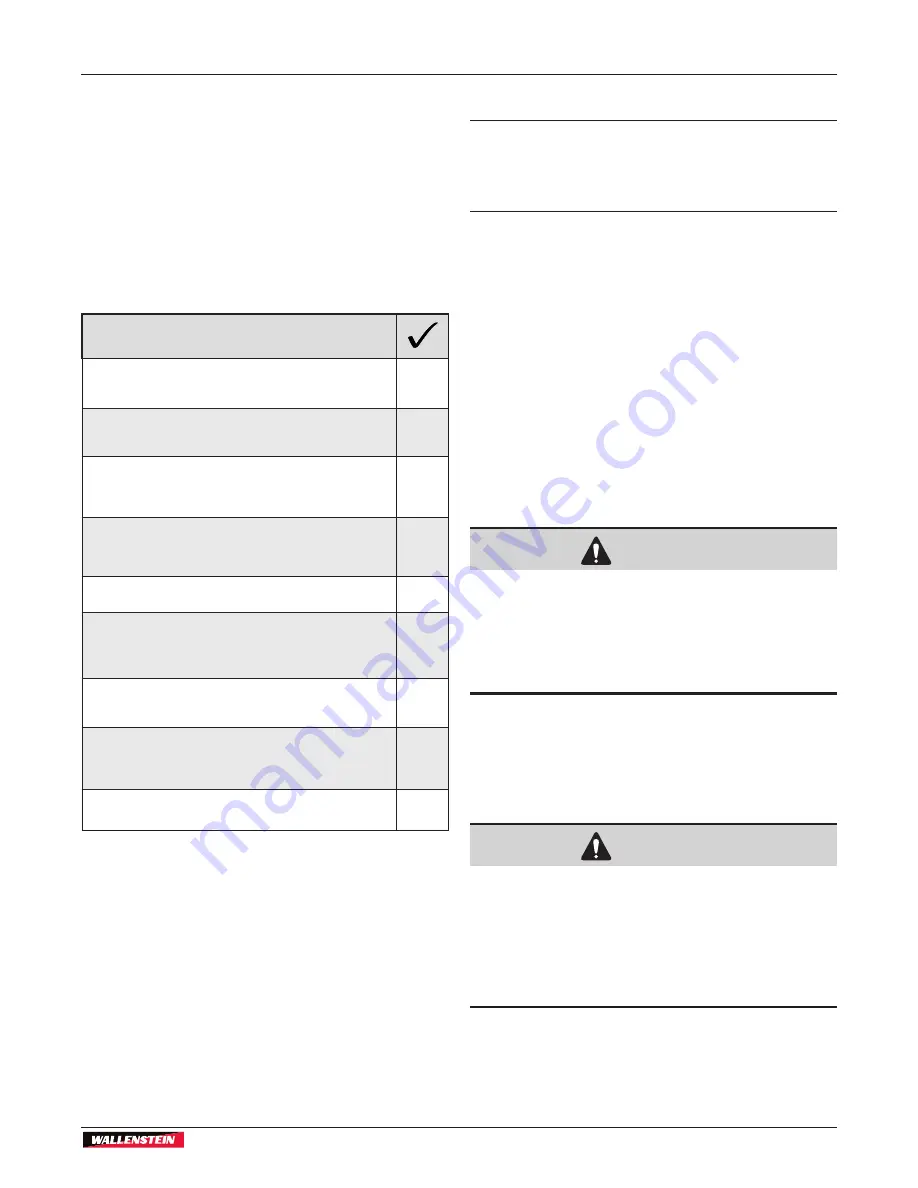
6.4.1  Pre-operation Checklist

Efficient and safe operation of the Wallenstein 

wood splitter requires that each operator reads and 

understands the operating procedures and all related 

safety precautions outlined in this section. 

A Pre-operation Checklist is provided for the operator. 

The checklist is important for both personal safety and 

keeping the wood splitter in good mechanical condition.

Before operating the machine and each time thereafter,  

check the following:

Pre-operation Checklist

Wood splitter is mounted on a tractor less 

than 100 horsepower.

Extra weights are mounted on the front of the 

tractor, if required.

Wood splitter is properly attached to the 

tractor. Lynch pin retainers are installed in 

mounting pins.

Check the wedge and anvil. Be sure they are 

not damaged or broken or badly worn. Repair 

or replace as required.

Check and remove any entangled material.

Check for hydraulic leaks. Tighten 

connections or replace components to stop 

leaks.

Check and tighten all fasteners. Make sure 

the equipment is in good condition.

Check that appropriate equipment for 

personal protection is being used and in good 

condition.

Check that jewelry, loose-fitting clothing are 

not worn. Make sure long hair is tied back.

6.5  Splitting Logs

IMPORTANT!  Park the wood splitter on a level, 

dry work area free of debris and other objects. 
Position the splitter so the prevailing wind blows 

engine exhaust away from the operator.

1. 

Make sure working area is clear of stones, 

branches or other obstacles. 

2. 

Precut logs to desired block size, ready to load 

onto splitter bed.

3. 

Determine where the split wood is going to be 

piled. Make sure that location does not interfere 

loading splitter.

4. 

Move tractor into its working position, set the 

3-point hitch and the splitter to a comfortable work 

height. Set the park brake. 

5. 

Set the throttle in its mid-range position. Place the 

working hydraulic circuit in detent.

6.5.1  Log Placement

 WARNING!

Risk of pinching or crushing hazard between the 

wedge or push block and the log! 

Never place hands at the ends of the log. 

Always grasp logs by the sides when loading or 

removing.

W035

•  Always grasp the log by the sides not the 

ends when placing in or removing logs from 

the splitter. 

This minimizes the chance of getting 

fingers, hands or an arm between the wedge and 

the log.

 WARNING!

Risk of pinching or crushing hazard! The worker 

loading the splitter MUST be the only one in 

control of the hydraulic cylinder and splitting 

wedge. 

Only one worker should operate and load the 

wood splitter.

W036

6.5.2  Horizontal Splitting

1. 

Place wood or log on the splitter.

2. 

Push control lever forward and hold to split wood.

Содержание WX370

Страница 1: ...OPERATOR S MANUAL 3 pointHitchWoodSplitter WX370 Part Number Z97140_En Rev May 2019...

Страница 2: ...ters are equipped with a closed center control valve and the model is identified as WX370C Units of measurement in Wallenstein Equipment technical manuals are written as US Customary SI metric Keep th...

Страница 3: ...igns 14 4 Familiarization 15 4 1 To the New Operator 15 4 2 Machine Components 16 5 Controls 17 5 1 Hydraulic Valve 17 5 2 Stroke Limiter Accessory 18 5 3 Splitter Frame Latch 19 6 Operating Instructi...

Страница 4: ..._________ Customer s Name _________________________________________ Contact Name _________________________________________ Dealer Name _________ _______________________________ Phone Number __________...

Страница 5: ...llenstein product when ordering parts or requesting service or other information The product information plate location is shown below For future convenience record the product Model and Serial Number...

Страница 6: ...Protective Equipment is required for safe operation Product Decals indicate machine model and serial number and other important information VIN NLV MODEL Manufactured by Wallenstein Equipment Inc 7201...

Страница 7: ...us situation that if not avoided will result in death or serious injury This signal word is to be limited to the most extreme situations typically for machine components which for functional purposes...

Страница 8: ...safety precautions 2 4 Safety Rules DO give operating instructions to operators or employees before allowing them to operate the machine DO read and understand ALL Safety and Operating instructions in...

Страница 9: ...ble operators should use this equipment A person who has not read and understood all operation and safety instructions is not qualified to use the machine Untrained operators expose themselves and bys...

Страница 10: ...ing or snagging hazard Ground should be firm and level 4 Operate only in daylight or good artificial light 5 Make sure machine is properly adjusted and in good operating condition 6 Perform the Pre op...

Страница 11: ...the sign off sheet provided below can be used Make periodic reviews of Safety and Operation a standard practice for all operators Review again at the startup of every season The design and manufactur...

Страница 12: ...ions on the equipment are shown in the illustrations that follow Good safety requires that you familiarize yourself with the various safety signs the type of warning and the area or particular functio...

Страница 13: ...ve glasses goggles or face shield 2 Caution Refer to the operator s manual Read ALL operating instructions in the manual and learn the meaning of ALL safety signs on the machine The best safety featur...

Страница 14: ...signs are available from your authorized Distributor or Dealer Parts Department or the factory 3 3 1 How to Install Safety Signs Ambient temperature must be above 50 F 10 C to install decals 1 Clean a...

Страница 15: ...ur wood splitter can provide many years of trouble free service IMPORTANT Make sure all operators understand how to put the wood splitter in a Safe Condition before working with this machine See Safe...

Страница 16: ...omponents 1 Anvil 2 Log Saddle 3 Tilting Splitter Bed 4 Sliding Wedge 5 Control Valve 6 Hydraulic Cylinder 7 Splitter Frame Latch 8 Locking Latch 9 Splitter Frame 10 Product Manual Storage Tube 11 Cat...

Страница 17: ...three positions Extend Neutral and Retract 00644 Fig 4 Extend Neutral Retract Extend Push the lever forward toward the wood and hold to extend the wedge and split the wood Releasing the lever returns...

Страница 18: ...cal sized log on the splitter bed then start apply power to the wood splitter 2 Using the hydraulic control move the wedge up to the log but stop approximately 3 8 cm from it 3 Shut off the engine Mak...

Страница 19: ...ntrols release the splitter beam by pulling the spring loaded frame latch outward 3 At the same time grab the cylinder end and tip the splitter beam assembly up towards the vertical position 4 Continu...

Страница 20: ...ng the implement from side to side 2 When reversing lower raise the lift arms so that they are level with the lower attachment points on the splitter 00742 Fig 10 Back up in line with Splitter 3 Back...

Страница 21: ...t couplers on the tractor 2 Route the splitter hoses along the tractor hitch to avoid binding and pinching then connect them to the tractor couplers The protective caps on the hoses are colored to ind...

Страница 22: ...e is in motion 5 Keep hands out of splitting area Do not rest hands on the log being split 6 Do not step over or straddle splitter during operation 7 Do not try to split more than one log at a time Th...

Страница 23: ...Make sure long hair is tied back 6 5 Splitting Logs IMPORTANT Park the wood splitter on a level dry work area free of debris and other objects Position the splitter so the prevailing wind blows engin...

Страница 24: ...e split wood close to the working area but do not allow pieces to pile up and clutter the area A cluttered working area can lead to tripping and an accident 6 5 3 Vertical Splitting WARNING Risk of pi...

Страница 25: ...nd replace any leaking components 4 Check for entangled material Remove before resuming work After 8 hours of operation 5 Repeat the above steps 6 7 Transporting 6 7 1 Transport Safety 1 Comply with l...

Страница 26: ...f next season The wood splitter can have a long trouble free life by following these steps 1 Place the splitter in the horizontal configuration Fully retract the cylinder ram 2 Thoroughly wash the mac...

Страница 27: ...onal protective equipment 6 Where replacement parts are necessary use only OEM parts to restore your equipment to original specifications Wallenstein Equipment is not responsible for injuries or damag...

Страница 28: ...ottle is set to maximum Check that choke is off Control handle does not go to neutral after rod is fully retracted Valve detent set too tight Adjustment required to detent on valve Hydraulic oil too c...

Страница 29: ...m Splitting Force 2550 psi 176 bar 16 ton Splitting Force 3000 psi 207 bar 20 ton Valve Type Closed center auto return detent Recommended minimum hydraulic flow 10 gpm 38 Lpm Splitter Orientation Hori...

Страница 30: ...crease torque values by 5 NOTE Bolt grades are identified by their head markings Imperial Bolt Torque Specifications Bolt Diameter Torque Value SAE Gr 2 SAE Gr 5 SAE Gr 8 lbf ft N m lbf ft N m lbf ft...

Страница 31: ...ody and tighten the swivel nut with the second Torque to values shown If a torque wrench is not available use the FFFT Flats From Finger Tight method Hydraulic Fitting Torque Tube Size OD Hex Size Acr...

Страница 32: ...original purchase receipt with any claim This warranty does not cover the following 1 Normal maintenance or adjustments 2 Normal replacement of wearable and service parts 3 Consequential damage indir...

Страница 33: ...tion 23 Pressure IN Line 16 Product Labels 6 Product Manual Storage Tube 16 Product Warranty 32 Putting Wood Splitter in Storage Removing from Storage 26 R Replace Damaged Safety Signs 14 Return OUT L...

Страница 34: ...www wallensteinequipment com...

Отзывы: