background image

Operating Instructions

WX520, WX520L, WX520T

Trailer Wood Splitter

22

6.  Operating Instructions

The WX520 splitter models operate in the horizontal 
configuration only. 

The operator has the responsibility of being familiar with all 
operating and safety procedures and following them.

6.1  Operating Safety

Read and obey the safety signs on the machine. Clean or 
replace them if they are not legible. 

There is no substitute for a cautious, safe-minded operator 
who recognizes potential hazards and follows reasonable 
safety practices. This machine must be used with all its 
safety equipment properly installed to minimize the chance of 
accidents. 

1. 

Wear appropriate personal protective equipment. Tie back 
long hair, remove jewelry, and avoid loose fitting clothing. 
Prolonged exposure to loud noise can cause permanent 
hearing loss! Wear hearing protection on a full-time basis 
when using this machine.

2. 

The operator must be in control of the machine at all times. 
Read and understand owner's manual before starting. 
Review safety instructions annually.

3. 

Never use engine-powered machinery indoors. Gas engine 
exhaust contains toxic carbon monoxide, which cannot be 
smelled or seen. Breathing carbon monoxide can be lethal.

4. 

Make sure all guards, deflectors and shields are in place 
before starting and operating. 

5. 

Keep hands out of splitting area. Do not rest hands on the 
log being split.

6. 

Do not step over or straddle splitter during operation.

7. 

Do not try to split more than one log at a time. The logs can 
fly out and cause injury.

8. 

Keep your fingers and hands away from cracks in the log 
that can open while splitting.

9. 

Always load logs by grasping the bark side, not the cut 
ends.

10. 

Do not reach into or load the splitter when the push block  
is in motion.

11. 

Do not try to split logs across the grain. Some types of 
wood can burst or splinter causing pieces to be thrown 
causing injury.

12. 

For uneven cut logs, always place the squares cut end 
against the splitting push block.

13. 

Never place any part of your body where it would be 
in danger if machine movement should occur during 
assembly, installation, operation, maintenance, repairing or 
moving.

14. 

Before servicing or repairing the machine, place it in a 

Safe 

Condition

. See 

page 10.


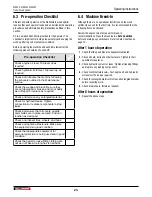
6.2  Before Starting the Engine

1. 

Check the engine oil level. See 

page 24.

2. 

Check the hydraulic oil level. See 

page 24.

3. 

Check the fuel level

.

4. 

Check the engine air cleaner. See

 page 26.

5. 

Clear the area of bystanders, especially small children.

6. 

Make sure each operator is trained and familiar with the set 
up and operation of the wood splitter.

7. 

Follow the Pre-Operation Checklist.

8. 

Review the Controls (see 

page 18

).

9. 

Survey the work site and position the wood splitter in a 
clear, level work area. 

10. 

Set up the machine correctly. See 

Machine Set-up on page 

25

.

Содержание 250754

Страница 1: ...OPERATOR S MANUAL Trailer Wood Splitter WX520 up to S N 250754 WX520T up to S N 250757 WX520L up to S N 2E9US1115KS250746 WX520 L WX520T Part Number Z97135_En Rev Jun 2020...

Страница 2: ...S Customary SI metric Keep this manual handy for frequent reference and to pass on to new operators or owners Call your Wallenstein dealer or distributor if you need assistance information or addition...

Страница 3: ...oke Limiter Accessory 21 6 Operating Instructions 22 6 1 Operating Safety 22 6 2 Before Starting the Engine 22 6 3 Pre operation Checklist 23 6 4 Machine Break In 23 6 5 Engine Oil Level Check 24 6 6...

Страница 4: ...h Ball Hitch Review Operating and Safety Instructions _________________________________________ Customer s Name _________________________________________ Contact Name _________________________________...

Страница 5: ...dering parts or requesting service or other information The product information plate location is shown in the illustration For future convenience record the product Model and Serial Number in the spa...

Страница 6: ...se Include the original purchase receipt with any claim This warranty does not cover the following 1 Normal maintenance or adjustments 2 Normal replacement of wearable and service parts 3 Consequen al...

Страница 7: ...provides additional information to the operator or explains the operation of a control Product Decals indicate machine model and serial number and other important information VIN NLV MODEL Manufacture...

Страница 8: ...ardous situation that if not avoided will result in death or serious injury This signal word is to be limited to the most extreme situations typically for machine components which for functional purpo...

Страница 9: ...nderstand ALL Safety and Operating instructions in the manual and follow them The most important safety device on this equipment is a SAFE operator DO review safety related items annually with all per...

Страница 10: ...safety instructions is not qualified to use the machine Untrained operators expose themselves and bystanders to possible serious injury or death If elderly people are assisting with the work their ph...

Страница 11: ...ing fuel tank DO NOT choke carburetor to stop engine Whenever possible gradually reduce engine speed before stopping DO NOT run engine above rated speeds This may result in injury DO NOT tamper with g...

Страница 12: ...zard Ground should be firm and level Operate only in daylight or good artificial light Make sure machine is properly adjusted and in good operating condition Store fuel well away from the wood pile Pe...

Страница 13: ...ning the sign off sheet provided below can be used Make periodic reviews of Safety and Operation a standard practice for all operators Review again at the startup of every season The design and manufa...

Страница 14: ...equipment are shown in the illustrations that follow Good safety requires that you familiarize yourself with the various safety signs the type of warning and the area or particular function related t...

Страница 15: ...laced that have safety signs on them new signs must be applied Safety signs must always be replaced if they become damaged are removed or become illegible Safety signs are included in the product deca...

Страница 16: ...d splitter can provide many years of trouble free service IMPORTANT Make sure all operators understand how to put the wood splitter in a Safe Condition before working with this machine See Safe Condit...

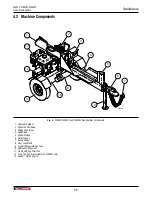
Страница 17: ...Hydraulic Cylinder 2 Splitter Control Valve 3 Sliding Push Block 4 Splitter Bed 5 Splitter Wedge 6 Trailer Tongue 7 Safety Chains 8 Front Jack Stand 9 Product Manual Storage Tube 10 Hydraulic Oil Rese...

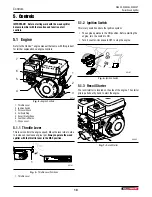
Страница 18: ...Lever 5 1 1 Throttle Lever This lever controls the engine speed Move the lever side to side to increase or decrease engine rpm Always operate the wood splitter with the throttle lever in the MAX posit...

Страница 19: ...starting a cold engine Move the choke lever to the OPEN position 2 after the engine starts When restarting a warm engine leave the lever in the OPEN position 00188 1 2 3 Fig 9 Choke Lever 1 Choke Lev...

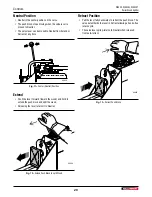
Страница 20: ...1 Center Neutral Position Extend Push the lever forward toward the wood and hold to extend the push block and split the wood Releasing the lever returns it to Neutral 00634 Fig 12 Extend Push Block to...

Страница 21: ...ine Make sure the control valve lever is in the neutral position 4 Loosen the hex set screw on the rod adjusting collar and move the rod up to the push block This is the set position at which the push...

Страница 22: ...perating 5 Keep hands out of splitting area Do not rest hands on the log being split 6 Do not step over or straddle splitter during operation 7 Do not try to split more than one log at a time The logs...

Страница 23: ...ers guards and shields are in place secured and can function as designed Check and inspect tires wheels and hubs Check and tighten all fasteners Make sure the equipment is in good condition Check that...

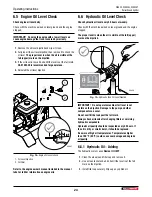
Страница 24: ...oils 6 6 Hydraulic Oil Level Check Check hydraulic oil level every 40 hours or weekly Check with the machine parked on level ground and the engine stopped The proper level is when the oil is visible a...

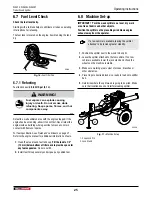
Страница 25: ...uels 1 Clean the area around fuel tank cap Fill the tank to 1 2 12 mm below bottom of filler neck to provide space for any fuel expansion Do not overfill 2 Install fuel fill cap securely and wipe up a...

Страница 26: ...ight 00188 1 2 3 Fig 18 Choke Lever 1 Choke Lever 2 Choke OPEN 3 Choke CLOSED 2 Move the throttle lever away from the MIN position about 1 3 of the way toward the MAX position 00191 1 Fig 19 Engine Th...

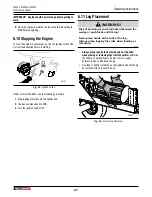
Страница 27: ...ing material onto the splitter bed 2 Decrease engine speed to MIN 3 Turn the ignition switch OFF 6 11 Log Placement WARNING Risk of pinching or crushing hazard between the wedge or push block and the...

Страница 28: ...ty and transporting of machinery on public roads 2 Do not exceed 50 mph 80 km h when towing this machine Slow down for rough terrain and cornering 3 Do not transport or move the wood splitter with the...

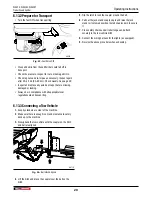
Страница 29: ...ns when transporting 6 13 3Connecting a Tow Vehicle 1 Keep bystanders are clear of the machine 2 Make sure there is enough room and clearance to safely back up to the machine 3 Slowly back the tow veh...

Страница 30: ...buretor 3 Turn fuel valve OFF 4 Thoroughly wash the machine using a pressure washer to remove all dirt mud debris and residue 5 Inspect the cylinder ram push block and wear plates for damage or entang...

Страница 31: ...ponsible for injuries or damages caused by use of unapproved parts or accessories 8 Inspect and tighten all bolts nuts and screws Check that all electrical and fuel connections are properly secured 9...

Страница 32: ...aily Check fuel level See page 25 Check engine oil level See page 24 Every 40 hours or Annually Check hydraulic oil level See page 24 Clean engine air filter See page 26 Inspect hydraulic oil quality...

Страница 33: ...decal on your machine It indicates a grease point and the interval in hours Wipe grease fitting with a clean cloth before greasing to avoid injecting dirt and grit If fittings do not take grease remov...

Страница 34: ...Dispose of used oil in an environmentally safe manner 8 6 Hydraulic Oil Filter Changing Change hydraulic oil filter at 100 hours of operation or annually The filter is located on side of the hydraulic...

Страница 35: ...his type of damage is not covered by Warranty 00202 Fig 31 Engine Air Cleaner Inspection Remove the air cleaner cover and inspect the filter elements Clean or replace dirty filter elements Always repl...

Страница 36: ...ve wood Low engine speed Check throttle is set to maximum Check that choke is off Control handle does not go to neutral after rod is fully retracted Valve detent set too tight Adjustment required to d...

Страница 37: ...c Pump Type 2 stage Gear Hydraulic Pump Flow 11 gpm 47 Lpm Bed Height 19 48 cm 28 71 cm Wedge Height 9 23 cm Tire Size 4 80 X 8 Tire Type Highway Safety Chains Standard Ball Hitch Size 2 Splitter Orie...

Страница 38: ...ocker increase torque values by 5 NOTE Bolt grades are identified by their head markings Imperial Bolt Torque Specifications Bolt Diameter Torque Value SAE Gr 2 SAE Gr 5 SAE Gr 8 lbf ft N m lbf ft N m...

Страница 39: ...portant safety procedure to apply and maintain proper wheel mounting torque on your trailer axle Torque wrenches are the best method to assure the proper amount of torque is being applied to a fastene...

Страница 40: ...ing 34 Hydraulic Oil Level Check 24 Hydraulic Oil Type 24 I Ignition Switch 18 Informative Labels 7 Introduction 2 Foreword 2 L Log Placement 27 Lubricants 31 M Machine Components 17 Machine Set up 25...

Страница 41: ...f form 13 Specifications 37 Common Bolt Torque Values 38 Hydraulic Fitting Torque 39 Machine Specifications 37 Wheel Lug Torque 39 WX520T 37 WX520 WX520L 37 Splitter Operation Before Starting the Engi...

Страница 42: ...www wallensteinequipment com...

Отзывы: