


220.805.011
12
Date: 2021-12-09
Physical installation
Warning! The Winch 25 must be either fastened to a flat surface such as a roof, or
clamped to a truss or similar structure in such a way that the wire exit points
downwards. Do not apply power to the Winch 25 if it is not securely fastened.
Warning! The supporting surface must be hard and flat. Fasten the winch securely.
Warning! Use only the supplied rigging clamps.
Fastening the winch to a flat surface
The Winch 25 can be fastened to flat surface such as a roof. Check that the surface
can support at least 10 times the weight of all winches and equipment to be installed
on it.
Mounting the winch on a truss
The Winch 25 can be clamped to a truss or similar rigging structure.
To clamp a Winch 25 to a truss:
1.
Check that the rigging clamps are undamaged and that the rigging structure can
support at least 10 times the combined weight of all winches and equipment to
be installed on it.
2.
Block access under the work area. Working from a stable platform, hang the
winch on the truss with the wire downwards. Tighten the rigging clamp.
3.
Use the supplied 2 slim couplers sitting on the top plate. It is important to use
both slim couplers for mounting because the load is not evenly distributed across
the winch.
Содержание Winch 25
Страница 38: ...220 805 011 38 Date 2021 12 09 Appendix 1 Winch 25 220...
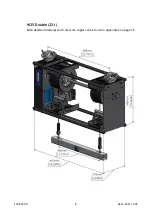
Страница 39: ...220 805 011 39 Date 2021 12 09 Appendix 2 Winch 25 Double 221...
Страница 40: ...220 805 011 40 Date 2021 12 09 Appendix 3...
Страница 41: ...220 805 011 41 Date 2021 12 09...
Страница 42: ...220 805 011 42 Date 2021 12 09 Appendix 4...
Страница 43: ...220 805 011 43 Date 2021 12 09 Appendix 5 Block diagram of the control system of the winch...


